

When you want the cozy, comforting taste of classic apple pie but need to feed a crowd, this Apple Slab Pie is the perfect solution. With a buttery, flaky crust and a generous layer of tender cinnamon-sugar apples, it delivers all the flavor of a traditional pie—just in a larger, more shareable format.
This dessert is ideal for holidays, potlucks, or family gatherings where a standard 9-inch pie just won’t cut it. Baked in a sheet pan, it’s easier to slice, serve, and transport, making it one of those go-to recipes you’ll return to again and again.
INGREDIENTS YOU’LL NEED
For the crust:
- 2 ½ cups all-purpose flour
- 1 tsp salt
- 1 tsp sugar
- 1 cup (2 sticks) cold unsalted butter, cubed
- 6–8 tbsp ice water
For the filling:
- 8 cups peeled, cored, and sliced apples (Granny Smith or Honeycrisp work great)
- ¾ cup granulated sugar
- ¼ cup brown sugar
- 2 tbsp all-purpose flour
- 1 ½ tsp ground cinnamon
- ¼ tsp ground nutmeg
- 2 tbsp lemon juice
- 1 tbsp unsalted butter, cut into small pieces
For the topping:
- 1 egg, beaten (for egg wash)
- 1 tbsp sugar (optional, for sprinkling)
This recipe yields a full 10×15-inch slab pie, perfect for 12–16 servings depending on how you slice it.
STEP 1: MAKE THE CRUST
In a large bowl, whisk together the flour, salt, and sugar. Cut in the cold cubed butter using a pastry cutter, two forks, or even your fingers. You want the mixture to resemble coarse crumbs, with a few pea-sized bits of butter still visible.
Start adding ice water, one tablespoon at a time, mixing gently with a fork until the dough just comes together. You may not need all 8 tablespoons—stop as soon as the dough holds together when pressed.
Divide the dough in half, shape each into a rectangle, wrap in plastic wrap, and chill in the fridge for 30 minutes. This resting time helps keep the crust tender and flaky.
STEP 2: PREPARE THE APPLE FILLING
While the dough chills, it’s time to prepare the star of the show—the apple filling. In a large bowl, combine:
- Sliced apples
- Granulated and brown sugars
- Flour, cinnamon, nutmeg
- Fresh lemon juice
Toss everything together until the apples are evenly coated. The flour will help thicken the juices as the pie bakes, while the sugars and spices infuse the apples with warm, classic flavor.

STEP 3: ROLL OUT THE BOTTOM CRUST
After chilling, roll out one rectangle of dough on a lightly floured surface until it fits a 10×15-inch jelly roll pan. Gently transfer the dough to the pan, pressing it into the bottom and up the sides.
This will form the sturdy foundation that holds the generous apple layer you’ll be adding next.
ASSEMBLING AND BAKING YOUR APPLE SLAB PIE
Now that your crust is rolled out and fitted into the pan, it’s time to bring your apple slab pie to life. In this part of the recipe, we’ll layer the sweet, spiced filling, cover it with the second crust, and bake it until golden and bubbling. This is the step that fills your kitchen with that unmistakable aroma of homemade apple pie—just on a bigger, more shareable scale.
Whether you’re baking for a holiday crowd or just want extra leftovers, this slab pie delivers big comfort in every square.
STEP 4: ADD THE APPLE FILLING
Evenly spread your prepared apple filling over the crust-lined jelly roll pan. Be sure to spread the apples all the way to the edges so every bite of your slab pie gets a good mix of fruit and crust.
Once the apples are in place, dot the top of the filling with small pieces of butter. This helps enrich the filling as it bakes, adding extra flavor and richness.

STEP 5: ROLL OUT AND ADD THE TOP CRUST
Take your second chilled dough rectangle and roll it out on a lightly floured surface to about the same size as your baking dish. Carefully lay it over the apple filling.
Trim any excess dough, then fold the edges under and press to seal. Crimp the edges with a fork or your fingers to keep the filling from bubbling out during baking.
Use a sharp knife to cut a few slits or small vents in the top crust. This step is important—it allows steam to escape while the pie bakes and helps prevent a soggy crust.

STEP 6: BRUSH WITH EGG WASH AND SPRINKLE WITH SUGAR
In a small bowl, beat 1 egg and use a pastry brush to apply a light egg wash over the top crust. This gives your pie that beautiful golden color once it comes out of the oven.
If you’d like a little sparkle and texture on top, sprinkle with 1 tablespoon of granulated sugar before baking.

STEP 7: BAKE TO GOLDEN PERFECTION
Place your pie in the preheated 375°F (190°C) oven and bake for 40 to 45 minutes, or until the top crust is golden and the filling is visibly bubbling through the slits.
Check the pie around the 30-minute mark. If the edges are browning too quickly, you can loosely tent them with foil to prevent over-baking while the center finishes.
STEP 8: LET IT COOL BEFORE SLICING
Once baked, remove the pie from the oven and allow it to cool in the pan for at least 30 minutes before slicing. This helps the filling set and makes it easier to serve clean squares.

APPLE SLAB PIE: FAQ AND FINAL THOUGHTS
Baking an Apple Slab Pie is a simple way to turn a classic dessert into a celebration-sized treat. With its buttery crust, perfectly spiced apples, and golden topping, it delivers all the nostalgia and comfort of traditional apple pie—just in a more shareable, sliceable format.
Before you serve your masterpiece, here are some frequently asked questions to help you get the most out of this recipe, along with a few final tips to make your pie truly memorable.
1. What’s the best type of apple to use for slab pie?
Granny Smith apples are a go-to for their tartness and firmness, but Honeycrisp, Braeburn, or a mix of both sweet and tart varieties also work beautifully. Avoid overly soft apples like Red Delicious, which can get mushy.
2. Can I make the dough ahead of time?
Yes! You can prepare the dough up to 2 days ahead and keep it wrapped in the refrigerator. You can also freeze it for longer storage—just thaw overnight in the fridge before rolling out.
3. How do I store leftovers?
Cover the pie loosely with foil or plastic wrap and store at room temperature for up to 2 days, or in the refrigerator for up to 4 days. You can serve it cold or reheat individual slices in the microwave or oven.
4. Can I freeze the baked pie?
Yes, this pie freezes well. Let it cool completely, then wrap tightly in plastic wrap and foil. Freeze for up to 3 months. To reheat, bake uncovered at 350°F until warmed through.
5. What’s the best way to serve slab pie?
This pie is delicious on its own, but it’s even better with a scoop of vanilla ice cream or a dollop of whipped cream. It also pairs beautifully with a drizzle of caramel sauce for an extra-special touch.
6. Can I use store-bought crust instead of homemade?
Absolutely. If you’re short on time, two boxes of refrigerated pie crust (you’ll need four crusts total) can be rolled and trimmed to fit a jelly roll pan. The homemade crust adds flavor, but store-bought will still yield great results.
CONCLUSION: A HOMEMADE FAVORITE FOR ANY OCCASION
Whether you’re serving it at Thanksgiving, bringing it to a potluck, or baking it just because, Apple Slab Pie is one of those reliable, crowd-pleasing recipes you’ll want to make again and again. It’s everything you love about a traditional apple pie, scaled up to serve a group—and it’s just as easy as making the classic version.
The crisp, buttery crust. The warm, cinnamon-kissed filling. The golden, sugar-dusted top. It all comes together into one satisfying slice after another.
If you make this recipe, let us know how it turned out! Share your tips, your favorite apple combinations, or how you like to serve it. There’s something special about taking a classic and making it your own—and this pie is the perfect place to start.
Enjoy every slice!
Print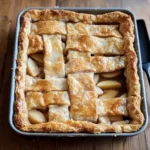
Apple Slab Pie – A Crowd-Pleasing Dessert Recipe
- Total Time: 1 hr
Description
Apple Slab Pie is a larger, sheet-pan version of the classic dessert—perfect for serving a crowd. With a flaky crust, sweet cinnamon-spiced apples, and a golden finish, it’s a must for holidays, potlucks, and fall feasts!
Ingredients
For the crust:
-
2 refrigerated pie crusts (or homemade, rolled out to fit a 15×10-inch jelly roll pan)
For the filling:
-
6 cups thinly sliced peeled apples (Granny Smith, Honeycrisp, or a mix)
-
¾ cup granulated sugar
-
¼ cup brown sugar
-
¼ cup all-purpose flour
-
1½ tsp ground cinnamon
-
¼ tsp nutmeg
-
1 tbsp lemon juice
For the topping:
-
1 egg, beaten (for egg wash)
-
1 tbsp coarse sugar (optional)
-
Optional: vanilla glaze (powdered sugar + milk)
Instructions
1️⃣ Preheat oven: Set to 375°F (190°C). Lightly grease or line a 15×10-inch jelly roll pan with parchment paper.
2️⃣ Prepare crust: Roll out pie crusts and press into the bottom and up the sides of the pan, trimming excess.
3️⃣ Make the filling: In a large bowl, combine apples, sugars, flour, cinnamon, nutmeg, and lemon juice. Toss to coat evenly.
4️⃣ Assemble: Spread apple mixture evenly over the crust. Roll out and lay the second crust on top, or cut into strips for a lattice pattern. Seal edges and crimp.
5️⃣ Brush and bake: Brush top crust with beaten egg and sprinkle with coarse sugar. Bake for 35–40 minutes, or until crust is golden and filling is bubbly.
6️⃣ Cool and serve: Let cool slightly before slicing. Drizzle with glaze if desired.
Notes
-
Perfect served warm with vanilla ice cream.
-
Can be made a day ahead and reheated.
-
Try adding chopped pecans or raisins to the filling for variation.
- Prep Time: 20 min
- Cook Time: 40 min


