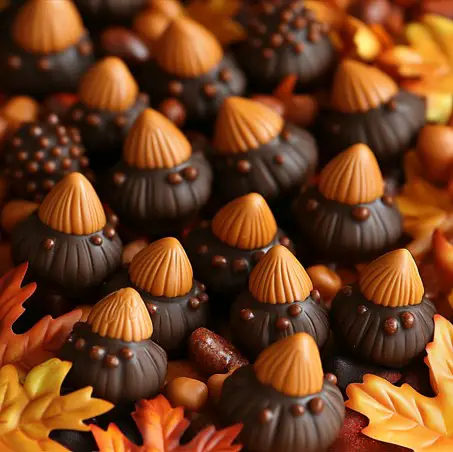
Candy Acorns are an adorable and delicious treat that brings the charm of autumn right to your table. Made with just a few simple ingredients—chocolate kisses, mini vanilla wafers, and baking chips—these bite-sized snacks are not only easy to make but also a delightful way to celebrate the season. The combination of creamy chocolate and crispy vanilla wafers offers a satisfying texture contrast, making them a hit with both kids and adults alike.
One of the best things about Candy Acorns is how fun and straightforward they are to create, even for novice bakers. With minimal preparation and no baking required, they are the perfect project for a cozy afternoon at home or a fun activity with children. The process of assembling these little treats is quick and mess-free, making them an ideal option for those who want to whip up something festive without spending hours in the kitchen.
These charming treats are perfect for a variety of occasions, especially fall-themed gatherings like Thanksgiving dinners, harvest festivals, and Halloween parties. Their cute acorn shape adds a seasonal touch to any dessert table, and they can also be used as edible decorations, party favors, or even as part of a gift basket. Whether you’re hosting a party or looking for a fun way to embrace the autumn spirit, Candy Acorns are a delightful and versatile treat that everyone will love.
Ingredients Breakdown
Chocolate Kisses
Chocolate kisses are the star ingredient in Candy Acorns, providing both flavor and structure to these adorable treats. Available in a variety of flavors, from classic milk chocolate to dark chocolate, white chocolate, and even seasonal varieties like pumpkin spice or mint, there’s a chocolate kiss to suit every palate. When choosing the best type for your Candy Acorns, consider the overall flavor profile you want to achieve. Milk chocolate is a popular choice for its creamy, sweet taste, while dark chocolate offers a richer, more intense flavor. Flavored kisses can add a unique twist, making your Candy Acorns even more special.
Mini Vanilla Wafers
Mini vanilla wafers serve as the base for each Candy Acorn, providing a crunchy contrast to the smooth chocolate. Commonly found in the cookie aisle of most grocery stores, popular brands include Nilla Wafers and Keebler Mini Vanilla Wafers. These small, round cookies are just the right size to pair with a chocolate kiss, creating a perfect bite-sized treat. If you can’t find mini vanilla wafers, you can use other small, round cookies like mini graham crackers or butter cookies as a substitute. Just ensure that the cookie size complements the chocolate kiss for the best visual and taste results.
Baking Chips
Baking chips are used both as the “stem” of the Candy Acorn and as the “glue” to hold everything together. Options include milk, dark, white chocolate, or butterscotch chips, each offering a different flavor profile. Choose a flavor that complements your chocolate kisses, and be sure to use high-quality chips that melt smoothly for easy assembly.
Coconut Oil or Cooking Oil
Coconut oil is added to the baking chips to help them melt smoothly and create a glossy finish. It’s ideal because it solidifies at room temperature, helping to set the chocolate quickly. If you don’t have coconut oil, vegetable oil or shortening can be used as alternatives, though they may slightly alter the texture and setting time of the chocolate.
Step-by-Step Preparation
Preparation of Ingredients
Begin by preparing all the ingredients to ensure a smooth assembly process. Start by unwrapping the chocolate kisses. Since a full 11-ounce bag typically contains about 75 kisses, unwrap as many as you plan to use, keeping in mind that each kiss will become the top of one Candy Acorn.
Next, sort through your mini vanilla wafers, setting aside only the whole, unbroken ones. You’ll need as many wafers as you have chocolate kisses. It’s a good idea to have a few extras on hand in case some wafers break during assembly. Place the unwrapped kisses and sorted wafers in separate bowls or on a clean tray, ready for assembly.
Finally, measure out your baking chips. You’ll use half for melting to act as the adhesive and the other half for the acorn stems. Having everything prepped before you start will make the process more efficient and enjoyable.
Melting the Chocolate
The next step is to melt the baking chips, which will be used to “glue” the candy acorns together. In a microwave-safe bowl, combine half of the baking chips with a teaspoon of coconut oil or cooking oil. The oil helps the chocolate to melt smoothly and prevents it from hardening too quickly.
Microwave the mixture in 30-second intervals, stirring thoroughly between each interval to ensure even melting. Be careful not to overheat the chocolate, as it can seize and become unusable. If the chocolate starts to thicken or clump, you can add a small amount of additional oil and continue stirring until smooth.
Assembling the Candy Acorns
With the melted chocolate ready, it’s time to assemble the Candy Acorns. Using a toothpick, the thin end of a chopstick, or even a small spoon, dab a small amount of melted chocolate onto the flat side of a mini vanilla wafer. This chocolate will act as the adhesive to hold the chocolate kiss in place.
Immediately press the flat side of a chocolate kiss onto the melted chocolate, positioning it in the center of the wafer. Set the assembled acorn aside on a tray or parchment paper, with the kiss pointing upwards. Continue this process until all the chocolate kisses and wafers are paired.
Allow the Candy Acorns to cool and set for at least 10-15 minutes at room temperature. If you’re in a hurry, you can place the tray in the refrigerator for about 5 minutes to speed up the process. The chocolate should harden, securing the kiss to the wafer.
Final Touches
Once the acorns are set, it’s time to add the finishing touch—the baking chip “stem.” Dip the tip of an unmelted baking chip into the remaining melted chocolate, then attach it to the center of the wafer, on the opposite side of the kiss. Gently lay the acorn on its side and let it cool completely to ensure the stem adheres securely. If the melted chocolate hardens before you finish, simply reheat it in the microwave in short intervals until it’s usable again.
Serving Suggestions and Presentation Ideas
Using Candy Acorns as Decorations
Candy Acorns make charming decorations that can add a festive touch to any fall-themed gathering. One creative way to display them is by arranging them in small bowls or glass jars on a dessert table. For a rustic, woodland vibe, consider scattering the Candy Acorns among autumn leaves, pinecones, and mini pumpkins as part of a centerpiece. They can also be used as edible place settings—simply place a few Candy Acorns in a small organza bag or on a decorative plate at each guest’s seat.
Pairing Candy Acorns with other fall-themed treats can elevate your presentation. Serve them alongside caramel apples, pumpkin spice cookies, or cinnamon-sugar doughnuts for a cohesive autumn dessert spread. They also work well with a warm drink station, complementing beverages like hot chocolate, apple cider, or spiced lattes. Their small size and appealing look make them a versatile addition to any festive table setting.
Incorporating into Desserts
Candy Acorns can easily be incorporated into a variety of desserts to add a seasonal twist. Try using them as toppers for cupcakes or cakes, where their adorable acorn shape will stand out against a backdrop of buttercream frosting. They can also be added as a garnish for fall-inspired trifles, layered with whipped cream, caramel, and apple or pumpkin filling. For a simple yet elegant dessert, sprinkle a few Candy Acorns over a bowl of vanilla ice cream, then drizzle with warm caramel sauce. Their sweet and crunchy combination enhances both the flavor and visual appeal of your favorite fall desserts.
Gifting Ideas
Candy Acorns make delightful edible gifts during the holiday season. Package them in clear cellophane bags tied with a ribbon, or present them in decorative tins or mason jars. Add a personalized tag or label with a festive message, and you’ve got a thoughtful, homemade gift perfect for friends, family, or coworkers. These sweet treats are sure to bring a smile to anyone who receives them!
Storage and Shelf Life
Short-Term Storage
Candy Acorns are best stored at room temperature in an airtight container to maintain their freshness and texture. Keep them in a cool, dry place away from direct sunlight or heat sources, as excessive warmth can cause the chocolate to melt or bloom (develop a white, powdery coating). Under optimal conditions, Candy Acorns can stay fresh for up to 1-2 weeks. To prevent them from sticking together, consider layering them with parchment or wax paper inside the container. If you’re planning to serve them for a special event, it’s best to make them a day or two in advance.
Long-Term Storage
For longer storage, Candy Acorns can be frozen. Place them in a single layer on a baking sheet and freeze until solid, then transfer them to a freezer-safe container or bag, separating layers with parchment paper to prevent sticking. They can be stored in the freezer for up to 2-3 months.
When you’re ready to enjoy them, thaw the Candy Acorns in the refrigerator for a few hours before bringing them to room temperature. This gradual thawing process helps maintain their texture and flavor, ensuring they taste as good as when they were first made. Avoid exposing them to moisture during thawing to prevent the chocolate from becoming tacky or losing its shine.
Troubleshooting Common Issues
Chocolate Not Setting Properly
If the chocolate isn’t setting properly on your Candy Acorns, it could be due to a humid or warm environment, which can prevent the chocolate from hardening. To fix this, try placing the assembled Candy Acorns in the refrigerator for 10-15 minutes to help the chocolate set more quickly. Another common cause is the chocolate being too thin; if this happens, allow the melted chocolate to cool slightly before using it as “glue,” as this can help it firm up faster.
Baking Chips Not Sticking
If the baking chips aren’t sticking well as stems, it might be due to the melted chocolate hardening too quickly or not enough being used. To improve adhesion, ensure that the melted chocolate is warm and smooth when applying it to the wafer. Use a small dab of melted chocolate on the chip and press it firmly onto the acorn. Holding the acorn in place for a few seconds before setting it down can help secure the stem better.
Melting Chocolate Clumping
Melting chocolate can sometimes clump or seize if it’s overheated or if water comes into contact with it. To avoid this, melt the chocolate slowly in the microwave using short intervals, stirring in between. Adding a small amount of coconut or vegetable oil can also help keep the chocolate smooth. If it does seize, try adding a little more oil or warm cream and stirring vigorously to bring it back to a usable consistency.
Tips for Customizing Candy Acorns
Flavor Variations
One of the joys of making Candy Acorns is the ability to experiment with different flavors. Start by trying out various types of chocolate kisses—dark chocolate, white chocolate, or even flavored options like caramel or hazelnut. Each will give the acorns a distinct taste. You can also switch up the baking chips; for example, using butterscotch or peanut butter chips as the “stem” can introduce new flavor profiles. Mix and match different combinations of chocolate kisses and baking chips to create unique flavor pairings that suit your preferences or the tastes of your guests.
Texture and Appearance Modifications
To add some extra flair to your Candy Acorns, consider modifying their texture and appearance. After assembling, lightly dust them with edible glitter for a festive sparkle, or roll the edges in colored sugar crystals. You can also sprinkle them with finely chopped nuts or coconut flakes, adding both texture and visual interest, making them even more appealing.
Themed Variations for Other Occasions
While Candy Acorns are perfect for fall, you can easily adapt them for other holidays and events. For Christmas, use red and green sprinkles or mint-flavored kisses. For a springtime treat, try pastel-colored kisses and white chocolate chips. You can also adjust the decorations to match any party theme, making these treats versatile year-round.
Frequently Asked Questions
Can I use a different type of cookie?
Yes, you can use other small, round cookies like mini graham crackers or butter cookies if mini vanilla wafers aren’t available. Just ensure the size complements the chocolate kisses.
How far in advance can I make Candy Acorns?
You can make Candy Acorns up to 1-2 weeks in advance if stored properly in an airtight container at room temperature.
What’s the best way to melt chocolate without a microwave?
Use a double boiler or a heatproof bowl set over simmering water, stirring continuously until smooth.
Are there any dairy-free alternatives for the ingredients?
Yes, you can use dairy-free chocolate kisses and baking chips, and opt for a plant-based oil instead of coconut oil for a fully dairy-free version.

Candy Acorns
Description
Candy Acorns are a delightful, no-bake treat that perfectly capture the essence of autumn. Made with just a handful of simple ingredients—chocolate kisses, mini vanilla wafers, and baking chips—these charming candies are as fun to make as they are to eat. With their adorable acorn shape and sweet, chocolatey taste, they’re perfect for fall-themed parties, Thanksgiving celebrations, or even as a fun DIY gift. Whether you’re a seasoned baker or a novice in the kitchen, Candy Acorns are an easy and enjoyable project that will impress your friends and family.
Ingredients
- 11 ounces chocolate kisses any flavor you would like
- 75 mini vanilla wafers about half of an 11 ounce package
- 1 cup baking chips any flavor, divided
- 1 teaspoon coconut oil or cooking oil
Instructions
-
Unwrap as many kisses as you would like to make as candies. Set aside. A full 11 ounce bag will make about 75 cookies.
-
Remove cookies from the box, set aside as many unbroken whole cookies as you have kisses. Set aside.
-
In a small bowl. Add 1/2 of the baking chips and the coconut oil.
-
Microwave for 30 seconds at a time, stirring in between cycles until chocolate is melted.
-
Using a toothpick or the thin end of a chopstick, add melted baking chips to the flat side of a cookie and attach the flat end of a kiss to the cookie.
-
Set the cookie, kiss side up.
-
Allow to cool until chocolate is set and kisses are not easily removed from the cookie.
-
If melted baking chips have gotten hard, just microwave again using the above method.
-
Again, using a toothpick or thin chopstick end, add chocolate to the cookie side opposite of the kiss side. You will need much less baking chip glue, attach an un-melted baking chip.
-
Gently lay the candy acorn on its side and allow to cool.
-
Once cool, use as decorations or place into a bowl for snacking.
Notes
- Customizability: This recipe is highly customizable. Feel free to experiment with different flavors of chocolate kisses and baking chips to suit your taste preferences or the theme of your event.
- Storage: To keep your Candy Acorns looking and tasting their best, store them in an airtight container at room temperature. They can be made ahead of time and will stay fresh for up to two weeks.
- Dietary Adjustments: If you need a dairy-free option, substitute the chocolate kisses and baking chips with dairy-free alternatives and use a plant-based oil instead of coconut oil.


