


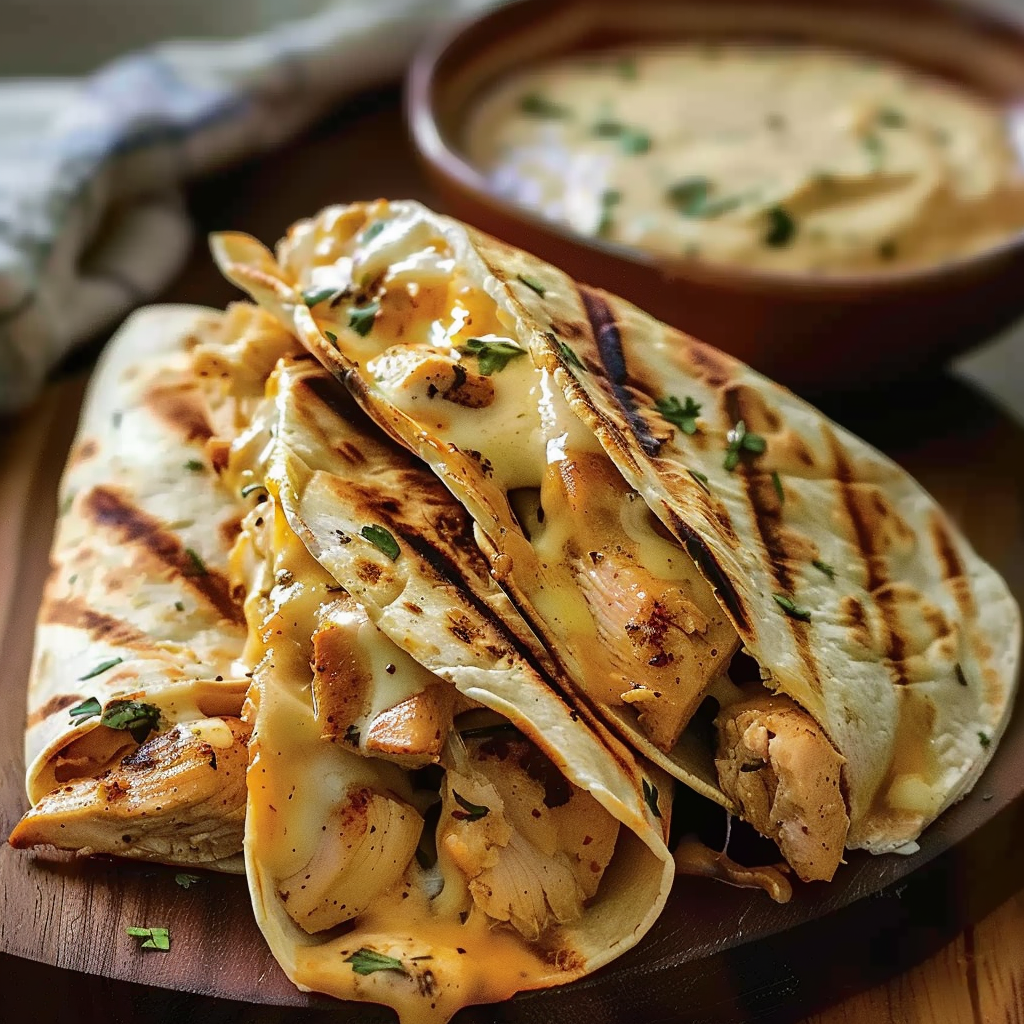
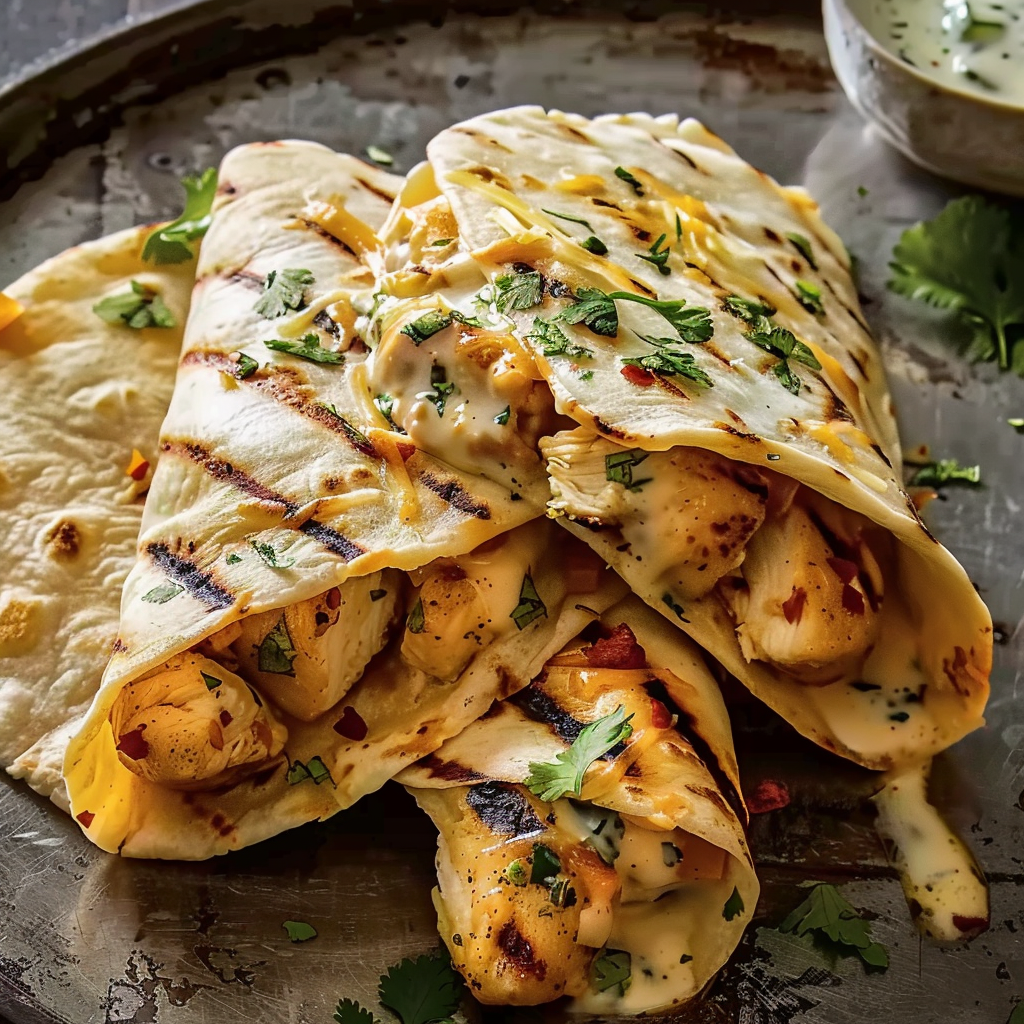
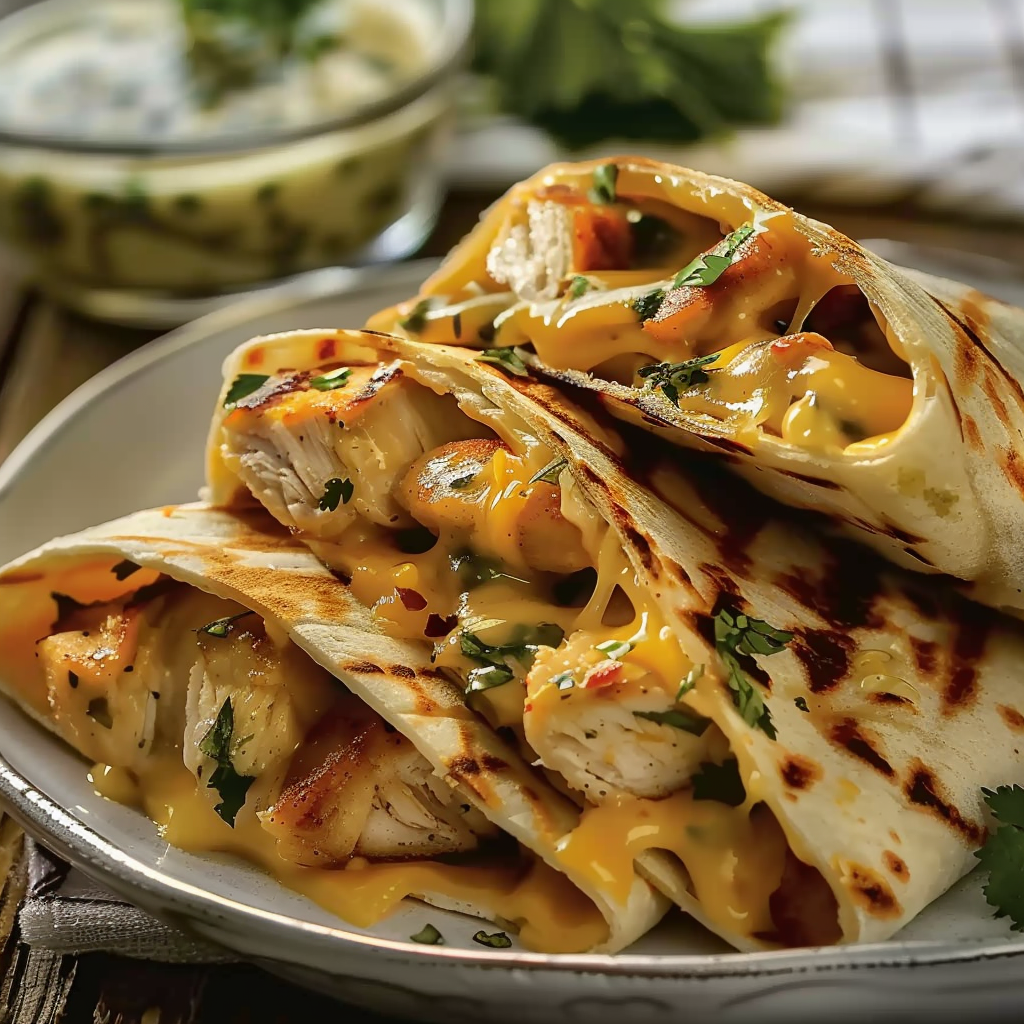
Looking for a quick and satisfying meal that combines flavor, convenience, and comfort? These Cheesy Garlic Chicken Wraps check every box. Whether you prefer the golden crisp of a skillet or the hands-off ease of an air fryer, this recipe delivers gooey cheese, juicy chicken, and a warm garlic-kissed tortilla in just minutes. Ideal for busy weeknights, meal prep, or a crowd-pleasing lunch, this dish is endlessly adaptable.
Using simple ingredients you likely already have, like shredded rotisserie chicken, mozzarella, and soft flour tortillas, this wrap is the ultimate shortcut to a delicious homemade meal. The wraps toast up beautifully, locking in melty cheese and savory fillings that make each bite irresistible. You can even explore healthier or low-carb versions depending on your dietary goals.
This recipe is inspired by classic rotisserie chicken ranch wraps but adds layers of creamy richness with cream cheese, cheddar, and a punch of garlic. To see how mozzarella cheese transforms the texture, check out Mozzarella cheese on Wikipedia. The versatility also makes it easy to mix things up with whatever leftovers you have on hand—grilled veggies, spicy sauce, or extra herbs.
Want to dive into more quick wrap ideas? Browse Pinterest’s chicken wrap recipes for more variations, or read up on how skillet cooking works in recipes like this at Wikipedia’s guide to frying pans.
Ready to get started? Let’s break down why this wrap deserves a spot in your weekly rotation.
Why You’ll Love These Cheesy Garlic Chicken Wraps
These Cheesy Garlic Chicken Wraps are the perfect solution for those days when you want something flavorful, comforting, and fast. With a rich garlic butter flavor, melty mozzarella cheese, and juicy chicken, this dish is more than just convenient—it’s downright crave-worthy. Here’s why you’ll want to make them again and again:
-
Quick and easy prep: From start to finish, these wraps take about 20 minutes, making them perfect for weeknight dinners or lunch on the go. Using pre-cooked or rotisserie chicken cuts prep time dramatically.
-
Versatile cooking methods: Whether you love the seared texture from a skillet or prefer the efficiency of an air fryer, you can prepare these wraps your way. Learn more about the air fryer cooking method here on Wikipedia.
-
Perfect texture balance: Crispy on the outside, creamy and gooey on the inside—thanks to a combination of mozzarella, cheddar, and cream cheese—these wraps deliver big on mouthfeel.
-
Great for meal prep: The wraps can be assembled in advance, making them a great choice for meal prep. Explore even more meal prep ideas on Pinterest to build a full week of easy dinners.
-
Family-friendly flavors: Mild cheeses, garlic seasoning, and soft tortillas make these wraps a hit with both kids and adults. You can also adjust the spice level or switch up the protein to suit everyone’s preferences.
-
Customizable ingredients: Swap in different cheeses, add cooked veggies, or drizzle with ranch or chipotle mayo for a new twist. You’ll find more inspiration under the variations section below.
Not only are these wraps delicious, they also tap into key comfort food cravings without requiring hours in the kitchen. Plus, they make good use of pantry staples and leftover proteins—making them a practical, no-waste meal option. If you’re a fan of cheese lovers recipes, check out Pinterest’s collection of cheesy meal ideas to find even more ways to indulge.
Ingredients Breakdown
Creating these Cheesy Garlic Chicken Wraps is all about using simple, everyday ingredients to deliver maximum flavor. Each component plays a key role in balancing creaminess, savory richness, and texture. Below is a breakdown of the ingredients, their purpose in the recipe, and possible substitutions to suit your taste or dietary needs.
-
2 cups cooked shredded chicken
Rotisserie chicken is ideal for convenience and flavor. You can also use grilled or baked chicken breast. For quick prep, read more about rotisserie cooking on Wikipedia. Canned chicken works in a pinch, just drain it well. -
1 cup shredded mozzarella cheese
This cheese is loved for its meltability and mild flavor. It creates that stretchy, gooey texture that makes these wraps irresistible. Learn more about mozzarella cheese here. You can swap in Monterey Jack or provolone for variation. -
1/2 cup shredded cheddar cheese
Adds sharpness and color contrast. For a more robust flavor, try sharp or aged cheddar. A blend of cheeses enhances the overall richness of the filling. -
2 tablespoons cream cheese (softened)
Cream cheese adds smoothness and helps bind the filling. You can substitute Greek yogurt or sour cream for a tangier, lighter option. -
2 tablespoons mayonnaise
Contributes moisture and creaminess. If you’re looking for a lighter version, use light mayo or Greek yogurt. For a flavor twist, try garlic aioli. -
1 teaspoon garlic powder
Essential for that signature garlicky flavor. You can substitute with fresh minced garlic if desired, but garlic powder ensures even distribution. -
1/2 teaspoon onion powder
Adds subtle depth and enhances the savory profile. A dash of finely minced shallot could also work. -
Salt and pepper to taste
Season the mixture carefully after combining all other ingredients. Taste before adding more salt, especially if your cheese is already salty. -
1 tablespoon chopped fresh parsley (optional)
Adds freshness and a pop of color. You can substitute with cilantro, basil, or omit it altogether. -
4 large flour tortillas
These are the perfect wrap base—soft and easy to fold. For a lower-carb option, use almond flour or whole wheat tortillas. You can learn more about flour tortillas and their variations here. -
1 tablespoon butter or olive oil (for toasting)
Helps crisp up the exterior in the skillet or air fryer. Use olive oil for a healthier option or avocado oil for a high smoke point alternative.
Each ingredient is carefully chosen to create a balance of creamy, cheesy, and savory flavors with just the right amount of crunch and structure from the tortilla. And if you’re inspired to customize your wraps even further, explore Pinterest’s easy weeknight dinners for creative variations and substitutions that fit your lifestyle.
Step-by-Step Instructions
Making Cheesy Garlic Chicken Wraps is as easy as mix, fill, and cook. Below is a clear, step-by-step guide to help you prepare these wraps to crispy, melty perfection using either a skillet or an air fryer. This method ensures maximum flavor with minimal effort—ideal for beginners and experienced home cooks alike.
Step 1: Prepare the Filling
-
In a large bowl, combine the following:
-
2 cups shredded chicken (use rotisserie chicken for best flavor)
-
1 cup mozzarella cheese
-
1/2 cup cheddar cheese
-
2 tablespoons softened cream cheese
-
2 tablespoons mayonnaise
-
1 teaspoon garlic powder
-
1/2 teaspoon onion powder
-
Salt and pepper to taste
-
Optional: 1 tablespoon chopped parsley for a fresh herbaceous note
-
-
Mix thoroughly until all ingredients are evenly incorporated. The mixture should be creamy and easy to spread.
Pro tip: Let the mixture sit for a few minutes while you prepare the tortillas—this allows the flavors to meld and makes spreading easier.
Step 2: Assemble the Wraps
-
Lay 4 large flour tortillas on a flat surface. For best results, use soft and fresh tortillas to avoid cracking during folding.
-
Divide the chicken mixture evenly among the tortillas, spreading it in a line down the center of each one.
-
Fold in the sides first, then roll tightly from the bottom up to form a burrito-style wrap. Ensure the seams are sealed to prevent the cheese from leaking during cooking.
Need help with tortilla folding techniques? Explore this guide to flour tortillas to better understand the structure and types you can use.
Step 3: Cook the Wraps – Skillet Method
-
Heat a large skillet over medium heat and add 1 tablespoon butter or olive oil.
-
Place the wraps seam-side down and cook for 2–3 minutes per side, pressing slightly with a spatula, until the outside is golden and crispy, and the cheese inside has melted.
-
Transfer to a cutting board, slice in half if desired, and serve hot.
Want to understand how skillet cooking impacts crispiness? Check out Wikipedia’s overview of frying pans to explore how different cooking surfaces affect food texture.
Step 4: Air Fryer Method (Alternative)
-
Preheat your air fryer to 375°F (190°C).
-
Lightly brush the wraps with oil or spray with non-stick cooking spray.
-
Place wraps in the air fryer basket in a single layer, seam-side down.
-
Cook for 7–9 minutes, flipping halfway through, until golden and crispy.
This method is especially great for batch cooking or reheating meal-prepped wraps. Learn how the air fryer cooking method works and its benefits from Wikipedia’s guide.
Whichever method you choose, the result is a wrap that’s crisp on the outside, gooey and cheesy on the inside, and packed with garlicky chicken flavor—all in under 20 minutes.
Cooking Methods Compared: Skillet vs. Air Fryer
Both the skillet and air fryer methods deliver delicious results, but each has its own advantages depending on your kitchen setup, schedule, and desired texture. Here’s how they compare so you can choose what works best for you.
Skillet Method
-
Texture: Produces a golden, crunchy crust on the outside of the wrap, especially when using butter or olive oil to toast.
-
Control: Allows you to monitor and adjust the heat, ensuring even browning and melt.
-
Best for: When you want ultra-crispy edges and a slightly indulgent finish.
-
Time: 2–3 minutes per side (about 6 minutes total).
-
Drawback: Slightly more cleanup and requires attention while cooking.
Skillet cooking gives more control over browning and crispness. It’s ideal for those who prefer a hands-on approach or want that perfect diner-style sear. To explore the science behind this technique, visit Wikipedia’s guide to frying pans.
Air Fryer Method
-
Texture: Still crispy, though usually with a slightly lighter crust compared to a skillet.
-
Convenience: Set it and forget it—no need to stand over the stove.
-
Best for: Quick batch cooking, especially if you’re making multiple wraps.
-
Time: 7–9 minutes at 375°F, flipping once.
-
Drawback: Can dry out slightly if overcooked; wraps may open if not tightly sealed.
The air fryer method is excellent for busy cooks or anyone looking to reduce oil without sacrificing crispiness. Curious about how air frying compares to traditional cooking? Learn more from Wikipedia’s air fryer article.
Whether you go for the rich crisp of the skillet or the clean speed of the air fryer, both methods deliver on taste, texture, and convenience.
Variations & Add-Ins
One of the best features of Cheesy Garlic Chicken Wraps is how easily they adapt to whatever you have on hand. Whether you’re customizing for dietary needs or just adding variety, here are some delicious variations and creative add-ins to try.
Protein Variations
-
Shredded turkey or beef: Perfect for using up holiday leftovers or switching up flavor profiles.
-
Tofu or tempeh: For a vegetarian option, season and pan-fry tofu before mixing into the filling.
-
Canned chicken: Drained and seasoned well, it can be a super quick alternative.
Cheese Combos
-
Pepper Jack: Adds spice and tang.
-
Colby Jack: A milder, creamy blend that pairs well with garlic.
-
Monterey Jack: Melts beautifully and complements mild proteins.
Veggie Add-Ins
-
Spinach or kale: Stir into the filling for added nutrition.
-
Bell peppers or jalapeños: For crunch and heat.
-
Red onions or scallions: Add zing and complexity.
Flavor Boosters
-
Hot sauce or buffalo sauce: Add a few dashes for a spicy kick.
-
Garlic aioli or ranch: Swap for mayo or use as a drizzle on top.
-
Chopped herbs: Fresh basil or cilantro can give a vibrant flavor twist.
For more inspiration, check out Pinterest’s board on easy weeknight dinners to see how others are customizing similar wraps with bold flavors and textures.
Meal Prep & Storage Tips
These wraps are ideal for prepping ahead and storing for quick meals throughout the week. Here’s how to keep them fresh and delicious.
Make Ahead
-
Filling: Can be made up to 3 days in advance. Store in an airtight container in the fridge.
-
Wrap assembly: Can be rolled a day ahead and stored tightly wrapped in plastic or foil until ready to cook.
Storage
-
Cooked wraps: Let cool completely before storing. Wrap tightly in foil or place in an airtight container. Store in the refrigerator for up to 3 days.
Reheating
-
Air fryer: Reheat at 350°F for 5 minutes.
-
Oven: Bake at 375°F for 10 minutes, flipping once.
-
Skillet: Reheat on medium-low heat until warmed through and re-crisped.
Freezing
-
Wrap uncooked or cooked wraps in foil and store in a freezer-safe bag. Freeze up to 2 months. Thaw overnight in the fridge before reheating.
To see more make-ahead lunch and dinner options, browse Pinterest’s meal prep ideas for strategies and inspiration.
Serving Suggestions
These wraps are delicious on their own, but pairing them with a few sides or dips can elevate the meal even more. Here are some easy serving suggestions:
-
Dipping sauces: Serve with ranch dressing, chipotle mayo, sour cream, or garlic aioli for a flavorful finish.
-
Side dishes:
-
Mixed green salad with a lemon vinaigrette
-
Roasted vegetables or air-fried broccoli
-
Sweet potato fries or seasoned wedges
-
-
Party-style: Cut the wraps into pinwheels and secure with toothpicks for an appetizer platter.
For party inspiration or lunchbox layouts, check out Pinterest’s wrap serving ideas.
Nutritional Information
Each Cheesy Garlic Chicken Wrap offers a balanced combo of protein, fat, and carbs—making it a filling option for lunch or dinner. Here’s an approximate breakdown per full-sized wrap:
-
Calories: ~420–480 (varies with cheese and tortilla brand)
-
Protein: 28g
-
Fat: 26g
-
Carbohydrates: 25g
-
Fiber: 2g
-
Sugars: 2g
Lighter Options
-
Use low-fat cheese or reduce cheese amounts.
-
Swap mayonnaise with Greek yogurt.
-
Choose low-carb or whole wheat tortillas.
-
Add greens or veggies to boost fiber and reduce calorie density.
Learn more about healthy cheese choices from Wikipedia’s article on mozzarella cheese.
Common Mistakes to Avoid
Even simple recipes can go wrong with small oversights. Keep your wraps crisp, melty, and mess-free by avoiding these common mistakes:
-
Overfilling the wrap: Too much filling causes bursting during cooking.
-
Not sealing properly: Make sure to fold sides in tightly and press seam-side down while cooking.
-
Using dry or cold tortillas: Warm tortillas briefly before rolling to prevent cracks and ensure flexibility.
-
Skipping the oil or butter: Adds crispness and prevents sticking.
-
Cooking on high heat: Leads to burning on the outside before the inside melts.
For a better understanding of tortilla handling and techniques, check out this Wikipedia guide on tortillas.
FAQs – People Also Ask
Can I use canned chicken for wraps?
Yes, but make sure it’s well-drained and seasoned. Canned chicken works as a fast alternative, especially when mixed with flavorful ingredients like garlic powder and cream cheese.
How do I keep wraps from getting soggy?
Let the filling cool slightly before assembling and avoid overloading with moist ingredients. Toast the wraps just before serving for a crispy bite.
Can I freeze cheesy chicken wraps?
Absolutely. Wrap them tightly in foil, place in a freezer bag, and freeze for up to 2 months. Thaw overnight and reheat in the air fryer or oven.
What sauces go well with garlic chicken wraps?
Try ranch, chipotle mayo, sour cream, or buffalo sauce. For something garlickier, pair with a garlic aioli or herbed yogurt dip.
Can I make these wraps low-carb or gluten-free?
Yes. Use low-carb or gluten-free tortillas. Also consider skipping the wrap entirely and using the filling in lettuce cups or as a cheesy baked chicken bowl.
Cheesy Garlic Chicken Wraps Quick Skillet or Air Fryer Dinner
- Author: Naomi
Description
These Cheesy Garlic Chicken Wraps are an irresistible combination of juicy shredded chicken, melty mozzarella, cheddar, and creamy seasonings, all wrapped in a flour tortilla brushed with garlic butter and toasted to crispy perfection. Whether you use a skillet or air fryer, the result is a golden, gooey, flavor-packed wrap ready in under 20 minutes. It’s a fast, flexible, and family-approved dinner option that’s perfect for busy nights or meal prepping ahead.
Ingredients
- 2 cups cooked shredded chicken (grilled or rotisserie)
- 1 cup shredded mozzarella cheese
- 1/2 cup shredded cheddar cheese
- 2 tablespoons cream cheese, softened
- 2 tablespoons mayonnaise
- 1 teaspoon garlic powder
- 1/2 teaspoon onion powder
- Salt and pepper to taste
- 1 tablespoon chopped fresh parsley (optional)
- 4 large flour tortillas
1 tablespoon butter or olive oil (for toasting
Instructions
In a bowl, combine the shredded chicken, mozzarella cheese, cheddar cheese, cream cheese, mayonnaise, garlic powder, onion powder, salt, pepper, and parsley if using. Mix well until fully combined.
Lay out the tortillas on a flat surface. Divide the chicken mixture evenly between them, spreading it in a line down the center of each tortilla.
Fold in the sides of each tortilla and then roll it up tightly like a burrito to enclose the filling.
Heat a skillet over medium heat and add a little butter or olive oil.
Place the wraps seam-side down in the skillet and cook for 2-3 minutes per side, or until golden brown and crispy and the cheese inside is melted.
Remove from skillet, slice in half if desired, and serve warm.
Notes
-
For extra garlic flavor, add minced fresh garlic or garlic aioli.
-
Warm tortillas in the microwave or a pan to make rolling easier.
-
Make a double batch and freeze extra wraps for future meals.
-
Customize with veggies, sauces, or spice for endless variations.
-
For lighter versions, use low-fat cheeses, whole wheat tortillas, and skip the mayo


