Cherry bars are a delicious, versatile dessert that blends the rich, sweet-tart flavor of cherries with the satisfying crunch of an oatmeal crust. These bars are made by layering a buttery oat mixture with cherry spread or preserves, creating a dessert that’s both indulgent and wholesome. Cherry bars can be enjoyed as a snack, dessert, or even a quick breakfast on the go. Their combination of textures—crispy oats on top, soft cherries in the middle, and a dense, chewy base—makes them irresistible to those who love fruity, home-baked treats.
Historical or Cultural Background of Cherry Bars
While cherry bars as we know them today are a relatively modern dessert, cherries themselves have been enjoyed for thousands of years. Originating in Asia Minor and later cultivated by the Romans, cherries have long been a staple in both sweet and savory dishes. In American and European baking traditions, cherries became a popular ingredient in pies, tarts, and eventually bars, as bakers sought new ways to incorporate the fruit into convenient, easy-to-serve treats.
Oat bars, often referred to as fruit crumble or fruit bars, gained popularity in the mid-20th century, with their roots tied to traditional European fruit-based pastries. Cherry bars combine the timeless appeal of fruit preserves with the growing popularity of oats, creating a dessert that bridges both tradition and health-conscious modern baking trends.
Why This Recipe Stands Out
This particular cherry bar recipe distinguishes itself through the thoughtful inclusion of wholesome ingredients like whole wheat flour and oat flakes, which not only provide nutritional value but also contribute to a hearty, satisfying texture. The combination of whole wheat flour and white flour strikes a balance between health-conscious choices and maintaining a light, tender crust.
In addition, the use of cherry spread offers a concentrated burst of fruity flavor that spreads evenly across the bars without the extra moisture that fresh fruit can sometimes add. The result is a perfectly balanced treat: not too sweet, with the natural tartness of cherries complementing the rich, buttery base. These bars stand out as a healthier alternative to traditional desserts while still delivering a comforting, home-baked taste.
The Popularity of Fruit-Based Desserts
The Increasing Trend Toward Fruit-Based Desserts in Modern Diets
In recent years, there has been a noticeable shift in the culinary world towards incorporating more fruit-based desserts, driven in part by health-conscious consumers looking to reduce processed sugars while enjoying naturally sweet treats. Fruit-based desserts, like cherry bars, are celebrated for their ability to provide the sweetness people crave while offering nutritional benefits such as vitamins, fiber, and antioxidants. Cherries, for example, are rich in vitamin C and antioxidants like anthocyanins, which help reduce inflammation and promote overall health.
This trend aligns with the rise of farm-to-table dining and a growing appreciation for seasonal and locally sourced produce. As people become more aware of the benefits of eating whole foods, fruit desserts provide a way to indulge without feeling guilty about artificial ingredients or excessive sugar.
Appeal of Combining Cherries with Oat Bars for a Wholesome Snack or Dessert
The pairing of cherries and oats in this recipe taps into two major trends: the popularity of superfoods like cherries, which are known for their antioxidant properties, and the widespread use of oats in healthy baking. Oats are highly valued for their heart-healthy benefits, such as lowering cholesterol, and their high fiber content, which keeps you feeling full longer. When combined with cherries, they create a dessert that feels indulgent but is actually packed with nutrients.
Cherry oat bars are particularly appealing because they satisfy both a sweet tooth and a craving for something wholesome. They’re less sugary than traditional cakes or cookies, but still flavorful and satisfying. The blend of cherries’ natural sweetness with the texture of oats offers a balanced dessert that is suitable for various occasions, from casual snacking to special celebrations. Furthermore, these bars are easy to pack and carry, making them a popular choice for picnics, school lunches, or afternoon tea.
Ingredients Breakdown
Understanding the Ingredients
Butter
In this recipe, the butter is used to provide richness and moisture to the cherry bars. It’s important to use softened butter because it helps in creating a smooth, uniform mixture when creamed with the sugar. Softened butter blends more easily than cold butter, leading to a better texture in the final product. It also helps create a tender, melt-in-your-mouth bar by evenly distributing fat throughout the dough. If the butter is too cold, it may not cream properly, resulting in a denser or uneven texture.
Brown Sugar
The choice of brown sugar over white sugar in this recipe contributes to the caramelized flavor and adds moisture to the dough. Brown sugar contains molasses, which gives it a slightly richer, more complex flavor compared to the sharper sweetness of white sugar. The moisture from the molasses also helps create a softer, chewier texture in the bars. While white sugar is often used for crisper baked goods, brown sugar is preferred here for its depth of flavor and its ability to keep the bars from becoming too dry.
Egg
Eggs play a crucial role in binding the ingredients together and adding moisture to the dough. In baking, eggs provide structure due to their protein content, helping the bars hold their shape once baked. They also contribute to the richness and smooth texture of the bars. Without the egg, the mixture could become too crumbly or fall apart. Eggs also aid in browning, giving the bars a beautiful golden hue on top.
Vanilla
Vanilla extract is a simple yet powerful ingredient that enhances the overall flavor profile of the cherry bars. Though it’s used in a small quantity, it adds a warm, sweet, and slightly floral note that complements both the cherry filling and the oatmeal crust. Vanilla has a unique ability to round out flavors, bringing a depth that makes the bars taste more balanced and less one-dimensional.
Whole Wheat Flour
Whole wheat flour is a nutritious alternative to white flour, offering more fiber, vitamins, and minerals. It’s made by grinding the entire wheat kernel, retaining the bran, germ, and endosperm, which gives it a denser, more earthy flavor and texture. In this recipe, it helps add a slightly nutty flavor and increases the overall healthiness of the bars. The added fiber from whole wheat flour also helps to slow digestion, making the bars more satisfying and beneficial for digestive health.
Unbleached White Flour
Unbleached white flour is a healthier alternative to bleached white flour because it is processed without chemical treatments. It still provides the lightness and structure needed in baked goods but is closer to its natural state. In this recipe, it balances the density of the whole wheat flour, ensuring the bars remain tender and not overly heavy. By combining whole wheat and unbleached white flour, you achieve a perfect balance of nutrition and texture.
Baking Powder
Baking powder acts as a leavening agent, helping the bars rise slightly as they bake. This gives the bars a light, airy texture instead of being overly dense. Baking powder works by releasing carbon dioxide when heated, which causes the dough to expand and create a softer, more pleasant mouthfeel.
Oat Flakes
Oats are a key ingredient in this recipe, contributing both flavor and texture. They add heartiness to the bars, making them more filling and wholesome. Oats are rich in fiber, particularly beta-glucan, which can help lower cholesterol and improve heart health. The texture of oat flakes contrasts with the smooth cherry filling, adding a delightful chewiness to each bite. Their mild, nutty flavor complements the sweetness of the cherry spread, creating a balanced and satisfying dessert.
Cherry Spread
The cherry spread used in these bars is the star ingredient, providing a sweet and tart contrast to the rich, buttery oat layers. When choosing a cherry spread, it’s important to look for one with a high fruit content and minimal added sugars to let the natural flavor of the cherries shine through. Cherry spread is not only delicious but also packed with antioxidants, particularly anthocyanins, which offer anti-inflammatory properties and support overall health. If you prefer a smoother texture, a jelly-like spread works well, while chunkier preserves will add more texture and bursts of fruit.
Ingredient Substitutions and Variations
Substituting Ingredients for Dietary Preferences
- Gluten-Free Flour: For those who need a gluten-free option, a 1:1 gluten-free flour blend can replace the whole wheat and white flour combination. Ensure the blend includes xanthan gum to maintain structure.
- Plant-Based Butters: For a vegan or dairy-free alternative, plant-based butters like margarine or coconut oil can replace regular butter. Coconut oil, in particular, will add a subtle tropical flavor that pairs nicely with the cherry spread.
- Alternative Sweeteners: If you want to reduce sugar, try using coconut sugar or a sugar substitute like erythritol. These will slightly change the texture and flavor but offer lower glycemic index options.
Variations on the Recipe
- Different Fruit Spreads: The beauty of this recipe is its versatility. Instead of cherry spread, you can experiment with raspberry, strawberry, or apricot preserves for a different flavor profile. Each fruit brings its own unique sweetness and tanginess, allowing for endless customization.
- Add-Ins: You can add chopped nuts (like almonds or pecans) or even chocolate chips to the oat mixture for added crunch or sweetness. These additions can enhance the bars’ texture and appeal to different tastes.
Step-by-Step Preparation Guide
Step 1: Mixing the Butter and Sugar
The first step in making the perfect cherry bars is to cream the softened butter and brown sugar together. Creaming these ingredients properly is crucial to achieving a light and fluffy texture in the bars. The butter needs to be soft but not melted, which allows it to incorporate air as it’s mixed with the sugar. This aeration is key to creating a tender, non-dense base for the bars.
Using an electric mixer is the most efficient way to cream butter and sugar, as it quickly whips the mixture into a pale, fluffy consistency. Start on a low speed to avoid sugar flying out of the bowl, then gradually increase to medium-high speed until the mixture becomes smooth and creamy, about 3-5 minutes. If you don’t have an electric mixer, you can also cream by hand using a wooden spoon, though this method requires more time and effort. Whisking the butter and sugar by hand may take up to 10 minutes to achieve the same light, airy consistency.
Step 2: Adding the Egg and Vanilla
Once the butter and sugar are properly creamed, it’s time to add the egg and vanilla. It’s important to add the egg gradually, mixing well after each addition. Adding the egg all at once can cause the mixture to curdle, which results in a lumpy texture and uneven baking. Start by cracking the egg into a small bowl and beat it lightly before slowly incorporating it into the butter-sugar mixture. This helps maintain a smooth, cohesive batter.
As you add the vanilla, it will enhance the flavor of the bars by imparting a subtle, sweet aroma. Continue mixing on low speed just until the egg and vanilla are fully incorporated, ensuring a smooth, uniform texture without overmixing. Overmixing can lead to a denser bar, so stop as soon as the ingredients are evenly combined.
Step 3: Combining the Dry Ingredients
In a separate bowl, combine the dry ingredients: whole wheat flour, unbleached white flour, and baking powder. Proper mixing of these ingredients is important to ensure the baking powder is evenly distributed, which helps the bars rise uniformly in the oven.
For the best results, consider sifting the flours and baking powder together. Sifting aerates the flour and breaks up any lumps, ensuring the ingredients mix thoroughly and distribute evenly in the final dough. This step is especially important when using whole wheat flour, as it can sometimes clump and create uneven textures in the bars. Once the dry ingredients are ready, gradually add them to the butter mixture, mixing on low speed to avoid overworking the dough. Overmixing the flour can lead to tough bars, so stop as soon as the dry ingredients are incorporated.
Step 4: Stirring in the Oat Flakes
After the flour mixture is combined, it’s time to stir in the oat flakes. Oats add a chewy texture and hearty flavor to the bars, so it’s important to incorporate them gently. Using a wooden spoon or spatula, fold the oats into the dough rather than mixing vigorously. This folding method prevents the oats from being crushed or overworked, which could reduce their texture.
Oats also absorb some of the moisture from the wet ingredients, contributing to the chewy consistency of the bars. By folding them in at this stage, you help maintain the structure of the bars and ensure an even distribution of oats throughout the dough.
Step 5: Assembling the Bars
Now it’s time to assemble the cherry bars. First, set aside ½ cup of the oatmeal mixture for the topping. Press the remaining oatmeal mixture into the bottom of a lightly buttered 13″ x 9″ baking pan. Use your hands or the back of a spoon to press the mixture evenly across the bottom, making sure it reaches the edges of the pan. This forms the base crust of the bars, so it’s important to press firmly but evenly for a solid, cohesive layer.
Once the base is pressed in, spread the cherry spread evenly over the top. Use a spatula to ensure an even layer of cherry filling, spreading it all the way to the edges to ensure each bite gets a perfect balance of crust and fruit.
Step 6: Adding the Topping
Take the reserved oatmeal mixture and sprinkle it evenly over the cherry spread. This topping will create a crispy, golden layer as the bars bake. To ensure an even, crumbly texture, break up the oatmeal mixture into small clumps with your fingers before sprinkling it on top.
For extra texture and flavor, consider adding optional toppings like chopped nuts or seeds. Almonds, pecans, or sunflower seeds can add crunch and complement the sweetness of the cherries.
Step 7: Baking the Bars
Preheat your oven to 350°F (180°C). Place the pan in the center of the oven and bake for approximately 35 minutes or until the top is golden brown and the edges are slightly crisp. Baking times can vary depending on your oven, so start checking for doneness around the 30-minute mark. Insert a toothpick into the center of the bars; if it comes out clean or with a few moist crumbs, the bars are done.
It’s important not to overbake the bars, as this can dry them out. The top should be lightly browned, but the bars should remain moist and chewy. If your oven tends to run hot, consider reducing the baking time by a few minutes.
Step 8: Cooling and Cutting
Once the bars are finished baking, remove the pan from the oven and place it on a wire rack to cool completely. Cooling on a rack allows air to circulate around the pan, preventing the bottom of the bars from becoming soggy.
Allowing the bars to cool completely is essential for easy cutting. Warm bars tend to fall apart or become mushy. Once fully cooled, use a sharp knife to cut the bars into squares or rectangles. For the cleanest cuts, you can score the bars before cutting or run the knife under hot water between slices.
Nutritional Benefits of Cherry Bars
Nutritional Highlights
Cherry bars, while a delightful treat, also provide several nutritional benefits, thanks to the inclusion of wholesome ingredients like whole wheat flour, oats, and cherries.
Whole Grains (Whole Wheat Flour and Oats)
The use of whole wheat flour and oats in this recipe means you’re incorporating nutrient-dense whole grains into your diet. Whole wheat flour is rich in fiber, B vitamins, and essential minerals like iron, magnesium, and zinc. The fiber in whole grains helps regulate digestion, stabilizes blood sugar levels, and promotes heart health.
Oats, another vital component, are a fantastic source of soluble fiber, particularly beta-glucan, which has been shown to reduce cholesterol levels and improve heart health. Oats also contain vitamins and minerals, including manganese, phosphorus, and iron, which support bone health and energy production.
Cherries
Cherries, the key flavor component in these bars, are not just delicious—they’re also packed with nutrients. They are a great source of vitamins A and C, which are essential for immune function and skin health. Cherries also contain powerful antioxidants, including anthocyanins, which help reduce inflammation, improve heart health, and even combat oxidative stress. Additionally, cherries are known for aiding digestion, thanks to their fiber content, and promoting better sleep due to their natural melatonin.
How This Recipe Fits Into a Balanced Diet
These cherry bars, while indulgent, can fit well into a balanced diet when enjoyed in moderation. The fiber from both the oats and whole wheat flour helps to promote satiety, keeping you feeling full longer, and aiding in digestion. Fiber-rich foods are key to maintaining a healthy digestive system and managing weight.
The butter in the recipe, while a source of saturated fat, also provides essential fat-soluble vitamins like A, D, and E. In moderation, the fats from butter contribute to flavor and texture, offering energy and satisfaction from the treat. The balance of whole grains, fruit, and healthy fats makes these cherry bars a better choice compared to many other desserts high in processed sugars or refined flours.
Tips for Perfect Cherry Bars
Common Mistakes to Avoid
- Overmixing the dough: Overmixing can lead to tough, dense bars. Mix the dry ingredients just until combined to maintain a light texture.
- Spreading the cherry filling too thinly or too thickly: A too-thin layer of cherry spread can result in dry bars, while too much filling may cause sogginess. Spread the filling evenly, ensuring it fully covers the base without overwhelming it.
- Overbaking or underbaking the bars: Overbaking dries out the bars, making them crumbly. Underbaking leads to a soggy texture. Bake until the top is golden brown and a toothpick comes out with a few moist crumbs.
Additional Baking Tips
- Storing: Keep the bars in an airtight container at room temperature for up to 3 days or refrigerate for up to a week.
- Freezing: To freeze, wrap bars individually in plastic wrap, then place in a freezer-safe bag for up to 3 months. Thaw in the fridge or at room temperature before serving.
Serving Suggestions and Pairings
Best Ways to Serve Cherry Bars
Cherry bars are delicious on their own but can be elevated with a dollop of freshly whipped cream or a scoop of vanilla ice cream for added indulgence. For a healthier option, try pairing them with Greek yogurt for a creamy contrast.
These bars make an excellent dessert for events like potlucks or picnics, where they can be easily cut and shared. They also shine as a tea-time treat, paired with a cup of hot tea or coffee, making them perfect for casual gatherings or afternoon snacks.
FAQs
Can I use fresh cherries instead of cherry spread?
Yes, but fresh cherries have a different texture and less concentrated sweetness than cherry spread. If using fresh cherries, pit and cook them down with a little sugar and cornstarch to thicken into a jam-like consistency. This will ensure the bars hold together and have the right sweetness.
What can I substitute for whole wheat flour?
You can use almond flour for a nutty flavor, coconut flour (though you’ll need less as it absorbs more liquid), or a gluten-free blend if needed. Each may slightly alter the texture, so adjust liquid ingredients as necessary.
How do I make the bars less crumbly?
To reduce crumbliness, slightly increase the amount of butter or add an extra egg yolk for more binding. Also, avoid overbaking, which can dry out the bars.
Can I add nuts or chocolate chips?
Yes, adding nuts like almonds or walnuts provides extra crunch, while chocolate chips add sweetness. Stir them into the dough or sprinkle on top with the oat mixture for added texture and flavor.
How long can I store the cherry bars?
Store cherry bars in an airtight container at room temperature for up to 3 days, or refrigerate for up to a week. For longer storage, freeze them for up to 3 months.

Cherry Bars
Description
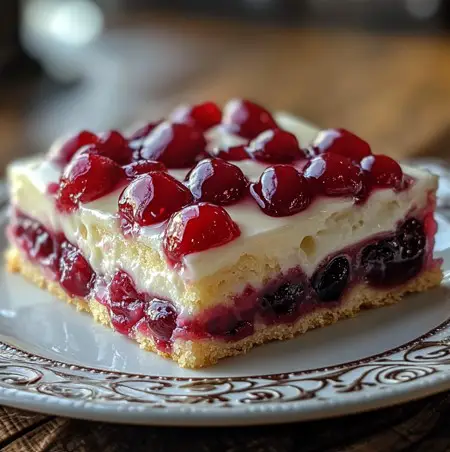
These delicious cherry bars combine the sweet-tart flavor of cherry spread with a wholesome, chewy oat and whole wheat crust. Perfect as a snack, dessert, or even a quick breakfast, these bars are a great way to enjoy the natural goodness of cherries while indulging in a homemade treat. The blend of oats, whole wheat flour, and cherry filling offers a balanced bite that’s both nutritious and satisfying.
Ingredients
- 3/4 cup softened butter
- 1 cup packed brown sugar
- 1 egg
- 1 teaspoon vanilla extract
- 1 cup whole wheat flour
- 1 cup unbleached white flour
- 2 teaspoons baking powder
- 2 cups oat flakes
- 1 cup cherry spread (preferably Double Fruit type)
Instructions
- Preheat the Oven:
Preheat your oven to 350°F (180°C). Lightly butter a 13″ x 9″ (33 cm x 23 cm) baking pan and set it aside. - Cream the Butter and Sugar:
In a large mixing bowl, beat the softened butter and brown sugar together using an electric mixer until light and fluffy, about 3-5 minutes. - Add Egg and Vanilla:
Beat in the egg and vanilla gradually until fully incorporated, ensuring a smooth mixture. - Mix the Dry Ingredients:
In a separate bowl, combine the whole wheat flour, unbleached white flour, and baking powder. Gradually add this mixture to the butter and sugar mixture, mixing on low speed. Stir in the oat flakes gently with a wooden spoon until evenly distributed. - Prepare the Crust:
Reserve ½ cup of the oat mixture for the topping. Press the remaining mixture into the bottom of the prepared baking pan, spreading it out evenly. - Add the Cherry Spread:
Spread the cherry spread evenly over the pressed crust, making sure to cover the surface completely. - Add the Topping:
Sprinkle the reserved oat mixture over the cherry layer to create a crumbly topping. - Bake the Bars:
Bake in the preheated oven for about 35 minutes, or until the top is golden brown. Remove the pan from the oven and place it on a wire rack to cool completely. - Cool and Serve:
Once cooled, cut the bars into squares or rectangles. Serve as a snack, dessert, or paired with whipped cream or ice cream for added indulgence.
Notes
- Butter Consistency: Ensure the butter is softened, not melted, for the best texture in the bars.
- Cherry Spread: For a richer, fruitier flavor, opt for a high-quality cherry spread with minimal added sugars.
- Add-ins: Feel free to add chopped nuts or chocolate chips to the oat mixture for additional texture and flavor.
- Storage: The bars can be stored in an airtight container for up to 3 days at room temperature, or up to a week in the refrigerator. They can also be frozen for up to 3 months if wrapped individually.