

Chi-Chi’s Baked Chicken Chimichangas have become a beloved Tex-Mex dish, cherished for their flavorful, crispy texture. Chi-Chi’s, a popular restaurant chain established in 1975, quickly gained a reputation for its vibrant atmosphere and delicious Mexican cuisine. Though the chain’s U.S. locations closed by 2004, the legacy of its dishes, like the baked chicken chimichangas, continues to live on in home kitchens.
Baked Chicken Chimichangas offer a healthier twist on the traditional deep-fried version. A chimichanga, essentially a deep-fried burrito, typically features a filling of meat, cheese, and various seasonings, then wrapped in a tortilla and fried to a golden crisp. However, by opting to bake the chimichangas instead of frying them, you can significantly reduce the calorie and fat content without sacrificing the delightful crunch that makes them so enjoyable.
The significance of baking versus frying cannot be overstated. Baking allows the tortillas to become crispy while maintaining the moist, flavorful filling inside. This method not only makes the dish healthier but also simplifies the cooking process, making it more accessible for home cooks. With baked chimichangas, you can enjoy all the deliciousness of this Tex-Mex favorite with fewer calories and less guilt.
Ingredients and Equipment
To create the delicious Chi-Chi’s Baked Chicken Chimichangas, you’ll need a precise selection of ingredients and some basic kitchen equipment. Here’s a detailed list to ensure you have everything you need to get started:
Ingredients:
- 2 cups cooked shredded chicken: You can use leftover chicken, a rotisserie chicken, or quickly cook and shred chicken breasts. Read more about shredded chicken.
- 1 cup shredded Monterey Jack cheese: This cheese melts well and adds a creamy texture. Learn about Monterey Jack cheese.
- 1 cup shredded cheddar cheese: Adds a sharp, tangy flavor to balance the Monterey Jack.
- 1/2 cup salsa: Use your favorite store-bought or homemade salsa for added zest. More on salsa.
- 1/4 cup diced green chilies: These provide a mild heat and a burst of flavor. Discover green chilies.
- 1 teaspoon ground cumin: Adds a warm, earthy flavor to the filling. Ground cumin details.
- 1 teaspoon chili powder: Enhances the dish with a mild spiciness. Chili powder info.
- 1/2 teaspoon garlic powder: Provides a subtle garlic flavor.
- 1/4 teaspoon cayenne pepper (optional): For those who like a bit more heat.
- Salt and pepper, to taste: Essential for seasoning.
- 6 large flour tortillas: These should be large enough to hold the filling securely. Flour tortillas.
- Cooking spray: To help the chimichangas crisp up in the oven.
- Sour cream, guacamole, and salsa for serving: These condiments add the perfect finishing touch.
Necessary Kitchen Equipment:
- Mixing bowl: For combining the filling ingredients.
- Baking sheet: To bake the chimichangas.
- Parchment paper: To line the baking sheet and prevent sticking.
- Spoon: For scooping the filling.
- Cooking spray: To lightly coat the chimichangas and ensure they crisp up nicely.
- Oven: Preheated to 400°F (200°C).
Step-by-Step Cooking Instructions
Creating Chi-Chi’s Baked Chicken Chimichangas at home is a rewarding process that combines simple preparation with delicious results. Follow these detailed steps to ensure your chimichangas turn out perfectly crispy and flavorful.
Preparation Steps:
- Preheat the Oven: Start by preheating your oven to 400°F (200°C). Ensuring your oven is fully preheated is crucial for achieving the desired crispiness.
- Line the Baking Sheet: Line a baking sheet with parchment paper. This will prevent the chimichangas from sticking and make for easier cleanup. If you don’t have parchment paper, lightly grease the baking sheet with cooking spray.
Mixing the Filling:
- Combine Ingredients: In a large mixing bowl, add 2 cups of cooked shredded chicken, 1 cup of shredded Monterey Jack cheese, 1 cup of shredded cheddar cheese, 1/2 cup of salsa, and 1/4 cup of diced green chilies.
- Season the Mixture: Add 1 teaspoon of ground cumin, 1 teaspoon of chili powder, 1/2 teaspoon of garlic powder, and, if desired, 1/4 teaspoon of cayenne pepper for extra heat. Season with salt and pepper to taste.
- Mix Thoroughly: Use a spoon to mix all the ingredients thoroughly until they are well combined. This ensures that every bite of your chimichanga is packed with flavor.
Assembling the Chimichangas:
- Prepare the Tortillas: Lay out 6 large flour tortillas on a clean surface. If your tortillas are a bit stiff, warm them slightly in the microwave for about 10-15 seconds to make them more pliable.
- Add the Filling: Place a generous scoop of the chicken mixture in the center of each tortilla. Aim for about 1/3 to 1/2 cup of filling per tortilla to ensure they are well-stuffed but not overfilled.
- Fold the Tortillas: To fold the chimichangas, start by folding in the sides of the tortilla over the filling. Then, roll the tortilla from the bottom up, securing the filling inside. Ensure they are tightly rolled to prevent them from opening during baking.
- Place on Baking Sheet: Arrange the rolled chimichangas seam-side down on the prepared baking sheet.
Baking Process:
- Spray with Cooking Oil: Lightly spray the tops and sides of the chimichangas with cooking spray. This will help them achieve a golden, crispy exterior.
- Bake: Place the baking sheet in the preheated oven and bake for 20-25 minutes. Turn the chimichangas halfway through the baking time to ensure even crisping on all sides. They should be golden brown and crispy when done.
- Check for Doneness: Remove the baking sheet from the oven and let the chimichangas cool for a few minutes before serving. This allows the filling to set slightly and makes them easier to handle.
Serving Suggestions:
- Plate and Garnish: Serve the baked chicken chimichangas hot. Plate them individually or on a large serving platter.
- Accompaniments: Offer a variety of accompaniments such as sour cream, guacamole, and additional salsa for dipping. These add extra flavor and creaminess to the dish.
- Side Dishes: Consider serving the chimichangas with sides like Mexican rice, refried beans, or a fresh salad. These complement the main dish and create a well-rounded meal. Check out these side dish ideas.
Health Benefits of Baking Chimichangas
Comparison with Frying: Baking chimichangas instead of frying them offers significant health benefits. Traditional fried chimichangas are submerged in hot oil, absorbing a substantial amount of fat and calories. In contrast, baking reduces the need for excess oil, cutting down on unhealthy fats. For instance, frying a chimichanga can add up to 300 extra calories and 20 grams of fat, whereas baking significantly lowers these numbers, resulting in a lighter, yet still crispy, meal.
Nutritional Benefits of Ingredients: The ingredients used in Chi-Chi’s Baked Chicken Chimichangas also contribute to their nutritional value. Shredded chicken provides a lean source of protein, essential for muscle repair and growth. Monterey Jack and cheddar cheeses offer calcium and other vital nutrients, though in moderation due to their fat content. Green chilies and salsa add vitamins and antioxidants, supporting overall health. Cumin and chili powder not only enhance flavor but also offer anti-inflammatory properties.
Tips for Making the Recipe Healthier:
- Use Whole Wheat Tortillas: Swap regular flour tortillas with whole wheat ones for added fiber and nutrients.
- Reduce Cheese Quantity: Cut back on the amount of cheese or use low-fat cheese alternatives to lower the fat content.
- Add Vegetables: Incorporate more vegetables like bell peppers, spinach, or zucchini into the filling for added vitamins and minerals.
- Limit Sodium: Use low-sodium salsa and seasoning to keep salt intake in check.
- Serve with Healthy Sides: Pair the chimichangas with a fresh salad or steamed vegetables instead of high-calorie sides like refried beans.
Variations of the Recipe
Chi-Chi’s Baked Chicken Chimichangas can be customized in numerous ways to suit different tastes and dietary preferences. Here are some popular variations:
Alternative Fillings:
- Beef: Substitute the shredded chicken with ground beef or shredded beef. Cook the beef with onions, garlic, and your favorite taco seasoning before mixing it with cheese and other ingredients. This option is perfect for those who prefer a richer, heartier filling. Learn more about beef fillings.
- Pork: Pulled pork or cooked ground pork can be used as a tasty alternative. Combine the pork with BBQ sauce for a unique twist, or season it traditionally with cumin, chili powder, and garlic powder.
- Vegetarian: For a meat-free option, use a mix of black beans, corn, and sautéed vegetables like bell peppers, onions, and zucchini. Add spices such as cumin and chili powder, and blend in cheese or a plant-based cheese alternative for creaminess. This creates a nutritious and satisfying vegetarian chimichanga. Vegetarian chimichangas inspiration.
Different Cheese Options:
- Pepper Jack: For an extra kick, use pepper jack cheese instead of, or in addition to, Monterey Jack and cheddar. This cheese adds a spicy element that enhances the overall flavor.
- Queso Fresco: This mild, crumbly cheese is perfect for adding a traditional Mexican touch. Mix it with the filling or sprinkle it on top before serving.
- Vegan Cheese: For a dairy-free option, use your favorite vegan cheese shreds. These work well in the recipe and cater to those with dietary restrictions.
Using an Air Fryer: If you have an air fryer, it’s a great alternative to baking chimichangas in the oven. The air fryer can produce an equally crispy texture with less cooking time.
- Preparation: Follow the same steps for assembling the chimichangas. Lightly spray them with cooking spray or brush with a small amount of oil.
- Cooking: Preheat your air fryer to 400°F (200°C). Place the chimichangas in a single layer in the air fryer basket. Cook for 8-10 minutes, flipping them halfway through to ensure even crisping. They should be golden brown and crispy when done.
- Advantages: The air fryer method reduces cooking time and can be more energy-efficient. It’s also an excellent option for small batches or when you don’t want to heat up the entire kitchen.
Tips for Perfect Chimichangas
Making perfect Chi-Chi’s Baked Chicken Chimichangas involves a few key techniques to ensure your tortillas don’t crack, achieve even crispiness, and store well for future enjoyment. Here are some essential tips:
How to Prevent Tortillas from Cracking:
- Warm the Tortillas: Cold tortillas are more likely to crack when rolled. To prevent this, warm your flour tortillas slightly before filling them. You can do this by microwaving them for about 10-15 seconds or heating them briefly in a dry skillet.
- Moisture Balance: Ensure your filling is moist but not overly wet. A too-dry filling can make the tortillas brittle, while an overly wet filling can make them soggy and prone to tearing.
Ensuring Even Baking for Crispiness:
- Use Cooking Spray: Lightly spraying the chimichangas with cooking spray before baking helps them achieve a golden, crispy exterior. This mimics the effect of frying without the excess oil.
- Turn Halfway: For even crispiness, turn the chimichangas halfway through the baking time. This ensures that all sides get evenly browned and crispy.
- Bake on a Rack: Placing the chimichangas on a baking rack set over a baking sheet allows hot air to circulate around them, promoting even baking and preventing the bottoms from becoming soggy.
Tips for Storing and Reheating Leftovers:
- Refrigerate Properly: Store leftover chimichangas in an airtight container in the refrigerator for up to four days. This keeps them fresh and prevents them from drying out.
- Freezing: Wrap each chimichanga individually in foil and place them in a freezer-safe bag. They can be frozen for up to three months. To reheat, bake directly from frozen at 400°F (200°C) for 35-40 minutes or until heated through.
- Reheat for Crispiness: To maintain crispiness when reheating, avoid the microwave. Instead, reheat in an oven at 375°F (190°C) for about 15-20 minutes, or until they are hot and crispy. For smaller portions, an air fryer set at 375°F (190°C) for about 5-7 minutes works well too.
Serving Suggestions
Recommended Sides:
- Mexican Rice: A classic side that complements the flavors of the chimichangas. You can make it by sautéing rice with onions, garlic, tomatoes, and spices. Try this Mexican rice recipe for a delicious accompaniment.
- Refried Beans: Creamy and flavorful refried beans are a perfect match. You can use canned beans for convenience or make them from scratch. Learn more about refried beans.
- Fresh Salads: A light and refreshing salad like a simple lettuce and tomato salad, or a more elaborate Mexican street corn salad, balances the richness of the chimichangas. Explore salad recipes.
Beverage Pairings:
- Margaritas: Classic margaritas, whether traditional or flavored with fruits like mango or strawberry, make a great pairing. Their tangy sweetness complements the savory chimichangas. Margarita recipes.
- Mexican Sodas: Drinks like Jarritos or Mexican Coca-Cola offer a sweet, fizzy contrast to the meal. These sodas come in various flavors, adding a fun and festive touch to your dinner. Read about Mexican sodas.
Presentation Tips for Parties:
- Serve Buffet Style: Arrange the chimichangas, sides, and toppings like sour cream, guacamole, and salsa on a long table, allowing guests to serve themselves. This setup is perfect for casual gatherings.
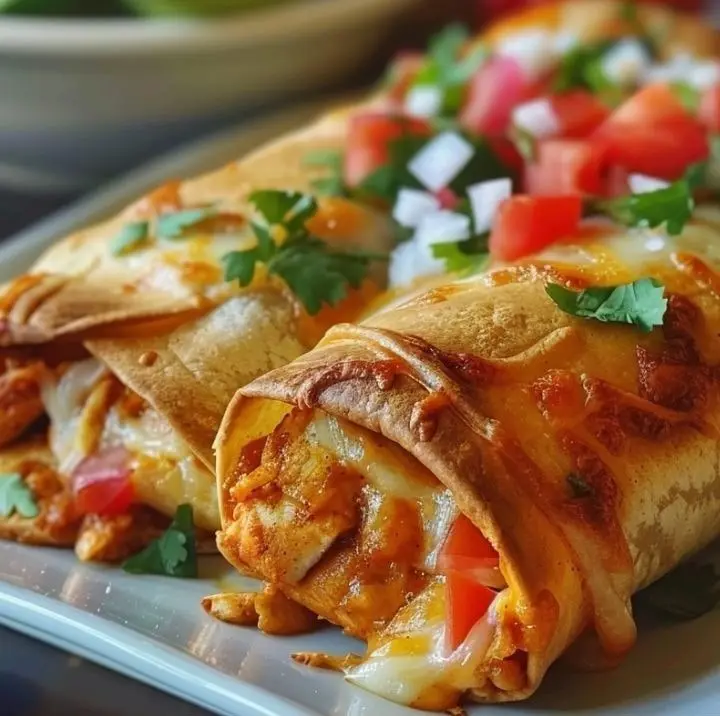
- Garnish Creatively: Add a pop of color by garnishing with fresh cilantro, diced tomatoes, and lime wedges. These not only enhance the visual appeal but also add fresh flavors.
- Use Festive Dinnerware: Serve the chimichangas on colorful plates or Mexican-themed serving platters to create an authentic ambiance. Check out these serving ideas.
Common Mistakes to Avoid
To ensure your Chi-Chi’s Baked Chicken Chimichangas turn out perfectly, it’s important to avoid some common mistakes:
Overstuffing the Tortillas:
- Avoid Overfilling: While it might be tempting to pack as much filling as possible into each tortilla, overstuffing can lead to messy, broken chimichangas. Too much filling makes it difficult to roll the tortilla tightly, causing it to burst during baking. Aim for about 1/3 to 1/2 cup of filling per tortilla to maintain a good balance and prevent spillage.
Baking at Incorrect Temperatures:
- Proper Preheating: Ensure your oven is preheated to the correct temperature of 400°F (200°C). Baking at too low a temperature can result in soggy chimichangas, while too high a temperature may cause them to burn before the filling is properly heated. Use an oven thermometer if necessary to verify the temperature is accurate.
Not Allowing Chimichangas to Rest Before Serving:
- Cooling Period: After baking, let the chimichangas rest for a few minutes before serving. This resting period allows the filling to set slightly, making them easier to handle and preventing burns from hot steam or filling. Serving them immediately can result in a messier presentation and potential burns.
FAQs
What is the difference between a burrito and a chimichanga?
- Burrito vs. Chimichanga: A burrito and a chimichanga are similar in that they both use a flour tortilla to wrap a filling typically consisting of meat, cheese, beans, and other ingredients. The primary difference lies in the preparation method. A burrito is simply rolled and served as is, while a chimichanga is rolled and then fried or baked until crispy. This gives chimichangas a distinctive crunchy texture, unlike the soft, pliable burrito. Read more about burritos and chimichangas.
Can I make chimichangas ahead of time?
- Make Ahead: Yes, you can make chimichangas ahead of time. Assemble the chimichangas as directed, but instead of baking, place them on a baking sheet and freeze until firm. Once frozen, transfer them to a freezer-safe bag. When ready to bake, place the frozen chimichangas on a baking sheet, spray with cooking spray, and bake at 400°F (200°C) for 35-40 minutes, or until heated through and crispy. This method is perfect for meal prepping or having a quick meal ready on busy nights.
How do I store leftover chimichangas?
- Storing Leftovers: To store leftover chimichangas, allow them to cool completely before transferring them to an airtight container. Store them in the refrigerator for up to four days. To reheat, preheat your oven to 375°F (190°C) and bake the chimichangas on a baking sheet for 15-20 minutes, or until heated through and crispy again. Avoid microwaving as it can make the chimichangas soggy.
What can I serve with baked chicken chimichangas?
- Serving Suggestions: Baked chicken chimichangas pair well with a variety of sides and toppings:
- Mexican Rice: A classic side dish that complements the flavors of the chimichangas.
- Refried Beans: Creamy and rich, refried beans are a perfect match.
- Fresh Salad: A light salad with lettuce, tomatoes, and avocados balances the richness of the chimichangas.
- Sour Cream, Guacamole, and Salsa: These add creaminess and extra flavor. Explore more serving ideas.
Can I freeze baked chimichangas?
- Freezing Chimichangas: Yes, baked chimichangas can be frozen for later use. Allow them to cool completely, then wrap each chimichanga individually in aluminum foil. Place the wrapped chimichangas in a freezer-safe bag and freeze for up to three months. To reheat, remove the foil and bake at 400°F (200°C) for 35-40 minutes if frozen, or 20-25 minutes if thawed, until heated through and crispy. This method ensures you have a quick, delicious meal ready at any time

Chi-Chi’s Baked Chicken Chimichangas
- Author: Naomi
- Total Time: 40 minutes
- Yield: 6 servings
Description
Chi-Chi’s Baked Chicken Chimichangas are a delicious and healthier twist on the traditional fried version. This recipe features tender shredded chicken mixed with Monterey Jack and cheddar cheeses, salsa, and diced green chilies, all seasoned with cumin, chili powder, and garlic powder.
Ingredients
Instructions
Notes
- Ingredient Substitutions: Feel free to substitute the chicken with other proteins like ground beef, pork, or even a vegetarian option like black beans and corn.
- Cheese Variations: You can experiment with different cheeses such as pepper jack for added spice or queso fresco for a more traditional Mexican flavor.
- Air Fryer Option: If you prefer using an air fryer, preheat it to 400°F (200°C) and cook the chimichangas for 8-10 minutes, flipping halfway through.
- Serving Ideas: Pair your chimichangas with sides like Mexican rice, refried beans, or a fresh salad. Beverages like margaritas or Mexican sodas complement the meal perfectly.
- Storage: Leftover chimichangas can be stored in an airtight container in the refrigerator for up to four days. They can also be frozen for up to three months. Reheat in the oven to maintain their crispiness.
- Prep Time: 15 minutes
- Cook Time: 25 minutes
- Category: Chicken
- Cuisine: American
Nutrition
- Calories: 350 kcal per serving


Made for lunch today and were delicious. Will definitely make again.
★★★★★