If you’re looking for a dessert that effortlessly combines the best of both worlds, look no further than Cookie Dough Cheesecake Bars. These indulgent treats marry two beloved desserts into one irresistible creation, making them a perfect choice for any occasion. Whether you’re hosting a family gathering, celebrating a special event, or simply craving a sweet indulgence, these bars are sure to impress.
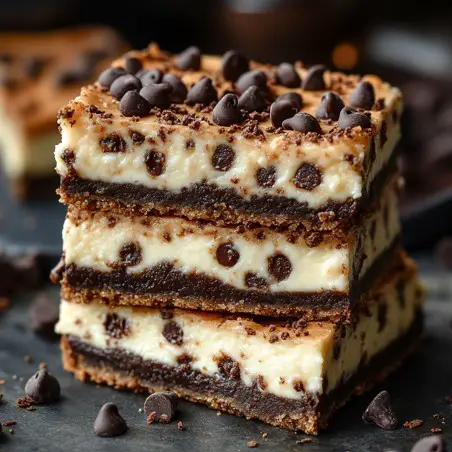
At the heart of this recipe is the luxurious combination of creamy cheesecake and rich chocolate chip cookie dough, both layered on top of a crunchy graham cracker crust. The smooth and velvety cheesecake filling provides a delightful contrast to the cookie dough’s soft and chewy texture, while the graham cracker crust adds a satisfying crunch to every bite. The result is a multi-layered dessert that is as visually appealing as it is delicious.
The beauty of Cookie Dough Cheesecake Bars lies in their versatility. They can be dressed up with a drizzle of chocolate or caramel sauce, or kept simple to let the classic flavors shine. No matter how you choose to serve them, these bars are guaranteed to be a crowd-pleaser, offering a little something for everyone.
Ingredients Breakdown: Building the Perfect Cookie Dough Cheesecake Bars
To create the perfect Cookie Dough Cheesecake Bars, you’ll need to gather ingredients for three main components: the graham cracker crust, the creamy cheesecake filling, and the chocolate chip cookie dough topping. Each layer contributes to the delicious complexity of this dessert, so choosing the right ingredients is crucial.
1. Graham Cracker Crust
- Graham Cracker Crumbs (1 ¼ cup): The foundation of the crust, providing a sweet and slightly crunchy base. You can use about one full packet of graham crackers, finely crushed, or pre-made crumbs.
- Packed Brown Sugar (⅛ cup): Adds a hint of caramel-like sweetness and helps bind the crumbs together. Light or dark brown sugar can be used, depending on your preference.
- Unsalted Butter, Melted (¼ cup): The fat that binds the crust, giving it richness and flavor. Unsalted butter allows you to control the saltiness of the crust.
2. Cheesecake Filling
- Cream Cheese, Room Temperature (16 oz): The star of the cheesecake layer, providing a smooth and creamy texture. Make sure it’s softened for easy mixing.
- White Granulated Sugar (½ cup): Sweetens the cheesecake, balancing the tanginess of the cream cheese.
- Sour Cream, Room Temperature (¼ cup): Adds a slight tang and helps achieve a silky texture.
- Heavy Cream, Room Temperature (⅛ cup): Enhances the creaminess and richness of the filling.
- Pure Vanilla Extract (1 teaspoon): Provides a warm, sweet aroma and depth of flavor.
- Large Eggs, Room Temperature (2): Acts as a binder, giving structure to the cheesecake.
3. Chocolate Chip Cookie Dough
- Unsalted Butter, Room Temperature (⅓ cup): Creates a rich and tender cookie dough. Room temperature butter is key to a well-blended dough.
- White Granulated Sugar (⅛ cup) and Packed Brown Sugar (⅓ cup): A combination of sugars gives the dough its characteristic sweetness and chewiness.
- Pure Vanilla Extract (1 teaspoon): Enhances the cookie dough’s flavor.
- Large Egg, Room Temperature (1): Provides structure and moisture to the dough.
- All-Purpose Flour (¾ cup): The base of the dough, creating a tender cookie layer.
- Salt (¼ teaspoon): Balances the sweetness and enhances the flavor.
- Semi-Sweet Chocolate Chips (¾ cup): The classic choice for chocolate chip cookie dough, providing pockets of melty chocolate.
Importance of Room Temperature Ingredients Using room temperature ingredients, especially for the cream cheese, eggs, and butter, ensures that the batter and dough mix smoothly. Cold ingredients can lead to a lumpy cheesecake batter and uneven cookie dough consistency, affecting the final texture of your dessert.
Possible Substitutions and Variations
- Gluten-Free Option: Substitute gluten-free graham crackers and flour to make this dessert gluten-free without compromising on taste or texture.
- Dairy-Free Option: Use dairy-free cream cheese, butter, and chocolate chips. Coconut cream can replace heavy cream, and a plant-based sour cream alternative can be used for the cheesecake layer.
- Flavor Variations: Consider adding a pinch of cinnamon to the graham cracker crust, or using dark chocolate chips for a richer flavor. You can also mix in nuts, such as chopped walnuts or pecans, for added texture.
Essential Tools and Equipment for Cookie Dough Cheesecake Bars
To ensure your Cookie Dough Cheesecake Bars turn out perfectly, it’s important to have the right tools and equipment on hand. Here’s what you’ll need:
- 9×9 Baking Pan: A square pan is ideal for even baking and achieving the right thickness for your bars. Lining the pan with parchment paper will make it easier to lift the bars out once they’ve cooled.
- Mixer: An electric hand mixer or stand mixer is essential for achieving a smooth and creamy cheesecake batter. It also helps to blend the cookie dough evenly.
- Food Processor: Use a food processor to finely crush the graham crackers into crumbs. This ensures a uniform, fine texture that binds well with the butter and sugar for the crust.
- Measuring Cups and Spoons: Accurate measurements are key to getting the perfect consistency for each component, so a reliable set of measuring cups and spoons is a must.
- Parchment Paper: Lining your pan with parchment paper, leaving some overhang on the sides, makes it easy to lift the bars out without damaging them.
Tips for Best Results Using a food processor ensures that your graham cracker crumbs are fine and consistent, which helps create a firm and even crust. Additionally, a mixer helps achieve a lump-free cheesecake batter, essential for a smooth and creamy texture. Proper use of parchment paper will make it easier to remove the bars cleanly from the pan, resulting in perfectly shaped squares.
Step-by-Step Instructions for Making Cookie Dough Cheesecake Bars
Preparing the Graham Cracker Crust
- Preheat the Oven: Begin by preheating your oven to 325°F (163°C). This ensures that your crust will bake evenly as soon as it goes in.
- Prepare the Pan: Spray a 9×9-inch baking pan with non-stick baking spray. Line the bottom and two sides with parchment paper, making sure it extends over the sides for easy removal later. Spray the parchment paper lightly with baking spray.
- Crush the Graham Crackers: Use a food processor to crush graham crackers into fine crumbs. You need 1 ¼ cups of crumbs, which should resemble wet sand when properly mixed with other ingredients.
- Mix the Crust Ingredients: In a medium bowl, combine the graham cracker crumbs, ⅛ cup of packed brown sugar, and ¼ cup of melted unsalted butter. Stir until the mixture is well combined and evenly moist.
- Press the Crust into the Pan: Pour the crumb mixture into the prepared pan. Use your fingers to spread it evenly across the bottom. Then, use the bottom of a measuring cup or glass to press the crumbs down firmly, creating a compact and even layer.
- Pre-Bake the Crust: Place the pan in the preheated oven and bake for 10 minutes. Pre-baking ensures the crust is firm and provides a solid base for the cheesecake layer, preventing it from becoming soggy.
Making the Cheesecake Layer
- Beat the Cream Cheese: While the crust is baking, start preparing the cheesecake batter. In a large mixing bowl, beat 16 oz of room temperature cream cheese using a mixer on high speed for 1 minute, or until it’s smooth and creamy.
- Add the Sugar: Gradually add ½ cup of white granulated sugar to the cream cheese. Beat on high speed for another minute until the mixture is fluffy and fully combined. Make sure to scrape down the sides of the bowl to incorporate all the ingredients evenly.
- Incorporate the Creams and Vanilla: Add ¼ cup of sour cream, ⅛ cup of heavy cream, and 1 teaspoon of pure vanilla extract to the mixture. Beat on medium speed for 1-2 minutes until the batter is smooth and silky. Scrape the bowl again to ensure a consistent texture.
- Add the Eggs: Finally, add 2 large eggs, one at a time, mixing on low speed just until combined after each addition. Avoid overmixing, as this can incorporate too much air into the batter, leading to cracks in the cheesecake. Scrape the bowl between adding each egg to ensure the batter is well mixed.
- Final Check: Before pouring the batter over the crust, ensure the mixture is smooth and lump-free. A well-mixed batter will create a creamy and dense cheesecake layer without any imperfections.
Creating the Chocolate Chip Cookie Dough
- Sift the Dry Ingredients: In a medium bowl, sift together ¾ cup of all-purpose flour and ¼ teaspoon of salt. Set this aside, as you’ll mix it into the wet ingredients later.
- Cream the Butter and Sugars: In a separate large mixing bowl, beat ⅓ cup of room temperature unsalted butter with ⅛ cup of white granulated sugar and ⅓ cup of packed brown sugar. Use a mixer on high speed for about 2 minutes, until the mixture is light, fluffy, and well combined.
- Add the Vanilla and Egg: Mix in 1 teaspoon of pure vanilla extract and 1 large egg, continuing to beat until everything is thoroughly combined. Scrape down the sides of the bowl to ensure an even consistency.
- Incorporate the Dry Ingredients: Slowly add the sifted flour and salt mixture to the wet ingredients, mixing on low speed until just combined. Avoid overmixing, as this can make the dough tough.
- Add the Chocolate Chips: Fold in ¾ cup of semi-sweet chocolate chips, mixing just until they’re evenly distributed throughout the dough.
- Variation Suggestions: For a twist, you can add chopped nuts like walnuts or pecans to the cookie dough or substitute the semi-sweet chocolate chips with dark or milk chocolate, depending on your preference.
Assembling the Bars
- Layer the Cheesecake Batter: Once the graham cracker crust has finished pre-baking and cooled slightly, pour the prepared cheesecake batter over the crust. Use a spatula to spread it evenly across the pan, ensuring the entire crust is covered.
- Add the Cookie Dough: Take small amounts of the prepared chocolate chip cookie dough and flatten each piece into a disc shape using your hands. Gently place these discs on top of the cheesecake layer, covering as much of the surface as possible. It’s fine if some spots of the cheesecake batter are visible; this adds to the marbled appearance of the final bars.
- Evenly Distribute the Dough: As you place the cookie dough discs, try to distribute them evenly across the entire surface to ensure each bite has a good balance of cheesecake and cookie dough. If you have any remaining dough, fill in any gaps or add a few smaller pieces on top.
- Visual Cues for Readiness: Before baking, check that the cookie dough is evenly spread and that the layers are level. The bars are ready to bake when the dough covers most of the cheesecake layer but allows some of the creamy filling to peek through.
- Final Assembly Tip: Ensure that the layers are smooth and evenly spread to prevent uneven baking. A uniform layer of cookie dough will bake evenly, providing a consistent texture and flavor throughout the bars.
Baking and Cooling
- Bake the Bars: Place the assembled bars in your preheated 325°F (163°C) oven. Bake for 50-60 minutes, or until the cookie dough layer is golden brown and the edges of the bars are set. The center should still have a slight jiggle when you gently shake the pan; this indicates the cheesecake is baked but still creamy.
- Check for Doneness: Visual cues are key in determining when the bars are done. Look for golden brown edges on the cookie dough, and a slightly puffed and set appearance. The center should not appear wet, but it should not be fully firm either, as it will continue to set as it cools.
- Cool the Bars: Once baked, remove the pan from the oven and let the bars cool completely at room temperature. This step is crucial as it allows the cheesecake layer to set properly without cracking. Cooling too quickly, such as in the fridge immediately, can cause cracks and condensation.
- Refrigerate for Final Setting: After cooling at room temperature, cover the pan with plastic wrap and place it in the refrigerator for at least 6 hours or preferably overnight. This extended chilling time helps the flavors meld together and ensures that the cheesecake layer firms up completely, making it easier to cut cleanly into bars.
Serving and Storing
- Cutting the Bars: Once fully chilled, use the parchment paper overhang to lift the bars out of the pan and place them on a cutting board. Use a sharp knife to cut them into squares or rectangles, wiping the knife clean between cuts to ensure neat edges.
- Serving Suggestions: Serve the bars chilled or at room temperature. For an extra indulgent touch, drizzle them with chocolate or caramel sauce, or top with a dollop of whipped cream. These bars pair perfectly with a cup of coffee or a glass of cold milk.
- Storing the Bars: Store any leftover bars in an airtight container in the refrigerator. They will stay fresh for up to 5 days. For longer storage, you can freeze the bars for up to 2 months; just wrap them individually in plastic wrap and place them in a freezer-safe bag. Thaw in the refrigerator before serving.
Expert Tips for Success
Common Mistakes to Avoid:
- Overmixing the Cheesecake Batter: Mixing the cheesecake batter too much can incorporate excess air, leading to cracks as it bakes. Mix just until smooth and combined.
- Underbaking the Crust: Make sure to pre-bake the graham cracker crust for the full 10 minutes. This helps it set and prevents it from becoming soggy when the cheesecake layer is added.
Troubleshooting Common Issues:
- Cracks in the Cheesecake: If your cheesecake develops cracks, it may be due to overbaking or rapid cooling. To prevent this, avoid overmixing the batter and let the bars cool slowly at room temperature before refrigerating.
- Soggy Crust: If your crust turns out soggy, it could be because the crumbs were not compacted enough or the crust wasn’t pre-baked long enough. Press the crumbs firmly into the pan and ensure they’re baked until firm.
Enhancements and Flavor Ideas:
- Caramel Layer: Add a layer of caramel sauce between the cheesecake and cookie dough layers for an extra decadent treat.
- Flavored Extracts: Experiment with different extracts like almond or coconut to add a unique twist to the cheesecake or cookie dough.
FAQs
Can I make these bars ahead of time? Yes, Cookie Dough Cheesecake Bars can be made ahead of time. In fact, they taste even better the next day after the flavors have melded together. Simply store them in the refrigerator, covered, until ready to serve.
How can I make these cheesecake bars gluten-free? To make these bars gluten-free, use gluten-free graham crackers for the crust and substitute the all-purpose flour in the cookie dough with a gluten-free flour blend. Ensure all other ingredients, like chocolate chips, are also gluten-free.
What can I use instead of graham crackers for the crust? If you don’t have graham crackers, you can use digestive biscuits, crushed cookies (like Oreos), or even a mixture of nuts and oats for the crust.
How do I know if my cheesecake is fully baked? The cheesecake is fully baked when the edges are set and the center still has a slight jiggle when the pan is gently shaken. It will continue to set as it cools.
Can I freeze these bars? If so, how should I do it? Yes, you can freeze these bars. Wrap individual bars in plastic wrap, then place them in a freezer-safe container or bag. They can be frozen for up to 2 months. Thaw in the refrigerator before serving.
Conclusion
Cookie Dough Cheesecake Bars offer the perfect combination of creamy cheesecake and rich chocolate chip cookie dough, layered on a crunchy graham cracker crust. This dessert is a true crowd-pleaser, balancing smooth, tangy cheesecake with the comforting sweetness of cookie dough in every bite.
Whether you’re making them for a special occasion or just treating yourself, these bars are sure to impress. With the right techniques and ingredients, you can create a dessert that looks and tastes like it came from a bakery. Plus, the recipe is versatile, allowing for gluten-free or dairy-free adjustments, as well as creative flavor enhancements like caramel or nut additions.
I encourage you to try making these Cookie Dough Cheesecake Bars and share them with friends and family. And if you’re looking for more dessert inspiration, don’t hesitate to explore other cheesecake and bar recipes for more delightful treats.
Print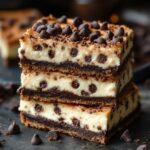
Cookie Dough Cheesecake Bars
Description
These Cookie Dough Cheesecake Bars combine two beloved desserts—cheesecake and chocolate chip cookies—into one irresistible treat. With a crunchy graham cracker crust, a creamy cheesecake layer, and a rich chocolate chip cookie dough topping, these bars are perfect for any occasion. They are simple to make but look and taste like they came from a high-end bakery.
Ingredients
Graham Cracker Crust:
- 1 ¼ cup Graham cracker crumbs (about 1 full packet of graham crackers)
- ⅛ cup Packed brown sugar (light or dark)
- ¼ cup Unsalted butter, melted
Cheesecake Filling:
- 16 oz Cream cheese, room temperature
- ½ cup White granulated sugar
- ¼ cup Sour cream, room temperature
- ⅛ cup Heavy cream, room temperature
- 1 teaspoon Pure vanilla extract
- 2 Large eggs, room temperature
Chocolate Chip Cookie Dough:
- ⅓ cup Unsalted butter, room temperature
- ⅛ cup White granulated sugar
- ⅓ cup Packed brown sugar (light or dark)
- 1 teaspoon Pure vanilla extract
- 1 Large egg, room temperature
- ¾ cup All-purpose flour
- ¼ teaspoon Salt
- ¾ cup Semi-sweet chocolate chips
Instructions
1. Preparing the Graham Cracker Crust
- Preheat the Oven: Preheat your oven to 325°F (163°C).
- Prepare the Pan: Spray a 9×9-inch baking pan with non-stick spray. Line the bottom and two sides with parchment paper, leaving an overhang on the sides for easy removal. Spray the parchment paper lightly with baking spray.
- Crush the Graham Crackers: Use a food processor to crush the graham crackers into fine crumbs.
- Mix the Crust Ingredients: In a bowl, combine the graham cracker crumbs, brown sugar, and melted butter. Stir until the mixture resembles wet sand.
- Press the Crust into the Pan: Pour the crumb mixture into the prepared pan. Use your fingers and the bottom of a measuring cup to press the crumbs firmly into an even layer.
- Pre-Bake the Crust: Bake for 10 minutes. Let it cool while preparing the cheesecake layer.
Note: Pre-baking the crust helps it set, ensuring a firm base that won’t become soggy once the cheesecake layer is added.
2. Making the Cheesecake Layer
- Beat the Cream Cheese: In a large bowl, beat the room temperature cream cheese on high speed for 1 minute until smooth.
- Add the Sugar: Gradually add the sugar and beat for another minute until fluffy. Scrape down the sides of the bowl to ensure even mixing.
- Incorporate the Creams and Vanilla: Add the sour cream, heavy cream, and vanilla extract. Beat on medium speed until the mixture is smooth and lump-free. Scrape the bowl as needed.
- Add the Eggs: Add the eggs one at a time, mixing on low speed until just combined after each addition. Avoid overmixing to prevent cracks during baking.
- Final Check: Ensure the batter is smooth and free of lumps before pouring it over the cooled graham cracker crust.
Note: Scraping the bowl between steps ensures that all ingredients are fully incorporated, preventing any lumps or uneven textures in the final cheesecake.
3. Creating the Chocolate Chip Cookie Dough
- Sift the Dry Ingredients: In a bowl, sift together the flour and salt.
- Cream the Butter and Sugars: In a separate bowl, beat the butter, white sugar, and brown sugar together on high speed for 2 minutes until light and fluffy.
- Add the Vanilla and Egg: Mix in the vanilla extract and egg until well combined. Scrape down the sides of the bowl.
- Incorporate the Dry Ingredients: Slowly add the flour mixture to the wet ingredients, mixing on low speed until just combined.
- Add the Chocolate Chips: Fold in the chocolate chips until evenly distributed throughout the dough.
Note: For variations, consider adding nuts like chopped walnuts or substituting the chocolate chips with dark or white chocolate for a different flavor profile.
4. Assembling the Bars
- Layer the Cheesecake Batter: Pour the prepared cheesecake batter over the cooled graham cracker crust. Spread it evenly with a spatula.
- Add the Cookie Dough: Flatten small amounts of cookie dough into discs and place them on top of the cheesecake layer, covering most of the surface.
- Evenly Distribute the Dough: Spread the dough evenly across the entire surface, leaving some cheesecake visible for a marbled effect.
- Final Check: Ensure the layers are even before baking.
Note: A well-distributed cookie dough layer ensures that each bar has a balanced amount of cheesecake and cookie dough in every bite.
5. Baking and Cooling
- Bake the Bars: Bake in the preheated oven for 50-60 minutes, or until the edges are set and the center has a slight jiggle.
- Check for Doneness: Look for golden brown edges and a center that is slightly set but still jiggles when gently shaken.
- Cool the Bars: Remove from the oven and cool completely at room temperature.
- Refrigerate for Final Setting: Once cooled, cover the pan and refrigerate for at least 6 hours or overnight.
Note: Allowing the bars to cool slowly and refrigerating them ensures the cheesecake layer sets properly and the bars are easy to cut.
6. Serving and Storing
- Cutting the Bars: Use the parchment paper to lift the bars out of the pan. Cut into squares with a sharp knife, wiping the blade between cuts for clean edges.
- Serving Suggestions: Serve the bars as is, or drizzle with chocolate or caramel sauce. Pair with coffee or a glass of milk for the perfect treat.
- Storing the Bars: Store in an airtight container in the refrigerator for up to 5 days. For longer storage, freeze the bars individually wrapped in plastic.
Notes
- Pre-baking the crust helps it set, ensuring a firm base that won’t become soggy once the cheesecake layer is added.
- Scraping the bowl between steps ensures that all ingredients are fully incorporated, preventing any lumps or uneven textures in the final cheesecake.
- For variations, consider adding nuts like chopped walnuts or substituting the chocolate chips with dark or white chocolate for a different flavor profile.
- A well-distributed cookie dough layer ensures that each bar has a balanced amount of cheesecake and cookie dough in every bite.
- Allowing the bars to cool slowly and refrigerating them ensures the cheesecake layer sets properly and the bars are easy to cut.
- Freezing the bars makes them a great option for make-ahead desserts. Thaw in the fridge before serving for the best texture.
- For best results, ensure that all ingredients are at room temperature before starting. This will help achieve a smooth cheesecake batter and well-blended cookie dough.


