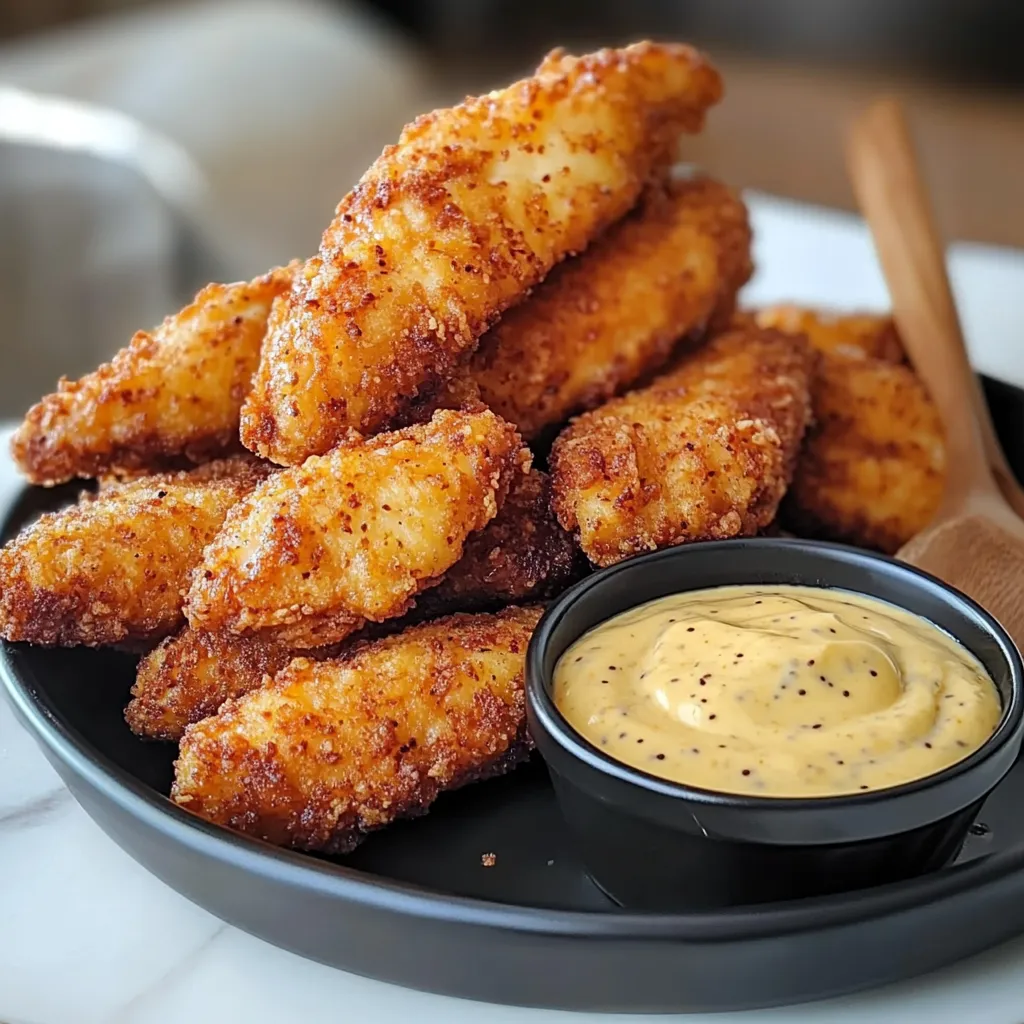
There’s something undeniably satisfying about biting into a perfectly crispy chicken tender. That golden, crunchy coating, the juicy, flavorful chicken inside, and the irresistible honey mustard dip—it’s the kind of meal that makes you feel like a kid again. Whether you’re making these for a weeknight dinner, a fun appetizer, or even a game-day snack, they’ll disappear fast.
The secret to these crispy chicken tenders? A few simple techniques that make all the difference. First, marinating the chicken in buttermilk helps keep it tender and juicy. Then, a three-step breading process ensures that extra-crispy texture. Finally, frying them to a perfect golden brown locks in all that crunch. And when you dip them in a homemade honey mustard sauce? It’s pure perfection.
Let’s dive into how to make these crispy, flavorful chicken tenders from scratch!
MARINATING THE CHICKEN FOR EXTRA FLAVOR
Before we even think about frying, we need to start with a key step: marinating the chicken. This not only enhances the flavor but also keeps the tenders juicy and tender.
Ingredients for the Chicken Tenders:
- 1 pound chicken tenders
- 1/2 cup buttermilk
- 1 teaspoon salt
- 1 teaspoon black pepper
- 1 teaspoon garlic powder
- 1 teaspoon paprika
- 1/2 teaspoon onion powder
- 1/2 teaspoon cayenne pepper (optional)
Step 1: Prepare the Marinade
In a large bowl, whisk together the buttermilk, salt, black pepper, garlic powder, paprika, onion powder, and cayenne pepper. This blend of seasonings gives the chicken a rich, savory flavor with just a hint of spice.

Step 2: Marinate the Chicken
Add the chicken tenders to the bowl and ensure they are fully coated in the buttermilk mixture. Cover and refrigerate for at least 30 minutes. If you have more time, letting them marinate for an hour will make them even more flavorful and tender.
While the chicken is marinating, it’s the perfect time to set up your breading station.

SETTING UP THE BREADING STATION
The key to getting that irresistibly crispy coating is a three-step breading process. This helps the breading stick to the chicken and creates that perfect crunch.
Ingredients for Breading:
- 1 cup all-purpose flour
- 2 eggs, beaten
- 1 cup panko breadcrumbs
Step 3: Prepare the Breading Bowls
Grab three shallow bowls:
- Fill the first bowl with flour.
- In the second bowl, beat the eggs.
- Fill the third bowl with panko breadcrumbs.
Each of these layers plays a role in making the tenders extra crispy. The flour helps the egg stick, the egg binds everything together, and the panko breadcrumbs add that signature crunch.

COATING AND FRYING THE CHICKEN TENDERS
Now that the chicken has marinated and the breading station is set up, it’s time to get these tenders coated and fried to crispy perfection. This is where the magic happens. The key to achieving that irresistible crunch is following the right breading technique and frying at the perfect temperature.
Let’s dive into the step-by-step process for coating and frying the chicken tenders!
BREADING THE CHICKEN FOR MAXIMUM CRUNCH
A well-breaded chicken tender is what gives it that classic crispy texture. To ensure a perfectly crunchy bite, follow this simple three-step coating process.
Step 4: Coat the Chicken in Flour
Take a marinated chicken tender and let any excess buttermilk drip off. Dredge it in the flour, making sure it’s fully coated. This helps create a dry surface for the egg to cling to.

Step 5: Dip into the Egg Mixture
Next, dip the floured chicken tender into the beaten eggs, ensuring it’s completely covered. The egg acts as the “glue” that helps the final layer of breadcrumbs stick.

Step 6: Press into Panko Breadcrumbs
Finally, coat the chicken tender in the panko breadcrumbs, pressing gently to make sure the crumbs adhere well. This step is crucial for getting that extra crispy, golden-brown exterior.
Repeat these steps with each chicken tender, placing them on a plate or baking sheet while you finish the rest.
FRYING THE CHICKEN TO GOLDEN PERFECTION
Now that the tenders are fully coated, it’s time to fry them. Frying at the right temperature ensures they cook evenly, with a crispy crust and juicy interior.
Step 7: Heat the Oil
Pour about an inch of vegetable oil into a large skillet and heat it over medium heat. To check if the oil is ready, drop in a small piece of breadcrumb—if it sizzles and turns golden brown, the oil is at the perfect temperature (about 350°F).

Step 8: Fry the Chicken in Batches
Carefully place a few tenders into the hot oil, being careful not to overcrowd the pan. Fry for about 3 to 4 minutes per side, or until they’re golden brown and crispy.
Step 9: Drain and Rest
Once the tenders are cooked, transfer them to a paper towel-lined plate to absorb any excess oil. This keeps them crisp while preventing greasiness.
Now that the chicken tenders are hot and crispy, it’s time to make the perfect dipping sauce to go with them!
MAKING THE HONEY MUSTARD DIP
A good dipping sauce takes these tenders to the next level. This homemade honey mustard dip is creamy, tangy, and slightly sweet—perfect for balancing out the crunch.
Ingredients for the Honey Mustard Dip:
- 1/2 cup mayonnaise
- 2 tablespoons Dijon mustard
- 2 tablespoons honey
- 1 teaspoon lemon juice
Step 10: Mix the Sauce
In a small bowl, whisk together the mayonnaise, Dijon mustard, honey, and lemon juice until smooth and well combined. That’s it! In just a few seconds, you have a delicious, creamy sauce ready for dipping.

FAQ SECTION: COMMON QUESTIONS ABOUT CRISPY CHICKEN TENDERS
Making crispy chicken tenders at home is easier than you think, but you might still have some questions. Below, we’ve answered some of the most common ones to help you achieve the best results every time.
HOW DO I MAKE SURE THE BREADING STAYS ON THE CHICKEN?
The key to keeping the breading intact is following the three-step coating process: flour, egg, and panko breadcrumbs. Make sure to press the breadcrumbs onto the chicken to help them stick. Also, letting the breaded chicken rest for a few minutes before frying can help set the coating.
CAN I BAKE THESE INSTEAD OF FRYING?
Yes! To bake them, preheat your oven to 400°F, place the breaded tenders on a wire rack set over a baking sheet, and spray them lightly with cooking oil. Bake for 20-25 minutes, flipping halfway through, until golden brown and crispy.
CAN I MAKE THESE IN AN AIR FRYER?
Absolutely! Preheat your air fryer to 375°F, lightly spray the tenders with oil, and cook for about 10-12 minutes, flipping halfway through. This method gives you a crispy coating without needing as much oil as frying.
HOW DO I STORE LEFTOVER CHICKEN TENDERS?
Store leftover chicken tenders in an airtight container in the refrigerator for up to 3 days. Make sure they are completely cooled before storing to prevent them from getting soggy.
WHAT’S THE BEST WAY TO REHEAT THEM SO THEY STAY CRISPY?
The best way to reheat chicken tenders while keeping them crispy is to bake them in a 375°F oven for about 10 minutes or air-fry them for 5-6 minutes. Avoid microwaving, as it can make the breading soggy.
CAN I MAKE THE HONEY MUSTARD DIP AHEAD OF TIME?
Yes! The honey mustard dip can be made up to a week in advance and stored in the refrigerator in an airtight container. Just give it a quick stir before serving.
CONCLUSION: ENJOY YOUR CRISPY CHICKEN TENDERS!
Now that you have all the tips and tricks for making the best crispy chicken tenders, it’s time to dig in! Whether you’re serving these as a family meal, an appetizer for a party, or a fun snack, they’re sure to be a hit. The crunchy coating, the juicy chicken inside, and the sweet and tangy honey mustard dip make for an unbeatable combination.
If you try this recipe, let us know how it turned out! Feel free to experiment with different seasonings or dipping sauces and share your favorite variations.
Print
Crispy Chicken Tenders with Honey Mustard Dip – The Ultimate Crunchy Snack
- Total Time: 30 min
Description
Golden, extra-crisp chicken tenders are seasoned and coated in a panko-and-spice crust, then fried or baked until irresistibly crunchy. Paired with a tangy-sweet honey mustard dip, they’re perfect for snacking, lunchboxes, or game-day feasting.
Ingredients
For the Chicken Tenders
-
1½ lbs (680 g) chicken tenders or thinly sliced chicken breasts
-
Salt & freshly ground black pepper
-
1 tsp garlic powder
-
1 tsp onion powder
-
½ tsp smoked paprika (optional)
-
2 large eggs
-
2 Tbsp milk
-
1 cup (120 g) all-purpose flour
-
1½ cups (150 g) panko breadcrumbs
-
¼ cup grated Parmesan cheese (optional, for extra flavor)
-
Vegetable oil (for shallow‐frying) or cooking spray (for oven/air fryer)
For the Honey Mustard Dip
-
⅓ cup mayonnaise
-
3 Tbsp Dijon mustard
-
3 Tbsp honey
-
1 tsp lemon juice
-
Pinch of cayenne or a dash of hot sauce (optional)
Instructions
1️⃣ Season & set up dredging stations:
Pat chicken tenders dry and season evenly with salt, pepper, garlic powder, onion powder, and smoked paprika.
• In one shallow bowl, whisk eggs with milk.
• In a second bowl, combine flour and a pinch of salt.
• In a third bowl, mix panko and Parmesan.
2️⃣ Coat the tenders:
Working one at a time, dredge each tender in flour (shake off excess), dip into the egg mixture, then press firmly into the panko mixture to coat completely. Place on a wire rack.
3️⃣ Cook the tenders:
Shallow-fry: Pour oil to a ¼″ depth in a large skillet over medium-high heat. When shimmering, add tenders in a single layer (do not overcrowd). Fry 3–4 minutes per side until deep golden and cooked through. Drain on paper towels.
Oven-bake: Preheat oven to 425 °F (220 °C). Arrange tenders on a parchment-lined sheet, spray tops lightly with cooking spray, and bake 15–18 minutes, flipping halfway, until crisp.
Air-fryer: Preheat to 400 °F (200 °C). Arrange in a single layer, spray lightly with oil, and air-fry 10–12 minutes, flipping once.
4️⃣ Make the honey mustard dip:
While the tenders cook, whisk together mayonnaise, Dijon mustard, honey, lemon juice, and cayenne (if using) in a small bowl. Adjust sweetness or tang by adding more honey or mustard to taste.
5️⃣ Serve:
Transfer tenders to a platter with the dip in a ramekin. Garnish with chopped parsley if desired and serve immediately.
Notes
-
Servings: 4 (about 4–5 tenders each)
-
Make-Ahead: Dredge tenders through the panko stage, cover, and refrigerate up to 2 hours; cook just before serving.
-
Spice Variation: Add ½ tsp cayenne to the panko for a kick, or swap smoked paprika for chili powder.
-
Gluten-Free: Use GF flour and GF panko.
-
Storage: Store cooked tenders and dip separately in the fridge up to 2 days; reheat tenders in a 375 °F oven until warm and crisp.
- Prep Time: 15 min
- Cook Time: 15 min


