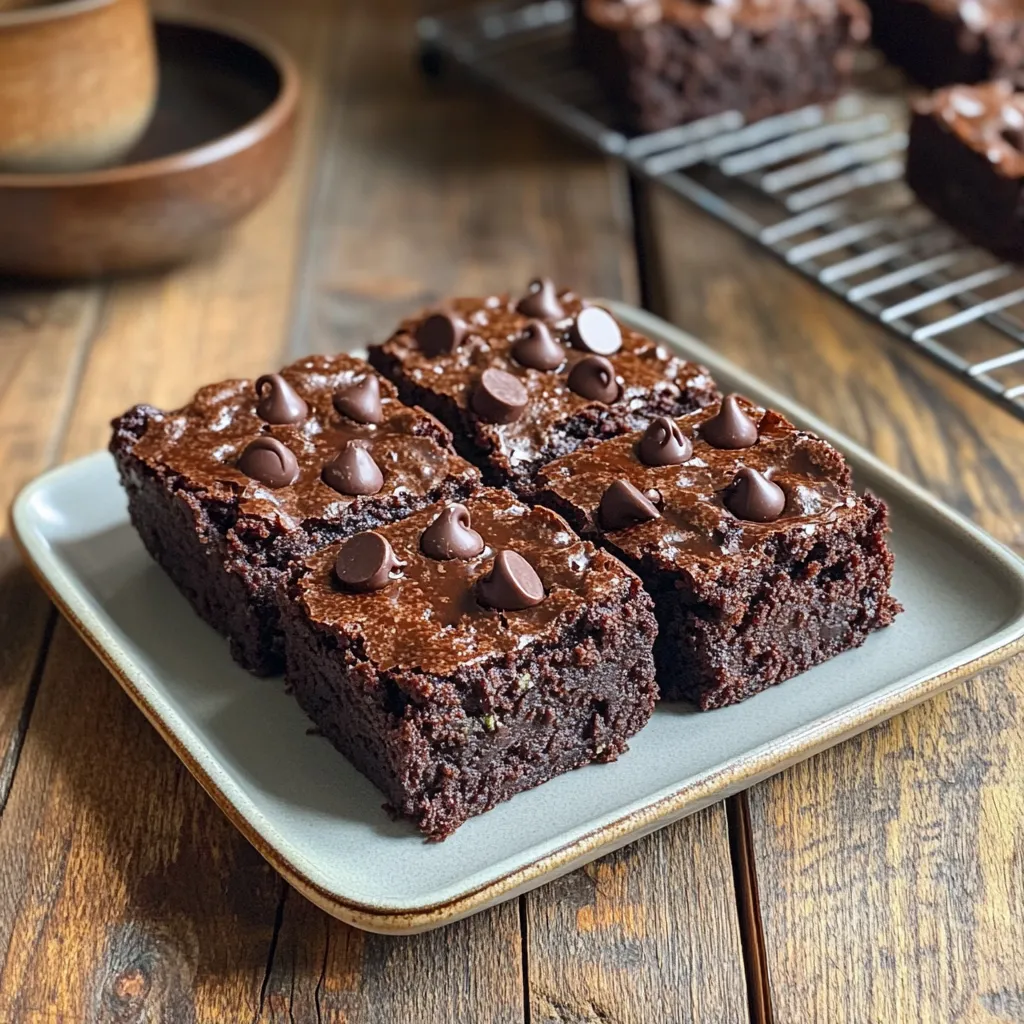
Brownies are a universal comfort food, but when you can sneak in a serving of vegetables without sacrificing a fudgy bite, you’ve hit dessert gold. These Decadent Chocolate Zucchini Brownies marry rich cocoa and mini chocolate chips with finely shredded zucchini for extra moisture, keeping each square perfectly tender. I first developed this recipe when I wanted to offer my kids a “healthier” treat—one that still satisfied their chocolate cravings but incorporated a dash of green. They had no idea there was veggie hidden in their brownie; all they noticed was how irresistibly gooey they were.
What makes these brownies special is the balance of ingredients and technique. The dry mix lays the foundation with unsweetened cocoa and just enough leavening for structure. Whisking the sugars with eggs until pale traps air, lending lift without making them cakey. A modest amount of neutral oil keeps the crumb soft, while vanilla adds depth. Folding in the dry mix gently prevents gluten development, ensuring a fudgy texture. Finally, shredded zucchini and mini chips bring moisture and bursts of chocolate, respectively.
Whether you’re baking for family, friends, or a potluck, this one-bowl recipe comes together in under 10 minutes of hands-on time. Below, you’ll find the ingredient list and first five steps—preparing your pan, blending dry and wet mixes, and uniting them into a smooth batter that’s ready for zucchini, chips, and the oven.
Ingredients
For the Dry Mix
- 1 cup (125 g) all-purpose flour
- ½ cup (50 g) unsweetened cocoa powder
- 1 tsp baking powder
- ½ tsp baking soda
- ¼ tsp salt
For the Wet Mix
- ½ cup (100 g) granulated sugar
- ½ cup (110 g) packed light brown sugar
- 2 large eggs
- ⅓ cup (80 ml) neutral oil (vegetable or canola)
- 2 tsp vanilla extract
Add-Ins
- 1 cup (100 g) finely shredded zucchini, patted dry
- ½ cup (90 g) mini chocolate chips (plus extra for topping)
STEPS
- Preheat & Prep
Preheat your oven to 350 °F (175 °C). Line an 8″×8″ (20×20 cm) baking pan with parchment paper or lightly grease it to ensure easy removal of fudgy, intact brownies. - Mix Dry Ingredients
In a medium bowl, whisk together 1 cup flour, ½ cup cocoa powder, 1 tsp baking powder, ½ tsp baking soda, and ¼ tsp salt until fully combined. This aerates the mixture and breaks up any lumps for a smooth batter.

- Beat Sugars & Eggs
In a large bowl, whisk the ½ cup granulated sugar and ½ cup brown sugar together with the 2 eggs until the mixture turns pale and slightly fluffy—about 1–2 minutes. This step dissolves the sugars and incorporates air for tenderness.

- Stir in Oil & Vanilla
Add the ⅓ cup neutral oil and 2 tsp vanilla extract to the sugar-egg mixture. Stir gently until just combined; avoid overmixing to keep the brownies dense and fudgy.

- Combine Wet & Dry
Fold the dry ingredients into the wet mixture in two additions, mixing gently until no streaks of flour remain. Use a light hand to maintain air pockets and prevent a cakey texture.

Adding Veggies, Baking, and Serving
Now that your batter is smooth and chocolatey, it’s time to bring in the zucchini for moisture and the mini chips for those melty chocolate pockets. From there, it’s a quick bake and cool before you’re diving into squares of decadent, vegetable-enhanced goodness.
STEPS
- Add Zucchini & Chocolate Chips
Gently fold in 1 cup of finely shredded zucchini, making sure it’s well patted dry to avoid thinning the batter. Then fold in ½ cup of mini chocolate chips, reserving a small handful to sprinkle on top. The zucchini keeps the brownies extra moist without imparting any “green” flavor, while the chips create delightful bursts of chocolate. - Transfer to Pan & Top
Scrape the batter into your prepared 8″×8″ pan. Use a spatula to smooth the surface into an even layer. If you set aside some mini chips, scatter them across the top now—this gives the finished brownies a professional, rippled appearance and an extra melty finish. - Bake
Place the pan in the center of your preheated 350 °F (175 °C) oven. Bake for 25–30 minutes, or until the edges look set and a toothpick inserted into the center comes out with just a few moist crumbs. Be careful not to overbake: you want fudgy centers, not dry cake. - Cool & Slice
Remove the pan and set it on a wire rack. Let the brownies cool completely—about 1 hour—so they firm up and slice cleanly. Once cool, lift the parchment out of the pan, set on a cutting board, and slice into 9 large or 12 smaller squares. - Serve & Enjoy
Arrange your brownies on a platter or individual plates. They’re delicious on their own, but you can elevate them by serving warm with a scoop of vanilla ice cream or a dollop of whipped cream. Store any leftovers in an airtight container at room temperature for up to three days.
Helpful Variations and Tips
- Extra Fudgy: For an even richer brownie, stir in an additional 2 tablespoons of melted butter after mixing in the zucchini.
- Nutty Crunch: Fold in ½ cup chopped walnuts or pecans along with the chips for texture and flavor contrast.
- Spice It Up: Add a pinch of ground cinnamon or ¼ teaspoon instant espresso powder to the dry mix to deepen the chocolate notes.
- Gluten-Free Option: Substitute a 1:1 gluten-free flour blend and verify your baking powder is gluten-free. Baking times remain the same.
- Zucchini Prep: If your zucchini is particularly watery, squeeze it in a clean dish towel before adding to the batter to prevent a soggy texture.
- Make-Ahead Convenience: Bake and cool the brownies, then wrap them tightly and store at room temperature for up to two days. For a quick warm-and-serve, microwave individual squares for 10–15 seconds.

FAQs and Conclusion
Q1: Can I substitute applesauce for oil to reduce fat?
Yes. Replace half or all of the oil with unsweetened applesauce. The brownies will be slightly more cake-like and less fudgy, but still moist.
Q2: My zucchini gave off too much water—how can I prevent a soggy batter?
After shredding, wrap the zucchini in a clean kitchen towel or paper towels and squeeze firmly to remove excess moisture. This keeps the batter at the correct consistency.
Q3: How do I store and freeze these brownies?
Store cooled brownies in an airtight container at room temperature for up to three days. For longer storage, wrap individual squares tightly in plastic and freeze for up to two months; thaw at room temperature before serving.
Q4: Can I use dark or Dutch-processed cocoa?
Yes, but you may need to adjust the leavening slightly. Dark or Dutch-processed cocoa is less acidic—add a pinch more baking powder or replace half the baking soda with baking powder to ensure proper rise.
Q5: What other mix-ins work well?
Chopped nuts (walnuts or pecans), shredded coconut, or dried fruit (cherries or cranberries) add texture and flavor. Fold in up to ¾ cup total before baking.
Conclusion
These Decadent Chocolate Zucchini Brownies offer the best of both worlds: the rich, fudgy texture you expect from a classic brownie and the added moisture—and nutrition—of shredded zucchini. With simple pantry staples and just one bowl, you’ll have a batch of crowd-pleasing, vegetable-enhanced treats in under an hour. Experiment with mix-ins, serve them warm with ice cream, or pack them in lunchboxes—they’re guaranteed to disappear fast. Enjoy every indulgent, slightly sneaky bite!
Print
Decadent Chocolate Zucchini Brownies Recipe
- Total Time: 40 min
Description
This one-dish bake layers smoky sausage, tender beans, and a rich tomato-herb sauce, all topped with melted cheese and crispy breadcrumbs. It’s an easy, comforting meal that’s perfect for cold nights, potlucks, or anytime you want a stick-to-your-ribs casserole.
Ingredients
For the Bean & Sausage Base
-
1 lb (450 g) smoked sausage or kielbasa, sliced into ¼″ rounds
-
1 Tbsp olive oil
-
1 medium yellow onion, diced
-
2 garlic cloves, minced
-
1 red bell pepper, diced
-
2 (15 oz) cans beans (such as cannellini, great Northern, or pinto), drained and rinsed
-
1 (14–15 oz) can diced tomatoes
-
1 Tbsp tomato paste
-
1 tsp dried oregano
-
1 tsp smoked paprika
-
½ tsp dried thyme
-
¼ tsp crushed red-pepper flakes (optional, for heat)
-
Salt & freshly ground black pepper, to taste
For the Topping
-
1 cup shredded sharp cheddar or mozzarella
-
¼ cup panko breadcrumbs
-
1 Tbsp melted butter
-
1 Tbsp chopped fresh parsley (optional, for garnish)
Instructions
1️⃣ Preheat & prep:
Preheat your oven to 375 °F (190 °C). Lightly grease a 9×9″ or similar baking dish.
2️⃣ Brown the sausage:
In a large skillet over medium heat, add olive oil. Once shimmering, sauté the sliced sausage 3–4 minutes until edges begin to crisp. Transfer to a plate.
3️⃣ Sauté the veggies:
In the same skillet, add onion and bell pepper. Cook 4–5 minutes until softened. Stir in garlic and cook 30 seconds until fragrant.
4️⃣ Build the sauce:
Return the sausage to the pan. Stir in tomato paste, then add diced tomatoes, beans, oregano, smoked paprika, thyme, and red-pepper flakes if using. Season lightly with salt and pepper. Bring to a gentle simmer, stirring occasionally, for 5 minutes to meld flavors.
5️⃣ Transfer & top:
Pour the mixture into the prepared baking dish, spreading evenly. Sprinkle shredded cheese over the top. In a small bowl, toss panko with melted butter, then sprinkle over the cheese layer.
6️⃣ Bake to bubbly:
Bake uncovered for 20–25 minutes, until the cheese is melted, crumbs are golden, and the edges are bubbling.
7️⃣ Garnish & serve:
Let the bake rest 5 minutes out of the oven. Sprinkle with chopped parsley and serve straight from the dish.
Notes
-
Bean Swap: Kidney or black beans work equally well.
-
Heat Level: Increase red-pepper flakes or stir in sliced jalapeños for extra kick.
-
Cheesy Variation: Mix in ½ cup grated Parmesan with the breadcrumbs for more depth.
-
Gluten-Free: Use gluten-free breadcrumbs or omit topping and bake just with cheese.
-
Make-Ahead: Prepare through step 4, cover, and refrigerate up to 24 hours. Bake straight from cold, adding 5 minutes to cook time.
-
Serving Suggestions: Spoon over rice or mashed potatoes, or serve with crusty bread for soaking up the sauce.
- Prep Time: 10 min
- Cook Time: 30 min


