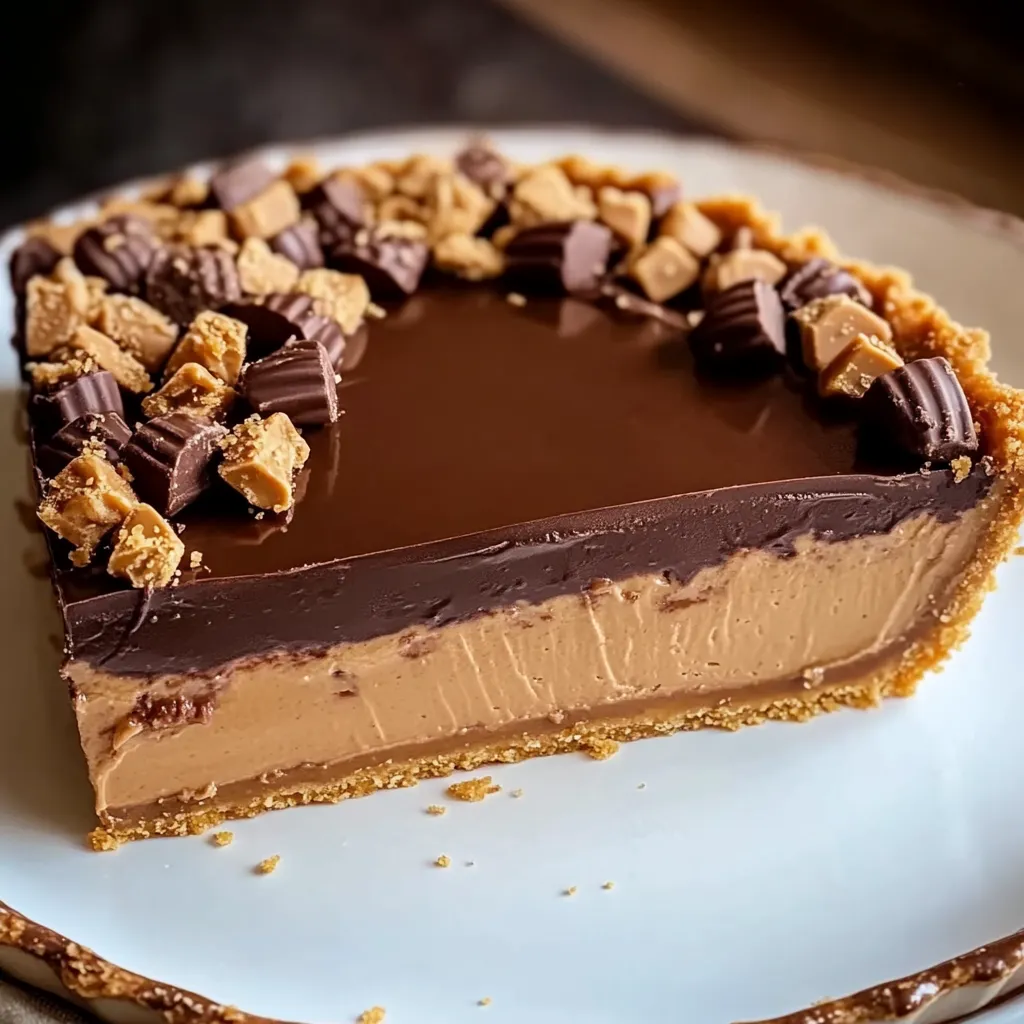
If you’re a peanut butter lover (and who isn’t?), then this Giant Reese’s Peanut Butter Cup Pie is going to be your new favorite dessert. Imagine a creamy peanut butter filling nestled in a buttery graham cracker crust, topped with silky milk chocolate ganache, and finished off with a generous sprinkle of mini Reese’s peanut butter cups. It’s a dessert that brings all the iconic flavors of a Reese’s Peanut Butter Cup into one irresistible pie.
This pie is perfect for every occasion—whether you’re hosting a party, bringing a dish to a family gathering, or just treating yourself (because you definitely deserve it). It’s rich, creamy, and packed with that perfect peanut butter-chocolate combo that’s hard to resist. Plus, it’s no-bake after the crust is done, so it’s pretty simple to put together!
Let’s get started with the first few steps to creating this sweet, peanut buttery masterpiece.
INGREDIENTS FOR THE CRUST:
We’re starting with a classic graham cracker crust. The buttery, slightly sweet base pairs perfectly with the rich peanut butter filling and chocolate topping. Here’s what you’ll need:
-
1 ½ cups graham cracker crumbs – This will be the main base for the crust.
-
¼ cup granulated sugar – Adds a touch of sweetness to the crust.
-
½ cup unsalted butter, melted – Helps bind the crumbs together and gives the crust its buttery richness.
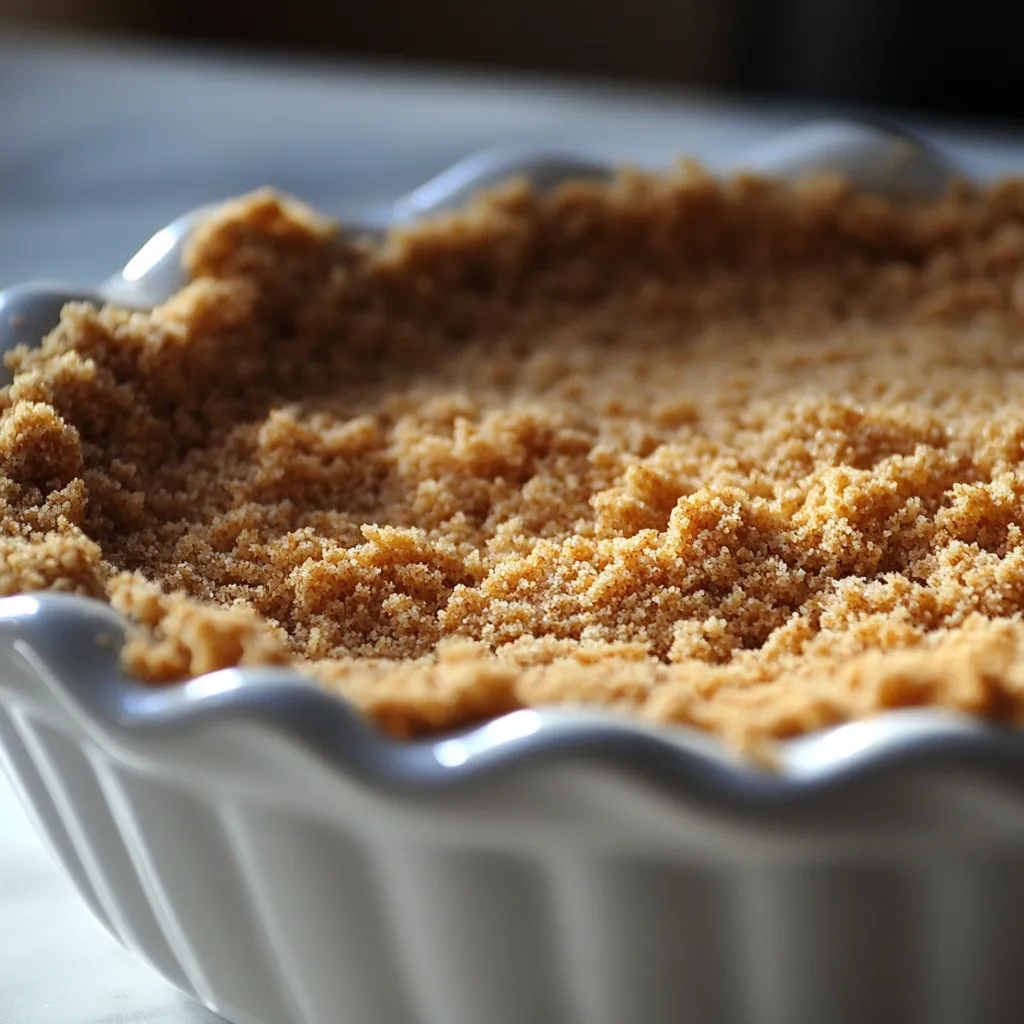
STEP 1: PREHEAT YOUR OVEN AND PREPARE THE CRUST
First, preheat your oven to 350°F (175°C). While the oven heats up, prepare your 9-inch pie dish by setting it aside and making the graham cracker crust.
In a medium bowl, combine the graham cracker crumbs, granulated sugar, and melted butter. Stir until the crumbs are evenly coated with the butter and sugar. The mixture should resemble wet sand, and it will hold together when pressed into the pan.
STEP 2: PRESS THE CRUST INTO THE PIE DISH
Next, press the graham cracker mixture into the bottom and up the sides of the pie dish. You can use the back of a spoon or your fingers to press it down firmly. Make sure it’s evenly spread, so the crust bakes up nice and crisp.
Once the crust is formed, bake it in the preheated oven for 8-10 minutes. You’ll know it’s ready when it turns golden brown and starts to smell buttery and delicious. When done, remove it from the oven and let it cool completely before adding the peanut butter filling. This step is crucial—if you add the filling while the crust is still warm, the filling might melt, so be patient!
STEP 3: PREPARE THE PEANUT BUTTER FILLING
While the crust is cooling, start preparing the filling. This creamy peanut butter layer is the heart of the pie, and it’s what makes this dessert stand out.
In a large bowl, mix together the peanut butter, powdered sugar, and softened cream cheese until the mixture is smooth and creamy. This combination creates a rich, velvety filling that’s not too sweet and not too dense—just the perfect peanut butter flavor.
Make sure your cream cheese is softened before mixing to ensure there are no lumps in the filling. You can use a hand mixer or stand mixer for a smoother result.
CREAMY FILLING, CHOCOLATE TOPPING, AND FINISHING TOUCHES
Now that your crust has cooled and the peanut butter filling is ready, let’s finish assembling this decadent Giant Reese’s Peanut Butter Cup Pie. With a creamy peanut butter layer, a smooth chocolate topping, and a sprinkle of mini Reese’s peanut butter cups, this pie is going to be the showstopper dessert at your next gathering. Let’s move on to the next steps!
STEP 4: WHIP THE CREAM
In a separate bowl, whip the heavy whipping cream and vanilla extract together until stiff peaks form. This process will make the whipped cream light and airy, which is essential for the texture of the filling.
You can use a hand mixer or a stand mixer for this step. Make sure to beat the cream on medium-high speed until you see stiff peaks form. Be careful not to overwhip, or the cream will turn into butter, and we want it to stay light and fluffy.

STEP 5: FOLD THE WHIPPED CREAM INTO THE PEANUT BUTTER MIXTURE
Once your whipped cream is ready, gently fold it into the peanut butter mixture using a spatula. You want to keep the airiness of the whipped cream, so fold it in carefully, mixing until everything is well combined but still light. The whipped cream will give the filling a smooth, creamy, and slightly airy texture that’s a perfect complement to the rich peanut butter base.
STEP 6: STIR IN THE CHOPPED MINI REESE’S PEANUT BUTTER CUPS
Now, it’s time to add in some fun! Stir in 1 ½ cups of chopped mini Reese’s peanut butter cups into the peanut butter filling. These bits of chocolate and peanut butter will melt slightly as the pie chills, creating little pockets of deliciousness throughout the filling. Gently fold the chopped pieces in so they are evenly distributed.

STEP 7: SPREAD THE FILLING INTO THE COOLED CRUST
Now that the filling is ready, spread it evenly over the cooled graham cracker crust. Use a spatula to smooth the surface and ensure the filling reaches all the edges of the crust. Once it’s evenly spread, the pie is nearly complete, but we still have one more crucial step—the chocolate topping!

STEP 8: MAKE THE CHOCOLATE TOPPING
For the topping, you’ll be creating a rich, glossy chocolate layer that will complement the peanut butter filling perfectly. In a small saucepan, heat the milk chocolate chips and ¼ cup heavy whipping cream over low heat, stirring constantly until the chocolate is smooth and fully melted. This creates a silky ganache that will set perfectly on top of the pie.
Make sure to keep the heat low and stir gently to avoid burning the chocolate. Once it’s melted and smooth, remove it from the heat.

STEP 9: POUR AND SPREAD THE CHOCOLATE TOPPING
Pour the melted chocolate mixture evenly over the peanut butter filling. Use a spatula to gently spread it across the surface. You want a smooth, even layer that covers the entire pie, creating a rich, chocolatey topping.
STEP 10: ADD THE FINAL TOUCH – MORE CHOPPED REESE’S PEANUT BUTTER CUPS
To make the pie even more decadent, sprinkle the remaining ½ cup of chopped mini Reese’s peanut butter cups over the chocolate topping. These little pieces of candy will add texture and a burst of peanut butter flavor, making every bite a delight.
STEP 11: CHILL THE PIE
Now, place the pie in the refrigerator for at least 30 minutes to allow the chocolate topping to set. For best results, refrigerate the pie for a few hours or overnight. The longer the pie sits, the better the flavors will meld together. Once it’s chilled and the topping is set, you’re ready to slice and serve!
SERVING SUGGESTIONS AND TIPS:
-
Serving: This pie is best served chilled. Slice it into generous pieces, and if you like, serve it with a dollop of whipped cream or a scoop of vanilla ice cream on the side.
-
Storage: Store leftovers (if any!) in the refrigerator, covered tightly. It will keep for about 4-5 days in the fridge, but the chocolate topping is best enjoyed within the first few days.
-
Customization: You can adjust the topping by adding crushed nuts, a drizzle of caramel sauce, or even a sprinkle of sea salt for a sweet-salty twist.
FREQUENTLY ASKED QUESTIONS & FINAL THOUGHTS ON DELICIOUS GIANT REESE’S PEANUT BUTTER CUP PIE:
By now, your Giant Reese’s Peanut Butter Cup Pie should be chilling in the refrigerator, waiting for its moment to shine. But before you dig in and indulge, let’s go over some common questions and helpful tips to ensure everything turns out just right. This pie is a crowd-pleaser, and with these answers, you’ll be fully prepared to make it a success every time.
1. Can I make this pie ahead of time?
Yes! This pie is perfect for making ahead. In fact, it’s best when refrigerated for a few hours or even overnight, allowing the flavors to meld together and the filling to set perfectly. You can prepare the crust, filling, and topping ahead of time and then store the pie in the refrigerator for up to 3 days before serving.
2. Can I use crunchy peanut butter instead of creamy?
While creamy peanut butter is the ideal choice for a smooth filling, you can definitely substitute crunchy peanut butter if you like a bit of texture in the filling. Keep in mind that it will alter the smooth consistency of the filling slightly, but it will still taste delicious.
3. Can I use a different type of crust?
If you’re not a fan of graham cracker crust, you can easily swap it out. A chocolate cookie crust (like Oreo cookies) or even a store-bought pie crust could work well as an alternative. If you use a chocolate crust, it will enhance the chocolate flavor in the pie, making it even more indulgent.
4. How can I make this pie even more chocolatey?
For an extra dose of chocolate, you can drizzle some melted chocolate ganache over the pie after the Reese’s peanut butter cups have been added. You could also sprinkle some chopped chocolate or mini chocolate chips over the topping before refrigerating. There’s never too much chocolate, right?
5. Can I make this pie without cream cheese?
The cream cheese in this pie adds creaminess and a slight tang that balances the sweetness. If you need to avoid cream cheese, you can substitute it with mascarpone cheese or a cream cheese substitute (like silken tofu or cashew cream). However, be aware that this may change the flavor and texture slightly.
6. Can I freeze this pie?
Yes, you can freeze the pie! After you’ve completed all the steps and the pie is fully chilled and set, cover it tightly with plastic wrap and aluminum foil, and freeze it for up to 2-3 months. When you’re ready to serve it, let it thaw overnight in the refrigerator. You may want to add the topping (mini Reese’s cups) just before serving to keep them fresh.
7. How do I know when the pie is ready to serve?
This pie is best when it’s fully chilled, allowing the filling to set properly and the topping to harden. After refrigerating for at least 3 hours (preferably overnight), it should be firm enough to slice. The chocolate topping will also have set, making the pie easy to serve and eat.
FINAL THOUGHTS: A DECADENT, PEANUT BUTTER LOVERS’ DREAM
There’s no denying that the Giant Reese’s Peanut Butter Cup Pie is a treat for the ages. With its rich peanut butter filling, buttery graham cracker crust, and chocolate topping, this pie is the perfect combination of creamy, crunchy, sweet, and salty. Whether you’re serving it at a special occasion or simply enjoying it after a weeknight dinner, this pie is sure to be a hit every time.
The beauty of this dessert is its versatility. From different crusts to flavor variations, there are plenty of ways to customize it to your liking. And because it’s so easy to make and store, you’ll find yourself coming back to this recipe time and time again.
I hope this recipe becomes a staple in your dessert collection. If you’ve made it or tried any variations, I’d love to hear how it turned out! Leave a comment below and share your experiences or ideas for making it even better.
So, what are you waiting for? It’s time to slice into that decadent, peanut butter-filled goodness and enjoy the rewards of your baking! Happy baking, and may your sweet tooth always be satisfied!
Print
Delicious Giant Reese’s Peanut Butter Cup Pie Recipe
- Total Time: 3 hours 30 minutes to overnight
Description
This indulgent pie is the perfect treat for any peanut butter and chocolate lover. With a graham cracker crust, a creamy peanut butter filling, and a rich chocolate topping, it’s sure to be a crowd-pleaser.
Ingredients
For the crust:
- 1 ½ cups graham cracker crumbs
- ¼ cup granulated sugar
- ½ cup unsalted butter, melted
- For the filling:
- 1 cup creamy peanut butter
- 1 cup powdered sugar
- 8 oz (225g) cream cheese, softened
- 1 cup heavy whipping cream
- 1 tsp vanilla extract
- 1 ½ cups mini Reese’s peanut butter cups, chopped
For the topping:
- 1 cup milk chocolate chips
- ¼ cup heavy whipping cream
- ½ cup mini Reese’s peanut butter cups, chopped
Instructions
1️⃣ Preheat your oven to 350°F (175°C).
2️⃣ Prepare the crust: In a medium bowl, combine the graham cracker crumbs, granulated sugar, and melted butter. Stir until the crumbs are evenly coated.
3️⃣ Form the crust: Press the mixture into the bottom and sides of a 9-inch pie dish to create an even crust.
4️⃣ Bake the crust: Bake the crust for 8-10 minutes or until slightly golden. Remove from the oven and let it cool completely.
5️⃣ Make the filling: In a large bowl, mix together the peanut butter, powdered sugar, and softened cream cheese until smooth and creamy.
6️⃣ Whip the cream: In a separate bowl, whip the heavy whipping cream and vanilla extract until stiff peaks form.
7️⃣ Combine the mixtures: Gently fold the whipped cream into the peanut butter mixture until fully combined and smooth.
8️⃣ Add Reese’s: Stir in 1 ½ cups of chopped mini Reese’s peanut butter cups.
9️⃣ Fill the crust: Spread the peanut butter filling evenly into the cooled graham cracker crust.
🔟 Chill the pie: Refrigerate the pie for at least 3 hours or overnight to allow the filling to set.
1️⃣1️⃣ Prepare the topping: For the topping, heat the chocolate chips and ¼ cup heavy whipping cream in a small saucepan over low heat. Stir until smooth and melted.
1️⃣2️⃣ Add the topping: Pour the melted chocolate mixture over the pie, spreading it evenly to cover the filling.
1️⃣3️⃣ Finish the pie: Sprinkle the remaining chopped mini Reese’s peanut butter cups on top.
1️⃣4️⃣ Let it set: Return the pie to the refrigerator for an additional 30 minutes to allow the chocolate topping to firm up before serving.
Notes
-
Chill Time: For best results, refrigerate the pie overnight for a more stable set.
-
Customization: Feel free to add extra peanut butter cups on top for an even more indulgent finish.
-
Serving Tip: Let the pie sit for a few minutes at room temperature before serving to make cutting easier.
- Prep Time: 20 minutes
- Cook Time: 8-10 minutes (for the crust)