INGREDIENTS YOU’LL NEED:
- 1 cup red lentils (uncooked)
- 1 ½ cups water (for soaking)
- ½ teaspoon salt
- ½ teaspoon baking powder
- ½ teaspoon garlic powder (optional)
- 2 eggs
- ½ cup plain Greek yogurt or unsweetened dairy-free yogurt
- 1 cup shredded cheese (cheddar, mozzarella, or a blend)
- ¼ cup grated Parmesan (optional)
- ½ cup finely chopped spinach, parsley, or green onions (optional)
- 1 tablespoon olive oil (for greasing your pan)

- 1 cup shredded cheese (cheddar, mozzarella, or a mix)
- ¼ cup grated Parmesan (optional, but adds extra flavor)
- ½ cup finely chopped spinach, parsley, or green onions (also optional, but a great way to sneak in extra nutrition and color)


SERVING IDEAS AND FLAVOR VARIATIONS:
One of the best things about this bread is how versatile it is. Here are a few easy ways to enjoy it or switch it up: 1. Serve with soup or stew – It’s the perfect dipper for hearty meals. 2. Toast and top – Spread with avocado, cottage cheese, or your favorite spread. 3. Make it spicy – Add a pinch of chili flakes or chopped jalapeños to the batter. 4. Add herbs – Mix in fresh or dried herbs like rosemary, dill, or thyme. 5. Go dairy-free – Use unsweetened dairy-free yogurt and skip the cheese (or use a plant-based cheese alternative).
FAQS & FINAL THOUGHTS ON DELICIOUS GLUTEN-FREE NO YEAST BREAD RECIPE:
Now that your kitchen smells amazing and your loaf has cooled just enough to slice, let’s talk about how to get the most out of this simple and satisfying Gluten-Free No Yeast Bread. Whether this is your first time baking with red lentils or you’re already hooked on easy no-rise breads, the following FAQs will help you adapt the recipe to your needs and make it again and again with confidence. 1. CAN I MAKE THIS RECIPE COMPLETELY DAIRY-FREE? Yes, you can. Substitute the Greek yogurt with an unsweetened non-dairy yogurt, like coconut or almond yogurt, and either skip the cheese or use a plant-based cheese alternative. The texture will be slightly different, but the bread still holds together well and tastes great. 2. WHAT IF I DON’T HAVE A BLENDER? A high-speed blender works best for creating a smooth lentil puree, but a food processor can also work. If you don’t have either, try soaking the lentils overnight and then mashing them very well with a fork or potato masher. The result won’t be as smooth, but the bread will still bake up nicely. 3. HOW SHOULD I STORE LEFTOVERS? Once cooled, wrap the bread tightly in foil or store it in an airtight container. It keeps well at room temperature for up to 2 days, in the refrigerator for up to 5 days, or in the freezer for up to 2 months. Slice before freezing for easy grab-and-toast portions. 4. CAN I USE BROWN OR GREEN LENTILS INSTEAD? Red lentils are best for this recipe because they’re soft and quick to cook. Brown or green lentils don’t blend as smoothly and have a firmer texture, which may affect the final result. Stick with red lentils for the best outcome. 5. WHY IS MY BREAD TOO MOIST OR TOO DRY? If your bread is too moist, it may need a few extra minutes in the oven. Make sure to drain soaked lentils well before blending. If it’s too dry, check your measurements and avoid overbaking. Adding a bit more yogurt or cheese next time can also help with moisture. 6. IS THIS RECIPE HIGH PROTEIN? Yes. Between the lentils, eggs, yogurt, and cheese, each slice packs a good amount of protein, making it a great choice for anyone looking for a more balanced, nourishing bread. 7. CAN I MAKE THIS INTO MUFFINS OR MINI LOAVES? Absolutely. Pour the batter into greased muffin tins or mini loaf pans and reduce the baking time to about 20–25 minutes, or until a toothpick comes out clean.FINAL THOUGHTS: WHY THIS NO YEAST, GLUTEN-FREE BREAD DESERVES A SPOT IN YOUR RECIPE BOX
This Delicious Gluten-Free No Yeast Bread is one of those recipes that checks all the boxes—easy, nourishing, and so customizable. It comes together with minimal prep, skips the kneading and rising time, and uses real ingredients you can feel good about. Whether you enjoy it warm out of the oven, toasted with toppings, or packed into lunchboxes, it’s a dependable recipe you’ll want to keep on repeat. It’s especially great if you’re cutting back on gluten or looking for creative ways to use pantry staples like lentils. And even better—it holds up to slicing, toasting, and freezing like a champ. If you try this recipe, I’d love to hear how it turned out. Did you go cheesy, add greens, or keep it simple? Drop a comment and let us know what you loved or how you put your own twist on it. Want a printable version or step-by-step photos? Just let me know—I’m happy to help you bake it again and again. Print
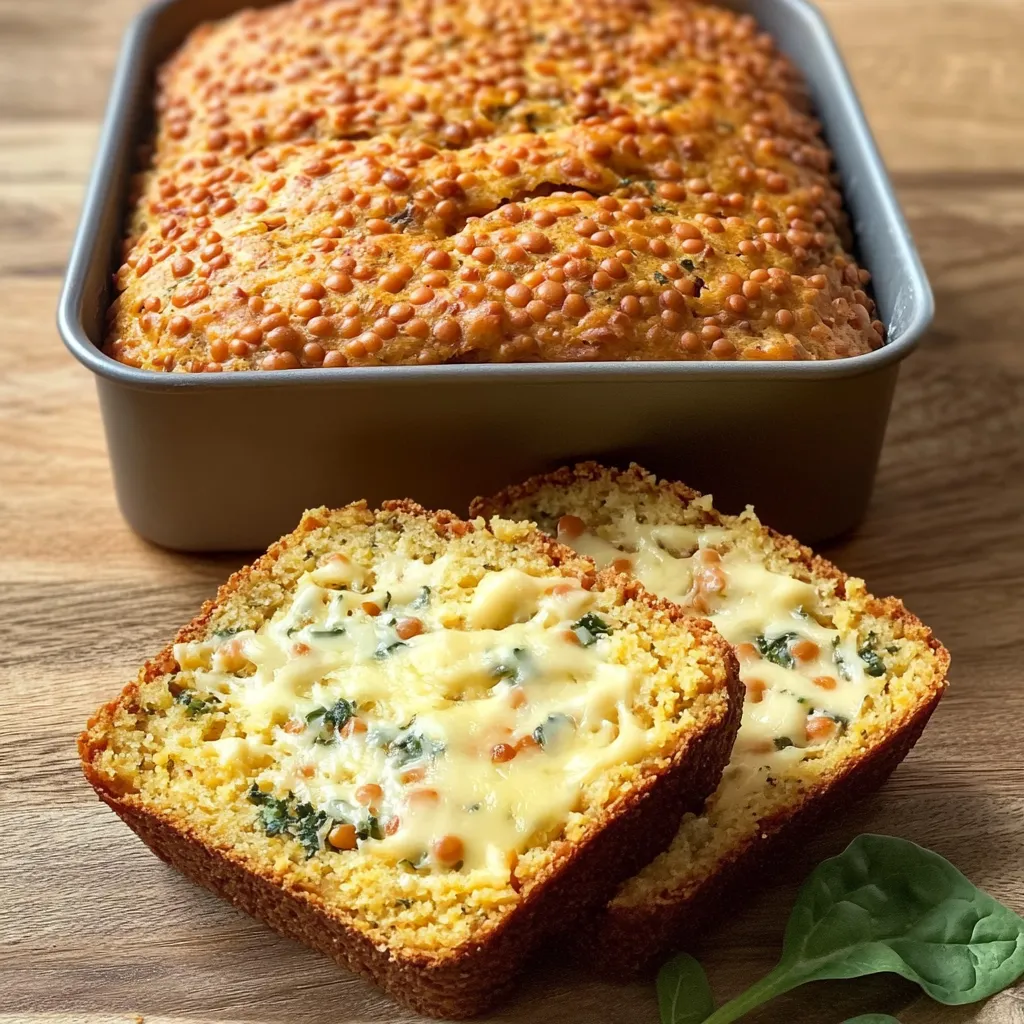
Delicious Gluten-Free No Yeast Bread Recipe
- Total Time: 50 min
Description
A savory, high-protein bread made without flour or yeast. This lentil-based loaf is gluten-free, naturally high in fiber, and customizable with herbs, cheese, or greens — perfect for a hearty, healthy meal or snack.
Ingredients
- 1 cup red lentils (uncooked)
- 1 ½ cups water (for soaking)
- ½ tsp salt
- ½ tsp baking powder
- ½ tsp garlic powder (optional)
- 2 eggs
- ½ cup plain Greek yogurt or unsweetened dairy-free yogurt
- 1 cup shredded cheese (cheddar, mozzarella, or a blend)
- ¼ cup grated Parmesan (optional)
- ½ cup finely chopped spinach, parsley, or green onions (optional)
- 1 tbsp olive oil (for greasing)
Instructions
1️⃣ Soak the lentils: Rinse the red lentils thoroughly and soak them in 1 ½ cups of water for at least 3 hours or overnight.
2️⃣ Blend the base: Drain any excess water and blend the soaked lentils in a high-speed blender until smooth and thick.
3️⃣ Preheat the oven: Preheat your oven to 375°F (190°C) and lightly grease or line a loaf pan or small baking dish.
4️⃣ Mix the batter: In a large mixing bowl, combine the lentil puree, eggs, yogurt, baking powder, salt, and garlic powder (if using). Mix well.
5️⃣ Add extras: Fold in the shredded cheese, Parmesan (if using), and chopped greens. Stir until evenly incorporated.
6️⃣ Bake: Pour the batter into the prepared pan and smooth out the top. Bake for 35–40 minutes, or until the top is golden and a toothpick inserted in the center comes out clean.
7️⃣ Cool and serve: Let the bread cool for 10–15 minutes before slicing. Serve warm or at room temperature.
Notes
-
Lentils act as the flour: Blended soaked lentils create a flourless batter perfect for gluten-free baking.
-
Soak time matters: Minimum 3 hours soaking time for soft blending and better texture.
-
Cheese adds richness: Use your favorite blend — cheddar for sharpness, mozzarella for melt, or both.
-
Customizable greens: Stir in herbs or greens like parsley, spinach, or green onions for color and nutrition.
-
Dairy-free? Sub in dairy-free yogurt and skip the Parmesan or use dairy-free cheese alternatives.
-
Stores well: Keeps up to 5 days in the fridge or can be sliced and frozen for longer storage.
- Prep Time: 10 min
- Cook Time: 40 min