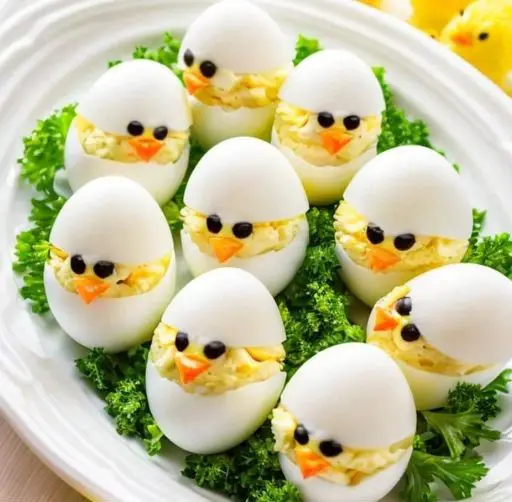
Deviled Egg Chicks

Naomi

Everyday Culinary Delights 👩‍🍳


Easter is a time of renewal and celebration, marked by various traditions that bring families together. One such tradition is the making and sharing of deviled eggs, a dish that has become synonymous with Easter Sunday meals. These savory treats, made from hard-boiled eggs, mayonnaise, mustard, and spices, offer a delightful balance of flavors that appeal to both adults and children alike.

The origin of deviled eggs can be traced back to ancient Rome, where eggs were boiled, seasoned with spicy sauces, and served as a first course during gatherings. This practice evolved over centuries, spreading across Europe and eventually reaching the Americas, where it took on new forms and flavors. Today, deviled eggs are a staple at Easter feasts, embodying the spirit of the holiday with their bright, cheerful appearance and delicious taste.

Incorporating deviled eggs into Easter celebrations not only honors a long-standing culinary tradition but also provides an opportunity for creativity in the kitchen. From the classic recipe to more innovative versions, deviled eggs are a versatile dish that can be adapted to suit various tastes and dietary preferences. As we prepare to celebrate Easter, let’s embrace the joy of making deviled eggs, a simple yet profound gesture of sharing and togetherness.

This introduction sets the stage for the article, weaving in the important keywords and setting a festive, inclusive tone for the discussion on Deviled Egg Chicks.

Why Deviled Egg Chicks?

Deviled egg chicks are a whimsical twist on the traditional deviled egg, transforming a classic appetizer into an adorable Easter-themed treat. These delightful creations not only add a touch of whimsy to the holiday table but also engage the imagination and creativity of cooks both young and old. The appeal of deviled egg chicks lies in their playful presentation, with each egg mimicking a little chick peeking out of its shell, making them an instant hit among children and a conversation starter at Easter gatherings.

The process of making deviled egg chicks involves the same basic steps as traditional deviled eggs, but with an added element of artistry in the assembly. By using simple ingredients like olives for eyes and carrots for beaks, these eggs are transformed into charming chick replicas. This not only makes the preparation process more enjoyable but also encourages family members to get involved, turning meal prep into a fun Easter activity.

Moreover, deviled egg chicks are a testament to the versatility of eggs in culinary traditions. Eggs have long been a symbol of new life and rebirth, making them a fitting centerpiece for Easter celebrations. By choosing to make deviled egg chicks, families can celebrate the season’s themes of renewal and creativity, all while enjoying a deliciously unique snack.

Ingredients Overview

Creating deviled egg chicks requires a simple list of ingredients, most of which may already be in your pantry or refrigerator. Here’s what you’ll need to bring these adorable chicks to life:

  • 12 large eggs: The base of our deviled chicks, providing a canvas for our creativity.
  • 1/3 cup mayonnaise: Adds creaminess and binds the yolk mixture together. For a healthier alternative, consider using Greek yogurt.
  • 1 1/2 tsp Dijon mustard: Gives the filling a tangy depth. The history of Dijon mustard adds a touch of culinary tradition to our dish.
  • 1/4 tsp garlic powder: Enhances flavor, adding a subtle hint of garlic.
  • 1/8 tsp salt, or to taste: Balances and brings out the flavors of the other ingredients.
  • 1 small carrot, peeled and sliced into rings: Used for the chicks’ beaks, adding a pop of color and a hint of sweetness.
  • 6 black olives: For the eyes, bringing our chicks to life with a playful gaze.

These ingredients combine to create a dish that’s not only visually appealing but also delicious and nutritious, making deviled egg chicks a perfect addition to any Easter celebration.

Step-by-Step Preparation

Preparing deviled egg chicks is a fun and straightforward process. Follow these steps to create your own adorable Easter treats:

  1. Boil the Eggs: Place 12 large eggs in a single layer in a saucepan. Cover with water by 1 inch. Bring to a boil, then cover, remove from heat, and let stand for 12 minutes. Transfer eggs to an ice-water bath to cool.
  2. Peel and Cut: Once cooled, peel the eggs. With a sharp knife, slice off a thin layer from the base of each egg so it can stand upright. Then, cut a larger top third off each egg to create the chick’s “hat.”
  3. Prepare the Filling: Carefully remove the yolks and place them in a mixing bowl. Add 1/3 cup mayonnaise, 1 1/2 tsp Dijon mustard, 1/4 tsp garlic powder, and 1/8 tsp salt. Mash and mix until smooth.
  4. Assemble the Chicks: Transfer the yolk mixture to a piping bag or a ziplock bag with a corner snipped off. Pipe the filling into the egg white bases, filling them generously. Place the egg white tops slightly askew on each base to resemble a chick peeking out.
  5. Add Features: For eyes, slice black olives into small pieces and place on the filling. Cut carrot slices into small triangles for beaks and insert them into the filling.
  6. Garnish and Serve: Arrange your deviled egg chicks on a platter. Garnish with fresh parsley or dill to simulate grass, giving them a cheerful “free-range” look.

Enjoy your deviled egg chicks, a festive and flavorful addition to your Easter celebration!

Decoration Tips for the Perfect Chick Appearance 

Achieving the perfect chick appearance for your deviled egg chicks involves a few simple decoration tips that can make all the difference. Here’s how to ensure your chicks look as adorable as they taste:

  • Smooth Filling: To get a smooth, creamy filling that’s easy to pipe, ensure your egg yolks are mashed thoroughly. A sieve can be used to push the yolks through for an extra fine texture. This makes the filling not only tastier but also gives your chicks a polished look.
  • Piping Technique: When piping the filling into the egg whites, start from the bottom and fill upwards to create a rounded, chick-like shape. If you don’t have a piping bag, a ziplock bag with a corner cut off works just as well. The key is to fill the egg white generously, allowing a slight overflow to mimic a chubby chick.
  • Eye Placement: The eyes are crucial for bringing your deviled egg chicks to life. Use a toothpick to place the olive pieces precisely where you want them. The eyes should be close together and near the top of the filling to create a cute, cartoonish look.
  • Beak Proportions: Cutting the carrot into small, even triangles is essential for a realistic beak. Each piece should be small enough to fit comfortably on the chick’s face without overpowering it. Insert the beak pieces gently into the filling to avoid them sinking too deep.
  • Final Touches: Position the egg white caps at a slight angle to give the impression that the chicks are peeking out. A light dusting of paprika around the chicks’ cheeks can add a blush effect, enhancing their cuteness.

With these decoration tips, your deviled egg chicks will be the highlight of your Easter table, charming guests with their delightful appearance and delicious taste.

Variations of Deviled Egg Chicks

Deviled egg chicks are not only adorable but also incredibly versatile, allowing for a variety of flavors and ingredients to suit any taste. Here are some creative variations to spice up your Easter celebration:

  • Avocado Deviled Egg Chicks: For a healthier twist, replace half of the mayonnaise with mashed avocado. The creamy texture and rich flavor of avocado blend seamlessly with the yolks, creating a nutritious and colorful filling. Garnish with red pepper flakes for a hint of spice and a vibrant contrast.
  • Spicy Deviled Egg Chicks: Add a kick to your chicks by incorporating a small amount of finely chopped jalapeño or a dash of hot sauce into the yolk mixture. The spice pairs well with the creamy filling, offering a delightful heat that’s sure to please those who enjoy a bit of spice in their dishes.
  • Herbed Deviled Egg Chicks: Mix in finely chopped fresh herbs such as dill, chives, or parsley into the yolk mixture for a fresh, aromatic twist. Herbs not only add flavor but also a dash of color, making the chicks even more visually appealing.
  • Bacon-Topped Deviled Egg Chicks: For a savory variation, top each chick with a small piece of crispy bacon. The smoky flavor of the bacon complements the creamy filling beautifully, adding a crunchy texture that contrasts with the smoothness of the egg.
  • Curried Deviled Egg Chicks: Incorporate a teaspoon of curry powder into the yolk mixture for an exotic twist. The warm spices of curry add depth and complexity to the flavor, making these chicks a unique and memorable addition to your Easter table.

Each of these variations on the classic deviled egg chick recipe offers a unique flavor profile, allowing you to customize your Easter feast to cater to a wide range of tastes and dietary preferences. Whether you prefer the creamy richness of avocado, the zesty kick of spice, the freshness of herbs, the savory crunch of bacon, or the exotic warmth of curry, there’s a deviled egg chick variation for everyone to enjoy.

Serving Suggestions 

Deviled egg chicks make a delightful addition to any Easter spread, and presenting them in a creative and appealing way can enhance the overall dining experience. Here are some serving suggestions to make your deviled egg chicks the centerpiece of your Easter celebration:

  • Egg Carton Display: For a rustic and thematic presentation, arrange your deviled egg chicks in a clean, empty egg carton. This not only holds the eggs securely but also adds a charming farm-to-table feel to your table setting.
  • Nest of Greens: Create a nest-like base on a platter using fresh greens such as parsley, dill, or lettuce. Place the deviled egg chicks atop the greens, giving the appearance that they are nestled comfortably in a springtime nest.
  • Garden Scene: For a more elaborate display, create a garden scene on a large platter. Use finely chopped herbs or edible flowers to simulate grass and flowers, and position the deviled egg chicks among the foliage. This whimsical setup invites guests to “pluck” a chick from the garden.
  • Individual Spoons: For a more formal or finger-food-friendly option, serve each deviled egg chick on a decorative spoon. This allows for easy handling and adds an elegant touch to your appetizer offering.

By incorporating these serving suggestions, your deviled egg chicks will not only taste delicious but also become a memorable part of your Easter festivities, showcasing your creativity and attention to detail.

Make-Ahead and Storage Tips

Preparing for Easter celebrations can be a busy time, so finding ways to make dishes ahead of time, like deviled egg chicks, can be a real lifesaver. Here are some tips for preparing and storing your deviled egg chicks to ensure they remain fresh and delicious:

  • Boil and Peel Eggs in Advance: Hard-boil your eggs up to two days before you plan to make your deviled egg chicks. Store the peeled eggs in a container filled with cold water in the refrigerator to keep them moist and fresh.
  • Prep the Filling Early: The yolk mixture can be prepared a day ahead. Store it in an airtight container in the refrigerator. This not only saves time but also allows the flavors to meld together, enhancing the taste.
  • Assemble Before Serving: For the best appearance and freshness, assemble the deviled egg chicks a few hours before your event. Keep them chilled in the refrigerator until ready to serve to maintain their shape and freshness.
  • Storing Leftovers: If you have leftovers, place them in an airtight container and refrigerate. Consume within 2 days for the best quality. Remember, the fresher they are, the better they taste.

By following these make-ahead and storage tips, you can enjoy your deviled egg chicks with minimal stress, leaving more time to celebrate Easter with your loved ones.

FAQs 

Can I make Deviled Egg Chicks ahead of time? 

Yes, you can prepare deviled egg chicks ahead of time, which is especially helpful for busy holiday preparations. Boil and peel the eggs, and prepare the filling a day or two in advance. Store them separately in the refrigerator. For the best presentation, assemble the chicks a few hours before serving. This approach not only saves time but also ensures that your deviled egg chicks are fresh and delicious for your Easter celebration. Remember to keep the assembled chicks refrigerated until it’s time to serve to maintain their adorable appearance and optimal freshness.

What are some creative variations of Deviled Egg Chicks?

Creative variations of deviled egg chicks allow you to cater to different tastes and dietary preferences. Some popular variations include Avocado Deviled Egg Chicks, incorporating mashed avocado for a creamy, healthier option; Spicy Deviled Egg Chicks, adding a kick with jalapeños or hot sauce; Herbed Deviled Egg Chicks, mixing in fresh herbs for a burst of flavor; Bacon-Topped Deviled Egg Chicks, for a savory, crunchy addition; and Curried Deviled Egg Chicks, introducing warm spices for an exotic twist. These variations ensure that your deviled egg chicks are not only a visual treat but also a delightful culinary experience for everyone.

How can I ensure the eggs are perfectly boiled? 

To ensure your eggs are perfectly boiled for deviled egg chicks, start by placing the eggs in a single layer in a saucepan and cover them with water by about an inch. Bring the water to a boil, then reduce the heat to low, cover the pan, and let it simmer for 1 minute. Afterward, remove the pan from the heat and leave it covered for about 12 minutes. Finally, transfer the eggs to an ice-water bath to cool. This method helps prevent overcooking and makes peeling easier, resulting in smooth, perfectly cooked eggs ideal for your Easter treats.

Tips for piping the filling smoothly?

For smooth piping of the filling in your deviled egg chicks, ensure your yolk mixture is lump-free by mashing the yolks thoroughly or passing them through a sieve. Use a piping bag fitted with a wide star tip for a decorative look, or cut the corner off a ziplock bag for a simple DIY option. Fill the bag with the yolk mixture, twist the top to secure, and gently squeeze from the top down, guiding the filling into the egg whites. Practice even pressure for a consistent shape. If the mixture is too thick, a little more mayonnaise can help it pipe smoothly.

Print
clock clock iconcutlery cutlery iconflag flag iconfolder folder iconinstagram instagram iconpinterest pinterest iconfacebook facebook iconprint print iconsquares squares iconheart heart iconheart solid heart solid icon

Deviled Egg Chicks


  • Author: Ashely
  • Total Time: 25 minutes
  • Yield: 12 deviled egg chicks

Description

This delightful Deviled Egg Chicks recipe is a playful and tasty twist on the classic deviled egg, perfect for Easter celebrations or any spring gathering. Featuring creamy, tangy filling and charming chick decorations, these appetizers are sure to bring smiles to your guests’ faces. With simple ingredients and a dash of creativity, you can transform ordinary eggs into a festive treat that’s as fun to make as it is to eat.


Ingredients

12 large eggs, hard boiled and peeled
1/3 cup mayonnaise
1 1/2 tsp dijon mustard, or add to taste
1/4 tsp garlic powder
1/8 tsp salt, or to taste
1 small carrot, peeled and sliced into rings
6 black olives

Instructions

Peel 12 hard-boiled eggs. With a sharp knife, slice off a very thin layer from the base of the egg – this will give it a flat surface to stand on a platter.
Cut off a generous top third of the egg.
Squeeze around the egg base gently to loosen the yolk and it should pop right out.
Keep the lids paired with their bases.
In a medium mixing bowl, combine 12 cooked yolks and mash well with a fork.
Add 1/3 cup mayonnaise, 1 1/2 tsp dijon mustard, 1/4 tsp garlic powder, and 1/8 tsp salt, or season to taste.
Mash everything together until smooth.
Transfer mixture to a ziploc or pastry bag and pipe generously into egg bases.
Place the top 1/3 back over the base and press down slightly to adhere.
For the eyes, poke through an olive with a plastic straw several times then gently squeeze down the straw and the little circles of olives will pop right out. For the beaks, thinly slice a few rings of carrot and cut each ring into sixths. Insert 2 olive spots for eyes and 2 carrot wedges for the beak. Set chicks on a platter and garnish with fresh parsley or dill to give them that “free range” feel.

Notes

  • Boiling Eggs: Achieving perfectly boiled eggs is crucial for this recipe. Follow the suggested method for eggs that are easy to peel and have a firm yet tender white with a creamy yolk.
  • Filling Consistency: For a smooth, easy-to-pipe filling, ensure the yolk mixture is free of lumps. Adjust the mayonnaise as needed to achieve the desired consistency.
  • Decorating Tips: Use small pieces of olives and carrot to create the chicks’ eyes and beaks. Be gentle when placing these on the filling to maintain the overall look.
  • Make-Ahead Option: You can boil the eggs and prepare the filling a day in advance. Store them separately in the refrigerator and assemble a few hours before serving to keep everything fresh.
  • Serving Suggestion: Present your deviled egg chicks on a bed of lettuce or parsley for an extra festive touch. Using an egg carton for serving can also add a fun and rustic appeal.
  • Variations: Feel free to experiment with the filling by adding avocado, spices, or herbs to suit your taste preferences. Each variation can bring a new flavor profile to this classic Easter dish.
  • Prep Time: 10 minutes
  • Cook Time: 15 minutes
  • Cuisine: American

Leave a Comment

Recipe rating