


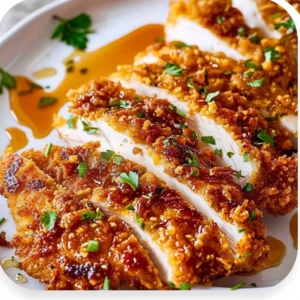
Double Crunch Honey Garlic Chicken Breasts Crispy golden chicken breasts coated in a sticky-sweet honey garlic sauce that’s bold, crunchy, and absolutely irresistible! Total time: 40 minutes Yield: Serves 4. Honestly, if you’re looking for a quick weeknight dinner that feels a little fancy but doesn’t require a culinary degree, this is it. I mean, who doesn’t love the sound of “double crunch”? It promises so much, and trust me, it really delivers.
Let me take you back to my early cooking days. I remember trying to impress friends with a homemade dinner, only to end up with a charred chicken that resembled something out of a horror movie. I learned the hard way that cooking doesn’t have to be a nightmare, especially when you find recipes that are practical and work in a real kitchen. That’s where this double crunch honey garlic chicken comes in. It’s simple, it’s tasty, and it’s made with ingredients you probably already have in your pantry.
I first made this dish after watching a cooking show where the host raved about the crunchy texture of fried chicken. I thought, “I can do that!” Well, spoiler alert: I had my share of mishaps, but after several attempts, I finally nailed it! This recipe works for anyone, whether you’re a busy parent looking for something quick or a kitchen novice wanting to impress someone special. Let’s dive in!
Why You’ll Love This Recipe
- **Quick Prep Time**: You can whip this up in just 40 minutes, which is perfect for those busy evenings when you don’t want to spend hours in the kitchen.
- **Flavor Explosion**: The combination of honey, garlic, and soy sauce creates a sticky-sweet sauce that complements the crunchy chicken beautifully.
- **Budget-Friendly**: All the ingredients are easy to find and won’t break the bank. Plus, you can use leftovers creatively!
- **Customizable**: Feel free to swap out ingredients based on what you have at home. No honey? Use maple syrup! Out of soy sauce? Try a splash of teriyaki instead.
- **Healthy Eating**: While this is fried chicken, you can make it healthier by serving it with steamed veggies or a fresh salad.
Now that you know why this recipe is a must-try, let’s check out what you’ll need to make it happen.
Ingredients You’ll Need
- 4 boneless, skinless chicken breasts: The star of the show! They cook quickly and soak up all that delicious sauce.
- 2 cups all-purpose flour: This is the base for your crispy coating.
- 4 tablespoons cornstarch: Adds extra crunch to the breading.
- 2 teaspoons baking powder: Helps give the coating a lighter texture.
- 1 teaspoon salt: Essential for flavor.
- 1 teaspoon black pepper: For a bit of heat.
- 1 teaspoon paprika: Adds a lovely color and subtle smokiness.
- 1 teaspoon garlic powder: Because more garlic is never a bad idea.
- 1 teaspoon onion powder: Enhances the overall flavor.
- 2 large eggs: This will help the flour stick to the chicken.
- 1/4 cup water: To thin out the egg wash.
- Vegetable oil for frying: Use a neutral oil that can handle high heat.
- 1/2 cup honey: The sweet component of the sauce.
- 6 cloves garlic, minced: Fresh minced garlic is a must for that bold flavor.
- 1/4 cup soy sauce: Adds depth and saltiness to the sauce.
- 2 tablespoons rice vinegar (or apple cider vinegar): A touch of acidity balances the sweetness.
- 1 tablespoon cornstarch mixed with 2 tablespoons water (slurry): This will thicken your sauce to that perfect glossy finish.
Look, I know some of these ingredients might sound a bit fancy, but trust me, they’re super accessible. If you’re on a budget, use store brands or even check the discount aisle for some of these. I’ve also tried this recipe with both chicken thighs and drumsticks, and it works just as well!
Let’s Get Started
Step 1: Pound the Chicken
Begin by pounding the chicken breasts to an even thickness. This ensures they cook uniformly. Use paper towels to pat them dry. If you don’t have a meat mallet, a rolling pin or even a heavy pan will do the trick. Just be gentle; we want to flatten, not obliterate!
Step 2: Mix the Dry Ingredients
In a large bowl, combine the flour, cornstarch, baking powder, salt, black pepper, paprika, garlic powder, and onion powder, whisking them together thoroughly. This step is crucial because it helps distribute the flavors evenly throughout the coating.
Step 3: Prepare the Egg Wash
In a separate bowl, whisk together the eggs and water to create the batter. The water helps thin it out a bit, making it easier to coat the chicken. You want a nice, smooth consistency here.
Step 4: Coat the Chicken
Take each chicken breast and first coat it in the flour mixture, followed by dipping it into the egg wash, and then coat it once more in the flour mixture for that extra crunch. This double-dipping technique is what gives you that coveted crispy texture. Don’t rush this step; make sure every inch is covered.
Step 5: Heat the Oil
Heat vegetable oil in a deep skillet until it reaches 350°F (175°C). Fry the chicken breasts for 6–8 minutes per side, or until they are golden brown and cooked through (internal temperature should reach 165°F/74°C). Once cooked, drain the chicken on paper towels to remove excess oil. You’ll know it’s ready when it’s a beautiful golden color and filling your kitchen with that irresistible fried chicken smell.
Step 6: Prepare the Sauce
To prepare the sauce, sauté minced garlic in a saucepan over medium heat until it becomes fragrant. This usually takes about 30 seconds—don’t let it burn! Then, add honey, soy sauce, and vinegar. Allow this mixture to come to a simmer before stirring in the cornstarch slurry to thicken the sauce. Cook until it becomes glossy and sticky. This is where the magic happens!
Step 7: Combine Chicken and Sauce
Generously pour the hot honey garlic sauce over the crispy chicken breasts, ensuring they are well coated. I usually do this right before serving; it keeps the chicken nice and crunchy while still allowing that sweet sauce to shine.
Step 8: Slice and Serve
Slice the chicken and serve it with additional sauce spooned over the top. Optionally, garnish with chopped chives or parsley for a pop of color. I love serving this with steamed rice or roasted veggies to balance out the richness.
Step 9: Pro Tip
For an even crunchier texture, allow the coated chicken to rest for 10 minutes before frying; this will help the breading adhere better. Trust me, this is worth the wait!
Tips for the Best Double Crunch Honey Garlic Chicken Breasts
- Make sure your chicken is dry before coating it; moisture will prevent the breading from adhering properly.
- If you find the coating coming off while frying, let the chicken rest a bit longer before you put it in the oil.
- Don’t overcrowd the pan! Fry in batches if you need to. This allows the chicken to fry evenly and get nice and crispy.
- Play around with the sauce! Add a pinch of red pepper flakes if you like a little heat, or try using orange juice instead of vinegar for a citrus twist.
- If you’re short on time, you can use pre-cut or frozen chicken tenders. Just adjust the cooking time accordingly.
Storage Tips
If you have leftovers (which you might not, because this dish is so good), here’s how to store them. Let the chicken cool down completely before placing it in an airtight container. It’ll last in the fridge for about 3-4 days. Just know that the breading may lose some of its crunch when reheated, but you can always pop it in the oven for a few minutes to crisp it back up.
Look, I live alone, so I often find myself eating leftovers for lunch the next day. When I do, I like to throw the chicken on a salad or mix it into a stir-fry to keep things interesting. You can also freeze cooked chicken for about 2-3 months, but I recommend freezing it without the sauce to maintain that crunch.
Frequently Asked Questions About Double Crunch Honey Garlic Chicken Breasts
Can I bake this instead of frying?
Absolutely! Just coat the chicken as directed and bake it at 400°F (200°C) for about 25-30 minutes, flipping halfway through. It won’t be as crunchy, but it’ll still be delicious.
Can I use other meats?
Definitely! This recipe works with chicken thighs, turkey, or even tofu for a vegetarian option. Just adjust the cooking times as needed.
What if I don’t have honey? Can I use something else?
Sure! Maple syrup or agave can be great substitutes. Just remember that the flavor will change a bit, but it’ll still be tasty.
How do I know when the chicken is done?
The internal temperature should reach 165°F (74°C). A meat thermometer is your best friend here, especially for beginners!
Is this recipe kid-friendly?
Yes! Kids usually love chicken tenders, and the sweet honey garlic sauce is a hit. You can adjust the seasoning to make it milder if needed.
Can I make this gluten-free?
You can! Just use a gluten-free flour blend instead of all-purpose flour, and make sure your soy sauce is gluten-free as well.
Final Thoughts
So, there you have it—Double Crunch Honey Garlic Chicken Breasts that are not only crispy and flavorful but also pretty straightforward to make. Honestly, if I can whip this up in my tiny kitchen, so can you! I’m already thinking about how I’ll serve this next time—maybe with a side of roasted Brussels sprouts or a zesty cucumber salad?
I hope you give this recipe a shot; it’s perfect for a weeknight dinner or even a cozy gathering with friends. Happy cooking, and remember, it’s all about enjoying the process and making it your own!
Double Crunch Honey Garlic Chicken Breasts
Ingredients
- 4 boneless, skinless chicken breasts
- 2 cups all-purpose flour
- 4 tablespoons cornstarch
- 2 teaspoons baking powder
- 1 teaspoon salt
- 1 teaspoon black pepper
- 1 teaspoon paprika
- 1 teaspoon garlic powder
- 1 teaspoon onion powder
- 2 large eggs
- 1/4 cup water
- Vegetable oil for frying
- 1/2 cup honey
- 6 cloves garlic, minced
- 1/4 cup soy sauce
- 2 tablespoons rice vinegar (or apple cider vinegar)
- 1 tablespoon cornstarch mixed with 2 tablespoons water (slurry)
Instructions
- Begin by pounding the chicken breasts to an even thickness. Use paper towels to pat them dry.
- In a large bowl, combine the flour, cornstarch, baking powder, salt, black pepper, paprika, garlic powder, and onion powder, whisking them together thoroughly.
- In a separate bowl, whisk together the eggs and water to create the batter.
- Take each chicken breast and first coat it in the flour mixture, followed by dipping it into the egg wash, and then coat it once more in the flour mixture for that extra crunch.
- Heat vegetable oil in a deep skillet until it reaches 350°F (175°C). Fry the chicken breasts for 6–8 minutes per side, or until they are golden brown and cooked through (internal temperature should reach 165°F/74°C). Once cooked, drain the chicken on paper towels.
- To prepare the sauce, sauté minced garlic in a saucepan over medium heat until it becomes fragrant. Then, add honey, soy sauce, and vinegar. Allow this mixture to come to a simmer before stirring in the cornstarch slurry to thicken the sauce. Cook until it becomes glossy and sticky.
- Generously pour the hot honey garlic sauce over the crispy chicken breasts, ensuring they are well coated.
- Slice the chicken and serve it with additional sauce spooned over the top. Optionally, garnish with chopped chives or parsley.


