

If you’ve ever been intimidated by the idea of making cream puffs from scratch, I’m here to tell you that you don’t have to be a pastry chef to enjoy that delicate, airy goodness. This Easy Cream Puff Cake is a beginner-friendly dessert that brings all the deliciousness of cream puffs to the table with far less effort.
The best part? You don’t need to pipe individual cream puffs or worry about keeping everything perfectly uniform. Instead, we’re making a single, golden crust that puffs up beautifully in the oven and holds a creamy, smooth filling that’s a cross between rich cream cheese and dreamy vanilla pudding.
Whether you’re a novice baker or someone looking for a quick yet elegant dessert for a family dinner or a special occasion, this cake is your answer. It’s a guaranteed crowd-pleaser that requires just a few simple steps, and trust me, everyone will think you spent hours in the kitchen.
Let’s dive into the first steps of making this easy, creamy puff cake!
INGREDIENTS FOR THE CRUST:
We’re starting with the dough for the crust. This is the base that will puff up and create a crisp, golden layer that pairs perfectly with the creamy filling. Here’s what you’ll need:
- 1 cup water – The base for your dough.
- ½ cup unsalted butter – Adds richness and flavor to the crust.
- 1 cup all-purpose flour – The foundation for the dough.
- 1 tsp vanilla extract – To give the crust a subtle flavor boost.
- 4 large eggs – These will help the dough puff up in the oven and give it that classic cream puff texture.
STEP 1: PREHEAT THE OVEN AND GREASE THE BAKING DISH
First things first, preheat your oven to 350°F (175°C). While the oven is heating up, grease a 9×13-inch baking dish with butter or non-stick spray. This will prevent the dough from sticking and ensure it comes out easily after baking.
STEP 2: COOK THE DOUGH
In a medium saucepan, combine 1 cup water and ½ cup butter over medium heat. Stir occasionally until the butter is completely melted and the water comes to a boil. Once it’s boiling, add 1 cup of all-purpose flour all at once. Stir constantly for about 2 minutes until the mixture thickens and pulls away from the sides of the pan, forming a ball of dough.
This process is critical because the heat helps create that puffed texture, and stirring it well ensures a smooth consistency. When you’re done, remove the pan from the heat and let the dough cool for about 5 minutes.

STEP 3: BEAT IN THE EGGS
Once the dough has cooled slightly, it’s time to beat in the 4 large eggs. Add the eggs one at a time, beating well after each addition. This will make the dough smooth and shiny, giving it the right texture for the crust. Don’t worry if it seems a little runny at first; that’s exactly how it should be.

STEP 4: SPREAD THE DOUGH AND BAKE
Now that your dough is ready, spread it evenly into the prepared 9×13-inch baking dish. Use a spatula or spoon to smooth it out so it’s an even layer. Pop the dish into the oven and bake for 30 to 35 minutes, or until the crust is golden brown and puffed up.
The dough will puff and form a slight crispy layer while remaining soft in the center. Once baked, let the crust cool completely. This is an important step—don’t rush it, or the filling might melt into the crust.

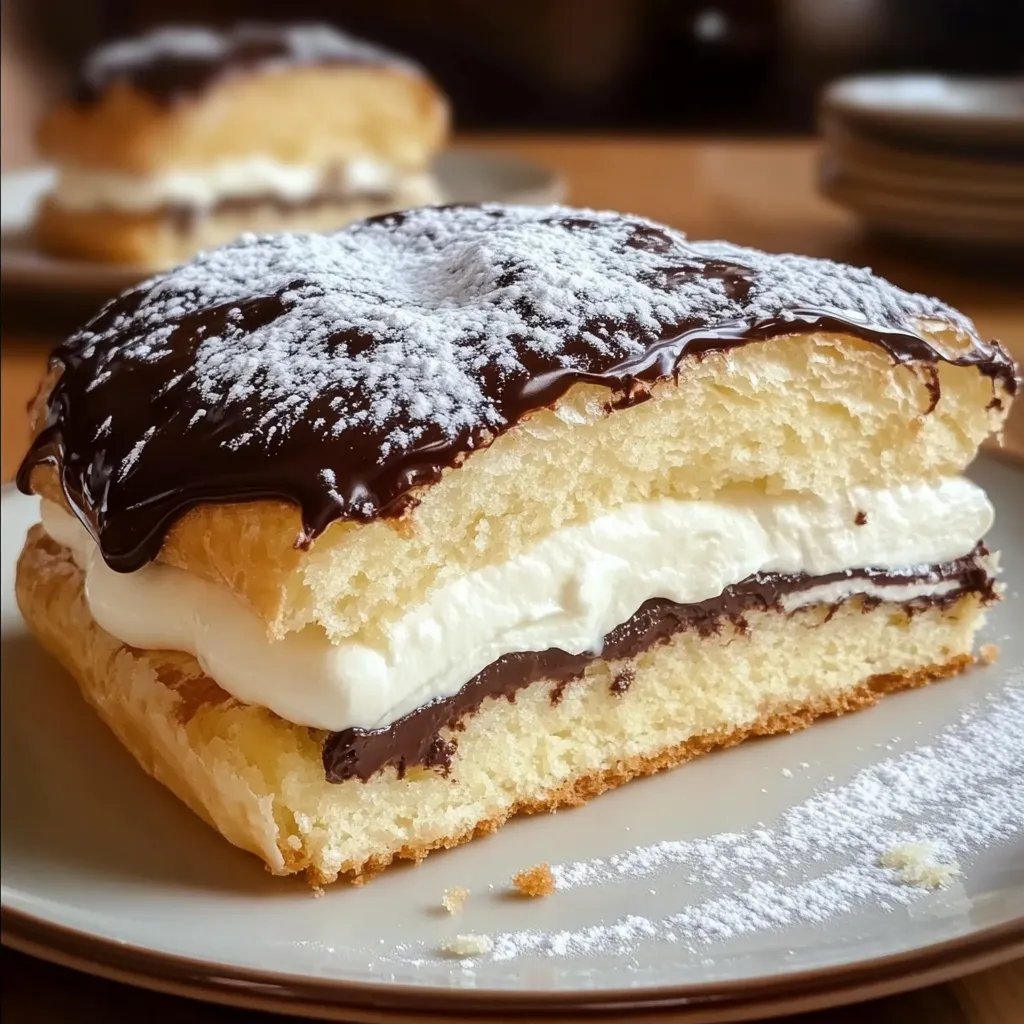
CREAMY FILLING AND FINAL TOUCHES – ASSEMBLE AND ENJOY!
Now that the crust has cooled, we’re ready to move on to the fun part: making the creamy, luscious filling that will transform this dessert into something truly special. The combination of cream cheese, vanilla pudding, and whipped cream creates a perfectly smooth, light, and indulgent filling that balances the crispy, golden crust. Let’s get into the final steps!
INGREDIENTS FOR THE FILLING:
Here’s what you’ll need to create that dreamy filling:
- 8 oz (225g) cream cheese, softened – Adds richness and a slight tang that complements the sweetness of the pudding.
- 1 package (3.4 oz) instant vanilla pudding mix – This helps thicken the filling and adds that classic vanilla flavor.
- 2 cups cold milk – This will help activate the pudding mix and create a creamy base for the filling.
- 1 cup heavy whipping cream – Adds volume and makes the filling light and airy.
- 2 tbsp powdered sugar – To sweeten the whipped cream.
- 1 tsp vanilla extract – For a little extra flavor boost in the whipped cream.
STEP 5: MAKE THE CREAM CHEESE MIXTURE
In a medium bowl, beat together the softened cream cheese, vanilla pudding mix, and cold milk. Beat until the mixture is smooth and thickened. This will be the first layer of your filling—rich, creamy, and velvety.
Make sure the cream cheese is softened to room temperature before you begin. If it’s too cold, it won’t blend well with the pudding mixture, and you could end up with lumps. A hand mixer or stand mixer works best for this step to ensure a smooth consistency.

STEP 6: WHIP THE CREAM
In a separate bowl, whip the heavy whipping cream with powdered sugar and vanilla extract until stiff peaks form. This is the key to making the filling light and airy. Be careful not to overwhip the cream, or it might become too stiff and difficult to fold into the pudding mixture.
Once the whipped cream is ready, gently fold it into the pudding mixture. Take your time to combine everything until it’s smooth and well-blended. The whipped cream should maintain its airy texture while mixing with the pudding, creating a light and creamy filling.
STEP 7: SPREAD THE FILLING OVER THE CRUST
Now that the filling is perfectly smooth and fluffy, spread it evenly over the cooled crust. Be gentle as you spread, so you don’t disturb the delicate puffed crust underneath. Once it’s evenly spread out, the cake is nearly complete—just a few finishing touches!

STEP 8: REFRIGERATE BEFORE SERVING
Cover the cake with plastic wrap or a lid and refrigerate it for at least 2 hours before serving. This chilling time allows the flavors to meld together and the filling to firm up a bit, making the cake easier to slice and serve. Plus, the cooling gives it that refreshing, chilled dessert vibe that everyone will love.
STEP 9: DUST WITH POWDERED SUGAR
Just before serving, dust the top of the cake with powdered sugar for that perfect finishing touch. It adds a little sweetness and makes the dessert look extra inviting. You can use a sifter or fine mesh strainer to get an even dusting.
SERVING SUGGESTIONS AND TIPS:
- Serving: This cake is best served chilled. Cut it into squares, and enjoy the combination of the crisp crust, creamy filling, and light, fluffy texture.
- Storage: If you have leftovers, store the cake in the refrigerator, covered tightly. It should keep for about 3-4 days. The longer it sits, the more the flavors meld together, making it even more delicious.
- Customization: Feel free to get creative with toppings. A drizzle of chocolate or caramel sauce, fresh fruit, or even whipped cream would all be wonderful additions if you want to elevate it even more.

FREQUENTLY ASKED QUESTIONS & FINAL THOUGHTS ON EASY CREAM PUFF CAKE:
Now that you’ve made this easy Cream Puff Cake, it’s time to address some common questions and provide a few tips to ensure everything turns out just as delicious as it sounds. Whether this is your first time making a cream puff-style dessert or you’re looking for ways to customize it, I’ve got you covered.
Let’s dive into some frequently asked questions about this dessert to help you perfect it every time!
1. Can I make this cake ahead of time?
Yes, this cake is perfect for making ahead! After assembling the cake and refrigerating it for at least 2 hours, you can store it in the fridge for up to 3-4 days. The flavors actually get better as it sits, and it’s an excellent make-ahead option for parties or special occasions.
2. Can I use a different type of pudding mix?
While this recipe calls for instant vanilla pudding, you can easily swap it out for other flavors. Chocolate pudding would create a rich, decadent contrast with the cream cheese filling. You could also try butterscotch or banana pudding for a fun twist. Just ensure you use instant pudding and follow the package instructions.
3. Is it okay to make this cake without the whipped cream?
The whipped cream adds a light, airy texture to the filling, but if you prefer a denser filling, you can skip it. You could substitute the whipped cream with an extra ½ cup of cream cheese or add a little more milk to achieve the desired consistency.
4. Can I freeze this cake?
While this cake is best served fresh and chilled, you can freeze it if you need to prepare it in advance. Wrap the assembled cake tightly with plastic wrap and aluminum foil before freezing. To serve, let it thaw overnight in the refrigerator and top with powdered sugar just before serving. Keep in mind that freezing may slightly alter the texture of the whipped cream, but it will still taste great.
5. How can I make the crust more crispy?
If you want a slightly firmer, crispier crust, try baking the dough a little longer (about 5-7 extra minutes). However, keep an eye on it to avoid burning. For a lighter, crispier texture, you could also use a thinner layer of dough or substitute part of the water with a bit of milk in the crust.
6. Can I use a different pan size?
The recipe is designed for a 9×13-inch baking dish, but if you use a different size pan, you may need to adjust the baking time. A larger pan will make the crust thinner, so keep an eye on the baking time to prevent it from becoming too crisp. A smaller pan might require a little extra baking time for the crust to fully puff and cook through.
FINAL THOUGHTS: A SIMPLE, DELICIOUS DESSERT WITH BIG FLAVOR
The Easy Cream Puff Cake is a fantastic dessert for any occasion. It’s simple enough for beginners, yet impressive enough to be the star of any dessert table. The combination of the golden, puffed crust, rich cream cheese filling, and sweet powdered sugar topping creates a treat that’s both satisfying and elegant.
What makes this cake truly special is its versatility. You can easily customize it with different pudding flavors, fruit toppings, or even a drizzle of chocolate. It’s a crowd-pleaser that can be made in advance, making it perfect for busy schedules or unexpected guests.
So, if you haven’t tried making this cake yet, give it a go! It’s sure to become a favorite in your dessert repertoire. And if you do make it, I’d love to hear how it turned out. Leave a comment below with your tips, variations, or any fun twists you tried!
Here’s to easy, impressive desserts that everyone will love. Enjoy!
Print
Easy Cream Puff Cake Recipe for Beginners
- Total Time: 2 hours 50 minutes (includes refrigeration)
Description
Easy Cream Puff Cake is a simple, delicious dessert with a golden, puffed crust topped with a creamy, smooth vanilla filling. It’s perfect for beginners, requiring just a few ingredients and easy steps. With a light, airy texture and a dusting of powdered sugar, this no-bake treat is ideal for any occasion!
Ingredients
For the crust:
- 1 cup water
- ½ cup unsalted butter
- 1 cup all-purpose flour
- 1 tsp vanilla extract
- 4 large eggs
For the filling:
- 8 oz (225g) cream cheese, softened
- 1 package (3.4 oz) instant vanilla pudding mix
- 2 cups cold milk
- 1 cup heavy whipping cream
- 2 tbsp powdered sugar
- 1 tsp vanilla extract
- For the topping:
- ½ cup powdered sugar
Instructions
1️⃣ Preheat the oven: Set your oven to 350°F (175°C). Grease a 9×13-inch baking dish to prepare for the crust.
2️⃣ Make the crust dough: In a medium saucepan, combine the water and butter. Bring the mixture to a boil over medium heat. Stir in the flour and cook, stirring constantly, until the dough forms a ball and pulls away from the sides of the pan.
3️⃣ Cool the dough: Remove the saucepan from the heat and let the dough cool for about 5 minutes.
4️⃣ Add eggs: Beat in the eggs one at a time, making sure each egg is fully incorporated before adding the next. Continue until the dough is smooth and shiny.
5️⃣ Bake the crust: Spread the dough evenly in the prepared baking dish. Bake in the preheated oven for 30-35 minutes, or until the crust is golden brown and puffed up. Let the crust cool completely.
6️⃣ Prepare the filling: In a medium bowl, beat together the softened cream cheese, vanilla pudding mix, and cold milk. Beat until the mixture is smooth and has thickened.
7️⃣ Whip the cream: In a separate bowl, beat the heavy whipping cream, powdered sugar, and vanilla extract until stiff peaks form. Once whipped, gently fold the whipped cream into the pudding mixture until smooth.
8️⃣ Assemble the cake: Spread the cream filling evenly over the cooled crust, ensuring it covers the entire surface.
9️⃣ Chill the cake: Refrigerate the assembled cake for at least 2 hours to allow the flavors to meld and the filling to set.
🔟 Serve: Just before serving, dust the top of the cake with powdered sugar for a final touch of sweetness.
Notes
-
The cake is best served chilled, and you can make it a day ahead for even better results.
-
You can try adding fruit toppings, such as berries, for extra flavor and decoration.
-
This is a great dessert for beginners since the steps are simple but produce a deliciously impressive result!
- Prep Time: 15 min
- Cook Time: 35 min


