INGREDIENTS YOU’LL NEED:
- 1 lb thinly sliced beef steak (ribeye or sirloin work great)
- 1 tbsp olive oil
- 1 green bell pepper, sliced
- 1 small onion, sliced
- 1 cup mushrooms, sliced
- Salt and black pepper, to taste
- 4 oz cream cheese, softened
- 8 slices provolone cheese
- 8 slices turkey bacon

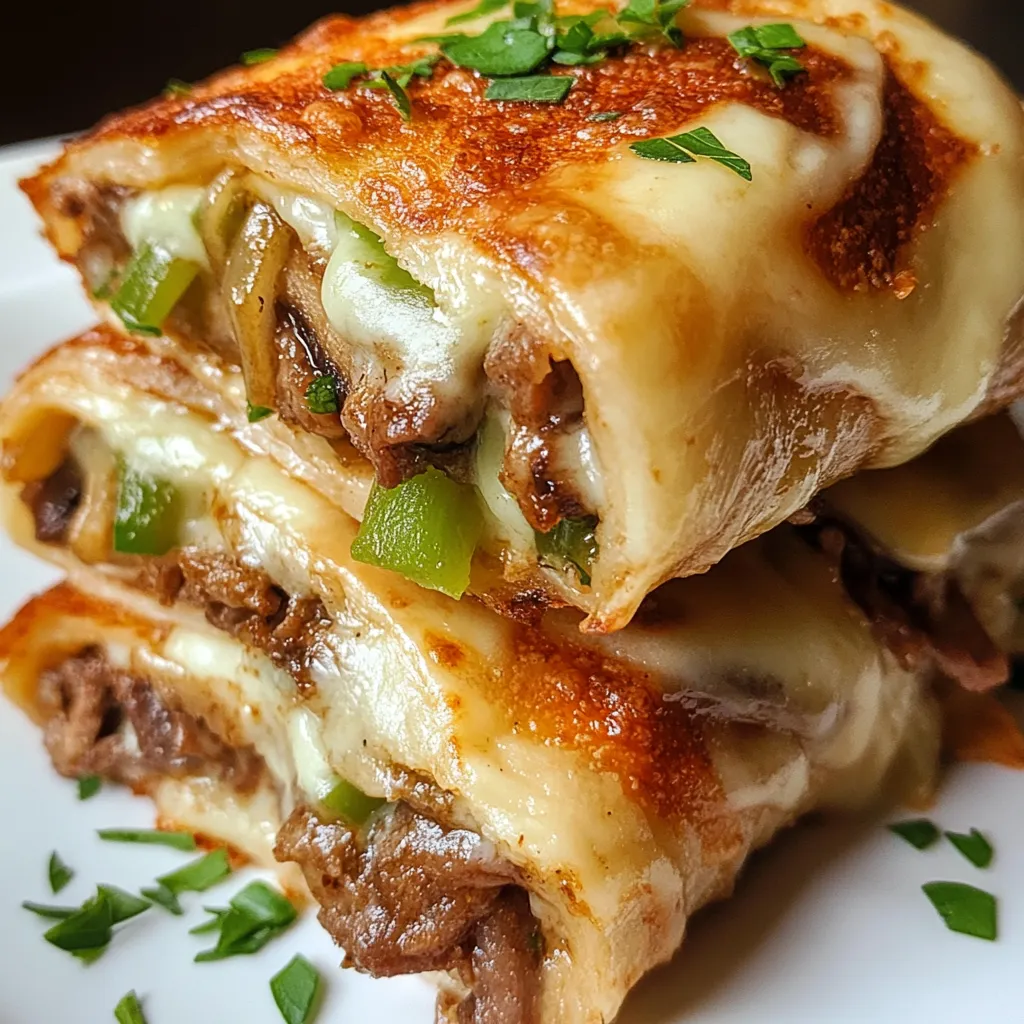
ASSEMBLE, ROLL, AND BAKE YOUR EASY KETO PHILLY CHEESESTEAK ROLL UPS
With your steak and veggies cooked to perfection, now it’s time to turn all that savory goodness into cheesy, low-carb roll ups that are packed with flavor. This part is quick and fun—especially once you see how neatly everything rolls together. And the best part? You’ll only need a few more minutes before these hit the oven and fill your kitchen with the smell of melted cheese and sizzling turkey bacon. Let’s bring it all together step by step. STEP 4: LAY OUT THE PROVOLONE CHEESE AND SPREAD THE CREAM CHEESE On a clean work surface, lay out the 8 slices of provolone cheese. These slices will form the outer layer of your roll ups and help hold everything together once baked. Next, take your softened cream cheese and spread a thin layer onto each slice of provolone. This adds a creamy element that melts beautifully and brings all the fillings together. If your cream cheese is still cold, a quick 10 seconds in the microwave helps soften it just enough to spread easily.


SERVING IDEAS AND KETO-FRIENDLY SIDES:
These roll ups are filling on their own, but if you want to serve them with something extra, here are a few low-carb ideas:- A simple side salad with olive oil and vinegar
- Roasted or sautéed zucchini, cauliflower, or asparagus
- A scoop of cauliflower mash
- Keto dipping sauces like ranch, chipotle mayo, or garlic aioli
MAKE-AHEAD TIPS:
These roll ups are perfect for meal prep. You can make them ahead, refrigerate, and reheat in the oven or air fryer. They’re also freezer-friendly—just wrap them individually in foil or freezer paper, then reheat from frozen in a 350°F oven until warmed through.
FAQS & FINAL THOUGHTS ON EASY KETO PHILLY CHEESESTEAK ROLL UPS RECIPE:
Now that your roll ups are hot out of the oven—cheesy, meaty, and perfectly wrapped in crispy turkey bacon—it’s time to dig in and enjoy. But before you do, let’s go over some common questions to help make this recipe even more flexible for your lifestyle. Whether you’re new to keto, meal prepping for the week, or just want a fun twist on a classic cheesesteak, these tips will help you customize and enjoy this dish over and over again. 1. CAN I USE A DIFFERENT TYPE OF MEAT? Yes. Ribeye and sirloin are traditional for cheesesteaks, but thin-sliced roast beef or even ground beef can work in a pinch. Just be sure to drain any extra grease before assembling the roll ups. 2. IS THERE A DAIRY-FREE OPTION? While this dish is cheese-forward, you can use dairy-free cream cheese and dairy-free sliced cheese alternatives. Just check the labels to ensure they melt well and are low in carbs if you’re keeping it keto. 3. WHAT IF I DON’T EAT BACON? You can skip the turkey bacon entirely and simply roll the filling inside the provolone slices. They’ll still hold together nicely after baking, especially if you let them cool slightly before serving. Alternatively, try using thin slices of deli turkey as a wrap. 4. HOW SHOULD I STORE LEFTOVERS? Store leftovers in an airtight container in the fridge for up to 4 days. Reheat in the oven or air fryer at 350°F for 5–7 minutes to maintain the crispness. Microwave reheating works too, but the bacon won’t be as crispy. 5. CAN I FREEZE THESE ROLL UPS? Yes. Let them cool completely, then wrap each roll individually in parchment paper or foil and place in a freezer-safe container. Freeze for up to 2 months. Reheat from frozen in a 350°F oven until heated through. 6. CAN I MAKE THESE AHEAD OF TIME? Definitely. You can fully prepare the roll ups, store them uncooked in the fridge for up to 24 hours, and then bake when ready to serve. Great for party prep or easy weeknight meals. 7. WHAT OTHER CHEESE CAN I USE INSTEAD OF PROVOLONE? Mozzarella, Monterey Jack, or Swiss cheese work well. Just choose a cheese that melts smoothly and can hold its shape when wrapped.FINAL THOUGHTS: WHY YOU’LL LOVE THESE KETO PHILLY CHEESESTEAK ROLL UPS
These Easy Keto Philly Cheesesteak Roll Ups are everything you want in a low-carb meal—satisfying, flavorful, cheesy, and so simple to make. They hit all the right notes of a classic cheesesteak while skipping the bread and sticking to your keto goals. Even better? They’re family-friendly, freezer-friendly, and full of protein and healthy fats. Whether you’re following a keto diet or just trying to cut back on carbs without sacrificing flavor, this recipe is a must-try. It’s quick enough for busy weeknights but tasty enough to serve to guests. And once you try it, you’ll probably start dreaming up your own variations—spicy jalapeños, different cheese combos, or even a breakfast version. If you make these, I’d love to hear what you think. Did you go classic or put your own twist on them? Leave a comment and let me know how you served them—or what you’d pair them with for a full keto meal. Want a printable version or a quick keto meal prep plan to go with it? I’d be happy to put one together for you—just let me know. Print
Easy Keto Philly Cheesesteak Roll Ups Recipe
- Total Time: 35 min
Description
A low-carb twist on the classic Philly cheesesteak! These cheesy, savory roll ups are packed with steak, sautéed veggies, and wrapped in turkey bacon — perfect for keto diets and guilt-free indulgence.
Ingredients
- 1 lb thinly sliced beef steak (ribeye or sirloin)
- 1 tbsp olive oil
- 1 green bell pepper, sliced
- 1 small onion, sliced
- 1 cup mushrooms, sliced
- Salt and black pepper, to taste
- 4 oz cream cheese, softened
- 8 slices provolone cheese
- 8 slices turkey bacon
Instructions
1️⃣ Preheat oven: Set your oven to 375°F (190°C). Line a baking sheet with parchment paper.
2️⃣ Sauté vegetables: Heat olive oil in a skillet over medium heat. Add the bell pepper, onion, and mushrooms. Cook until soft and slightly caramelized, about 5–7 minutes.
3️⃣ Cook steak: Add the sliced beef steak to the skillet. Season with salt and black pepper. Cook until just browned, then remove from heat.
4️⃣ Layer cheese: Spread a thin layer of softened cream cheese onto each slice of provolone cheese.
5️⃣ Fill & roll: Evenly divide the beef and vegetable mixture among the provolone slices. Roll each one up tightly.
6️⃣ Wrap in bacon: Wrap each cheese roll with a slice of turkey bacon.
7️⃣ Bake: Arrange the roll ups on the prepared baking sheet. Bake for 15–20 minutes, or until the bacon is crispy and cheese is melted.
8️⃣ Cool & serve: Let them cool for a few minutes before serving
Notes
-
Use thinly sliced steak like ribeye or sirloin for tenderness and quick cooking.
-
🫑 Bell peppers, onions, and mushrooms add classic Philly flavor and texture.
-
Provolone and cream cheese create a rich, creamy interior.
-
Turkey bacon keeps it lighter and keto-friendly — bake until crispy!
-
Don’t overfill the rolls to prevent them from bursting in the oven.
-
Make ahead friendly — prep and refrigerate, then bake when ready!
- Prep Time: 15 min
- Cook Time: 20 min