

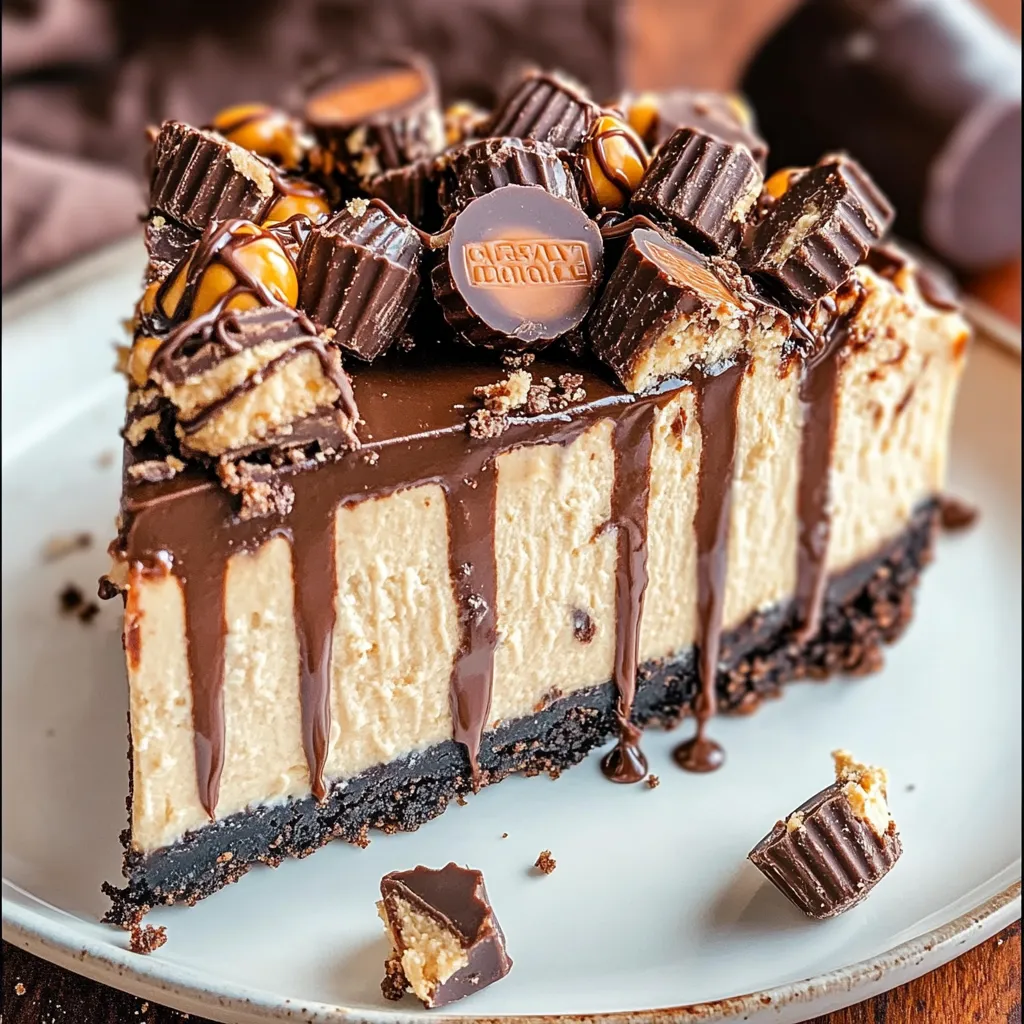
If you love peanut butter, chocolate, and cheesecake, this no-bake Reese’s Peanut Butter Cheesecake might just become your new favorite dessert. It’s rich, creamy, and packed with chopped Reese’s candies in every bite — and the best part? No oven needed.
This recipe is perfect for when you need a crowd-pleasing treat but don’t have the time (or energy) to bake. Whether you’re making it for a birthday, a holiday, or just because your sweet tooth is calling, this dessert comes together quickly and delivers big-time flavor.
I actually made this last weekend for a family BBQ and let me tell you… not a single slice was left. Everyone kept asking for the recipe — and when I said it didn’t even need baking, their jaws dropped!
Let’s get started on this decadent, no-bake treat that’s about to become your go-to for every occasion.
INGREDIENTS YOU’LL NEED
For the crust:
- 1 ½ cups chocolate cookie crumbs (like Oreos, crushed)
- ¼ cup melted butter
For the filling:
- 16 oz cream cheese, softened
- 1 cup creamy peanut butter
- ¾ cup powdered sugar
- 1 tsp vanilla extract
- 1 cup whipped topping (like Cool Whip)
- 1 cup chopped Reese’s Peanut Butter Cups
For the topping:
- Extra whipped topping for garnish
- Mini Reese’s or chopped Reese’s for decoration
- Chocolate syrup (optional)
STEPS TO MAKE THE CRUST AND START THE FILLING
STEP 1: PREPARE THE CRUST
In a medium mixing bowl, combine the chocolate cookie crumbs and melted butter. Stir until the crumbs are evenly moistened. Press this mixture firmly into the bottom of a 9-inch springform pan, using the bottom of a glass or measuring cup to create a smooth, even crust. Place the pan in the fridge to chill while you work on the filling.
STEP 2: MAKE THE FILLING BASE
In a large bowl, beat together the softened cream cheese and peanut butter using a hand mixer or stand mixer. Beat until smooth and creamy with no lumps remaining.

STEP 3: ADD THE SUGAR AND VANILLA
Next, add the powdered sugar and vanilla extract to the cream cheese mixture. Beat again until everything is fully incorporated. The filling should be light and fluffy at this point, but still thick and rich.

NO BAKE REESE’S CHEESECAKE – ASSEMBLING AND CHILLING THE FILLING
Now that the base is rich, smooth, and packed with peanut butter flavor, it’s time to fold in the whipped topping, stir in those irresistible Reese’s chunks, and bring it all together in the chilled cookie crust.
This part is where everything starts to look and feel like a real cheesecake — and trust me, the temptation to sneak a spoonful (or three) is strong. Don’t worry, I won’t judge!
STEPS TO COMPLETE THE FILLING AND ASSEMBLE
STEP 4: FOLD IN WHIPPED TOPPING
Using a spatula, gently fold in 1 cup of whipped topping into the peanut butter and cream cheese mixture. You want to keep as much air in the mixture as possible for that fluffy, mousse-like texture. Be careful not to overmix.
STEP 5: ADD CHOPPED REESE’S
Once the whipped topping is fully incorporated, stir in the chopped Reese’s Peanut Butter Cups. You can roughly chop them for bigger chunks or dice them smaller if you prefer more even bites. Either way, every spoonful is going to be delicious.
STEP 6: ASSEMBLE THE CHEESECAKE
Remove the crust from the fridge. Pour the cheesecake filling into the pan, spreading it evenly with a spatula or the back of a spoon. Make sure to press it gently into the edges so there are no gaps.

STEP 7: CHILL
This is the hardest part — the waiting. Cover the pan with plastic wrap and refrigerate for at least 4 hours, or overnight if you have the time. This helps the cheesecake firm up and allows all those flavors to blend together.
I know it’s tempting to dig in early, but letting it chill makes all the difference in texture. It’s worth the wait!
OPTIONAL BUT HIGHLY RECOMMENDED: ADD THAT FINAL FLAIR
Before you serve your masterpiece, it’s time to make it look just as good as it tastes. This part is totally up to you, but it’s a fun way to customize your dessert for birthdays, holidays, or just a fun family night.
You can get as simple or creative as you want with the topping:
- Swirl on extra whipped topping
- Sprinkle with more chopped Reese’s
- Add a drizzle of chocolate syrup
- Throw on a handful of mini chocolate chips for good measure
It’s all about making it your own. And no matter how you top it, one thing’s for sure — this cheesecake is going to disappear fast.

FREQUENTLY ASKED QUESTIONS ABOUT NO BAKE REESE’S CHEESECAKE
Before you dive into making this dreamy dessert, here are some common questions I get that might help you along the way!
Can I use crunchy peanut butter instead of creamy?
Yes! If you like a little texture in your cheesecake, go ahead and use crunchy peanut butter. It adds an extra layer of richness and a nice little bite.
What if I don’t have a springform pan?
No problem! You can use a regular 9-inch pie dish or even an 8×8 baking dish. Just make sure to press the crust in evenly and chill it well so it holds its shape when sliced.
Can I freeze this cheesecake?
Yes, you can. Wrap it tightly in plastic wrap and freeze for up to 2 months. Let it thaw in the refrigerator before serving. Just know that the texture might be slightly softer after freezing.
Can I make this ahead of time?
Definitely! This no bake cheesecake is perfect for prepping a day or two in advance. Just wait to add the toppings until right before serving so they stay fresh and pretty.
What other toppings can I use besides Reese’s?
If you want to switch things up, try mini chocolate chips, a peanut butter drizzle, chopped peanuts, or even pretzel pieces for a sweet and salty twist.
Can I use homemade whipped cream instead of Cool Whip?
You sure can! Just beat 1 cup of heavy cream with 2 tablespoons of powdered sugar until stiff peaks form. Fold it in the same way you would with the store-bought version.
FINAL THOUGHTS – THIS NO BAKE CHEESECAKE IS A MUST-MAKE
If you’re looking for a dessert that hits every craving — sweet, creamy, peanut buttery, and loaded with chocolate — this Reese’s Peanut Butter No Bake Cheesecake is it.
It’s the kind of dessert you’ll want to make for birthdays, potlucks, summer barbecues, or just because you need a treat that makes people smile. Plus, since it’s no bake, there’s no oven stress involved. Just mix, chill, and enjoy.
If you give this recipe a try, I’d love to hear how it turns out! Drop a comment, share your own twist, or snap a photo and tag it on social — I love seeing how others bring these recipes to life.
Until next time, happy no-b
Print
Easy Reese’s Peanut Butter Cheesecake Recipe No Bake
- Total Time: 6 hrs 20 min
Description
This no-bake cheesecake combines creamy peanut butter, rich cream cheese, and crushed Reese’s for a decadent dessert that’s as easy to make as it is irresistible. Perfect for holidays, birthdays, or any time you’re craving a sweet treat!
Ingredients
For the crust:
-
24 chocolate sandwich cookies (like Oreos)
-
¼ cup melted butter
For the filling:
-
16 oz cream cheese, softened
-
1 cup creamy peanut butter
-
1 cup powdered sugar
-
1 tsp vanilla extract
-
1 ½ cups whipped topping (like Cool Whip)
-
1 cup chopped Reese’s Peanut Butter Cups (plus more for topping)
For the topping (optional):
-
Additional whipped topping
-
Chocolate syrup drizzle
-
Extra chopped Reese’s
Instructions
1️⃣ Make the crust:
Crush cookies into fine crumbs. Mix with melted butter until fully coated. Press firmly into the bottom of a 9-inch springform pan. Chill while preparing the filling.
2️⃣ Make the filling:
In a large bowl, beat cream cheese, peanut butter, powdered sugar, and vanilla until smooth and fluffy.
3️⃣ Fold in whipped topping:
Gently fold in whipped topping until fully combined. Then stir in chopped Reese’s.
4️⃣ Assemble the cheesecake:
Spread the filling evenly over the prepared crust. Smooth the top with a spatula.
5️⃣ Chill:
Refrigerate for at least 6 hours, or overnight, until firm.
6️⃣ Decorate and serve:
Top with more whipped topping, a drizzle of chocolate syrup, and chopped Reese’s before serving.
Notes
-
For extra crunch, add chopped peanuts or a peanut butter drizzle.
-
Use mini Reese’s for a fun topping or swirl some into the filling for more texture.
-
Keeps well in the fridge for 3–4 days or can be frozen for up to a month.
- Prep Time: 20 min
- Cook Time: 6 hrs


