


If you’re someone who loves a good cookie but doesn’t want to compromise on your healthy eating goals, then this Greek Yogurt Cookie Dough recipe is about to become your new best friend. These cookies are a delightful combination of nutritious ingredients and the satisfying sweetness we all crave. They’re soft, chewy, and just the right balance of sweet without being overwhelming. And the best part? You can indulge without feeling guilty.
I stumbled upon this idea after looking for ways to swap out some of the more traditional ingredients in cookie recipes for healthier options. Greek yogurt seemed like a perfect candidate—it adds creaminess and a little protein boost, and it can replace some of the butter or oils used in classic cookie recipes. After experimenting a few times, I came up with this version that I’m sharing with you today. Trust me, you won’t miss the butter or refined sugar, and the texture is spot on.
These cookies are not only healthier, but they’re also incredibly easy to make. With just a few simple ingredients, you’ll have a batch of delicious cookies ready to go in no time. Whether you’re looking for a healthier snack to satisfy your sweet tooth or you want to serve something a little lighter at your next get-together, this recipe is perfect.
Let’s take a look at the ingredients you’ll need to get started:
Ingredients:
- 1 cup whole wheat flour
- ½ cup Greek yogurt
- ¼ cup honey or maple syrup
- 2 tsp vanilla extract
- 1 tsp baking soda
- ¼ tsp salt
- ½ cup mini chocolate chips (or any mix-ins you like)
Step 1: Preheat the Oven
To kick things off, preheat your oven to 350°F (175°C). This step is always a good place to start, as it ensures the oven is at the right temperature by the time your cookie dough is ready to go in.

Step 2: Mix the Dry Ingredients
While the oven is heating up, grab a large bowl and combine the whole wheat flour, baking soda, and salt. This step is quick but important—it ensures that the dry ingredients are evenly distributed before you add the wet ingredients. The whole wheat flour provides a bit more fiber and texture than all-purpose flour, and the baking soda will help your cookies puff up just the right amount. Give everything a good mix, and then you’re ready to move on to the next step.
Now that the dry ingredients are ready, it’s time to add the wet ingredients, which are going to bring everything together and turn this simple mix into the delicious dough we’re after. The combination of Greek yogurt, honey (or maple syrup), and vanilla extract will create a smooth, flavorful base for these cookies. Let’s dive into the next steps and get the dough ready for baking!

Step 3: Add the Wet Ingredients
In your bowl of dry ingredients, add the Greek yogurt, honey (or maple syrup), and vanilla extract. These wet ingredients are going to give the dough its soft, chewy texture, with the Greek yogurt providing a boost of creaminess and protein. Honey or maple syrup will add the perfect touch of sweetness—feel free to choose whichever one you prefer. Honey has a slightly floral sweetness, while maple syrup will give the cookies a rich, caramel-like flavor. Either one works beautifully, so choose what fits your taste!
Stir everything together until it’s fully combined. The dough should come together easily and form a smooth, cohesive mixture. The Greek yogurt helps bind the ingredients and adds moisture, while the honey or maple syrup ensures the cookies are just the right amount of sweet. At this stage, you’ll start to see the dough taking shape, and you’ll be able to tell that these cookies are going to be soft and delicious.

Step 4: Fold in the Chocolate Chips
Once your dough is fully combined, it’s time to add the mini chocolate chips (or any other mix-ins you like). The mini chocolate chips are perfect because they melt slightly while baking, creating little pockets of chocolate in every bite. You could also swap these out for other add-ins, like chopped nuts, dried fruit, or even a sprinkle of cinnamon if you’re in the mood for something a little different. The options are endless, so feel free to get creative!
Gently fold in the chocolate chips, making sure they’re evenly distributed throughout the dough. Be careful not to overwork the dough—just a few folds are enough to get everything mixed in.

Step 5: Scoop the Dough onto the Baking Sheet
Now that your dough is ready, it’s time to form your cookies! Using a tablespoon or a cookie scoop, scoop out portions of dough and place them on a parchment-lined baking sheet. Make sure to space the dough balls about 2 inches apart, as they will spread a little as they bake.
If you want your cookies to have a more uniform size, you can press them down lightly with the back of a spoon to help them bake evenly. However, if you like a little more height and softness to your cookies, feel free to leave them as they are.

Step 6: Bake the Cookies
Place your baking sheet in the preheated oven and bake the cookies for 8-10 minutes. Keep an eye on them as they bake, and be sure to check for the edges turning golden brown. The center should still look soft, but once the edges are golden and slightly crisp, they are ready to come out.
Let the cookies cool on the baking sheet for about 5 minutes. This helps them set and firm up a bit. After that, carefully transfer them to a wire rack to cool completely. The cookies will continue to firm up as they cool, giving you that perfect chewy texture on the inside and a slightly crisp edge.
Step 7: Allow the Cookies to Cool
Once your cookies are out of the oven, resist the temptation to eat them right away! Let the cookies sit on the baking sheet for about 5 minutes. This allows them to firm up and set properly, ensuring they don’t break apart when you move them. After that, carefully transfer the cookies to a wire rack to cool completely.
This cooling process is important because it helps the cookies maintain their chewy texture on the inside while allowing the edges to crisp up just enough. Plus, it gives the cookies a bit of time to rest and cool down to the perfect temperature for enjoying!
Once cooled, you can serve and enjoy them, or store them in an airtight container to keep them fresh.
Step 8: Enjoy and Store Leftovers
Once your cookies are completely cool, it’s time to enjoy them! These Greek Yogurt Cookies are perfect for a snack, dessert, or even a healthier treat to bring to a party. If you have leftovers (which is rare), store them in an airtight container at room temperature for up to 3 days, or in the fridge for up to a week.
For longer storage, you can freeze them for up to 3 months. Just make sure to separate them with parchment paper and place them in a freezer-safe bag or container. When you’re ready to eat them, simply let them thaw at room temperature or heat them in the microwave for a few seconds for that freshly-baked taste.
Enjoy your healthier treat, and don’t forget to share them with friends and family!

FAQ Section and Conclusion:
Now that your Greek Yogurt Cookie Dough is ready to bake, it’s time to pop them in the oven and enjoy the results of all your hard work. But before we wrap up this recipe, let’s answer some common questions to ensure your cookies turn out just right. Whether you’re a seasoned baker or new to the kitchen, these tips will help you get the best results possible.
1. Can I use regular all-purpose flour instead of whole wheat flour?
Yes, you can! If you prefer all-purpose flour or simply don’t have whole wheat flour on hand, feel free to use it as a substitute. However, whole wheat flour gives these cookies a bit more texture and fiber, which is why it’s the healthier choice. If you decide to use all-purpose flour, the texture may be a little lighter, but the cookies will still be delicious.
2. Can I make these cookies without Greek yogurt?
While Greek yogurt is a key ingredient for the texture and protein boost in these cookies, you can substitute it with other dairy or non-dairy options. For example, you could use regular yogurt, coconut yogurt, or even a bit of applesauce if you’re looking for a dairy-free version. Keep in mind that each substitution might slightly change the texture, but it will still be a tasty cookie!
3. Can I substitute the honey or maple syrup with a different sweetener?
Yes, you can use other sweeteners like agave syrup, stevia, or even coconut sugar. Just be mindful of the consistency and sweetness level. For example, stevia is much sweeter than honey, so you’ll need to adjust the amount to taste. If you choose to use a dry sweetener like coconut sugar, you might need to add a little more moisture to the dough.
4. How do I know when the cookies are done?
The cookies are done when the edges are golden brown and the centers are just slightly soft. They will continue to firm up as they cool, so don’t worry if they seem a bit soft when you first take them out. Typically, baking for 8-10 minutes will give you that perfect chewy texture, but if you prefer a crunchier cookie, you can leave them in a bit longer.
5. Can I store these cookies?
Yes, you can store these cookies! Once they’ve cooled completely, place them in an airtight container and store them at room temperature for up to 3-4 days. If you want to keep them longer, you can freeze them for up to 2-3 months. Just make sure to layer the cookies between parchment paper to prevent them from sticking together.
6. Can I make these cookies gluten-free?
Absolutely! To make these cookies gluten-free, just swap the whole wheat flour with a 1:1 gluten-free flour blend. Make sure to check that the flour blend contains xanthan gum or add it separately, as it helps bind the ingredients together and mimic the texture of wheat flour.
Conclusion:
And there you have it—your delicious, healthier Greek Yogurt Cookies are ready to enjoy! These cookies are perfect for satisfying your sweet tooth without all the guilt, thanks to their wholesome ingredients and simple, easy-to-follow recipe. Whether you’re looking for a quick snack or a light dessert, they’ll hit the spot every time.
What I love most about these cookies is their versatility—you can play around with the mix-ins, adjust the sweetness to your taste, and even experiment with different types of yogurt or flour. The result is always a soft, chewy cookie that’s both satisfying and nourishing.
I hope you give this recipe a try and enjoy them as much as I do! Don’t forget to share your experience in the comments and let me know what variations you try. Happy baking, and enjoy these wholesome treats!
Print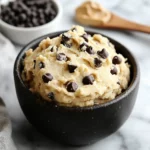
Greek Yogurt Cookie Dough Recipe for a Healthy Treat
- Total Time: 40 min
Description
This no-bake Greek Yogurt Cookie Dough is a protein-packed, healthy alternative to traditional cookie dough. Made with wholesome ingredients and no eggs, it’s totally safe to eat raw—and totally addictive!
Ingredients
-
1 cup plain Greek yogurt (preferably full-fat for creaminess)
-
½ cup almond flour or oat flour
-
2 tbsp natural peanut butter or almond butter
-
2 tbsp maple syrup or honey
-
1 tsp vanilla extract
-
Pinch of salt
-
¼ cup mini chocolate chips (dark chocolate preferred)
Instructions
1️⃣ Mix the base: In a medium bowl, whisk together Greek yogurt, peanut butter, maple syrup, and vanilla extract until smooth.
2️⃣ Add dry ingredients: Stir in almond flour and a pinch of salt until well combined. Adjust flour for a thicker or thinner consistency.
3️⃣ Fold in chocolate chips: Gently fold in mini chocolate chips until evenly distributed.
4️⃣ Chill (optional): For firmer texture, refrigerate for 20–30 minutes before serving.
5️⃣ Serve and enjoy: Scoop into bowls or eat straight from the container—no judgment here!
Notes
-
Add a spoonful of protein powder for a post-workout treat.
-
Swap chocolate chips for dried fruit, coconut flakes, or chopped nuts.
-
Store in the fridge for up to 3 days.
- Prep Time: 10 min
- Cook Time: 30 min


