Halloween Monster Eyeballs are a delightfully spooky treat that combines the sweet and salty flavors of chocolate and pretzels, making them an irresistible snack for Halloween parties. These bite-sized goodies are not only fun to make but also perfect for setting the eerie mood at any festive gathering. The combination of waffle pretzels, Hershey Hugs, and M&M’s creates a playful and eye-catching design that resembles creepy monster eyeballs, complete with a bloodshot effect from red sanding sugar and a sinister pupil made from black decorating gel.
These treats have become increasingly popular during Halloween, particularly among families and children. The simplicity of the recipe, requiring just a few ingredients and minimal baking skills, makes it an ideal project for kids and parents to enjoy together. Additionally, their whimsical appearance makes them a hit at any Halloween-themed event, adding a touch of fun and fright to the celebration.
Ingredients Breakdown
Creating the perfect Halloween Monster Eyeballs requires careful selection of ingredients to ensure both the look and taste are spot on. Here’s a breakdown of why each ingredient is essential to this recipe:
Waffle Pretzels
Waffle pretzels are the ideal base for these monster eyeballs due to their flat and grid-like surface. This design allows the Hershey Hugs to sit evenly on top without slipping, providing a stable foundation for the toppings. The small squares of the waffle pretzel also help to catch the red sanding sugar, enhancing the bloodshot effect. Additionally, the salty crunch of the pretzel perfectly balances the sweetness of the chocolate and candy, making each bite a delightful combination of textures and flavors.
Hershey Hugs vs. Kisses
While Hershey’s Kisses might be a popular choice for many recipes, Hershey Hugs are preferred for this one. The key difference lies in their melting behavior. Hershey Hugs, which are a blend of milk chocolate and white chocolate, tend to soften evenly and smoothly when heated, making them easier to work with. On the other hand, Hershey Kisses can sometimes hold their shape too long or melt unevenly, which can make it challenging to achieve the soft, shiny consistency needed for this recipe. The swirled look of Hugs also adds a touch of visual appeal, enhancing the overall aesthetic of the monster eyeballs.
Red Sanding Sugar
Red sanding sugar plays a crucial role in giving these treats their eerie, bloodshot appearance. This coarse sugar not only adds a subtle crunch but also provides a vibrant, eye-catching contrast against the white chocolate of the Hershey Hugs. The red hue mimics the look of blood vessels in the eyes, contributing to the spooky theme. Sprinkling the sugar while the chocolate is still warm ensures it adheres well and creates the desired effect.
M&M’s
M&M’s are used to form the “iris” of the monster eyeballs, and their wide variety of colors allows for creative customization. While traditional Halloween colors like green, orange, and purple work well, you can also use red or blue for a more traditional eye color. For a uniform look, it’s best to place the M&M’s with the “M” side down, ensuring a smooth and colorful surface on top. This candy adds a playful pop of color that brings the monster eyeballs to life.
Black Decorating Gel
The black decorating gel is the finishing touch that transforms these treats into convincing monster eyeballs. To create the “pupil,” a small dab of gel is placed in the center of the M&M. The key to success with this step is using just the right amount of gel—too much, and it can smudge or fail to set properly. A light touch will give the eyeballs a sharp, defined pupil that dries quickly, ensuring the treats are easy to handle and serve.
Step-by-Step Instructions
1. Preheat the Oven
Start by preheating your oven to 200 degrees Fahrenheit. This low temperature is key to softening the chocolate without causing it to burn or over-melt. Unlike traditional baking where higher temperatures are used, here, you want to gently heat the Hershey Hugs so that they become soft and malleable but not completely liquefied. If the oven is too hot, the chocolate can become too runny, making it difficult to work with and ruining the aesthetic of the monster eyeballs. The slow and steady approach ensures the Hugs maintain their shape while becoming just soft enough to press the M&M’s into.
2. Arranging the Pretzels on a Baking Sheet
While the oven is heating, line a baking sheet with parchment paper or a silicone baking mat. This not only helps with easy cleanup but also prevents the pretzels from sticking to the pan. Arrange the waffle pretzels in a single layer, ensuring they are spaced out evenly. Each pretzel should have its own space, with none overlapping or touching. Proper spacing is crucial to allow each Hug to melt evenly and ensures that the toppings adhere correctly. The flat, grid-like surface of the waffle pretzels is perfect for holding the Hugs and toppings in place without sliding off.
3. Melting the Hershey Hugs
Place one Hershey Hug on top of each pretzel, centered carefully. Then, put the baking sheet in the preheated oven. Let the Hugs warm for about 5 to 7 minutes, but keep a close watch on them during this time. The goal is for the Hugs to become soft and glossy but not completely melted. They should retain their shape while becoming just soft enough to press the M&M’s into. If they begin to puddle or lose their definition, they’ve been in too long. The soft, shiny consistency is perfect for adhering the toppings without them sliding off.
4. Adding the Sanding Sugar and M&M’s
Once the Hugs are at the right consistency, quickly remove the baking sheet from the oven. Immediately sprinkle a pinch of red sanding sugar over each Hug. The warm chocolate will cause the sugar to stick, creating a bloodshot effect on the eyeballs. Next, place an M&M in the center of each softened Hug, pressing it down gently with the “M” side facing down. This creates the iris of the eyeball. It’s important to work swiftly during this step, as the chocolate will begin to harden as it cools, making it more difficult for the sugar and M&M’s to adhere properly.
5. Decorating with Black Gel
Once the M&M’s are in place and the chocolate has cooled slightly, it’s time to add the final touch with black decorating gel. Using a small amount of gel, place a tiny dot in the center of each M&M to create the pupil of the monster eyeball. Be careful not to use too much gel, as it can easily spread or smudge, ruining the clean look of the eyeball. A small, precise dot will give the eyeballs a sharp, realistic appearance.
6. Setting in the Freezer
After decorating, place the baking sheet in the freezer for about an hour. This step is crucial to fully set the chocolate and gel, ensuring that the monster eyeballs hold their shape and are easy to handle. Freezing also helps the chocolate to harden quickly, locking in the toppings and preventing them from smudging or falling off. Once set, the treats can be stored at room temperature or in the refrigerator until ready to serve. The quick chill in the freezer ensures they’re ready to enjoy without any mess.
Tips for Perfect Halloween Monster Eyeballs
1. Timing is Everything
When working with melted chocolate, timing is crucial to achieving perfect Halloween Monster Eyeballs. The key is to monitor the chocolate closely as it softens in the oven. Overheating can cause the Hershey Hugs to lose their shape or become too runny, making it difficult to add the toppings without creating a mess. The moment the Hugs become glossy and slightly soft, but still hold their shape, it’s time to remove them from the oven. After this, work quickly to add the red sanding sugar and M&M’s before the chocolate begins to cool and harden. If the chocolate sets too fast, the toppings won’t stick properly, and you’ll miss out on the desired look.
2. Freezing and Storage Tips
Once your monster eyeballs are decorated, freezing is an important step to ensure they set properly. Place the baking sheet in the freezer for about an hour. This helps the chocolate to harden quickly, locking in the toppings and preventing them from smudging or sliding off. After they’re fully set, the eyeballs can be stored in an airtight container. If you plan to store them for an extended period, keep them in the refrigerator to prevent the chocolate from softening, especially if you live in a warm climate. If storing at room temperature, make sure it’s in a cool, dry place to avoid any melting or smudging of the gel.
3. Alternative Toppings
While the classic recipe calls for red sanding sugar and M&M’s, there are plenty of ways to customize your Halloween Monster Eyeballs. For a different look, you could use colored sugar in other hues, like green or blue, to create a variety of monster eyes. Instead of M&M’s, try using small candy eyes or other round candies like Skittles or Reese’s Pieces for the iris. You can also experiment with different sprinkles, such as edible glitter or nonpareils, to add texture and sparkle to your monster eyeballs. These variations not only add visual interest but also allow you to tailor the treats to different themes or color schemes.
Variations and Customizations
1. Different Flavors and Colors
One of the best aspects of making Halloween Monster Eyeballs is the ability to customize them to suit your preferences or match a specific theme. Start by experimenting with different flavors of Hershey Hugs. While the classic milk and white chocolate swirls are a favorite, you can also try using Hershey Hugs in other flavors, such as white crème or dark chocolate, to add a unique twist. These variations can enhance the overall flavor profile and cater to different taste preferences.
Additionally, playing with the colors of sanding sugar and M&M’s allows for endless creativity. Instead of the traditional red sanding sugar, consider using green, blue, or even black sugar for a different effect. Green sanding sugar could give the eyes a more monstrous or alien appearance, while black might create a more eerie or ghostly look. Similarly, you can choose M&M’s in various colors to represent different eye colors. Bright blue or green M&M’s could make the monster eyes look more vibrant, while yellow or orange could add a spooky twist.
2. Gluten-Free or Vegan Options
For those with dietary restrictions, it’s easy to adapt this recipe to be gluten-free or vegan. For a gluten-free version, ensure that the waffle pretzels you use are certified gluten-free. Many brands offer gluten-free pretzel options that taste just as delicious as the traditional ones. For a vegan version, you’ll need to make a few substitutions. Use a dairy-free chocolate alternative instead of Hershey Hugs—many brands offer vegan chocolate that melts beautifully. Opt for vegan-friendly candies like dairy-free chocolate chips or specific brands of colored candy-coated chocolates. Additionally, check that the black decorating gel and sanding sugar are vegan, as some may contain non-vegan ingredients like gelatin or certain food colorings.
3. Themed Variations
These monster eyeballs can easily be adapted for different holidays or themed events by simply changing the colors and decorations. For Christmas, you could use green and red sanding sugar and M&M’s to create festive holiday eyes. Consider using white chocolate Hugs with a sprinkle of edible glitter to add a snowy effect. For Valentine’s Day, switch to pink or red sanding sugar with white or dark chocolate Hugs, and use heart-shaped sprinkles or candies instead of M&M’s. These themed variations allow you to take a Halloween classic and transform it into a versatile treat that can be enjoyed all year round, making it perfect for any occasion.
Common Mistakes and How to Avoid Them
1. Overheating the Chocolate
One of the most common mistakes when making Halloween Monster Eyeballs is overheating the chocolate. If the Hershey Hugs are left in the oven too long, they can become overly melted, losing their shape and becoming difficult to work with. This can result in a runny mess rather than a smooth, soft chocolate base. To avoid this, always preheat your oven to 200 degrees Fahrenheit and keep a close eye on the chocolate as it softens. The Hugs should be soft and shiny but still hold their shape. If you notice the chocolate starting to puddle or lose its definition, remove it from the oven immediately.
2. Using Too Much Decorating Gel
Applying too much black decorating gel can lead to smudging, which not only affects the appearance of the monster eyeballs but also makes them harder to handle. If the gel doesn’t dry properly, it can smear when touched or when stored. To avoid this, use a light touch when applying the gel—just a small dab is enough to create the pupil effect. If you do end up using too much gel, you can try blotting the excess gently with a clean paper towel or letting the treats sit at room temperature for a bit longer before handling them.
3. Not Freezing Long Enough
Failing to freeze the monster eyeballs for the recommended time can result in the chocolate not setting properly. This can make the treats difficult to handle, as the toppings may slide off or the chocolate may smudge. To ensure the treats are fully set, place the baking sheet in the freezer for at least an hour. If you’re in a hurry and remove them too soon, simply return them to the freezer for additional time. Proper freezing ensures the eyeballs are firm, making them easier to store and serve.
FAQs
1. Can I use a different type of chocolate?
Hershey Hugs are preferred in this recipe because of their unique melting behavior—they soften evenly and maintain their shape better than other chocolates, like Hershey Kisses, which can sometimes melt unevenly. However, if you want to experiment, you can try using other types of chocolate, such as white chocolate chips or dark chocolate squares. Just be aware that the melting time may vary, and the final texture might differ. Using chocolate with a higher cocoa content may result in a firmer, less creamy consistency.
2. What if I don’t have sanding sugar?
If you don’t have red sanding sugar, you can substitute with regular granulated sugar, colored sprinkles, or even edible glitter. Granulated sugar won’t provide the same intense color or texture as sanding sugar, but it will still give a slight sparkle. Colored sprinkles can add a playful, textured effect, though they may not adhere as well as sanding sugar. Edible glitter will offer a more dramatic, sparkly look, perfect for a different take on monster eyeballs.
3. How far in advance can I make these?
You can make Halloween Monster Eyeballs up to a week in advance. After the treats have set in the freezer, store them in an airtight container at room temperature in a cool, dry place. If your environment is particularly warm, consider storing them in the refrigerator to prevent the chocolate from softening. Just ensure they’re well-sealed to avoid absorbing any fridge odors.
4. Can I use different types of pretzels?
Yes, you can use different types of pretzels, but there are pros and cons. Regular twist pretzels or pretzel rods can work, but they may not provide the same stability as waffle pretzels. The flat, grid-like surface of waffle pretzels is ideal for holding the chocolate and toppings in place. If using different shapes, be mindful of the size and how the chocolate will sit on top. Smaller or irregular shapes might make it harder to create a neat and uniform look.
Print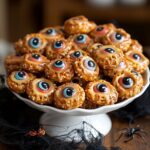
Halloween Pretzel Monster Eyebals
Description
Halloween Monster Eyeballs are a fun and spooky treat that’s perfect for any Halloween celebration. These bite-sized snacks combine the salty crunch of waffle pretzels with the sweet creaminess of Hershey Hugs, topped off with colorful M&M’s and a touch of red sanding sugar for a creepy bloodshot effect. A small dab of black decorating gel turns these into convincing monster eyeballs that are sure to be a hit with both kids and adults. They’re easy to make, visually striking, and delicious—perfect for adding a bit of frightful fun to your Halloween party.
Ingredients
- 35 waffle pretzels
- 35 Hershey Hugs (do not use Kisses, as they don’t melt as well)
- Red sanding sugar
- 35 M&M’s
- Black decorating gel
Instructions
- Preheat the Oven: Preheat your oven to 200 degrees Fahrenheit. This low temperature allows the Hershey Hugs to soften just right without melting too much or burning.
- Arranging the Pretzels on a Baking Sheet: Line a baking sheet with parchment paper or a silicone baking mat for easy cleanup. Arrange the waffle pretzels in a single layer, ensuring they don’t overlap.
- Melting the Hershey Hugs: Place one Hershey Hug on top of each pretzel. Place the baking sheet in the preheated oven and bake for 5-7 minutes, watching carefully. The Hugs should be soft and shiny, not fully melted.
- Adding the Sanding Sugar and M&M’s: Quickly remove the baking sheet from the oven. Immediately sprinkle red sanding sugar over the softened Hugs, then press an M&M into the center of each one, “M” side down.
- Decorating with Black Gel: Once the M&M’s are in place, use a small amount of black decorating gel to create a pupil in the center of each M&M. Be careful not to use too much gel to avoid smudging.
- Setting in the Freezer: Place the baking sheet in the freezer for about an hour to allow the treats to fully set. This step ensures the chocolate hardens properly and the toppings stay in place.
Notes
- Substitutions: You can use different flavors of Hershey Hugs, or experiment with other chocolates, but be mindful of their melting properties. If you don’t have sanding sugar, consider using colored sprinkles or edible glitter for a similar effect.
- Storage: These treats can be made up to a week in advance. Store them in an airtight container at room temperature in a cool, dry place, or in the refrigerator if your environment is warm. Ensure they are well-sealed to maintain freshness and prevent them from absorbing any unwanted odors.
- Customization: Feel free to customize the colors and toppings to fit other holidays or personal preferences. These treats can easily be adapted for Christmas, Valentine’s Day, or any themed party with a simple change of colors and decorations.


