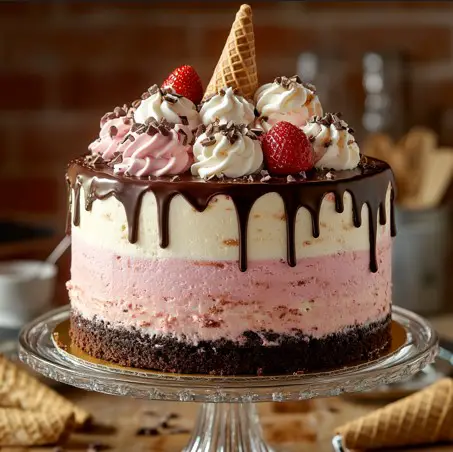
Neapolitan cake, inspired by the classic Neapolitan ice cream, is a delightful dessert that combines three beloved flavors—vanilla, strawberry, and chocolate—into one visually striking and delicious layered cake. Each layer offers a unique taste experience, and when combined, they create a beautiful, harmonious dessert that is both nostalgic and crowd-pleasing. The vibrant colors and distinct flavors make Neapolitan cake a popular choice for celebrations and special occasions.
However, baking a Neapolitan cake at high altitudes presents unique challenges. The lower air pressure can cause cakes to rise too quickly and then collapse, or become dry and crumbly. Adjusting recipes for high altitude is essential to achieve the desired texture and consistency, ensuring that each layer of the cake is moist, tender, and perfectly baked.
This recipe addresses the challenges of high-altitude baking by providing specific adjustments for the vanilla, strawberry, and chocolate cake layers, as well as their corresponding buttercreams. By following these carefully crafted instructions, you can create a stunning and delicious Neapolitan cake that maintains its structure and flavor, even at higher elevations. Whether you’re baking for a special occasion or just to satisfy a craving, this high-altitude Neapolitan cake is sure to impress.
Understanding High Altitude Baking
Baking at high altitudes, typically considered to be 3,000 feet or more above sea level, requires a different approach than baking at sea level. The lower atmospheric pressure at high altitudes affects the way cakes rise, their moisture content, and overall texture. Understanding these effects is crucial for successfully baking a Neapolitan cake, or any cake, at high altitudes.
One of the primary challenges of high-altitude baking is the tendency for cakes to rise too quickly. With less air pressure to resist the expansion of gases, cakes can rise rapidly and then collapse before they have a chance to fully set. This often results in a dense, sunken cake. Additionally, the drier air at high altitudes can cause cakes to lose moisture quickly, leading to a dry and crumbly texture.
To combat these issues, several adjustments can be made to cake recipes. First, reducing the amount of leavening agents like baking powder or baking soda helps control the rapid rise of the cake. Typically, you might reduce these ingredients by about 25% to prevent the cake from over-expanding and collapsing. Second, increasing the amount of liquid in the recipe helps retain moisture. This could involve adding an extra tablespoon or two of milk, water, or even sour cream, which also adds richness.
Another important adjustment is to slightly reduce the amount of sugar in the recipe. Sugar can weaken the structure of a cake at high altitudes, so cutting it by about a tablespoon per cup can provide more stability. Similarly, baking the cake at a slightly lower temperature for a longer period can help ensure even baking without the cake rising too quickly.
For buttercream, which can become too soft or unstable at high altitudes, it’s helpful to reduce the amount of liquid slightly and beat the buttercream a bit longer to achieve the desired consistency. With these adjustments, you can ensure that your high-altitude Neapolitan cake will be moist, well-risen, and deliciously layered.
Ingredients Breakdown
Vanilla Cake and Buttercream
Ingredients for the Vanilla Cake and Its Preparation
The vanilla layer is the foundation of a Neapolitan cake, providing a light and classic flavor. The ingredients you will need include:
- 1 ½ cups all-purpose flour
- 1 ¼ teaspoons baking powder
- ½ teaspoon salt
- ½ cup unsalted butter, softened
- 1 cup granulated sugar
- 2 large eggs
- 1 teaspoon pure vanilla extract
- ½ cup whole milk
To prepare the vanilla cake, begin by preheating your oven to 350°F (175°C) and preparing your 8-inch cake pan with non-stick spray. Cream the butter and sugar together until light and fluffy, then add the eggs one at a time, followed by the vanilla extract. In a separate bowl, whisk together the dry ingredients. Gradually add the dry ingredients to the wet mixture, alternating with the milk, and mix until just combined. Pour the batter into the prepared pan and bake for 28-30 minutes, or until a cake tester comes out clean.
Ingredients for the Vanilla Buttercream and Its Preparation
For the vanilla buttercream, you’ll need:
- 1 cup unsalted butter, softened
- 4 cups powdered sugar
- 1 teaspoon vanilla extract
- 2-3 tablespoons heavy cream or milk
To prepare the buttercream, beat the softened butter until creamy, then gradually add the powdered sugar, vanilla extract, and cream. Beat until the buttercream is light and fluffy.
Tips for Ensuring a Moist and Flavorful Vanilla Cake at High Altitude
To keep the vanilla cake moist at high altitude, consider adding an extra tablespoon of milk and slightly reducing the baking powder by 25%. These adjustments help prevent the cake from drying out and ensure a consistent rise.
Strawberry Cake and Buttercream
Ingredients for the Strawberry Cake and Its Preparation
The strawberry layer adds a fruity, vibrant flavor to the Neapolitan cake. You will need:
- 1 ½ cups all-purpose flour
- 1 ¼ teaspoons baking powder
- ½ teaspoon salt
- ½ cup unsalted butter, softened
- 1 cup granulated sugar
- 2 large eggs
- 1 teaspoon pure vanilla extract
- ½ cup strawberry puree
- 1-2 drops red or pink gel food coloring
To prepare the strawberry cake, follow a similar process as the vanilla cake. After creaming the butter and sugar, add the eggs and vanilla, then the strawberry puree. Add the food coloring to achieve your desired shade of pink. Gradually mix in the dry ingredients. Bake at 350°F (175°C) for 28-30 minutes.
The Role of Food Coloring in Achieving the Perfect Shade of Pink
Gel food coloring is ideal for this recipe as it provides a vibrant color without altering the cake’s texture. Start with a small amount and adjust until you achieve the desired shade of pink, which enhances the visual appeal of the strawberry layer.
Ingredients for the Strawberry Buttercream and Its Preparation
For the strawberry buttercream, you’ll need:
- 1 cup unsalted butter, softened
- 4 cups powdered sugar
- 3-4 tablespoons strawberry puree
- 1 teaspoon vanilla extract
- 1-2 drops red or pink gel food coloring
Beat the butter until creamy, gradually adding the powdered sugar, strawberry puree, and vanilla extract. Mix in the food coloring for a pink hue that matches the cake layer.
Adjustments Specific to Strawberry Flavor at High Altitude
To balance the strawberry flavor at high altitude, consider using concentrated strawberry puree and adding a bit of extra liquid (milk or cream) to maintain moisture.
Chocolate Cake and Buttercream
Ingredients for the Chocolate Cake and Its Preparation
The chocolate layer provides a rich and decadent finish to the Neapolitan cake. The ingredients include:
- 1 ½ cups all-purpose flour
- ½ cup cocoa powder
- 1 ¼ teaspoons baking powder
- ½ teaspoon baking soda
- ½ teaspoon salt
- ½ cup unsalted butter, softened
- 1 cup granulated sugar
- 2 large eggs
- 1 teaspoon vanilla extract
- ½ cup buttermilk
- ½ cup hot water or coffee
To prepare the chocolate cake, begin by preheating your oven to 350°F (175°C). Cream the butter and sugar, then add the eggs and vanilla. Sift together the dry ingredients (flour, cocoa powder, baking powder, baking soda, salt) and add them to the wet mixture, alternating with the buttermilk. Stir in the hot water or coffee last, mixing until smooth. Pour the batter into the prepared pan and bake for 28-30 minutes.
Ingredients for the Chocolate Buttercream and Its Preparation
For the chocolate buttercream, you’ll need:
- 1 cup unsalted butter, softened
- 3 ½ cups powdered sugar
- ½ cup cocoa powder
- 1 teaspoon vanilla extract
- 2-3 tablespoons heavy cream or milk
Beat the butter until creamy, then gradually add the powdered sugar and cocoa powder. Add the vanilla extract and cream, beating until the buttercream is smooth and fluffy.
Tips for Achieving a Rich, Moist Chocolate Cake at High Altitude
At high altitude, increase the liquid slightly (add an extra tablespoon of buttermilk) and reduce the leavening agents to ensure the cake doesn’t rise too quickly. Using hot coffee instead of water enhances the chocolate flavor, adding depth to the cake’s richness.
Step-by-Step Cake Assembly
Baking the Cakes
To begin, prepare your cake pans by spraying the bottoms and sides with non-stick spray. For extra assurance, line the bottoms with parchment paper to prevent sticking. Use three 8-inch round cake pans, one for each flavor layer (vanilla, strawberry, and chocolate).
When filling the pans with batter, try to distribute the batter evenly among the pans to ensure each layer bakes to the same thickness. To achieve perfectly even layers, weigh the batter with a kitchen scale and divide it equally.
Preheat your oven to 350°F (175°C) and place the pans on the center rack. Bake each cake for 28-30 minutes, or until a cake tester inserted into the center comes out clean. It’s important to rotate the pans halfway through baking to ensure even cooking, especially at high altitudes where ovens can heat unevenly.
After baking, remove the cakes from the oven and let them cool in the pans for about 10 minutes. Then, carefully turn them out onto a cooling rack to cool completely. If you’re making the cakes in advance, wrap each layer tightly in plastic wrap once they’re cool. They can be stored at room temperature for up to a day or frozen for up to 3-6 months.
Preparing the Buttercream
To prepare the buttercreams, start by beating the softened butter until it’s creamy and smooth. Use a stand mixer or hand mixer for best results. For each flavor (vanilla, strawberry, and chocolate), gradually add the powdered sugar to the butter, mixing on low speed to avoid a sugar cloud in your kitchen.
Once the sugar is incorporated, add the flavoring ingredients specific to each buttercream. For vanilla, this is vanilla extract and a few tablespoons of cream. For strawberry, add strawberry puree and a small amount of red or pink gel food coloring. For chocolate, add cocoa powder and a splash of hot cream or milk to help dissolve the cocoa.
Beat each buttercream on medium-high speed for several minutes until light and fluffy. Taste and adjust the flavorings or consistency as needed. If the buttercream is too stiff, add a bit more cream; if it’s too soft, add more powdered sugar.
Store the prepared buttercream in separate bowls, covered with plastic wrap, until you’re ready to assemble the cake. If making ahead, buttercream can be stored in the refrigerator for up to a week or frozen for up to three months. Be sure to bring it to room temperature and re-whip before using.
Assembling the Cake Layers
Begin the assembly by leveling the cakes. Use a serrated knife or a cake leveler to carefully trim the tops of each cake layer, ensuring a flat surface. This step is crucial for creating a stable, even cake.
Start with the vanilla cake layer. Place it on a cake board or directly on your cake stand. To secure the cake in place, you can dab a small amount of buttercream on the board before placing the cake on top. Spread a layer of vanilla buttercream on top of the vanilla cake, about ⅛ to ¼ inch thick, using an offset spatula to smooth it evenly. Ensure that the buttercream extends all the way to the edges.
Next, place the strawberry cake layer on top of the vanilla layer. Gently press it down to ensure it’s level and stable. Spread a layer of strawberry buttercream on top, using the same technique as with the vanilla buttercream. Ensure the buttercream is evenly spread and the layers are aligned.
Finally, place the chocolate cake layer on top of the strawberry layer. Repeat the process with the chocolate buttercream, making sure to cover the top of the cake with an even layer.
Once all layers are stacked and filled, apply a crumb coat to the entire cake. The crumb coat is a thin layer of buttercream that seals in the crumbs, preventing them from mixing into the final coat of frosting. Use a bench scraper or icing spatula to spread a thin layer of buttercream over the top and sides of the cake. This coat doesn’t need to be perfect—it’s meant to trap crumbs and create a smooth base for the final layer of frosting.
After applying the crumb coat, chill the cake in the refrigerator for about 30 minutes. This allows the crumb coat to set and firm up, making it easier to apply the final coat of buttercream later. Once the crumb coat is set, the cake is ready for its final decoration.
Final Touches and Decoration
Applying the Final Coat of Buttercream
After the crumb coat has set, it’s time to apply the final coat of buttercream, which will give your cake a polished, professional look. Start by preparing the vanilla, strawberry, and chocolate buttercreams that you’ve already made. If you haven’t done so yet, whip them again briefly to restore their smooth, fluffy texture.
Techniques for Achieving Smooth and Blended Buttercream Layers
To achieve a smooth and beautifully blended finish, you’ll need to apply each buttercream in sections. Begin with the vanilla buttercream and spread it along the bottom third of the cake. Use an offset spatula to apply an even layer, ensuring that it is smooth and level. Next, apply the strawberry buttercream in the middle section of the cake, followed by the chocolate buttercream on the top third and over the top surface of the cake. If you’re aiming for clean, distinct lines between the layers, use separate piping bags for each color to apply the buttercream with precision.
The Role of a Turntable in Cake Decorating
A cake turntable is an invaluable tool for achieving a smooth finish. Place your cake on the turntable and slowly spin it while holding a bench scraper or icing spatula against the sides of the cake at a slight angle. This continuous motion allows you to smooth the buttercream evenly, blending the colors where they meet for a seamless transition. If you don’t have a turntable, rotate the cake manually while keeping your tool steady.
How to Fix Imperfections and Achieve a Professional Finish
If you notice any air bubbles or gaps in the buttercream, use a small spatula to dab on more frosting and smooth it out. For any uneven spots, gently heat your spatula with warm water (wiping it dry before using it on the cake) to help smooth the buttercream more effectively. Sweep around the cake several times, cleaning your bench scraper or spatula between each pass, until you’re satisfied with the finish. Don’t worry if it’s not perfect—practice makes perfect, and even small imperfections can add a handmade charm to your cake.
Creating the Ice Cream Cone Topper
The ice cream cone topper adds a playful and eye-catching element to your Neapolitan cake, making it look as fun as it is delicious.
Step-by-Step Instructions for Making the Ice Cream Cone Topper
- Prepare the Cone: Start with a sugar cone. Position the cone in a small jar or container to hold it upright. This will make it easier to work with.
- Scoop the Buttercream: Chill the leftover buttercream that you scraped off while smoothing the cake. Once it’s firm, use an ice cream scoop with a release lever to scoop out two balls of buttercream. The chilled buttercream will hold its shape better and resemble real scoops of ice cream.
- Build the Topper: Release one scoop of buttercream onto the top of the sugar cone, followed by a second scoop on top of the first. If necessary, return the cone to the refrigerator to firm up between scoops to prevent it from becoming too soft.
Tips for Handling and Placing the Topper on the Cake
Once the buttercream scoops are firm, insert a wooden skewer into the top of the cone, pushing it down through both scoops and into the cone itself. This skewer will help stabilize the topper when placing it on the cake. Gently push the skewer into the center of the cake, making sure the cone is securely positioned on top. The topper should stand upright, creating a whimsical ice cream cone look.
Creative Variations and Alternatives to the Ice Cream Cone Topper
You can customize the topper by adding sprinkles, a drizzle of chocolate ganache, or even a maraschino cherry on top to mimic a classic ice cream sundae. For a different twist, consider using a waffle cone instead of a sugar cone or filling the cone with additional buttercream or cake crumbs for extra texture and flavor. Alternatively, you could create mini ice cream cone toppers for cupcakes or use different flavored buttercreams to represent various “ice cream” flavors.
Serving and Storing the Cake
Serving Suggestions
When it’s time to serve your Neapolitan cake, start by using a sharp, serrated knife to slice through the layers cleanly. To make cutting easier, especially through the multiple layers of buttercream, wipe the knife clean between cuts. This helps to keep the layers distinct and prevents the colors from mixing.
Pair this cake with beverages that complement its flavors, such as a hot cup of coffee, a fragrant tea, or a glass of cold milk. For an extra indulgent experience, serve the cake with a scoop of vanilla or strawberry ice cream, mirroring the cake’s flavors.
At events or gatherings, present the cake on a cake stand to showcase its vibrant layers. Add decorative elements around the cake stand, such as fresh berries, chocolate shavings, or edible flowers, to enhance the presentation. Consider offering small cards describing each layer, so guests know they’re getting a treat that’s as beautiful as it is delicious.
Storing the Cake
To maintain the freshness of your Neapolitan cake, store it in an airtight container at room temperature if you plan to consume it within a day or two. If the cake contains perishable fillings or if it’s hot and humid, it’s best to refrigerate it. Cover the cake loosely with plastic wrap to prevent it from drying out in the refrigerator, and let it come to room temperature before serving to restore its soft texture.
For longer storage, you can freeze leftover cake slices. Wrap each slice tightly in plastic wrap and then in aluminum foil, or place them in airtight freezer bags. The cake can be frozen for up to three months. To enjoy later, simply thaw the slices in the refrigerator overnight. Similarly, leftover buttercream can be frozen in an airtight container for up to three months. Before using, allow it to thaw in the refrigerator and then re-whip it to restore its creamy texture.
Frequently Asked Questions (FAQs)
How do I prevent my cake from collapsing at high altitude?
To prevent your cake from collapsing at high altitude, reduce the amount of leavening agents like baking powder or baking soda by about 25%. Additionally, increase the liquid in your recipe slightly to keep the cake moist, and bake at a slightly lower temperature to ensure even rising and baking.
Can I use natural food coloring instead of gel?
Yes, you can use natural food coloring instead of gel. However, natural food colorings tend to be less concentrated, so you may need to use more to achieve the desired color. Keep in mind that adding too much liquid from natural colorings (like beet juice or berry puree) can affect the cake’s texture, so adjust the other liquid ingredients accordingly.
What can I substitute for butter in the buttercream?
If you need a butter substitute in your buttercream, you can use margarine, shortening, or a plant-based butter substitute. Be aware that these substitutes may alter the flavor and texture slightly, but they can still produce a delicious and creamy frosting.
How can I make this cake gluten-free?
To make the cake gluten-free, substitute the all-purpose flour with a gluten-free flour blend that includes xanthan gum or another binding agent. Ensure that all other ingredients, like baking powder and vanilla extract, are gluten-free as well.
How do I transport a tiered cake like this?
To transport a tiered cake, first ensure that it is well-chilled to help the layers stay stable. Place the cake in a sturdy cake box and use non-slip mats underneath the box to prevent it from sliding during transport. Drive carefully, avoiding sudden stops and turns, and consider placing dowels or straws through the cake for extra support during longer journeys.
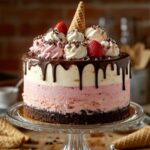
High Altitude Neapolitan Cake
Description
This High Altitude Neapolitan Cake combines three classic flavors—vanilla, strawberry, and chocolate—into a stunning layered cake that’s perfect for celebrations or special occasions. Each layer is crafted to retain its moisture and structure even at high altitudes, ensuring a delicious and visually appealing dessert. Topped with a whimsical ice cream cone made from buttercream, this cake is as delightful to look at as it is to eat.
Ingredients
Vanilla Cake:
- 1 ½ cups all-purpose flour
- 1 ¼ teaspoons baking powder
- ½ teaspoon salt
- ½ cup unsalted butter, softened
- 1 cup granulated sugar
- 2 large eggs
- 1 teaspoon pure vanilla extract
- ½ cup whole milk
Vanilla Buttercream:
- 1 cup unsalted butter, softened
- 4 cups powdered sugar
- 1 teaspoon vanilla extract
- 2–3 tablespoons heavy cream or milk
Strawberry Cake:
- 1 ½ cups all-purpose flour
- 1 ¼ teaspoons baking powder
- ½ teaspoon salt
- ½ cup unsalted butter, softened
- 1 cup granulated sugar
- 2 large eggs
- 1 teaspoon pure vanilla extract
- ½ cup strawberry puree
- 1–2 drops red or pink gel food coloring
Strawberry Buttercream:
- 1 cup unsalted butter, softened
- 4 cups powdered sugar
- 3–4 tablespoons strawberry puree
- 1 teaspoon vanilla extract
- 1–2 drops red or pink gel food coloring
Chocolate Cake:
- 1 ½ cups all-purpose flour
- ½ cup cocoa powder
- 1 ¼ teaspoons baking powder
- ½ teaspoon baking soda
- ½ teaspoon salt
- ½ cup unsalted butter, softened
- 1 cup granulated sugar
- 2 large eggs
- 1 teaspoon vanilla extract
- ½ cup buttermilk
- ½ cup hot water or coffee
Chocolate Buttercream:
- 1 cup unsalted butter, softened
- 3 ½ cups powdered sugar
- ½ cup cocoa powder
- 1 teaspoon vanilla extract
- 2–3 tablespoons heavy cream or milk
Instructions
- Baking the Cakes:
- Preheat your oven to 350°F (175°C). Prepare three 8-inch round cake pans by spraying them with non-stick spray and lining the bottoms with parchment paper.
- Follow the individual cake recipes to mix and prepare the vanilla, strawberry, and chocolate cake batters. Bake each cake for 28-30 minutes or until a cake tester comes out clean.
- Allow the cakes to cool in their pans for 10 minutes before turning them out onto a cooling rack to cool completely. If you’re preparing the cakes in advance, wrap them tightly in plastic wrap once they are cool and store them at room temperature or freeze for later use.
- Preparing the Buttercream:
- While the cakes are cooling, prepare the vanilla, strawberry, and chocolate buttercreams. Start by beating the softened butter until creamy, then gradually add the powdered sugar, followed by the flavoring ingredients (vanilla extract, strawberry puree, cocoa powder, etc.).
- Store the buttercreams in separate bowls, covered with plastic wrap, until you are ready to assemble the cake. If making ahead, refrigerate the buttercream and re-whip before use.
- Assembling the Cake:
- Begin by leveling the cakes with a serrated knife or cake leveler to create flat surfaces. Place the vanilla cake layer on a cake board or stand, and spread a layer of vanilla buttercream on top.
- Add the strawberry cake layer on top of the vanilla layer and spread strawberry buttercream evenly over it. Finally, place the chocolate cake layer on top and cover with chocolate buttercream.
- Apply a crumb coat to the entire cake by spreading a thin layer of buttercream over the top and sides. Refrigerate the cake for 30 minutes to set the crumb coat.
- Applying the Final Coat of Buttercream:
- After the crumb coat has set, apply the final coat of buttercream, using a turntable to smooth the buttercream and blend the colors seamlessly. If you notice any imperfections, fix them with a small spatula and smooth out the buttercream with a heated tool if necessary.
- Creating the Ice Cream Cone Topper:
- Prepare the ice cream cone topper by scooping chilled buttercream onto a sugar cone to mimic scoops of ice cream. Insert a wooden skewer through the cone and scoops for stability, then place the topper on the cake by inserting the skewer into the center of the cake.
Notes
- Baking at High Altitude: Adjust the leavening agents and liquid quantities as noted to ensure that your cakes rise properly and stay moist.
- Storage: Store the assembled cake at room temperature for up to a day, or refrigerate if the environment is warm. Leftover cake and buttercream can be frozen for up to three months.


