There’s something special about Girl Scout cookies, isn’t there? The excitement of waiting for them to go on sale, the thrill of finally getting your hands on a box (or two, or three), and the joy of savoring each bite. Among all the beloved varieties, Samoas (also known as Caramel deLites in some areas) always seem to stand out. That irresistible combination of buttery shortbread, toasted coconut, gooey caramel, and rich chocolate? It’s like a little piece of cookie heaven. But what if I told you that you don’t have to wait for Girl Scout cookie season to indulge in these delectable treats? That’s right! Today, I’m sharing a recipe that will show you exactly how to make Samoas at home—no Girl Scouts required.
Baking these cookies from scratch might sound a little intimidating at first, but trust me when I say it’s totally worth it. Not only will you be able to enjoy Samoas fresh from your oven, but you’ll also get to control the ingredients, making them just the way you like. So, grab your apron, preheat that oven, and let’s get baking! I’ll walk you through each step, and I promise this will be easier than you think.
Step 1: Preheat the Oven and Prep the Baking Sheet
Before we dive into the cookie dough, let’s get the oven warmed up! Preheat your oven to 350°F (175°C) so it’s nice and toasty when it’s time to bake the cookies. Also, line a baking sheet with parchment paper. This will not only make cleanup a breeze but will also prevent the cookies from sticking to the sheet as they bake.

Step 2: Whisk the Dry Ingredients
In a bowl, whisk together the flour, baking soda, and salt. These are the dry ingredients that will form the base of your cookie dough, and whisking them together helps ensure everything is evenly distributed before we mix them with the wet ingredients. It’s a simple step, but trust me, it’ll help your cookies turn out perfectly every time.

Step 3: Cream the Butter and Sugar
Now, grab your butter and sugar. In a separate bowl, beat together the softened unsalted butter and granulated sugar until the mixture becomes light and fluffy. This will usually take a few minutes with an electric mixer, and it’s a crucial step in achieving the right texture for your cookies. The air that gets whipped into the butter and sugar will help the cookies bake up soft and chewy, just like the ones you remember from childhood.

Step 4: Add the Egg and Vanilla Extract
Once your butter and sugar are all fluffy, it’s time to add the wet ingredients. Beat in the egg and vanilla extract, making sure they’re fully incorporated into the butter mixture. The egg helps bind everything together, while the vanilla gives the cookies that familiar, comforting flavor.

Step 5: Mix in the Dry Ingredients
Now comes the fun part—mixing everything together. Gradually add the dry ingredients (the flour mixture you whisked earlier) into the butter mixture. Stir it all together until the dough starts to come together. You may need to use your hands for a bit if the dough gets too thick to mix with a spoon. If it feels a little too dry, that’s where the milk comes in! Add in the milk, a little at a time, to help bring the dough together. The dough should be soft but not sticky, so don’t worry if it feels a bit crumbly at first. Just work with it until you get a nice, smooth texture.
Step 6: Roll and Cut Out the Cookies
Here’s where the magic happens. On a lightly floured surface, roll out the dough to about ¼-inch thickness. You don’t need to worry about making it perfectly even—just aim for a nice, consistent thickness so the cookies bake evenly. Once it’s rolled out, grab a round cookie cutter (or even a glass) and cut out circles. Then, use a smaller cutter or a knife to cut out the center of each circle, creating the classic “donut” shape of Samoas. Don’t worry about making them perfect; a little imperfection adds to their homemade charm!

Step 7: Bake the Cookies
Place the dough circles on your prepared baking sheet, making sure there’s a little space between each cookie. Pop them into the preheated oven and bake for 8-10 minutes or until the edges of the cookies are lightly golden. Don’t be tempted to overbake them, though—these cookies will firm up a little as they cool. Once they’re done, remove them from the oven and let them cool on the baking sheet for a few minutes before transferring them to a wire rack to cool completely.
Now that your cookies are cooling, it’s time to focus on the fun part—the topping! The toasted coconut, gooey caramel, and smooth chocolate come together to make Samoas irresistible, and I’m about to walk you through each step to ensure you get it just right. But before we get started, let’s talk about a few things you can do to make this topping absolutely perfect.

Step 8: Toast the Shredded Coconut
Start by grabbing your shredded coconut. In a large skillet over medium heat, add the coconut and toast it until golden brown, stirring frequently. Be sure to keep an eye on it because it can go from perfectly toasted to burned in a matter of seconds. The coconut should become fragrant and a lovely golden brown color. Once it’s done, remove the coconut from the heat and set it aside to cool. You want it to cool a bit before you add it to the cookies, so it’s easier to handle and press onto the caramel.

Step 9: Heat the Caramel Sauce
Next, it’s time to melt the caramel. The best way to do this is to heat the caramel sauce in a microwave-safe bowl. Microwave it in 30-second intervals, stirring after each interval, until it’s smooth and pourable. If the caramel looks too thick or doesn’t melt smoothly, you can stir in a little bit of milk to help thin it out and achieve the right consistency. Once it’s ready, stir in a pinch of salt and a teaspoon of vanilla extract to enhance the flavor. The caramel should be smooth, velvety, and easy to work with.

Step 10: Dip the Cookies in Caramel and Add the Toasted Coconut
Now comes the exciting part! Grab your cooled cookies and dip each one into the warm caramel sauce. Be generous with the caramel, coating the top of each cookie with a nice layer. After dipping in caramel, immediately sprinkle the toasted coconut over the top of each cookie, pressing gently to make sure it sticks. The coconut should adhere nicely to the caramel, creating that signature Samoa topping.
This is where the cookies start to look like the classic Girl Scout Samoas we all know and love. If you find the caramel getting a bit too thick while you’re dipping, just pop it back in the microwave for a few seconds to warm it up again. You want it to stay nice and smooth for easy dipping.

Step 11: Melt the Chocolate Chips
While the cookies are cooling with their delicious caramel-coconut topping, it’s time to work on the chocolate drizzle. In a microwave-safe bowl, place your semisweet chocolate chips and heat them in 30-second intervals, stirring in between, until the chocolate is completely melted and smooth. The chocolate should be glossy and easy to drizzle.
If you prefer a thicker drizzle, you can let the chocolate cool down a bit before using it. I love a good zigzag drizzle, but feel free to be creative with your chocolate decoration—whether you want a nice and neat drizzle or a little more freeform, it’s all up to you!

Step 12: Drizzle the Chocolate Over the Cookies
Once the chocolate is melted and smooth, use a spoon or a piping bag to drizzle the chocolate over the coconut-topped cookies. I like to go back and forth in a zigzag pattern, but you can also drizzle in a more random pattern if that’s what you prefer. The key is to get that beautiful chocolate finish that complements the caramel and coconut so perfectly.
Step 13: Let the Cookies Cool Completely
After you’ve drizzled the chocolate on each cookie, place them on a wire rack or a baking sheet lined with parchment paper and let them cool completely. This will give the chocolate time to harden, ensuring that the cookies are sturdy enough to handle and store. Be patient—let the cookies cool for at least 30 minutes, or longer if you can, so that the chocolate has fully set. You’ll be rewarded with perfectly firm and delicious cookies when they’re ready to enjoy!
And there you have it—your homemade Samoas, fresh out of your kitchen! It may seem like a few steps, but the end result is totally worth it. The caramel is gooey, the coconut is crispy and toasted, and the chocolate drizzle is the perfect finishing touch. These cookies are a true treat that will impress anyone who gets a taste.

FAQ Section and Conclusion:
By now, your homemade Samoas are cooled and ready to be devoured. But before you dive into these chewy, caramel-coated beauties, let’s go over some common questions and tips to help you make these cookies with confidence. Whether you’re a first-time baker or a seasoned pro, these answers should clear up any doubts and give you some insight into making these cookies even better.
1. Can I use unsweetened shredded coconut for this recipe?
It’s best to use sweetened shredded coconut in this recipe to match the classic Samoa flavor. The sweetened coconut adds the right balance of sweetness to the cookies, especially when paired with the caramel. Unsweetened coconut may result in a less flavorful topping, so I would recommend sticking with the sweetened variety for the best results.
2. How do I store my homemade Samoas?
To store your Samoas, place them in an airtight container at room temperature. They should stay fresh for about a week. If you need to store them for longer, you can freeze them! Just wrap each cookie individually in plastic wrap and place them in a freezer-safe bag or container. They’ll keep in the freezer for up to 3 months. When you’re ready to enjoy them, let them thaw at room temperature for a few hours before eating.
3. Can I make the dough ahead of time and freeze it?
Absolutely! If you want to prep ahead, you can freeze the cookie dough. Simply shape the dough into a disc, wrap it tightly in plastic wrap, and store it in an airtight container or freezer bag. When you’re ready to bake, let it thaw in the fridge for a few hours, then proceed with the rolling, cutting, and baking steps. It’s a great way to make the process quicker when you’re ready to bake fresh cookies.
4. How do I make the caramel from scratch instead of using store-bought sauce?
If you prefer to make homemade caramel, here’s a simple recipe for it:
- 1 cup granulated sugar
- 6 tbsp unsalted butter
- ½ cup heavy cream
- ¼ tsp salt
- 1 tsp vanilla extract
To make it, heat the sugar in a saucepan over medium heat, stirring occasionally until it melts and turns amber. Then, add the butter and stir until melted. Carefully pour in the heavy cream (it will bubble), and stir until smooth. Add the salt and vanilla, and cook for another minute. Let the caramel cool before using it on the cookies. Making homemade caramel is a great way to elevate the flavor even more, but store-bought sauce is perfectly fine too for a quicker option.
5. My caramel is too runny—what can I do?
If your caramel sauce turns out too runny, it may be because it was heated for too long or didn’t thicken enough during the initial preparation. If this happens, don’t panic! Try refrigerating it for a bit to thicken it up. You can also add a bit more sugar to the mixture (while reheating) and stir it until it reaches your desired consistency. Alternatively, if you’re using store-bought caramel, look for a thicker sauce that’s specifically designed for drizzling.
6. Can I use dark chocolate instead of semisweet?
Yes! If you prefer a deeper chocolate flavor, you can certainly use dark chocolate instead of semisweet. Dark chocolate will create a more intense, bittersweet contrast to the rich caramel and coconut topping, which many people enjoy. Just be sure to adjust the amount depending on how strong you want the chocolate flavor to be.
7. How can I make these cookies gluten-free?
To make these cookies gluten-free, simply swap the all-purpose flour for a gluten-free flour blend that’s suitable for baking. Make sure your caramel sauce and other ingredients (like chocolate chips) are also certified gluten-free. Keep in mind that the texture of the cookies might be slightly different, but they should still taste delicious!
Conclusion:
And there you have it—your very own homemade Samoas, ready to satisfy your cookie cravings! From the buttery shortbread base to the gooey caramel topping and the irresistible chocolate drizzle, these cookies are a labor of love that are well worth the effort. Whether you’re indulging in them yourself or sharing them with friends and family, these homemade Samoas will undoubtedly be a hit.
Baking these cookies at home means you can enjoy them fresh out of the oven, customize them to your liking, and even impress your friends with your baking skills. I hope this recipe inspires you to get creative in the kitchen and enjoy these delicious treats year-round, not just during Girl Scout cookie season.
So, go ahead—get baking, and when you do, I’d love to hear about how they turned out! Whether you stuck to the classic recipe or added your own twist, leave a comment below to let me know what variations you tried. Happy baking!
Print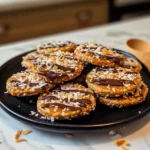
Homemade Samoas – Just Like the Girl Scouts!
- Total Time: 1 hour 15 minutes
Description
These Homemade Samoas are the perfect copycat of the beloved Girl Scout cookies. With a crisp shortbread cookie base, gooey caramel, toasted coconut, and a rich chocolate coating, these cookies are a decadent, irresistible treat you won’t be able to stop at just one!
Ingredients
For the Cookie Base:
-
1 cup unsalted butter, softened
-
1/2 cup granulated sugar
-
2 cups all-purpose flour
-
1/4 teaspoon salt
-
1 teaspoon vanilla extract
-
2 tablespoons milk
For the Caramel Topping:
-
1 1/2 cups sweetened shredded coconut
-
1 1/2 cups caramel bits (or you can use unwrapped caramel candies)
-
3 tablespoons heavy cream
-
1 teaspoon vanilla extract
-
Pinch of salt
For the Chocolate Coating:
-
1 cup semi-sweet chocolate chips
-
2 tablespoons vegetable oil (or coconut oil)
Instructions
1️⃣ Prepare the Cookie Base:
-
Preheat your oven to 350°F (175°C). Line a baking sheet with parchment paper or a silicone baking mat.
-
In a medium bowl, cream together the softened butter and granulated sugar until light and fluffy.
-
Add the flour and salt to the mixture, and mix until combined. Stir in the vanilla extract and milk until the dough comes together.
2️⃣ Shape the Cookies:
-
Roll out the dough on a lightly floured surface to about 1/4 inch thickness.
-
Use a round cookie cutter (about 2 inches in diameter) to cut out circles.
-
Use a smaller cutter or a knife to cut a small hole in the center of each cookie, creating the classic “ring” shape.
-
Place the cookies on the prepared baking sheet and bake for 12-14 minutes, or until the edges are slightly golden.
-
Let the cookies cool completely on a wire rack.
3️⃣ Toast the Coconut:
-
While the cookies are cooling, spread the shredded coconut in an even layer on a baking sheet.
-
Toast the coconut in the oven at 350°F (175°C) for 5-7 minutes, stirring every 2-3 minutes to ensure it toasts evenly. Be careful not to burn it! Remove from the oven and set aside.
4️⃣ Make the Caramel Topping:
-
In a small saucepan, melt the caramel bits and heavy cream over low heat, stirring until smooth.
-
Once the caramel is melted and fully combined, remove from heat and stir in the vanilla extract and a pinch of salt.
-
Fold in the toasted coconut until evenly coated.
5️⃣ Assemble the Samoas:
-
Carefully spread the caramel-coconut mixture over the cooled shortbread cookies, pressing down gently to make sure the topping sticks.
-
Allow the cookies to cool for about 10 minutes to let the caramel set.
6️⃣ Coat the Cookies in Chocolate:
-
In a microwave-safe bowl, melt the semi-sweet chocolate chips and vegetable oil in 30-second intervals, stirring in between, until smooth and fully melted.
-
Dip the bottom of each cookie into the melted chocolate, ensuring it’s well-coated.
-
Place the dipped cookies back on the parchment-lined baking sheet.
-
Drizzle any remaining chocolate over the top of the cookies for that signature look.
7️⃣ Chill and Serve:
-
Place the cookies in the refrigerator for 30 minutes to allow the chocolate to set and harden.
-
Serve and enjoy your delicious homemade Samoas!
Notes
-
Caramel Option: If you can’t find caramel bits, you can use unwrapped caramel candies. Just melt them with the heavy cream as you would the caramel bits.
-
Storage: Store the cookies in an airtight container at room temperature for up to 1 week or refrigerate them to extend their freshness for up to 2 weeks.
-
Make-Ahead: You can make the cookie base and caramel-coconut topping ahead of time and assemble the cookies the next day.
- Prep Time: 30 minutes
- Cook Time: 15-20 minutes (including toasting the coconut)