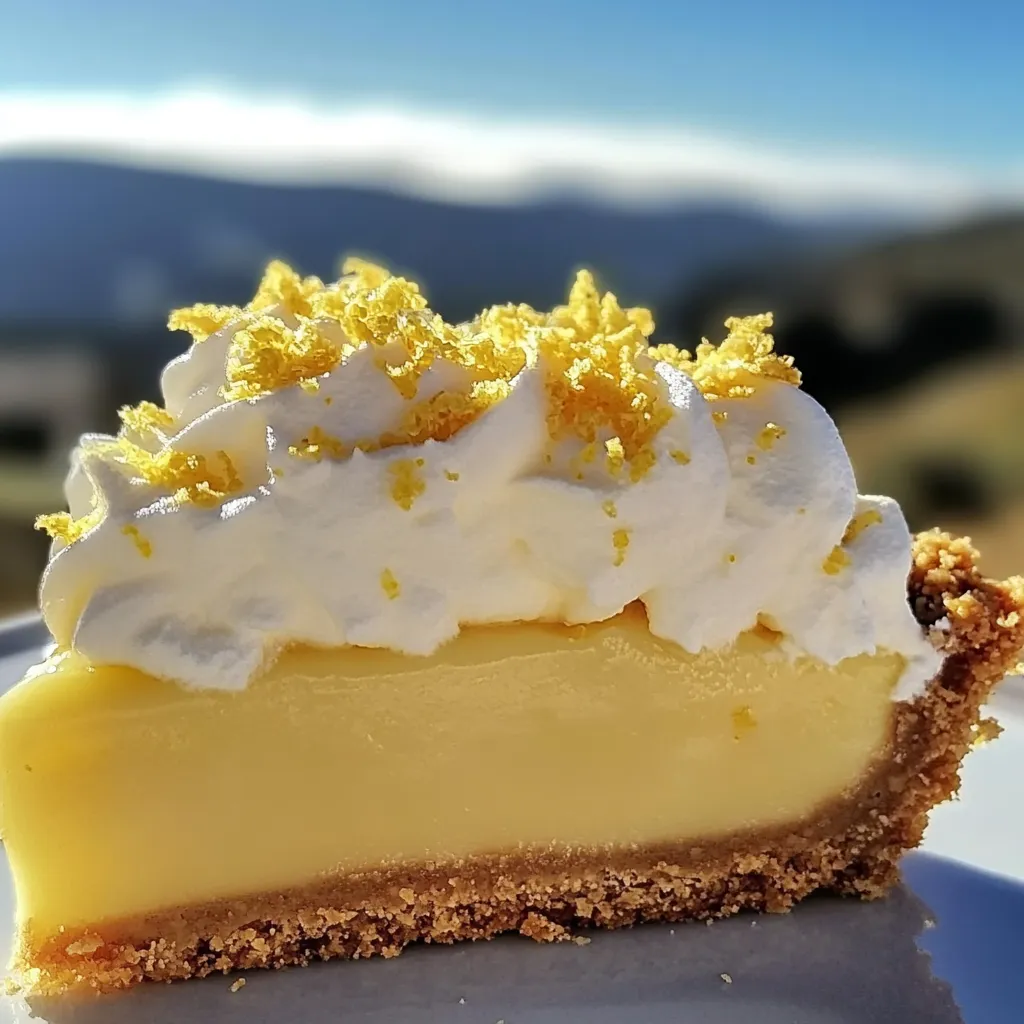
If you’re craving a dessert that’s light, bright, and bursting with citrus flavor, this Lemon Bliss Tart with Buttery Digestive Biscuit Crust is the perfect choice. It’s simple to make, refreshingly tangy, and sits beautifully on any dessert table—whether for a spring gathering, summer brunch, or just a weekend treat.
The name says it all: bliss. From the crisp graham cracker crust (or digestive biscuits if you prefer a British twist) to the velvety lemon filling topped with a cloud of whipped cream, this tart strikes a perfect balance between sweet and tangy. It’s the kind of dessert that feels fancy but comes together with everyday ingredients.
I first made this tart for a friend’s baby shower. I wanted something that felt light and elegant but could still be prepped ahead of time. The lemon filling, made with just four ingredients, turned out silky and rich without being heavy. And the best part? It chilled in the fridge overnight, which made it one less thing to worry about the day of the event. Everyone went back for seconds—and now, it’s a recipe I come back to often.
Whether you’re an experienced baker or just getting started, this recipe is approachable, foolproof, and endlessly rewarding. Let’s get started by making the buttery crust and preparing the zesty lemon filling.
Ingredients for the Crust
- 1 ½ cups graham cracker crumbs
- ¼ cup granulated sugar
- ⅓ cup unsalted butter, melted
STEP 1: Preheat the Oven
Begin by preheating your oven to 350°F (175°C). While the oven warms up, you’ll prep the crust, which takes just a few minutes.
STEP 2: Make the Crust
In a mixing bowl, combine the graham cracker crumbs with the granulated sugar and melted butter. Stir until all the crumbs are evenly coated and the mixture looks like wet sand. This blend forms the base of your tart and adds a warm, buttery crunch to balance the lemony filling.
Press the crumb mixture firmly into a 9-inch tart pan, making sure to cover the bottom and push the crumbs slightly up the sides. You can use your fingers to spread it out, then use the bottom of a flat glass or measuring cup to press everything down firmly and evenly.

STEP 3: Bake the Crust
Place the tart pan on the center rack of your preheated oven and bake for 8 minutes. The crust will become lightly golden and fragrant. Once baked, remove it from the oven and let it cool slightly while you prepare the lemon filling.
Ingredients for the Lemon Filling
- 1 can (14 oz) sweetened condensed milk
- 4 large egg yolks
- 1/2 cup freshly squeezed lemon juice
- 1 tbsp lemon zest

STEP 4: Mix the Filling
In a medium-sized mixing bowl, whisk together the sweetened condensed milk and egg yolks until well combined. Then stir in the freshly squeezed lemon juice and lemon zest. The mixture will thicken slightly as you whisk—this is a good sign. It should be smooth, creamy, and lightly golden in color from the yolks.
Tip: Use fresh lemon juice for the brightest flavor. Bottled juice can work in a pinch, but fresh makes all the difference in a dessert like this where lemon is the star.

STEP 5: Fill the Crust
Once the crust has cooled slightly, pour the lemon filling into the shell and use a spatula to smooth the top. The tart is now ready to return to the oven for a gentle bake that sets the custard without overcooking it.

Lemon Bliss Tart with Buttery Digestive Biscuit Crust
At this point, your tart shell is golden and crisp, and the lemon filling is smooth, silky, and bursting with fresh citrus flavor. Now, we’re ready to bake the filling just enough to set it while keeping that creamy, custard-like texture. Then it’s all about cooling, chilling, and finishing with a light whipped topping that brings everything together.
This part of the recipe is all about patience—but it’s worth it. The gentle bake followed by a cool-down gives the tart that clean slice and smooth texture that’s so satisfying. Once topped with whipped cream and a little lemon zest, this dessert goes from simple to stunning.
Let’s walk through the next steps to get your Lemon Bliss Tart ready to serve.
STEP 6: Bake the Filled Tart
Place the tart back into your preheated 350°F (175°C) oven and bake for 12 to 15 minutes. The goal here is to gently set the filling. You’ll know it’s ready when the edges look firm but the center still has a slight jiggle when you gently shake the pan.
Avoid overbaking—the tart will continue to firm up as it cools, and baking it too long can cause cracks or a rubbery texture.
STEP 7: Cool the Tart
Once the tart is out of the oven, let it cool completely at room temperature. This step allows the filling to settle and prevents condensation when you move it to the fridge. Once it’s fully cooled, transfer it to the refrigerator and chill for at least 3 hours.
Tip: Chilling overnight is even better if you’re planning ahead—it gives the tart plenty of time to firm up and makes slicing even easier.
Ingredients for the Topping
- 1 cup whipped cream or whipped topping
- Extra lemon zest or thin lemon slices, for garnish
- Fresh mint leaves (optional)
STEP 8: Add the Whipped Topping and Garnish
Right before serving, top the chilled tart with whipped cream. You can spread it across the entire surface or keep it to the center for a more rustic look. A piping bag works well for a neater presentation if you’re serving this for a special occasion.
Sprinkle with extra lemon zest for a punch of color and bright citrus aroma. Add a few thin lemon slices and fresh mint leaves for an elegant finishing touch.
Serving Tips and Customization Ideas
This tart is lovely on its own, but you can always add a personal spin. Here are a few ideas:
- Make it mini: Use mini tart pans for individual servings. Perfect for brunches or events.
- Add a berry twist: Top with fresh raspberries or blueberries for color and added sweetness.
- Try a ginger crust: Substitute digestive biscuits or ginger snaps for the graham crackers for a spicier base.
- Coconut cream topping: Swap regular whipped cream for coconut whipped cream for a tropical variation.

Lemon Bliss Tart with Buttery Digestive Biscuit Crust
By now, your Lemon Bliss Tart should be perfectly chilled, beautifully topped, and ready to impress. Whether you’re serving it after a holiday meal, at a brunch with friends, or simply treating yourself to a quiet slice with coffee or tea, this tart always finds its way to the center of attention.
Its delicate balance of tangy lemon and rich, buttery crust makes it light enough for warm-weather gatherings yet indulgent enough to satisfy any dessert craving. Before we wrap up, here are some frequently asked questions to help you serve and store your tart like a pro, along with some final tips for getting the most out of this delightful recipe.
1. Can I use bottled lemon juice instead of fresh?
Yes, you can, but fresh lemon juice gives the tart a brighter, more natural flavor. If using bottled juice, make sure it’s 100% lemon juice without added sweeteners or preservatives.
2. What can I use instead of graham crackers for the crust?
Digestive biscuits are a fantastic alternative and often used in UK versions of this tart. You could also try crushed shortbread cookies or vanilla wafers for a slightly different flavor.
3. Can I make the tart in advance?
Absolutely. This tart is a great make-ahead dessert. You can prepare it up to 24 hours in advance. Just add the whipped topping and garnishes right before serving for the freshest look and taste.
4. How do I store leftovers?
Store any leftovers in the refrigerator, covered with plastic wrap or in an airtight container. It will stay fresh for up to 3 days.
5. Can I freeze this tart?
You can freeze the baked and cooled tart (without the whipped topping) for up to one month. Wrap it tightly in plastic wrap and foil. Thaw in the refrigerator overnight before topping and serving.
6. What’s the best way to get clean slices?
Use a sharp knife and wipe it clean between each cut. For even cleaner slices, dip the knife in warm water, wipe it dry, and then slice.
7. Is there a way to make this tart dairy-free?
Yes. Use a plant-based butter for the crust, dairy-free sweetened condensed milk (available in many stores), and a coconut or almond milk-based whipped topping.
Final Thoughts: A Tart That’s Simple, Bright, and Beautiful
This Lemon Bliss Tart with Buttery Digestive Biscuit Crust is the kind of dessert that checks all the boxes—easy to make, full of fresh flavor, and effortlessly elegant. It’s a recipe you’ll find yourself coming back to again and again, especially when you need something that looks impressive but doesn’t take hours in the kitchen.
Its vibrant lemon filling and crisp, golden crust strike just the right balance of tart and sweet, and it pairs beautifully with everything from fresh berries to a drizzle of raspberry sauce or a dusting of powdered sugar.
If you give this recipe a try, I’d love to hear how you made it your own. Did you try a different crust? Add a fruity twist? Let us know in the comments and share your tips. However you serve it, this tart is bound to brighten your day—and your dessert table.
Print
Lemon Bliss Tart with Buttery Digestive Biscuit Crust
- Total Time: 3 hrs 40 min
Description
This Lemon Bliss Tart features a crisp, buttery crust made from crushed digestive biscuits and a silky-smooth lemon filling that’s tart, sweet, and sunshine-bright. It’s the perfect make-ahead dessert for spring and summer!
Ingredients
For the Crust:
-
1 ½ cups crushed digestive biscuits (or graham crackers)
-
¼ cup granulated sugar
-
6 tbsp unsalted butter, melted
For the Lemon Filling:
-
1 (14 oz) can sweetened condensed milk
-
4 large egg yolks
-
½ cup freshly squeezed lemon juice (about 3–4 lemons)
-
1 tbsp lemon zest
-
Pinch of salt
For Garnish:
-
Whipped cream
-
Lemon zest curls or slices
-
Fresh berries (optional)
Instructions
1️⃣ Preheat oven: Set to 350°F (175°C). Grease a 9-inch tart pan with a removable bottom.
2️⃣ Make the crust: Mix crushed biscuits, sugar, and melted butter in a bowl. Press firmly into the tart pan, evenly on the bottom and up the sides. Bake for 8–10 minutes. Cool slightly.
3️⃣ Prepare the filling: In a bowl, whisk together sweetened condensed milk, egg yolks, lemon juice, zest, and salt until smooth and thick.
4️⃣ Fill and bake: Pour the lemon mixture into the cooled crust. Bake for 12–15 minutes until just set but slightly jiggly in the center.
5️⃣ Chill: Cool at room temperature, then refrigerate for at least 3 hours (or overnight) until fully set.
6️⃣ Garnish and serve: Top with whipped cream, lemon zest curls, or fresh berries before slicing.
Notes
-
Add a dash of vanilla extract or a bit of ginger to the crust for a twist.
-
Make it ahead—it tastes even better the next day!
-
Store leftovers covered in the fridge for up to 4 days.
- Prep Time: 15 min
- Cook Time: 25 min


