


Lemon pepper chicken tenders are a delightful blend of zesty citrus and savory spice, making them a popular dish for those who love bold, vibrant flavors. These crispy tenders are made by marinating chicken in buttermilk, lemon juice, and a mix of spices, then frying them to golden perfection. Whether served as a family dinner, an appetizer for a party, or a casual snack, lemon pepper chicken tenders are a crowd-pleaser. Their versatility means they pair well with a variety of sides, like fries, salads, or even as part of a larger meal spread. The recipe’s ease makes it suitable for weeknight dinners, yet its gourmet flavor profile can easily elevate any social gathering. Plus, with the addition of a honey butter sauce, these tenders have the perfect balance of tangy, sweet, and savory flavors that keep everyone coming back for more.
Ingredients Overview
This recipe calls for simple, flavorful ingredients that come together to create an irresistible dish. Chicken tenderloins are the star, offering a juicy, tender base. Lemon pepper seasoning provides the signature tangy zest, while the buttermilk marinade tenderizes the meat, adding moisture and flavor. Lemon zest and juice bring a burst of freshness, complemented by garlic powder and smoked paprika, which add depth and smokiness. The honey butter sauce, made from unsalted butter, honey, lemon zest, and garlic, finishes the dish, offering a sweet, tangy glaze that enhances the savory chicken tenders.
Marinating the Chicken
To prepare flavorful lemon pepper chicken tenders, start by marinating the chicken. Combine buttermilk, lemon juice, lemon zest, garlic powder, smoked paprika, and lemon pepper seasoning to create a marinade that will both tenderize and flavor the meat. This mixture infuses the chicken with tangy, savory, and slightly spicy notes. Marinating for at least 3 hours allows the flavors to fully penetrate the chicken, ensuring that each bite is juicy and flavorful. For even better results, consider marinating the chicken overnight. Pro tip: The acidity from the lemon helps to break down the proteins in the chicken, making it tender and enhancing its natural flavors. This step is crucial for achieving that melt-in-your-mouth texture, and it also allows the spices to fully coat the chicken, ensuring every bite is packed with zest.
Preparing the Seasoned Flour
The seasoned flour is key to getting that perfect crispy coating on the chicken tenders. In a shallow dish, mix together all-purpose flour with lemon pepper seasoning, garlic powder, and smoked paprika. This blend not only adds flavor but ensures that the exterior crisps up beautifully when fried. Make sure to whisk the ingredients well to distribute the seasoning evenly throughout the flour. For those looking for a gluten-free option, substitute all-purpose flour with gluten-free alternatives such as rice flour or a gluten-free flour blend. The key is a thorough coating, which will give you a crispy, golden crust.
Cooking and Serving
Frying the Chicken
Frying the chicken tenders is a key step in achieving the perfect balance of crispy coating and juicy, tender meat. Start by heating your oil in a large heavy-bottomed pot or Dutch oven. The oil should reach 350-370°F for optimal frying. Maintaining this temperature is crucial because if the oil is too cold, the chicken will absorb excess oil, becoming soggy. If the oil is too hot, the exterior may burn before the chicken is fully cooked inside. Use a deep-fry thermometer to monitor the oil temperature accurately.
Once the oil reaches the correct temperature, carefully place the chicken tenders into the hot oil, but be mindful not to overcrowd the pot. Fry 4-5 tenders at a time to allow them to cook evenly and ensure they become golden brown and crispy. Overcrowding lowers the oil temperature, resulting in uneven cooking. Fry each batch for 2-3 minutes or until the internal temperature of the chicken reaches at least 165°F, which can be checked using a meat thermometer.
After frying, transfer the tenders to a wire rack set over a baking sheet or a plate lined with paper towels to drain excess oil. This allows air circulation around the tenders, keeping them crispy. Letting them sit directly on paper towels for too long may make the coating soggy. Between batches, ensure the oil temperature returns to 350°F before adding more chicken. Repeat until all tenders are fried to perfection.
Honey Butter Sauce
The honey butter sauce is the perfect finishing touch for these lemon pepper chicken tenders, adding a sweet and tangy glaze that enhances the savory flavors. To make the sauce, melt a stick of unsalted butter in a small saucepan over medium heat. Once the butter is fully melted, stir in half a cup of honey, 1 ½ teaspoons of lemon pepper seasoning, a tablespoon of fresh lemon zest, and a heaping teaspoon of minced garlic.
As the mixture heats, stir occasionally to ensure the ingredients combine thoroughly. Allow the sauce to come to a gentle boil, which helps deepen the flavors as the honey caramelizes slightly. This step is key for creating a well-balanced sauce that’s both sweet and tangy, with a subtle kick from the lemon pepper and garlic. Once the sauce reaches a slight boil, remove it from the heat to avoid overcooking the garlic, which could turn bitter. Let the sauce cool slightly before tossing it with the chicken.
Tossing Chicken in Honey Butter Sauce
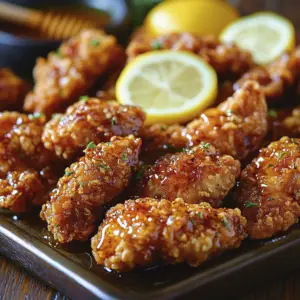
Once the chicken tenders have been fried to golden perfection, it’s time to coat them in the honey butter sauce. Place the tenders in a large bowl and pour the warm honey butter sauce over them. Gently toss the tenders in the sauce, making sure each piece is thoroughly coated. The sticky, flavorful glaze clings beautifully to the crispy exterior, adding a delicious sweetness that complements the savory chicken.
For a lighter touch, you can also serve the sauce on the side as a dip, allowing people to control how much sauce they want. This works particularly well for gatherings where guests may prefer different levels of sweetness. When serving, present the tenders on a platter with fresh lemon slices or a sprinkle of chopped parsley for a pop of color, making them visually appealing as an appetizer or a main dish.
Tips for Perfect Chicken Tenders
Achieving perfect chicken tenders requires attention to detail during the frying process. First, always use a thermometer to maintain oil temperature between 350-370°F to avoid soggy or burnt chicken. Fry in small batches to prevent the oil temperature from dropping, which could lead to uneven cooking.
To ensure the tenders remain juicy inside, check the internal temperature of the chicken with a meat thermometer, making sure it reaches at least 165°F. This prevents undercooking while preserving moisture.
For a more personalized touch, you can adjust the seasoning. Add a pinch of cayenne pepper or red pepper flakes to the marinade for a spicier kick. You can also swap smoked paprika for regular paprika or experiment with different herbs to suit your preferences. These tips ensure your chicken tenders turn out flavorful and perfectly cooked every time.
Serving Suggestions
Lemon pepper chicken tenders are versatile and can be paired with a variety of sides to suit any occasion. For a casual meal, serve them with classic options like French fries or potato wedges. A crisp coleslaw or a light, refreshing salad complements the richness of the fried chicken, balancing out the meal. If you want something heartier, consider serving them with macaroni and cheese or roasted vegetables.
These tenders also work beautifully as an appetizer for parties or game day snacks. Arrange them on a platter with dipping sauces like ranch, blue cheese, or extra honey butter sauce. For a summer cookout, pair them with grilled corn or a tangy pasta salad.
To enhance the experience, serve with refreshing beverages like iced tea, lemonade, or a cold beer to complement the tangy, sweet flavors of the chicken tenders.
Storing and Reheating Leftovers
If you have any leftovers, store the chicken tenders in an airtight container in the refrigerator for up to 3 days. To maintain their crispiness, reheat them in the oven rather than the microwave. Preheat the oven to 375°F and place the tenders on a baking sheet fitted with a wire rack. This allows air to circulate around the tenders, keeping them crispy while reheating. Bake for 8-10 minutes, or until heated through. You can also freeze the tenders for up to 2 months. To reheat frozen tenders, bake them at 400°F for 15-20 minutes until crispy and hot.
FAQs
Can I make this recipe gluten-free?
Yes, this recipe can easily be made gluten-free by substituting the all-purpose flour with gluten-free alternatives such as almond flour, rice flour, or a gluten-free flour blend. These options will still provide a crispy coating, though the texture may slightly differ from traditional flour.
What other oils can I use for frying?
While peanut oil is recommended for its high smoke point and neutral flavor, you can use other oils like vegetable oil, canola oil, or even sunflower oil. All of these oils are excellent for frying as they handle high temperatures well without imparting strong flavors to the food.
How long can I marinate the chicken?
Marinating for at least 3 hours allows the flavors to infuse into the chicken, making it tender and flavorful. However, for the best results, marinate the chicken overnight. This longer marination time not only deepens the flavors but also helps tenderize the meat further.
What can I substitute for buttermilk?
If you don’t have buttermilk on hand, you can easily make a substitute by mixing 1 cup of milk with 1 tablespoon of vinegar or lemon juice. Let it sit for about 5 minutes until it thickens slightly. This tangy mixture works as a great replacement in marinades and helps tenderize the chicken just like buttermilk.
Can I bake the chicken tenders instead of frying them?
Yes, baking is a healthier alternative to frying. To bake the tenders, preheat your oven to 400°F and line a baking sheet with parchment paper. Arrange the chicken tenders on the sheet and bake for 15-20 minutes, flipping them halfway through for even crispiness. This method will still yield delicious, crispy tenders without the extra oil.
Conclusion & Final Thoughts
Lemon pepper chicken tenders are not only easy to make but deliver an explosion of flavor with every bite. The combination of tangy lemon, savory garlic, and smoky paprika results in a dish that’s perfect for a variety of occasions. Whether fried or baked, these tenders are sure to impress, and the honey butter sauce adds a sweet, buttery glaze that elevates the entire meal.
This recipe is also incredibly versatile, offering opportunities for customization. You can experiment with the seasoning to add more spice, adjust the sweetness in the sauce, or even explore different sides to complement the dish. For example, try serving the tenders with a fresh salad for a lighter option or indulge by pairing them with mac and cheese.
In the end, the key to this recipe is its balance of flavors and textures—crispy, tender chicken coated in a mouthwatering sweet and tangy sauce. So, gather your ingredients, follow the steps, and enjoy the satisfaction of making homemade lemon pepper chicken tenders that are sure to become a favorite for family meals or entertaining guests.
Print
Lemon Pepper Chicken Tenders
Description
These lemon pepper chicken tenders are a flavorful and crispy dish perfect for any occasion. Marinated in a tangy blend of buttermilk, lemon juice, zest, and a variety of spices, the chicken tenderloins soak up tons of flavor while remaining juicy and tender. After marinating, the tenders are dredged in a seasoned flour mixture and fried to golden perfection. They are then tossed in a rich honey butter sauce, which perfectly balances the zesty lemon and savory chicken with just the right amount of sweetness. Whether served as an appetizer or a main course, these chicken tenders will quickly become a family favorite.
Ingredients
- For the Chicken Tenders:
- 2 lbs chicken tenderloins (about 14 tenders)
- 1 cup whole buttermilk
- 1 tablespoon + 2 teaspoons lemon pepper seasoning, divided
- 1 tablespoon lemon zest
- 1 tablespoon freshly squeezed lemon juice
- 1 teaspoon hot sauce (optional for a mild kick)
- 2 teaspoons garlic powder, divided
- 1 teaspoon smoked paprika, divided
- 1 cup all-purpose flour (or gluten-free flour if needed)
- Peanut oil or vegetable oil, for frying (enough to fill your frying pot to 1-2 inches deep)
- For the Honey Butter Sauce:
- 8 tablespoons (1 stick) unsalted butter, cut into cubes
- ½ cup pure honey
- 1 ½ teaspoons lemon pepper seasoning
- 1 tablespoon lemon zest
- 1 heaping teaspoon minced garlic
Instructions
1. Marinate the Chicken:
- Pat the chicken tenderloins dry using paper towels.
- Place the tenders in a large resealable plastic bag or a large container with a lid.
- Add 1 cup of buttermilk, 1 tablespoon of lemon pepper seasoning, 1 tablespoon of lemon zest, 1 tablespoon of lemon juice, 1 teaspoon of hot sauce, 1 teaspoon of garlic powder, and ½ teaspoon of smoked paprika into the bag or container.
- Massage the marinade into the chicken using your hands (gloves optional), ensuring that the chicken is well-coated.
- Seal the bag or cover the container and place it in the refrigerator to marinate for at least 3 hours or preferably overnight for deeper flavor.
2. Prepare the Seasoned Flour:
- In a shallow dish (such as a pie plate), combine 1 cup of flour, the remaining 2 teaspoons of lemon pepper seasoning, 1 teaspoon of garlic powder, and ½ teaspoon of smoked paprika.
- Whisk the flour and spices together until evenly combined. Set this seasoned flour aside.
3. Dredge the Chicken:
- Remove the chicken tenders from the refrigerator after marination.
- One at a time, take each piece of chicken from the buttermilk mixture, letting any excess drip off, and coat it thoroughly in the seasoned flour mixture.
- Make sure every part of the chicken is covered well. Shake off any excess flour and place the coated chicken on a baking sheet. Repeat until all the tenders are coated.
4. Fry the Chicken:
- In a large heavy-bottomed pot or Dutch oven, pour in enough oil to reach 1-2 inches deep. Heat the oil over medium-high heat until it reaches 350-370°F. Use a deep-fry thermometer to monitor the temperature.
- Once the oil reaches the right temperature, fry the chicken in batches of 4-5 tenders at a time. Fry for about 2-3 minutes per side, or until the tenders are golden brown and crispy.
- Make sure the internal temperature of the chicken reaches at least 165°F (use a meat thermometer).
- Once fried, transfer the tenders to a wire rack set over a baking sheet or a plate lined with paper towels to drain excess oil. Let them rest while you fry the remaining tenders, making sure the oil returns to the proper temperature between batches.
5. Make the Honey Butter Sauce:
- In a small saucepan, melt the 8 tablespoons of unsalted butter over medium heat.
- Once melted, stir in ½ cup of honey, 1 ½ teaspoons of lemon pepper seasoning, 1 tablespoon of lemon zest, and 1 heaping teaspoon of minced garlic.
- Stir the mixture until everything is well combined, and allow the sauce to come to a gentle boil. Let it simmer for a minute or two to develop the flavors, then remove from the heat.
6. Toss or Serve the Chicken with the Sauce:
- Option 1: Toss – Place the fried chicken tenders in a large bowl and pour the honey butter sauce over them. Gently toss the tenders to ensure they are fully coated in the sauce.
- Option 2: Serve as a Dip – Alternatively, serve the honey butter sauce in small dipping bowls alongside the tenders for individual dipping.
7. Serve and Enjoy:
- Serve the lemon pepper chicken tenders immediately, while they’re still crispy and hot.
- For a beautiful presentation, garnish with extra lemon zest or fresh parsley and serve with your favorite sides such as fries, coleslaw, or a fresh salad.
Notes
To ensure the best results, allow the chicken to marinate for at least 3 hours or overnight. This step is crucial for tenderizing the meat and allowing the flavors to penetrate fully. For a gluten-free version, substitute the all-purpose flour with a gluten-free alternative like almond or rice flour. If you prefer a healthier option, the chicken tenders can be baked instead of fried—simply follow the baking instructions included in the recipe for a delicious, lighter version of this dish. Also, feel free to adjust the spice level to your liking by adding a pinch of cayenne pepper to the marinade.


