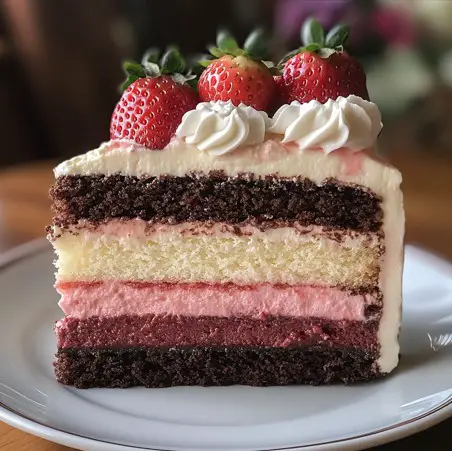
Neapolitan cake is a delightful and visually striking dessert that brings together the beloved flavors of strawberry, vanilla, and chocolate into one harmonious creation. This cake is inspired by the classic Neapolitan ice cream, which originated in Italy and became popular in the 19th century. The ice cream was traditionally made with the same trio of flavors, representing the colors of the Italian flag.
Neapolitan cake, much like its frozen counterpart, is a symbol of indulgence and variety, offering something for everyone. Each layer of the cake embodies one of these classic flavors, creating a beautiful and colorful presentation that is as appealing to the eyes as it is to the taste buds. The contrast of flavors and colors makes it a standout choice for birthdays, weddings, and other celebratory occasions. Whether you’re a fan of fruity strawberry, rich chocolate, or the smooth and simple taste of vanilla, the Neapolitan cake is sure to satisfy all your cravings in one delicious slice.
Ingredients Breakdown
When it comes to creating a perfect Neapolitan cake, understanding the role of each ingredient is crucial. Every element contributes to the final taste, texture, and visual appeal of this multi-layered dessert. Here’s a detailed look at the key ingredients used in both the cake layers and the frostings.
For the Cake:
Fresh Strawberries for the Puree: Using fresh strawberries is essential for the puree that flavors the strawberry cake layer. Fresh strawberries provide a vibrant, natural color and a bright, authentic taste that’s hard to replicate with artificial flavorings or frozen strawberries. The natural sugars in fresh strawberries also caramelize slightly when cooked down, intensifying the flavor, which is a key characteristic of the strawberry layer in a Neapolitan cake.
Butter vs. Oil in the Cake’s Texture: This cake recipe uses both butter and vegetable oil, each playing a distinct role in achieving the desired texture. Butter contributes a rich flavor and a tender crumb, thanks to its fat content and ability to trap air during the creaming process. Oil, on the other hand, keeps the cake moist and soft, even when refrigerated. The combination of these two fats ensures a balanced texture—moist yet structured—across all three layers of the cake.
Role of Baking Powder: Baking powder is the leavening agent responsible for giving the cake its rise. It works by releasing carbon dioxide gas when it comes into contact with moisture and heat, creating air pockets in the batter. This results in a light and fluffy texture, which is essential for each distinct layer to stand out and maintain its integrity when stacked. Ensuring the correct amount of baking powder is used is key to preventing the cake from becoming dense or failing to rise evenly.
For the Frostings:
Chocolate, Vanilla, and Strawberry Frostings: The Neapolitan cake features three distinct frostings, each complementing the corresponding cake layer:
- Chocolate Frosting: Made with unsweetened cocoa powder and butter, this frosting has a deep, rich chocolate flavor. The butter provides a creamy base, while the cocoa powder adds intensity and a slightly bitter note that balances the sweetness of the cake.
- Vanilla Frosting: This classic frosting is all about simplicity and smoothness. It’s made with vanilla extract, which imparts a subtle, sweet flavor that enhances the vanilla cake layer without overpowering it.
- Strawberry Frosting: The strawberry frosting is infused with reduced strawberry puree, giving it a natural, fruity flavor and a light pink hue. This frosting ties together the strawberry cake layer’s flavor while adding a fresh, berry-sweet note to the overall cake.
Importance of Heavy Cream in Frostings: Heavy cream is crucial for achieving the right consistency in the frostings. It adds a luxurious, smooth texture, making the frosting easier to spread and whip into light, airy peaks. The high fat content in heavy cream also stabilizes the frosting, allowing it to hold its shape on the cake and resist melting, especially when combined with powdered sugar.
For the Chocolate Ganache:
Why Semi-Sweet Chocolate Chips Are Recommended: Semi-sweet chocolate chips are ideal for ganache because they offer a balanced flavor—rich in chocolatey depth but not overly sweet. This balance is important for the ganache, which is intended to complement the already sweet layers and frostings of the cake. Semi-sweet chocolate also melts smoothly, creating a ganache that’s perfect for drizzling over the cake without becoming too thick or cloying.
Tips on Choosing the Right Cream: For the ganache, it’s essential to use heavy cream with at least 35% fat content. This type of cream not only helps to create a smooth and glossy ganache but also ensures that it sets properly on the cake without becoming too runny. The cream should be heated just to the point of simmering—not boiling—to avoid scorching it, which can alter the taste and texture of the ganache.
Step-by-Step Instructions for Cake Layers
Creating the perfect Neapolitan cake involves careful attention to each step in the process, from preparing the fruit puree to baking the individual cake layers. Here’s a detailed guide to help you achieve a flawless result.
Step 1: Preparing the Strawberry Puree
How to Reduce the Puree and Why It’s Crucial for the Cake’s Flavor: Start by washing and chopping fresh strawberries until you have about 2 cups (280g) of chopped berries. Place the chopped strawberries in a blender or food processor and blend until smooth, creating a puree. You should have approximately 1 cup of strawberry puree after blending.
Transfer the puree to a saucepan and cook over medium heat, stirring constantly to prevent burning. Allow the mixture to come to a slow boil. As it cooks, the water content in the puree will evaporate, reducing the volume by half to about 1/2 cup plus 2 tablespoons. This process takes approximately 15 minutes. Reducing the puree concentrates the strawberry flavor, ensuring that it stands out in the cake without adding too much moisture, which could affect the cake’s texture. Once reduced, remove the puree from the heat and allow it to cool to room temperature. This puree will be used in both the cake batter and the strawberry frosting.
Step 2: Preparing the Cake Pans
Importance of Greasing and Using Parchment Paper: Proper preparation of the cake pans is essential to prevent the cake layers from sticking and to ensure they bake evenly. Start by greasing three 8-inch round cake pans with butter or non-stick cooking spray. After greasing, cut out circles of parchment paper to fit the bottoms of the pans and place them inside. The parchment paper adds an extra layer of protection against sticking, making it easier to remove the cakes from the pans once baked. Grease the sides of the pans as well to ensure the cake layers release smoothly.
Step 3: Making the Cake Batter
Detailed Instructions for Creating the Base Batter: In a large mixing bowl, combine 10 tablespoons (140g) of unsalted butter (at room temperature), 1/2 cup plus 2 tablespoons (150ml) of vegetable oil, and 2 cups (414g) of sugar. Beat these ingredients together using a stand mixer or hand mixer on medium speed until the mixture becomes light and fluffy, about 3-4 minutes. This process is crucial as it incorporates air into the batter, contributing to the cake’s light texture.
Add 5 large eggs to the mixture, one at a time, beating until each egg is fully incorporated before adding the next. Be sure to scrape down the sides of the bowl as needed to ensure all ingredients are well mixed.
In a separate bowl, whisk together 2 3/4 cups (358g) of all-purpose flour, 3 teaspoons of baking powder, and 3/4 teaspoon of salt. Gradually add the dry ingredients to the wet mixture in three parts, alternating with 1 cup plus 2 tablespoons (270ml) of milk, starting and ending with the dry ingredients. Mix just until each addition is combined, being careful not to overmix, which can lead to a dense cake.
Strawberry Cake Layer: Take about 2 1/4 cups of the base batter and transfer it to a separate bowl. Add 1 tablespoon of milk, the cooled strawberry reduction (1/2 cup plus 2 tablespoons), 1 teaspoon of strawberry extract, and 10 drops of red food coloring to this batter. Gently fold the ingredients together until the batter is evenly colored and well mixed. Finally, fold in an additional 2 tablespoons (16g) of flour to ensure the right consistency. Be cautious not to overmix, as this can make the cake tough. Pour the strawberry batter into one of the prepared cake pans.
Vanilla Cake Layer: To the remaining base batter, add 1/2 teaspoon of vanilla extract and fold it in gently. Then, take half of this batter (about 2 1/2 cups) and add 2 tablespoons (16g) of flour, folding until just combined. This will be your vanilla cake layer. Pour this batter into a second prepared cake pan.
Chocolate Cake Layer: Melt 2.5 ounces (70g) of bittersweet chocolate (60% cacao) in a heatproof bowl, either in the microwave in 20-second intervals or over a double boiler, stirring until smooth. Add the melted chocolate and 2 tablespoons (14g) of unsweetened cocoa powder to the remaining base batter. Gently fold the chocolate mixture into the batter until fully combined. Pour the chocolate batter into the third prepared cake pan.
Step 4: Baking the Cake Layers
Tips on Ensuring Even Baking for Each Layer: Preheat your oven to 350°F (176°C). Place the cake pans on the middle rack, ensuring they are spaced evenly apart to allow proper air circulation. If your oven cannot accommodate all three pans on one rack, you may need to bake them in batches or rotate the pans halfway through baking.
How to Check for Doneness and Cool the Cakes Properly: Bake the cake layers for 23-28 minutes. Given that each layer has slightly different ingredients, the bake times may vary. The chocolate layer, being denser, may require an extra minute or two. To check for doneness, insert a toothpick into the center of each cake. The cakes are done when the toothpick comes out clean or with just a few moist crumbs attached.
Once baked, remove the cakes from the oven and let them cool in their pans for 2-3 minutes. This brief cooling period allows the cakes to set slightly, making them easier to handle. Afterward, carefully run a knife around the edges of the pans to loosen the cakes, then invert them onto cooling racks. Peel off the parchment paper and let the cakes cool completely before assembling the layers. Cooling on a rack allows air to circulate around the cakes, preventing them from becoming soggy on the bottom.
Making the Chocolate Buttercream
Crafting the perfect chocolate buttercream requires careful attention to texture, flavor, and consistency. Here’s how to achieve a rich and creamy chocolate buttercream for your Neapolitan cake.
Step 1: Creaming the Butter
Achieving the Perfect Buttercream Texture: Start by placing 1 cup (224g) of unsalted butter at room temperature into a large mixing bowl. The butter should be soft but not melted, as this ensures it will cream properly and create a smooth, airy texture in the buttercream. Using a stand mixer fitted with the paddle attachment or a hand mixer, beat the butter on medium speed until it becomes pale, fluffy, and smooth, about 2-3 minutes. The key here is to incorporate as much air as possible, which will give the buttercream a light and creamy texture that is easy to spread and pipe.
Step 2: Incorporating Cocoa Powder
How to Blend It Without Creating Lumps: Next, gradually add 1/2 cup (57g) of unsweetened cocoa powder to the creamed butter. It’s best to sift the cocoa powder first to remove any lumps, ensuring a smooth blend. Add the cocoa powder in two to three batches, mixing on low speed after each addition to prevent it from puffing up and making a mess. Once all the cocoa powder has been incorporated, increase the mixer speed to medium and beat until the mixture is fully combined and smooth. The result should be a rich, chocolatey buttercream with a deep, even color and a silky texture.
Step 3: Adjusting Consistency
Tips on Adding the Right Amount of Cream or Water: To achieve the ideal consistency for spreading and piping, you’ll need to adjust the buttercream by adding liquid. Gradually add 4-5 tablespoons (60-75ml) of heavy whipping cream or water, 1 tablespoon at a time, while continuing to beat the buttercream on medium speed. If you prefer a richer and creamier frosting, opt for heavy whipping cream. For a lighter texture, water works well.
As you add the liquid, pay attention to the buttercream’s consistency. It should be smooth, spreadable, and hold its shape well. If the buttercream becomes too thin, you can thicken it by adding a bit more powdered sugar (from the reserved portion). Conversely, if it’s too thick, add a small amount of cream or water until the desired consistency is reached.
Once the consistency is perfect, add 1 teaspoon of vanilla extract and a pinch of salt to enhance the flavor, and mix until fully incorporated. The finished chocolate buttercream should be rich, creamy, and perfectly balanced in sweetness, with a deep chocolate flavor that complements the layers of the Neapolitan cake.
Making the Vanilla & Strawberry Buttercreams
Creating the vanilla and strawberry buttercreams is a crucial step in building a beautiful and flavorful Neapolitan cake. These frostings not only add distinct flavors but also enhance the visual appeal of the cake with their contrasting colors.
Step 1: Preparing the Vanilla Buttercream
Importance of Beating the Butter Until Creamy: Begin by placing 2 1/2 cups (560g) of unsalted butter at room temperature into a large mixing bowl. The butter should be soft to the touch but not melted, as this consistency allows it to incorporate air effectively, resulting in a light and fluffy buttercream. Using a stand mixer fitted with the paddle attachment or a hand mixer, beat the butter on medium speed for 2-3 minutes. This initial creaming process is crucial because it sets the foundation for a smooth and creamy buttercream. Properly creamed butter ensures that the powdered sugar will blend seamlessly without forming lumps, giving the frosting a luxurious texture.
Achieving the Right Consistency with Powdered Sugar and Cream: Gradually add 10 cups (1150g) of powdered sugar to the creamed butter, 1-2 cups at a time, mixing on low speed after each addition to prevent the sugar from puffing out of the bowl. After incorporating half of the powdered sugar, add 2 1/2 teaspoons of vanilla extract and 2 tablespoons (30ml) of heavy cream or water. Continue beating on medium speed until the mixture is smooth and well combined.
Add the remaining powdered sugar and continue mixing until fully incorporated. The buttercream will be quite thick at this point, so gradually add more cream or water, 1 tablespoon at a time, until the desired consistency is reached. The buttercream should be smooth, spreadable, and slightly firm, making it ideal for both filling and covering the cake layers. If the buttercream becomes too soft, you can firm it up by placing it in the refrigerator for a few minutes before using it.
Step 2: Preparing the Strawberry Buttercream
Incorporating the Strawberry Reduction and Extract: To create the strawberry buttercream, start by removing 2 cups of the prepared vanilla buttercream and placing it in a separate mixing bowl. To this, add the remaining 1/4 cup of the cooled strawberry reduction, which was prepared earlier, along with 3/4 teaspoon of strawberry extract. The strawberry reduction not only imparts a natural, vibrant color to the buttercream but also infuses it with an intense, fresh strawberry flavor. The extract enhances this flavor, ensuring it stands out against the sweetness of the buttercream.
Gently beat the mixture on low speed until the strawberry reduction and extract are fully incorporated. Be careful not to overmix, as this can cause the buttercream to become too soft. Once the ingredients are well combined, increase the speed to medium and beat until the buttercream is smooth and evenly colored. The finished strawberry buttercream should have a light pink hue and a strong, natural strawberry flavor that pairs perfectly with the strawberry layer of the Neapolitan cake.
If the strawberry buttercream is too thick, you can adjust the consistency by adding a small amount of cream or water, as you did with the vanilla buttercream. Conversely, if it’s too soft, refrigerate it briefly to firm it up before using.
By following these steps, you’ll create both a rich vanilla buttercream and a fruity strawberry buttercream, each perfectly suited for layering and decorating your Neapolitan cake. These buttercreams not only add flavor but also contribute to the cake’s visual appeal, making it a true showstopper.
Assembling and Decorating Your Neapolitan Cake
Assembling and decorating your Neapolitan cake is where all the hard work comes together into a beautiful, finished product. Here’s a step-by-step guide to help you build, frost, and decorate your cake to perfection.
Building the Cake
Word Count: 400
Step 1: Leveling the Cake Layers Once your cake layers have cooled completely, it’s important to level them to ensure they stack evenly. Using a large serrated knife, hold the knife parallel to the work surface and carefully slice off the dome from the top of each cake layer. Start by making a small incision around the edge of the dome, then gradually work your way toward the center, keeping the knife level. This will help you achieve a flat, even surface on each layer, making it easier to stack them without tilting or instability.
Step 2: Stacking the Layers Begin by placing the chocolate cake layer on a serving plate or a cardboard cake round, which will help you move the cake if necessary. Spread about 1 cup of chocolate buttercream evenly over the top of the chocolate layer using an offset spatula. The frosting should be thick enough to provide a distinct layer of flavor but not so thick that it overpowers the cake.
Next, place the strawberry cake layer on top of the chocolate buttercream, aligning the edges carefully. Spread 1 cup of strawberry buttercream evenly over the top of the strawberry layer. Finally, place the vanilla cake layer on top of the strawberry buttercream. Spread about 1 cup of vanilla buttercream over the top of the vanilla layer, smoothing it out evenly.
Step 3: Applying the Frosting To achieve a smooth and professional-looking finish, apply a thin “crumb coat” of frosting around the entire cake. This first layer traps any loose crumbs and provides a smooth base for the final layer of frosting. Use the remaining buttercreams to frost the sides of the cake, applying chocolate frosting around the chocolate layer, strawberry frosting around the strawberry layer, and vanilla frosting around the vanilla layer.
To create clean, distinct layers of frosting on the sides, use an icing smoother or a large offset spatula. Hold the smoother at a slight angle and gently run it around the cake, pressing lightly to smooth the frosting and blend the layers slightly, without mixing the colors. This step may require a few passes, but try to minimize the number of times you go around the cake to keep the layers distinct and prevent colors from bleeding into each other.
Adding the Chocolate Ganache Drip
Word Count: 250
Step 1: Making the Ganache For the ganache, combine 3 ounces (1/2 cup | 85g) of semi-sweet chocolate chips with 1/4 cup (60ml) of heavy whipping cream in a heatproof bowl. Heat the cream until it just begins to simmer, either in the microwave or on the stovetop. Be careful not to let it boil, as boiling cream can cause the ganache to split or become grainy. Pour the hot cream over the chocolate chips and let it sit for 3-5 minutes. This waiting period allows the heat from the cream to melt the chocolate gently.
After the chocolate has melted, whisk the mixture until smooth and glossy. If you find the ganache is too thick for dripping, add a small amount of additional cream and mix until you achieve the desired consistency.
Step 2: Drizzling the Ganache To create the iconic drip effect, transfer the ganache to a squeeze bottle or use a spoon to drizzle it over the cake. Start at the edge of the cake, gently squeezing or spooning the ganache so that it drips down the sides. You can control the length and thickness of the drips by varying the amount of ganache you apply and the speed at which you move the bottle or spoon. After completing the drips around the edge, pour any remaining ganache over the top of the cake and spread it evenly with an offset spatula.
Final Decorating Tips
Piping the Buttercream Swirls For a polished finish, use a piping bag fitted with a star tip to pipe swirls of vanilla buttercream around the top edge of the cake. Start from the outside edge and pipe in a circular motion, working your way toward the center. For even and professional-looking swirls, apply consistent pressure to the piping bag and keep the piping tip at a 90-degree angle to the cake surface.
Garnishing with Fresh Strawberries To add a fresh and vibrant touch, garnish the cake with halved or whole fresh strawberries. Place the strawberries strategically on top of the buttercream swirls or along the base of the cake. To avoid sogginess, place the strawberries on the cake just before serving, or dab them with a paper towel to remove excess moisture before applying.
Storage Tips After decorating, refrigerate the cake until it’s ready to serve. To maintain freshness, store the cake in an airtight container or cover it with plastic wrap. The cake can be kept in the refrigerator for 3-4 days. Before serving, let the cake sit at room temperature for about 30 minutes to allow the buttercream to soften slightly, which enhances the flavor and texture.
Frequently Asked Questions (FAQs)
How do I prevent the cake layers from being dry? To prevent the cake layers from being dry, make sure not to overbake them. Check for doneness a few minutes before the recommended bake time by inserting a toothpick into the center of the cake. If it comes out with a few moist crumbs, the cake is done. Additionally, using a combination of butter and oil in the batter helps keep the cake moist. Finally, be sure to properly measure your ingredients, particularly flour, as too much flour can lead to a drier cake.
Can I use frozen strawberries instead of fresh for the puree? Yes, you can use frozen strawberries instead of fresh. However, make sure to thaw and drain the strawberries before pureeing them. Frozen strawberries can release more water, so draining them is important to avoid adding excess moisture to the puree, which could affect the consistency of the cake and frosting.
What can I substitute for heavy cream in the frosting? If you don’t have heavy cream, you can substitute it with whole milk or half-and-half. These options will still provide a creamy texture, though the frosting may be slightly less rich. If you’re looking for a dairy-free alternative, you can use coconut cream or almond milk, though these may alter the flavor slightly.
How long can I store the Neapolitan cake? The Neapolitan cake can be stored in the refrigerator for 3-4 days. To keep it fresh, store the cake in an airtight container or wrap it tightly in plastic wrap. Before serving, let the cake come to room temperature to soften the buttercream and enhance the flavors.
Can I make the cake layers ahead of time? Yes, you can make the cake layers ahead of time. Once baked, allow the layers to cool completely, then wrap each layer tightly in plastic wrap and store them in the refrigerator for up to 2 days. For longer storage, you can freeze the layers for up to 2 months. Thaw frozen cake layers in the refrigerator overnight before assembling the cake.
What should I do if my ganache is too thick? If your ganache is too thick, you can thin it out by adding a small amount of warm cream. Add the cream 1 tablespoon at a time, stirring until you reach the desired consistency. Be careful not to add too much at once, as this can make the ganache too runny.
Conclusion
Making the perfect Neapolitan cake involves careful attention to detail at each step—from preparing the fresh strawberry puree to assembling the beautifully layered cake. By following the outlined steps for baking, frosting, and decorating, you’ll create a show-stopping dessert that’s as delicious as it is visually stunning.
Remember, this recipe offers a great opportunity to experiment with flavors and decorations. Don’t hesitate to add your own twist, whether by incorporating different fruit flavors, trying out new frosting techniques, or adding decorative touches that make the cake uniquely yours. Enjoy the process of creating this classic treat, and delight in the reactions of those who get to taste your masterpiece!
Print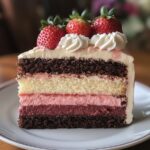
Neapolitan Cake
Description
The Neapolitan cake is a delightful, tri-layered dessert that brings together the classic flavors of strawberry, vanilla, and chocolate. Inspired by the traditional Neapolitan ice cream, this cake offers a perfect balance of rich chocolate, fragrant vanilla, and fruity strawberry in every bite. Each layer is paired with a corresponding buttercream, and the cake is topped off with a decadent chocolate ganache drip, making it as visually stunning as it is delicious.
Note: This recipe is ideal for special occasions, such as birthdays, weddings, or family gatherings. The preparation involves multiple steps, including making fruit puree, baking separate cake layers, and preparing different frostings, so be sure to set aside enough time to complete each step carefully. For best results, read through the entire recipe before beginning, and consider preparing the cake layers ahead of time to make the assembly process smoother.
Ingredients
For the Cake:
- 1 cup strawberry puree (from 2 cups [280g] chopped strawberries)
- 3 cups (390g) all-purpose flour, divided
- 3 tsp baking powder
- 3/4 tsp salt
- 10 tbsp (140g) unsalted butter, room temperature
- 1/2 cup plus 2 tbsp (150ml) vegetable oil
- 2 cups (414g) sugar
- 1 tbsp + 1/2 tsp vanilla extract, divided
- 5 large eggs
- 1 cup plus 2 tbsp (270ml) milk, divided
- 1 tsp strawberry extract
- 10 drops red food coloring
- 2.5 oz bittersweet chocolate (60% cacao), chopped
- 2 tbsp (14g) natural unsweetened cocoa powder
For the Chocolate Frosting:
- 1 cup (224g) unsalted butter, room temperature
- 3 1/2 cups (403g) powdered sugar
- 1/2 cup (57g) natural unsweetened cocoa powder
- 1 tsp vanilla extract
- 4–5 tbsp (60-75ml) heavy whipping cream (or water)
- 1/4 tsp salt
For the Vanilla & Strawberry Frostings:
- 1/4 cup strawberry puree (from 1/2 cup [70g] chopped strawberries)
- 2 1/2 cups (560g) unsalted butter, room temperature
- 10 cups (1150g) powdered sugar
- 2 1/2 tsp vanilla extract
- 4–6 tbsp (60-90ml) water or cream
- 3/4 tsp strawberry extract
- Pinch or two of salt
For the Chocolate Ganache:
- 3 oz (1/2 cup | 85g) semi-sweet chocolate chips
- 1/4 cup (60ml) heavy whipping cream
Instructions
Step 1: Preparing the Strawberry Puree
- Place 2 cups (280g) of chopped strawberries in a blender and puree until smooth.
- Transfer the puree to a saucepan and cook over medium heat, stirring constantly, until it reduces by half to 1/2 cup plus 2 tablespoons, about 15 minutes.
- Allow the puree to cool to room temperature. This will be used for both the cake batter and the strawberry frosting.
Step 2: Preparing the Cake Pans
- Preheat the oven to 350°F (176°C).
- Grease three 8-inch round cake pans and line the bottoms with parchment paper circles. Grease the sides of the pans as well to prevent sticking.
Step 3: Making the Cake Batter
- In a large mixing bowl, beat together 10 tablespoons (140g) of unsalted butter, 1/2 cup plus 2 tablespoons (150ml) of vegetable oil, and 2 cups (414g) of sugar until light and fluffy.
- Add 5 large eggs, one at a time, beating well after each addition.
- In a separate bowl, whisk together 2 3/4 cups (358g) of flour, 3 teaspoons of baking powder, and 3/4 teaspoon of salt.
- Gradually add the dry ingredients to the wet mixture, alternating with 1 cup plus 2 tablespoons (270ml) of milk, starting and ending with the dry ingredients.
- Divide the batter into three portions.
Strawberry Cake Layer:
- Take 2 1/4 cups of batter and mix with 1 tablespoon of milk, 1/2 cup plus 2 tablespoons of strawberry puree, 1 teaspoon of strawberry extract, and 10 drops of red food coloring. Fold in 2 tablespoons of flour.
- Pour into one of the prepared pans.
Vanilla Cake Layer:
- Add 1/2 teaspoon of vanilla extract to another 2 1/4 cups of batter. Fold in 2 tablespoons of flour.
- Pour into the second prepared pan.
Chocolate Cake Layer:
- Melt 2.5 oz bittersweet chocolate and fold into the remaining batter along with 2 tablespoons of cocoa powder.
- Pour into the third prepared pan.
Step 4: Baking the Cake Layers
- Bake the cake layers for 23-28 minutes, checking for doneness with a toothpick.
- Allow the cakes to cool in the pans for 2-3 minutes before turning them out onto wire racks to cool completely.
Making the Frostings
Chocolate Buttercream:
- Cream the Butter: Beat 1 cup (224g) unsalted butter until smooth and creamy.
- Incorporate Cocoa Powder: Gradually add 1/2 cup (57g) cocoa powder, mixing on low speed.
- Adjust Consistency: Add 4-5 tablespoons (60-75ml) heavy cream or water until the frosting reaches a spreadable consistency. Mix in 1 teaspoon vanilla extract and 1/4 teaspoon salt.
Vanilla Buttercream:
- Prepare the Base: Beat 2 1/2 cups (560g) unsalted butter until creamy.
- Incorporate Sugar: Gradually add 10 cups (1150g) powdered sugar, alternating with 4-6 tablespoons (60-90ml) cream or water. Mix in 2 1/2 teaspoons vanilla extract and a pinch of salt until smooth and spreadable.
Strawberry Buttercream:
- Prepare the Base: Take 2 cups of vanilla buttercream and mix in 1/4 cup of strawberry puree and 3/4 teaspoon of strawberry extract.
Assembling the Cake
- Level the Cake Layers: Use a serrated knife to remove any domes from the cake layers.
- Stack the Layers: Place the chocolate layer on a serving plate, spread with chocolate buttercream, add the strawberry layer, spread with strawberry buttercream, and finally add the vanilla layer, spread with vanilla buttercream.
- Apply the Final Frosting: Apply a crumb coat, then frost the cake with the remaining buttercreams, creating distinct layers on the sides.
Adding the Chocolate Ganache Drip
- Make the Ganache: Heat 1/4 cup (60ml) of heavy cream until simmering. Pour over 3 oz (85g) of semi-sweet chocolate chips and let sit for 3-5 minutes. Whisk until smooth.
- Drizzle the Ganache: Use a squeeze bottle or spoon to drizzle the ganache around the edge of the cake, allowing it to drip down the sides.
Final Decorating Tips
- Piping Buttercream Swirls: Use a piping bag to pipe swirls of vanilla buttercream on top of the cake.
- Garnishing with Strawberries: Add fresh strawberries on top just before serving to avoid sogginess.
Notes
- Store the cake in the refrigerator for up to 4 days. Allow the cake to sit at room temperature for 30 minutes before serving for the best texture and flavor.
- This recipe has a lot of steps and uses divided ingredients in several places. Read through everything before starting and pay close attention as you go.


