

There’s something irresistibly nostalgic about the classic banana split: the interplay of sweet bananas, juicy pineapple, bright strawberries, cool whipped cream, and that final cherry on top. Now, imagine all those flavors transformed into a luscious, no-bake cheesecake you can make in under thirty minutes, then simply chill until firm. This No-Bake Banana Split Cheesecake is the dessert dream of summer barbecues, birthday parties, or any time you crave a tropical twist on a creamy favorite—without ever firing up the oven.
I first experimented with this mash-up on a sunny Saturday when my backyard was buzzing with friends and family. Rather than juggling multiple bowls and scoops, I wanted a single dessert that captured every classic banana split element. I whipped together a simple graham-cracker crust, folded fluffy whipped topping into a tangy cream-cheese base, and layered bananas, pineapple, and strawberries in perfect harmony. The result was an eye-catching, indulgent cheesecake that tasted like an ice-cold banana split and looked like a culinary showpiece.
What I love about this recipe is how straightforward it is—yet it feels special every time. The crust, made from buttery graham crumbs and a touch of sugar, provides a crisp foundation. A light yet tangy cheesecake filling folds in just enough Cool Whip to stay fluffy and slice neatly. Then the real fun begins: layers of fresh fruit, optional pops of mini chocolate chips or chopped nuts, and a final cloud of whipped topping crowned with syrup and cherries. Whether you prepare it for potluck, picnic, or a relaxed family dinner, you’ll delight in how quickly it comes together and how enthusiastically everyone dives in.
In Part 1, we’ll focus on building that perfect crust and folding together the cheesecake layer. By the time you finish these steps, your dish will be chilling in the fridge, and you’ll be ready to pile on the fruit and garnishes. Ready to create the ultimate banana split cheesecake? Let’s get started.
STEPS
- Make and chill the crust
In a medium bowl, combine 2 cups of graham cracker crumbs with ½ cup of melted butter and ¼ cup of granulated sugar. Stir until every crumb is moistened and the mixture holds together when pressed. Transfer the crumb blend into a 9×13-inch baking dish, using the bottom of a measuring cup or glass to press it firmly and evenly across the bottom. This compacted layer sets the stage for a sturdy yet tender base. Place the pan in the refrigerator for at least 15 minutes to firm up while you prepare the filling. - Beat the cheesecake filling
In a large mixing bowl, use an electric mixer to beat 16 ounces of softened cream cheese until smooth and free of lumps. Add 1 cup of powdered sugar and 1 teaspoon of vanilla extract, then continue to beat until the sugar is fully incorporated and the mixture is light in color. The key here is to whip out any graininess so your cheesecake layer feels silky on the palate.

- Fold in whipped topping
Gently fold 1½ cups of thawed whipped topping into the cream-cheese mixture using a rubber spatula. Use sweeping motions to maintain volume and prevent deflating the topping. The resulting hybrid is lighter than a traditional cheesecake but still rich enough to hold its shape when sliced. Spread the filling evenly over the chilled crust, smoothing the surface with an offset spatula or the back of a spoon. At this point, return the cheesecake to the refrigerator to chill for at least 15 minutes before adding the fruit layers.
No-Bake Banana Split Cheesecake: Building the Fruity Layers
Now that your cheesecake layer is firmly set on its graham-cracker foundation, it’s time to transform this simple canvas into a vibrant banana-split masterpiece. In this section, we’ll arrange the bananas, pineapple, and strawberries; add optional chocolate chips and nuts; finish with the final whipped topping; and prepare the cheesecake for its final chill. By the end, you’ll have a show-stopping dessert that’s as pleasing to the eye as it is to the palate.
STEPS
- Layer the bananas
Remove the partially chilled cheesecake from the refrigerator. Evenly arrange two sliced bananas across the surface, covering the entire width of the pan. Press each slice gently into the cheesecake layer so they adhere without sinking too deeply.

- Add crushed pineapple
Sprinkle one cup of well-drained, crushed pineapple over the banana layer. Distribute it so that every bite of cheesecake will combine the mellow banana sweetness with bursts of tangy pineapple. - Scatter the strawberries
Dice one cup of fresh strawberries and pat them dry to avoid excess moisture. Arrange the strawberry pieces in a single layer atop the pineapple, pressing lightly so they nestle into the filling without breaking apart. - Incorporate optional mix-ins
If you’d like little pops of texture and chocolate, sprinkle up to ½ cup of mini chocolate chips over the fruit. For added crunch, scatter ½ cup of chopped nuts—such as pecans, walnuts, or macadamia nuts—over the top. These mix-ins are optional but enhance the classic banana-split flavor profile. - Finish with whipped topping
Spread the remaining 1½ cups of whipped topping in an even layer over the fruit and mix-ins. Use a spatula to create gentle peaks or swirls for an elegant presentation.

- Chill until set
Cover the dish loosely with plastic wrap and refrigerate for a minimum of four hours. For best results and clean slices, chill overnight. This extended rest allows the cheesecake filling to firm fully and the flavors to meld. - Final garnish and serve
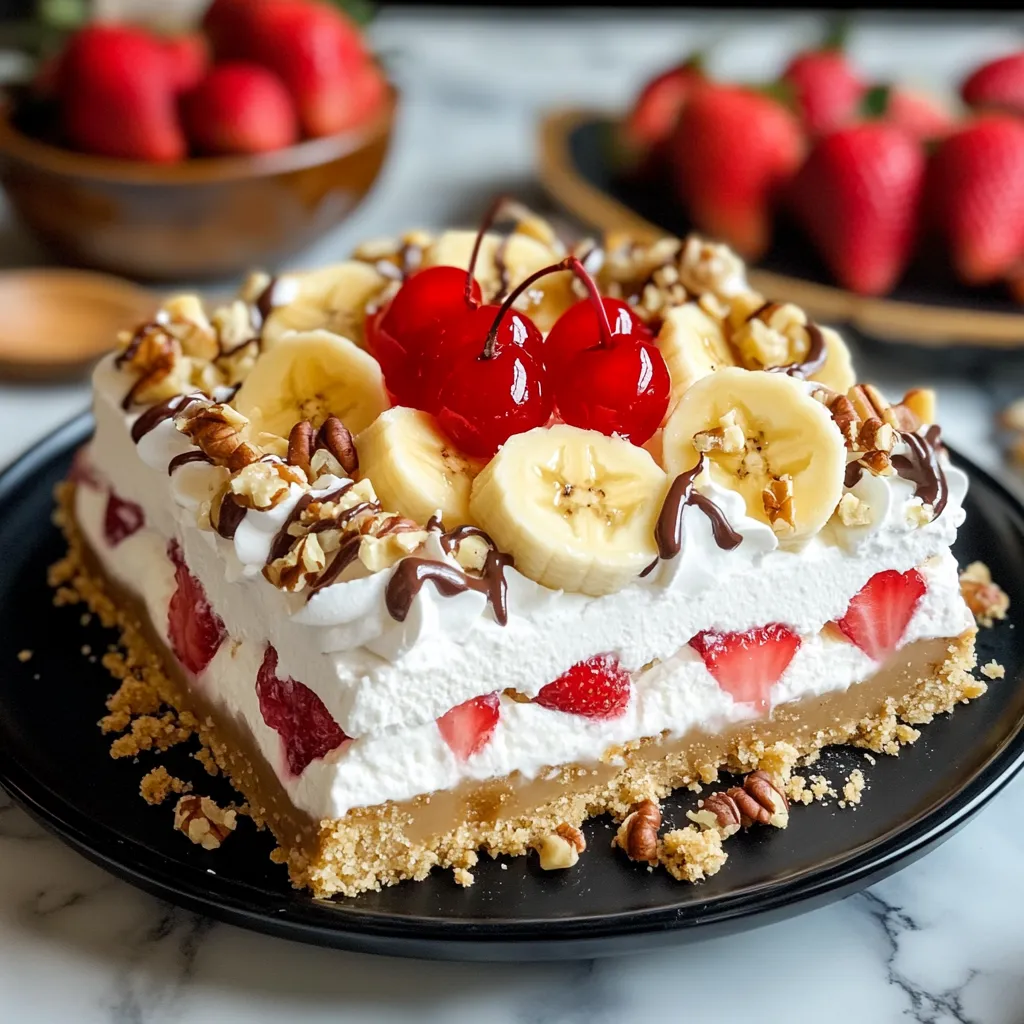
Just before serving, drizzle the top with chocolate syrup in a zigzag pattern. Arrange maraschino cherries evenly across the surface for a classic finishing touch. To serve, use a hot, dry knife—wiping between cuts—to produce neat, distinct slices.
TIPS & VARIATIONS
- Prevent soggy fruit
After slicing, pat bananas and strawberries dry with a paper towel. For pineapple, drain thoroughly or press in a fine-mesh sieve to remove excess juice before layering. - Tropical twist
Substitute mango chunks or toasted coconut flakes for pineapple for a more island-inspired flavor. You can also add passion‐fruit pulp or a thin layer of guava jam under the fruit for acidity and color contrast. - Lower-sugar option
Choose reduced-sugar graham crackers and swap powdered sugar in the filling for a sugar substitute such as powdered erythritol. Use unsweetened whipped topping to control sweetness. - Flavored cheesecake layer
Fold in ¼ cup of mashed ripe banana or a teaspoon of banana extract into the cream-cheese mixture for enhanced banana flavor. Alternatively, stir in 2 tablespoons of sour cream for extra tang. - Graham-cracker crust alternatives
Replace graham crumbs with crushed shortbread cookies or vanilla wafers to add subtle flavor shifts. For a gluten-free crust, use certified gluten-free graham crumbs or almond-meal crust. - Make-ahead convenience
Crust and cheesecake layer can be prepared up to two days in advance. Assemble fruit layers and final topping on the day of serving to keep fruit fresh and vibrant. - Individual servings
For portable or party‐friendly portions, assemble the entire dessert in clear parfait glasses or mason jars. Layer crust, filling, fruit, and whipped topping in each glass, then chill and garnish individually.

Q1: My cheesecake layer seems too soft—how can I firm it up?
Ensure your cream cheese is fully softened before whipping, which allows it to blend smoothly with the sugar and whipped topping. After assembling the filling, give it at least four hours—preferably overnight—in the refrigerator. If it’s still too soft, pop it back into the fridge for a bit longer; the chilling time is crucial for a sliceable consistency.
Q2: How do I prevent the fruit from releasing too much juice and making the filling soggy?
Pat sliced bananas and diced strawberries dry with paper towels before layering. For crushed pineapple, drain thoroughly in a fine-mesh sieve and even press gently to remove excess liquid. Layer the fruit just before serving if you plan to prepare the cheesecake a day in advance.
Q3: Can I make the crust gluten-free or with a different base?
Yes. Substitute gluten-free graham crumbs or finely ground almond meal for the graham crackers to create a gluten-free crust. You can also use crushed vanilla wafers or even finely chopped shortbread cookies for a different flavor profile—just maintain the 2-cup crumb to ½-cup melted butter ratio.
Q4: Is it possible to prepare this cheesecake in individual servings?
Absolutely. Divide the graham-crumb mixture among small glasses or mason jars, pressing to form individual bottoms. Layer the cream-cheese filling, fruit, and whipped topping in each container. Cover and chill as usual—guests will appreciate the single-serve presentation.
Q5: How long will leftovers keep, and what’s the best way to store them?
Store any uneaten cheesecake covered with plastic wrap or in an airtight container in the refrigerator. It will keep perfectly for up to three days; after that, the crust may begin to soften. Avoid freezing, as the fruit layers can become watery upon thawing.
Q6: Can I swap in different fruits or add mix-ins?
Feel free to customize. Mango or kiwi slices, mandarin segments, or raspberries all work beautifully. For an extra-indulgent touch, fold mini chocolate chips into the cheesecake layer or sprinkle chopped nuts—such as pecans or macadamias—over the fruit before topping with whipped cream.
Q7: What’s the best way to cut clean slices?
Use a large, sharp knife dipped in hot water and wiped dry before each cut. The warm blade glides through the cheesecake more smoothly, minimizing drag. Clean the knife between slices for neat, distinct pieces.
Conclusion
This No-Bake Banana Split Cheesecake brings together every element of the classic ice-cream-shop favorite in a single, effortlessly assembled dessert. The crisp, buttery graham-cracker crust sets the stage for a light yet tangy cream-cheese filling, while layers of bananas, pineapple, and strawberries toss in tropical brightness. A final crown of whipped topping, drizzled chocolate syrup, and maraschino cherries transforms the dish into a show-stopping centerpiece.
Whether you’re hosting a backyard barbecue, celebrating a birthday, or simply craving an easy, make-ahead treat, this cheesecake delivers crowd-pleasing flavor with minimal fuss. The straightforward assembly—mix, press, spread, and layer—means you can focus on garnish and presentation rather than oven time. And with tips for gluten-free and individual-serve variations, you can adapt the recipe to suit dietary needs or party themes.
Gather your graham crackers, ripe bananas, fresh berries, and a tub of whipped topping, and you’ll be just 15 minutes away from a dessert that tastes like sunshine in every bite. Chill it overnight for the cleanest slices, but don’t wait too long—the family (and friends) will be eager to dive in the moment you pull it from the fridge. Enjoy the creamy, fruity nostalgia of a banana split reimagined as a decadent, no-bake cheesecake.
Print
No-Bake Banana Split Cheesecake: Creamy Tropical Dessert for Any Occasion
- Total Time: 4 HRS 25 MIN
Description
This No-Bake Banana Split Cheesecake transforms the iconic ice cream parlor favorite into a luscious layered dessert. A buttery graham cracker base supports a creamy cheesecake filling topped with bananas, pineapple, strawberries, and all the classic toppings—no oven required! It’s perfect for parties, potlucks, or whenever you’re craving a cool and colorful treat.
Ingredients
For the crust:
-
2 cups graham cracker crumbs
-
½ cup unsalted butter, melted
-
2 tbsp granulated sugar
For the cheesecake layer:
-
16 oz cream cheese, softened
-
¾ cup powdered sugar
-
1 tsp vanilla extract
-
1 ½ cups whipped topping (like Cool Whip)
For the toppings:
-
2 ripe bananas, sliced
-
1 (8 oz) can crushed pineapple, drained
-
1 cup chopped strawberries
-
1 cup whipped topping (for top layer)
-
¼ cup chopped walnuts or pecans (optional)
-
Chocolate syrup or fudge sauce, for drizzling
-
Maraschino cherries, for garnish
Instructions
1️⃣ Make the crust: Combine graham cracker crumbs, sugar, and melted butter in a bowl. Press into the bottom of a 9×13-inch baking dish. Chill for 15–20 minutes.
2️⃣ Prepare the cheesecake layer: Beat cream cheese until smooth. Add powdered sugar and vanilla extract, mixing until creamy. Fold in whipped topping until fully combined.
3️⃣ Assemble the layers: Spread the cheesecake mixture over the chilled crust. Add a layer of sliced bananas, then top with crushed pineapple and chopped strawberries.
4️⃣ Top and chill: Spread a final layer of whipped topping over the fruit. Sprinkle with nuts (if using), drizzle with chocolate syrup, and place cherries on top.
5️⃣ Refrigerate: Chill the dessert for at least 4 hours (or overnight) before slicing and serving.
Notes
-
Keep bananas fresh: Add them just before serving or toss in lemon juice to prevent browning.
-
Crust tip: Chill well to keep it firm, or freeze briefly before adding the filling.
-
Customize: Try swapping strawberries for raspberries or adding mini chocolate chips to the cheesecake layer.
- Prep Time: 25 MIN
- Cook Time: 4 HRS


