


INGREDIENTS YOU’LL NEED
For the crust:
- 1 ½ cups chocolate cookie crumbs (like Oreos with the filling removed)
- ⅓ cup melted butter
For the filling:
- 8 oz (225g) cream cheese, softened
- 1 cup powdered sugar
- 1 teaspoon vanilla extract
- 1 ½ cups cold heavy whipping cream
- 1 ½ cups semisweet chocolate chips, melted and cooled
For the topping:
- Whipped cream or whipped topping
- Optional: chocolate shavings, crushed cookies, or sprinkles
STEP 1: MAKE THE CHOCOLATE COOKIE CRUST
In a mixing bowl, combine the chocolate cookie crumbs and melted butter. Stir until the mixture is fully coated and resembles wet sand. Press the crumb mixture firmly into the bottom and up the sides of a 9-inch pie dish. Use the bottom of a glass or measuring cup to get an even, compact layer. This crust is rich, chocolaty, and the perfect base for the creamy filling.
STEP 2: BEAT THE CREAM CHEESE MIXTURE
In a large bowl, beat the softened cream cheese using a hand mixer or stand mixer until smooth and creamy. Add in the powdered sugar and vanilla extract. Mix until light and well combined. This base gives the pie a slight tanginess that balances the sweetness of the chocolate.
STEP 3: WHIP THE CREAM
In a separate chilled bowl, whip the heavy cream until stiff peaks form. This is what gives the pie its light and airy texture, so don’t skip this step or cut corners—freshly whipped cream makes a big difference.
STEP 4: FOLD IT ALL TOGETHER
Gently fold the whipped cream into the cream cheese mixture. Use a spatula and fold slowly to keep the mixture light and fluffy. Once it’s mostly combined, add the melted and cooled chocolate. Continue folding until the mixture is evenly blended and smooth. You should now have a thick, creamy chocolate filling with a silky mousse-like texture.STEP 5: FILL THE PIE CRUST
Take the chilled cookie crust out of the fridge and spoon the chocolate cream filling into it. Smooth the top with a spatula, spreading the filling evenly all the way to the edges. Once filled, return the pie to the refrigerator to set.CHILLING, TOPPING, AND SERVING YOUR CHOCOLATE CREAM PIE
Now that your pie is filled with that rich, velvety chocolate mousse mixture, all that’s left to do is let it set and get creative with your toppings. This part is where the pie really transforms from simple to stunning—and it’s incredibly easy to personalize. Whether you’re keeping it classic with whipped cream or adding crushed cookies, chocolate curls, or a dusting of cocoa, your no bake chocolate cream pie is almost ready to steal the spotlight.STEP 6: CHILL THE PIE TO SET
Place the filled pie in the refrigerator and let it chill for at least 4 hours, or ideally overnight, until fully set. The chilling time allows the filling to firm up and slice cleanly while maintaining its creamy, mousse-like texture. If you’re short on time, you can pop it in the freezer for about 1 hour and then transfer it to the fridge for an additional hour or two. Just avoid freezing it all the way through unless you plan to serve it as a frozen dessert.STEP 7: ADD WHIPPED CREAM AND TOPPINGS
Once your pie is firm and chilled, it’s time to top it off. You have a few options here depending on how fancy or simple you want to keep it.Classic Whipped Cream Topping:
- Pipe or spoon whipped cream or whipped topping over the surface of the pie.
- Spread it evenly or create decorative swirls around the edges.
Optional Garnishes:
- Chocolate shavings or curls – for an elegant finish
- Crushed cookies – for texture and a little crunch
- Sprinkles – fun for birthdays or celebrations
- Cocoa powder dusting – for a café-style look
STEP 8: SLICE AND SERVE
Once decorated, slice the pie with a sharp knife. For the cleanest slices, dip your knife in hot water and wipe it off between each cut. The chilled filling will hold its shape beautifully, and the cookie crust will offer just the right amount of crunch with every bite. This pie pairs perfectly with a cup of coffee, a scoop of vanilla ice cream, or just on its own as a rich and satisfying dessert.
NO BAKE CHOCOLATE CREAM PIE: FAQ AND FINAL THOUGHTS
This No Bake Chocolate Cream Pie isn’t just easy—it’s foolproof. With its rich, chocolatey filling and light, creamy texture, it’s one of those desserts that everyone loves, and no one believes took so little effort. Whether you’re making it ahead for a party or need a last-minute treat that still looks impressive, this pie is a winner. Before you grab that second slice, here are some helpful answers to the most frequently asked questions about making, storing, and customizing this delicious dessert. 1. Can I use store-bought whipped topping instead of whipping cream? Yes! You can use about 2 cups of whipped topping in place of the homemade whipped cream. It’ll save time and still give you that light, fluffy texture. 2. Can I freeze this pie? Definitely. Freeze the pie after assembling (but before adding any toppings) for up to 2 months. Wrap it tightly in plastic wrap and foil. Thaw in the refrigerator overnight before serving. 3. What can I use instead of cream cheese? Mascarpone cheese is a great substitute with a similar texture but a milder flavor. Greek yogurt or ricotta can work in a pinch but may result in a softer filling. 4. Can I make it gluten-free? Absolutely. Just use gluten-free chocolate cookies for the crust. The rest of the ingredients are naturally gluten-free—just double-check labels to be safe. 5. How long will this pie keep in the refrigerator? This pie will stay fresh for up to 4–5 days in the fridge. Keep it loosely covered with plastic wrap or in an airtight container. 6. Can I use milk chocolate instead of semisweet? You can! Just know that the pie will be sweeter and slightly less rich. If using milk chocolate, consider reducing the powdered sugar slightly to balance the sweetness. 7. Why does my filling look too soft? Make sure your whipped cream is beaten to stiff peaks before folding it into the cream cheese mixture, and allow the pie to chill for at least 4 hours to fully set. Also, ensure the melted chocolate is cooled before adding it in—hot chocolate can melt the whipped cream and cause a softer texture.CONCLUSION: A PIE THAT’S ALWAYS A HIT
This No Bake Chocolate Cream Pie is the kind of dessert that never lets you down. It’s creamy, chocolatey, and elegant enough for a special occasion, but easy enough for a casual dinner or midnight craving. The no-bake method keeps it simple, and the flavor is rich, smooth, and indulgent with every bite. With a make-ahead friendly process, customizable toppings, and room to tweak the flavor to your liking, this pie is a recipe you’ll want to keep on hand all year round. So grab your mixing bowls and give it a try—you don’t need an oven to make dessert magic happen. And when you do make it, be sure to leave a comment and share your favorite topping combos or fun variations. We’d love to hear how you made it your own. Enjoy every slice! Print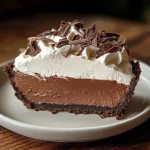
No Bake Chocolate Cream Pie – Easy and Delicious
- Total Time: 4 hrs 20 min
Description
This No Bake Chocolate Cream Pie is smooth, silky, and sinfully delicious. With a crunchy cookie crust, creamy chocolate filling, and fluffy whipped topping, it’s an effortless dessert that’s sure to impress.
Ingredients
For the crust:
-
1½ cups chocolate cookie crumbs (like Oreos, crushed with filling)
-
¼ cup melted butter
For the filling:
-
1 (3.9 oz) box instant chocolate pudding mix
-
1½ cups cold milk
-
½ cup heavy cream
-
4 oz cream cheese, softened
-
½ cup powdered sugar
-
1 tsp vanilla extract
For the topping:
-
1 cup whipped topping (Cool Whip or homemade)
-
Optional: chocolate shavings, mini chips, or cocoa powder for garnish
Instructions
1️⃣ Make the crust: Mix crushed cookies with melted butter. Press into a 9-inch pie dish. Chill while preparing the filling.
2️⃣ Prepare pudding: In a bowl, whisk pudding mix with cold milk. Let sit for 5 minutes until thickened.
3️⃣ Make cream layer: Beat cream cheese, powdered sugar, and vanilla until smooth. In a separate bowl, whip heavy cream until stiff peaks form. Fold whipped cream into the cream cheese mixture.
4️⃣ Assemble the pie: Spread cream cheese mixture into the crust. Top with chocolate pudding. Finish with whipped topping.
5️⃣ Chill: Refrigerate for at least 4 hours, or overnight for best results.
6️⃣ Serve: Garnish with chocolate shavings or chips and enjoy chilled.
Notes
-
Use a store-bought crust for even quicker prep.
-
Add a tablespoon of espresso powder to the pudding for mocha flavor.
-
Keeps well in the fridge for up to 4 days.
- Prep Time: 20 min
- Cook Time: 4 hrs chill time


