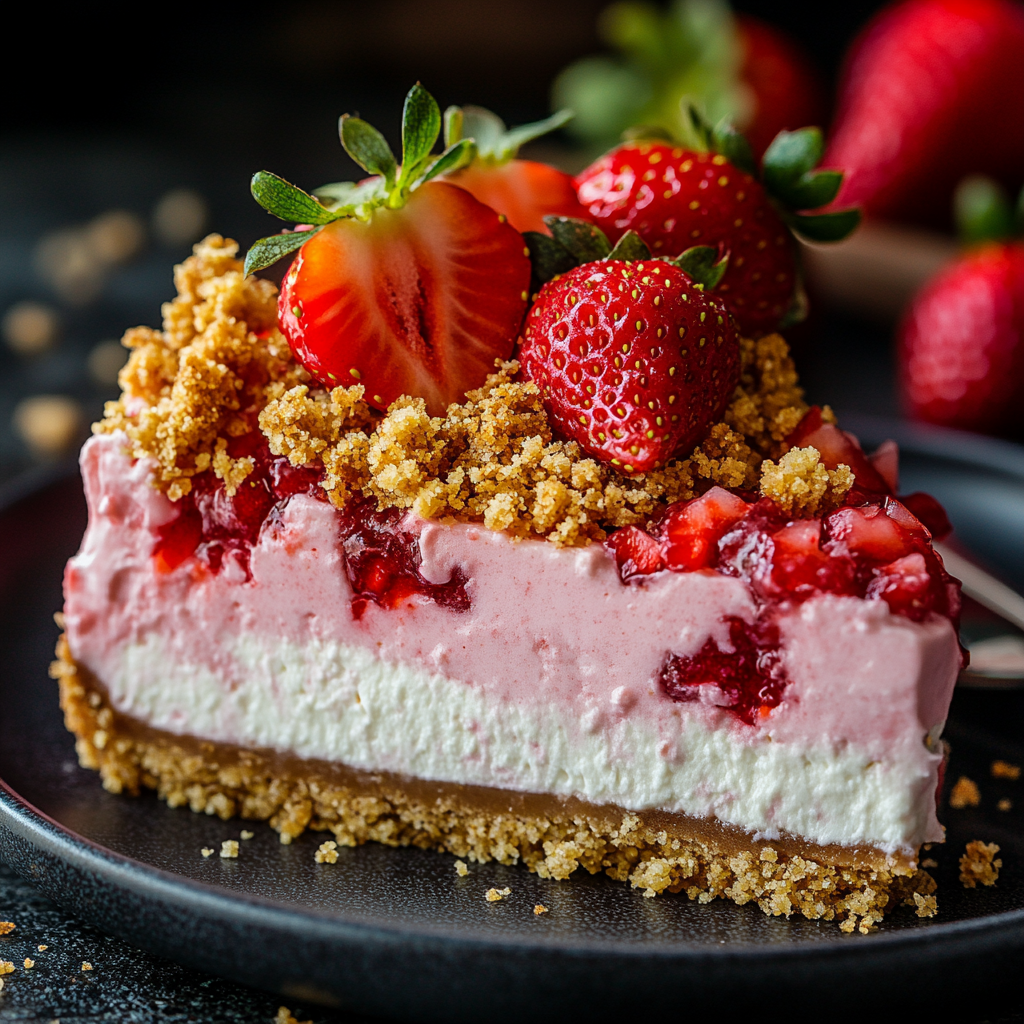
No-Bake Strawberry Crunch Cheesecake is a delightful, easy-to-make dessert that combines the creamy richness of cheesecake with the nostalgic, crunchy topping reminiscent of classic strawberry shortcake bars. This dessert is perfect for those who crave something sweet and satisfying but don’t want to deal with the hassle of turning on the oven. The no-bake format ensures that this cheesecake is simple and quick to prepare, making it an excellent choice for warm days when you want a refreshing dessert without the heat.
One of the key highlights of this cheesecake is the strawberry crunch topping, which adds a layer of texture and flavor that elevates the entire experience. Made from a combination of crushed vanilla cream cookies and strawberry wafer cookies, the topping provides a satisfying contrast to the smooth and creamy cheesecake base. Additionally, the use of strawberry jello gives the cheesecake a vibrant color and sweet, fruity flavor.
The key ingredients for this recipe include vanilla cream cookies for the crust and topping, strawberry jello for flavor and color, cream cheese for a rich and creamy texture, and whipped cream to create a light and airy filling. These ingredients come together to create a dessert that is not only visually appealing but also bursting with flavor.
Why You’ll Love This Recipe
There are plenty of reasons to fall in love with this No-Bake Strawberry Crunch Cheesecake. First, it requires no baking, which means you don’t have to worry about oven times or the risk of overcooking your dessert. It’s the perfect go-to recipe for those who prefer quick and effortless desserts that still deliver on flavor.
With only a handful of ingredients, this recipe keeps things simple, yet it packs a punch in terms of taste and texture. The combination of smooth cream cheese, sweet strawberry jello, and crunchy cookie layers makes it a dessert that’s hard to resist.
This cheesecake is ideal for gatherings, whether it’s a picnic, barbecue, or a holiday celebration. It can be prepared ahead of time, freeing you up for other tasks on busy days. Plus, its light, fruity flavor makes it the perfect finish to a summer meal or an indulgent treat for any occasion.
Ingredients Overview
Let’s take a closer look at the ingredients that make this No-Bake Strawberry Crunch Cheesecake so special:
- Vanilla Cream Cookies: These cookies form the base of the crust and part of the crunchy topping. Their subtle sweetness complements the creamy filling, adding both flavor and texture.
- Strawberry Jello: This provides the cheesecake with its signature strawberry flavor and a beautiful pink color, giving the dessert a visually appealing, summery vibe.
- Cream Cheese: The star ingredient for any cheesecake, cream cheese lends the filling its smooth, rich, and creamy texture. It balances out the sweetness from the jello and whipped cream.
- Heavy Whipping Cream: This helps create a light and fluffy filling by being whipped into stiff peaks before being folded into the cream cheese mixture.
- Strawberry Wafer Cookies: Added for extra crunch, these cookies give the cheesecake a delicious contrast in texture while enhancing the strawberry flavor.
For substitutions, consider using different flavors of jello, like raspberry or lemon, or swapping out the strawberry wafer cookies for chocolate or vanilla variations.
Preparing the Crust
A sturdy and delicious crust is the foundation of any great cheesecake, and this recipe is no exception. To begin, take 26 vanilla cream cookies and crush them into fine crumbs using a food processor or by placing them in a sealed plastic bag and crushing them with a rolling pin. The finer the crumbs, the better they will hold together for the crust. Once the cookies are finely crushed, combine them with 6 tablespoons of melted butter in a large mixing bowl. Stir until all the crumbs are well-coated with butter.
Next, take a 10-inch springform pan and lightly grease it. Pour the cookie mixture into the pan and press it down firmly using the back of a spoon or the bottom of a glass. This ensures the crust is compact and will hold its shape. Be sure to spread the crust evenly across the bottom to create a smooth, consistent layer.
Once the crust is pressed into place, transfer the springform pan to the freezer and let the crust chill for about 15 minutes. This helps the crust set, giving it the structure needed to support the creamy filling. Freezing the crust is an important step because it prevents it from crumbling when the filling is added, ensuring a firm base for your cheesecake.
Making the Filling & Assembly
Making the Cheesecake Filling
Creating a smooth, creamy, and flavorful filling is the heart of this No-Bake Strawberry Crunch Cheesecake. To start, dissolve one small box (3.3 oz) of strawberry jello in a cup of boiling water. Stir until fully dissolved, then set it aside to cool. The jello provides the cheesecake with a delicious strawberry flavor and a beautiful pink hue, but it’s important to let it cool slightly before adding it to the filling to prevent melting the whipped cream and destabilizing the mixture.
Next, in a large mixing bowl, beat 16 oz of softened cream cheese with ¾ cup of granulated sugar. The cream cheese should be at room temperature to ensure it blends smoothly and avoids lumps. Beat the mixture until it’s light and creamy, which will help create a velvety texture in the final filling.
In a separate bowl, whip 2 cups of heavy whipping cream with ½ cup of powdered sugar until stiff peaks form. To achieve perfect whipped cream, make sure the cream is cold and beat at a medium-high speed, stopping once the peaks hold their shape. Be careful not to overwhip, as this can result in a grainy texture.
Once the whipped cream is ready, gently fold it into the cream cheese mixture. Folding instead of stirring preserves the light and airy consistency of the whipped cream. Gradually add the cooled jello, folding until fully combined for a smooth, fluffy filling. Lastly, crush about 4 oz of strawberry wafer cookies and fold them into the mixture. The cookies add a delightful crunch, providing textural contrast to the creamy cheesecake filling.
Layering the Cheesecake
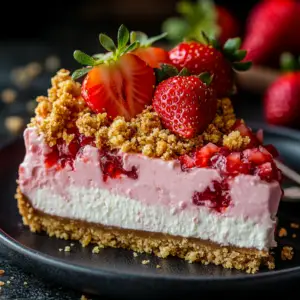
Now that the cheesecake filling is ready, it’s time to assemble the layers. Start by removing the chilled crust from the freezer. Spread half of the cheesecake filling evenly over the prepared cookie crust. Use a spatula to smooth the top and ensure the filling is spread evenly across the surface.
Place the pan back in the freezer for about 15 minutes. This brief freeze helps the first layer set, ensuring a more defined separation between the layers and providing extra stability for the second layer. Freezing between layers prevents the cheesecake from becoming too soft, allowing for cleaner slicing and a better overall texture.
After the first layer has chilled, add the remaining half of the filling on top. Again, smooth it out evenly with a spatula. You can stop here for a classic, two-layer cheesecake, or you can add a personal touch by creating a swirl effect. If desired, use a spoon to drop small dollops of additional strawberry jello onto the top of the cheesecake and gently swirl it into the filling for a marbled effect. For another variation, consider adding a layer of fresh sliced strawberries between the two layers for a burst of fresh fruit flavor.
Once the cheesecake is layered, it’s time to move on to the crunchy topping.
Topping the Cheesecake
The crunchy topping is what sets this cheesecake apart and adds both flavor and texture. Start by crushing the remaining vanilla cream cookies and strawberry wafer cookies (about 8 cookies total). You can crush them finely for a more uniform topping or leave a few larger pieces for extra texture and visual interest. If you want to give the topping a more vibrant color, feel free to add a few drops of food coloring to the crushed cookies.
Once the cookies are crushed, evenly sprinkle them over the top of the cheesecake, covering the entire surface. Gently press down on the topping to help it adhere to the cheesecake and stay in place. The combination of the smooth cheesecake filling and the crunchy, buttery topping creates a delightful contrast that will have everyone coming back for seconds.
For a fun, decorative look, you can also mix the crumbs with a bit of melted butter and press them into small clumps before sprinkling them on top. This will create larger chunks of crunchy topping for added texture.
Refrigeration and Final Steps
The final crucial step in making this cheesecake is allowing it to set in the refrigerator. Once the topping is in place, cover the cheesecake and refrigerate it for at least 4 hours, though overnight is even better. The cooling process helps the cheesecake firm up, allowing the flavors to meld and ensuring that the texture is smooth and sliceable.
When you’re ready to serve, use a sharp knife to slice clean pieces. To get neat slices, dip the knife in warm water and wipe it off between cuts. This helps the cheesecake maintain its shape and prevents the filling from sticking to the knife.
Serve the cheesecake chilled for the best texture and flavor. Whether you’re serving it at a party or enjoying a slice at home, this no-bake dessert is sure to impress.
Decorating with Whipped Topping
For a professional-looking finish, top your cheesecake with decorative swirls of whipped topping. Use a pastry bag fitted with a star tip and fill it with the thawed whipped topping. Pipe swirls or rosettes around the edges of the cheesecake, adding an extra layer of visual appeal. The whipped topping provides a light, fluffy contrast to the rich cheesecake filling and crunchy topping.
For an extra flourish, consider adding some garnishes. Fresh strawberries placed on top of each whipped cream swirl can enhance the fruity theme of the cheesecake. You can also drizzle a bit of strawberry sauce over the top or scatter edible flowers for a more elegant presentation.
This step is completely optional but adds a touch of sophistication to your no-bake cheesecake, making it perfect for any occasion—from casual family dinners to more formal events.
Enhancing Your Cheesecake & Serving Tips
Customizing Your Strawberry Crunch Cheesecake
One of the best aspects of the No-Bake Strawberry Crunch Cheesecake is its versatility. You can easily customize the flavor profile to suit your preferences or the occasion. For a chocolate twist, try using chocolate wafer cookies or chocolate jello in place of the strawberry components. If you’re a fan of citrus, swap the strawberry jello for lemon jello and garnish with candied lemon slices for a zesty treat. Raspberry jello is another great alternative for a rich berry flavor that pairs beautifully with the cream cheese base.
To enhance the fruity flavor, consider adding a fresh fruit layer. Thinly slice strawberries, raspberries, or even peaches and layer them between the cheesecake filling for a burst of fresh flavor in every bite. You can also mix fresh fruit directly into the filling to distribute the fruit flavor evenly throughout the cheesecake.
For a different take on the crust, you can experiment with various cookies. Graham crackers are a classic alternative for cheesecake crusts, or you can try Oreo cookies for a richer, chocolatey base. The possibilities are endless, and each variation can bring a new dimension to the cheesecake, allowing you to tailor it for any occasion or personal preference.
Serving and Presentation Tips
For the best texture and flavor, it’s essential to serve the cheesecake chilled. A cold cheesecake allows the filling to remain firm and creamy while keeping the flavors fresh and vibrant. Before serving, let the cheesecake sit at room temperature for about 10 minutes to soften slightly, making it easier to slice.
For a creative twist, consider serving the cheesecake in individual jars or as mini cheesecakes. Layer the crust, filling, and topping in small glass jars for a fun, portable dessert that’s perfect for parties or picnics. You can also use mini springform pans to create individual cheesecakes that make a delightful personal treat.
When it comes to pairing, fresh berries like strawberries, raspberries, or blueberries complement the flavors beautifully. A drizzle of chocolate sauce or a dollop of whipped cream can add richness and extra indulgence. For a more elegant presentation, you can garnish with mint leaves, edible flowers, or even a light dusting of powdered sugar.
Storing and Freezing
Storing your cheesecake properly ensures it stays fresh and maintains its delicious texture. Leftovers should be covered with plastic wrap or stored in an airtight container in the refrigerator. The cheesecake can last up to 4-5 days when refrigerated.
If you need to store the cheesecake for a longer period, freezing is an excellent option. To freeze, first allow the cheesecake to set completely in the refrigerator. Once firm, wrap it tightly in plastic wrap and then in aluminum foil to prevent freezer burn. The cheesecake can be frozen for up to 2 months. When you’re ready to serve it, thaw the cheesecake overnight in the refrigerator.
If you plan to re-freeze any leftovers after serving, keep in mind that refreezing can slightly alter the texture, making it less smooth. To avoid this, only slice and thaw what you need at the time.
Nutritional Information and Tips for Lighter Versions
While this No-Bake Strawberry Crunch Cheesecake is undoubtedly indulgent, it’s possible to make a lighter version without sacrificing flavor. A typical slice of this cheesecake contains around 300-400 calories, depending on portion size and the specific ingredients used. The richness comes primarily from the cream cheese, whipped cream, and cookie crust.
For a lighter option, try using reduced-fat or light cream cheese in place of the regular version. You can also substitute heavy whipping cream with a lower-fat alternative or a whipped topping like Cool Whip, which reduces the fat and calorie content. If you want to cut down on sugar, consider using sugar substitutes like Stevia or monk fruit sweetener in the filling.
Portion control is another way to enjoy this dessert without overindulging. Serving smaller slices or making mini cheesecakes in muffin tins can help with portion control while still allowing everyone to enjoy the treat.
You can also increase the nutritional value by incorporating fresh fruit into the cheesecake or as a garnish. Adding a layer of berries or serving with fresh fruit on the side can enhance the flavor and provide a boost of vitamins and antioxidants, making your dessert a bit more balanced.
Frequently Asked Questions
1. Can I use different flavors of jello?
Absolutely! The beauty of this no-bake cheesecake is its versatility. You can easily swap the strawberry jello for other flavors to suit your tastes. Raspberry jello is a popular alternative that adds a rich berry flavor. For a tangier twist, try lemon jello, which pairs beautifully with the creamy filling. Orange jello can give a refreshing citrusy note, or you can even combine flavors like lemon and raspberry for a more complex, layered taste. Just make sure to adjust the garnish and toppings accordingly to match the new flavors.
2. How long can I store this cheesecake?
This cheesecake can be stored in the refrigerator for up to 4-5 days when covered tightly with plastic wrap or stored in an airtight container. If you want to extend its shelf life, you can freeze the cheesecake. Once fully set, wrap it in plastic wrap and aluminum foil, and freeze for up to 2 months. When you’re ready to serve, thaw it overnight in the fridge to preserve the texture.
3. Can I use non-dairy substitutes for the cream cheese and whipped cream?
Yes, you can make this cheesecake dairy-free or vegan by using non-dairy alternatives. Vegan cream cheese, such as those made from almond or cashew, works well as a substitute. For the whipped cream, you can use coconut cream or a dairy-free whipped topping. Make sure to use a plant-based gelatin substitute, like agar-agar, if you’re avoiding animal products altogether.
4. Can I make this in advance?
Yes, this no-bake cheesecake is perfect for making ahead of time. You can prepare it a day or two in advance, as the flavors actually improve after it has time to chill. Just be sure to add the whipped topping and any fresh garnishes right before serving.
5. What if I don’t have a springform pan?
If you don’t have a springform pan, you can use a regular pie dish or even a square baking pan. The main difference is that you won’t be able to release the sides as you would with a springform pan, so serve directly from the dish. You could also try individual servings in mason jars or small cups for a fun, portable option.
No-Bake Strawberry Crunch Cheesecake
Description
This No-Bake Strawberry Crunch Cheesecake is a creamy, flavorful dessert that combines the best of both worlds: a smooth, rich cheesecake filling with a delightful crunchy topping. With no need to turn on the oven, this dessert is perfect for warm days or when you’re short on time. The layers of vanilla cookie crust, strawberry-infused cream cheese filling, and a sweet cookie crumble topping make for a refreshing and indulgent treat. Whether you’re serving this at a gathering or enjoying it at home, it’s sure to impress with its vibrant colors and irresistible taste.
Ingredients
- Crust & Topping:
- 1 lb Vanilla Cream Cookies (about 34 cookies), with some reserved for topping
- 6 tbsp Butter, melted
- 10 Strawberry Wafer Cookies (about 4 oz) for extra crunch
- Filling:
- 1 small box Strawberry Jello (3.3 oz)
- 1 cup Boiling Water
- 16 oz Cream Cheese, softened
- ¾ cup Granulated Sugar
- 2 cups Heavy Whipping Cream
- ½ cup Powdered Sugar
- Decoration:
- ½ small tub Whipped Topping, thawed, in a pastry bag with a star tip
Instructions
- Prepare the Crust:
- Crush 26 vanilla cream cookies into fine crumbs. Reserve the remaining cookies for the topping.
- In a mixing bowl, combine the crumbs with melted butter and mix until evenly coated.
- Press the mixture into a greased 10-inch springform pan, using the back of a spoon to create a firm, even crust.
- Place the crust in the freezer for 15 minutes to set.
- Make the Filling:
- Dissolve the strawberry jello in boiling water, stirring until completely dissolved. Set aside to cool.
- In a separate bowl, beat the softened cream cheese with granulated sugar until smooth and creamy.
- In another bowl, whip the heavy cream with powdered sugar until stiff peaks form.
- Gently fold the whipped cream into the cream cheese mixture, followed by the cooled jello, mixing until fully combined.
- Crush the strawberry wafer cookies and fold them into the filling for added crunch.
- Assemble the Cheesecake:
- Spread half of the cheesecake filling over the chilled crust, smoothing it evenly.
- Freeze the cheesecake for 15 minutes to help the first layer set.
- Add the remaining cheesecake filling and smooth the top.
- Add the Topping:
- Crush the reserved vanilla cream cookies and strawberry wafer cookies for the topping.
- Optionally, add a few drops of food coloring to enhance the visual appeal.
- Sprinkle the crushed cookies over the top of the cheesecake and gently press them down to adhere.
- Chill and Serve:
- Refrigerate the cheesecake for at least 4 hours, or until fully set.
- Before serving, use a pastry bag to pipe decorative swirls of whipped topping on the cheesecake.
- Optionally, garnish with fresh strawberries, strawberry sauce, or edible flowers.
Notes
- Make Ahead: This cheesecake can be made a day or two ahead of time. The flavors intensify with chilling, so preparing in advance is a great option. Just wait to add the whipped topping and garnishes until right before serving.
- Crust Substitutes: You can swap the vanilla cream cookies with graham crackers or Oreo cookies for a different flavor base. This allows for endless customization to suit your personal preferences.
- Fruit Variations: Feel free to use different flavored jello or add layers of fresh fruit between the cheesecake layers. Raspberries, blueberries, or peaches would all complement the filling beautifully.
- Storage: Store any leftovers covered in the refrigerator for up to 5 days. For longer storage, wrap the cheesecake tightly and freeze for up to 2 months. Thaw in the refrigerator before serving.


