


No-bake desserts have become a go-to option for many, and it’s easy to see why. They’re quick, convenient, and perfect for any occasion, whether it’s a family gathering, a party, or a simple treat to enjoy at home. Among these delightful treats, No Bake Turtle Mini Cheesecakes stand out for their rich combination of flavors and textures.
This recipe brings together the creamy goodness of cheesecake, the sweet and salty allure of caramel, the richness of chocolate, and the crunch of pecans. The no-bake aspect not only saves time but also ensures that you can enjoy these treats without needing an oven. The use of high-quality ingredients like cream cheese, caramel sauce, and semi-sweet chocolate is crucial to achieving the perfect balance of flavors in these mini cheesecakes.
To achieve the perfect texture and flavor, it’s important to use fresh and high-quality ingredients. This ensures that each bite of your mini cheesecakes is as decadent and satisfying as possible. Ready to dive into the world of no-bake delights? Let’s get started with the ingredients and preparation steps!
Ingredients
Creating the perfect No Bake Turtle Mini Cheesecakes requires a careful selection of ingredients, each contributing to the unique taste and texture of this delightful dessert. Here’s a detailed list of what you’ll need:
- 1 cup ground graham crackers: Forms the base crust, providing a crunchy texture and a slightly sweet flavor that complements the creamy filling. Substitution: For a gluten-free option, use gluten-free graham crackers or crushed wafer cookies.
- 1 tbsp sugar: Adds a bit of sweetness to the crust, balancing the flavors.
- 5 tbsp melted butter: Binds the graham cracker crumbs together to form a firm crust. Substitution: Vegan butter can be used for a dairy-free alternative.
- 8 oz softened cream cheese: The main ingredient for the filling, providing a smooth and creamy texture. Substitution: For a vegan option, use plant-based cream cheese.
- 1/2 cup powdered sugar: Sweetens the filling without making it grainy.
- 2 tsp vanilla extract: Adds a rich, aromatic flavor that enhances the taste of the cheesecake.
- 1 cup heavy whipping cream: Whipped to add lightness and volume to the filling. Substitution: Use coconut cream for a dairy-free alternative.
- Caramel sauce (store-bought or homemade): Adds a sweet and salty flavor that pairs well with the chocolate and pecans.
- 6 oz chopped semi-sweet chocolate: Used for the chocolate ganache, adding a rich, chocolaty layer to the cheesecake. Substitution: Use dairy-free chocolate for a vegan option.
- 1/4 cup heavy cream: Mixed with chocolate to create a smooth ganache. Substitution: Coconut cream can be used here as well.
- Chopped pecans: Provide a crunchy texture and a nutty flavor that complements the caramel and chocolate.
- Mini chocolate chips for garnish: Add a decorative and flavorful touch to the finished cheesecakes.
Dietary Variations
For those with dietary restrictions, this recipe can be easily adapted. To make it vegan, substitute the cream cheese and heavy cream with plant-based alternatives and ensure the chocolate and caramel are dairy-free. For a gluten-free version, use gluten-free graham crackers for the crust. These simple adjustments ensure that everyone can enjoy these delicious mini cheesecakes.
Preparation of the Crust
Creating the perfect crust for your No Bake Turtle Mini Cheesecakes is crucial for the overall texture and flavor of the dessert. Follow these step-by-step instructions to achieve a firm and flavorful base.
Step-by-Step Instructions
- Gather Ingredients:
- 1 cup ground graham crackers
- 1 tbsp sugar
- 5 tbsp melted butter
- Combine Ingredients:
- In a medium-sized mixing bowl, combine the ground graham crackers and sugar. Stir until evenly mixed.
- Pour the melted butter into the graham cracker mixture. Mix thoroughly until all the crumbs are evenly coated and the mixture has a consistency similar to wet sand.
- Form the Crust:
- Divide the graham cracker mixture evenly among your mini cheesecake cups or a mini muffin tin. Using the back of a spoon or a shot glass, press the mixture firmly into the bottom of each cup to form a solid crust.
- Place the cups in the refrigerator to chill while you prepare the filling. This helps the crust set and maintain its shape.
Tips for Perfect Crust Consistency
- Proper Mixing: Ensure that the graham cracker crumbs are thoroughly mixed with the melted butter. The mixture should hold together when pressed but not be overly greasy.
- Firm Pressing: Use a flat-bottomed object like a shot glass to press the crust mixture firmly into the cups. This compacts the crumbs and creates a sturdy base.
- Chilling Time: Allow the crust to chill in the refrigerator for at least 15-20 minutes. This helps the butter solidify, keeping the crust firm.
Alternative Crust Options
For those looking to switch things up or accommodate dietary needs, consider these alternative crust options:
- Chocolate Wafer Crust: Substitute graham crackers with crushed chocolate wafers for a richer, chocolaty base. This pairs wonderfully with the turtle flavors.
- Gluten-Free Crust: Use gluten-free graham crackers or crushed gluten-free cookies to make the crust suitable for those with gluten sensitivities.
- Nut-Based Crust: For a low-carb alternative, mix ground almonds or pecans with a bit of melted butter and sugar to form a nutty crust.
Making the Cheesecake Filling
Creating the perfect cheesecake filling is essential to achieving the creamy and rich texture that makes No Bake Turtle Mini Cheesecakes irresistible. Follow these detailed instructions to ensure your filling is flawless.
Step-by-Step Instructions
- Gather Ingredients:
- 8 oz softened cream cheese
- 1/2 cup powdered sugar
- 2 tsp vanilla extract
- 1 cup heavy whipping cream
- Whip the Cream Cheese Mixture:
- In a large mixing bowl, beat the softened cream cheese using an electric mixer until it becomes smooth and creamy. This should take about 2-3 minutes on medium speed.
- Gradually add the powdered sugar to the cream cheese, continuing to beat until fully incorporated and smooth. Ensure there are no lumps for a silky texture.
- Add Vanilla Extract:
- Mix in the vanilla extract, which adds a rich, aromatic flavor that enhances the overall taste of the cheesecake filling.
- Whip the Heavy Cream:
- In a separate bowl, whip the heavy whipping cream until it reaches stiff peaks. This can be done using an electric mixer on high speed for about 3-4 minutes. The cream should hold its shape when the beaters are lifted.
- Combine Whipped Cream with Cream Cheese Mixture:
- Gently fold the whipped cream into the cream cheese mixture. This step is crucial for maintaining the light and fluffy texture of the filling. Use a spatula to combine the mixtures slowly, ensuring not to deflate the whipped cream.
Importance of Achieving the Right Consistency
The right consistency in your cheesecake filling is vital for the final product’s texture and flavor. Here’s why each step matters:
- Cream Cheese Smoothness: Beating the cream cheese until it’s smooth ensures there are no lumps, resulting in a silky texture.
- Whipping the Cream: Achieving stiff peaks in the whipped cream adds volume and lightness to the filling, preventing it from being dense or heavy.
- Folding Technique: Gently folding the whipped cream into the cream cheese mixture keeps the filling airy and prevents it from becoming flat.
Incorporating Flavors: Vanilla, Caramel, and Chocolate
To enhance the cheesecake filling, we incorporate flavors that complement the overall dessert:
- Vanilla Extract: Adds a classic, rich flavor that blends well with the cream cheese.
- Caramel: For an extra layer of flavor, you can swirl some caramel sauce into the cheesecake mixture before filling the cups. This adds a sweet, buttery element that pairs perfectly with the chocolate and pecans.
- Chocolate: If desired, fold in some finely chopped semi-sweet chocolate or mini chocolate chips into the filling. This introduces a delightful chocolatey surprise in every bite.
Assembly of Mini Cheesecakes
Assembling your No Bake Turtle Mini Cheesecakes is a straightforward process that ensures each layer contributes to the overall flavor and texture of the dessert. Here’s how to achieve smooth, even layers in your mini cheesecake cups.
Layering the Crust and Filling
- Prepare the Crust:
- Ensure your graham cracker crust has chilled for at least 15-20 minutes in the refrigerator. This helps it firm up and hold the filling better.
- Add the Filling:
- Using a spoon or a piping bag, add the cheesecake filling on top of the chilled crust. If using a spoon, drop the filling into the cups, then smooth the tops with the back of the spoon. If using a piping bag, cut a medium-sized tip and pipe the filling evenly into each cup.
- Smooth and Even Layers:
- To ensure the filling is smooth and even, tap the cups gently on the counter after adding the filling. This helps remove any air bubbles and evens out the top layer.
Techniques for Smooth and Even Layers
- Piping Bag Method: Using a piping bag can significantly help in achieving smooth and even layers. Fill the bag with the cheesecake mixture, then pipe it in a circular motion starting from the outer edge and working your way inwards.
- Spoon Method: If you don’t have a piping bag, use a small spoon to add the filling. To smooth the top, dip the back of the spoon in warm water and gently smooth out the surface of the filling.
- Chill Between Layers: If adding multiple layers, such as a layer of caramel between the crust and filling, allow each layer to chill in the refrigerator for about 10 minutes before adding the next one.
Tips for Using Different Molds
- Mini Muffin Tins: These are perfect for bite-sized cheesecakes. Line the tins with paper liners for easy removal. Press the crust mixture firmly into the bottom using a small flat object, like the bottom of a shot glass, and then add the filling.
- Springform Pans: If you prefer slightly larger mini cheesecakes, use mini springform pans. These allow for easy removal and presentation. Ensure you press the crust evenly and fill to the top for a neat finish.
- Silicone Molds: Silicone molds are flexible and make it easy to pop out the cheesecakes once they’re set. They also come in various shapes, which can add a fun twist to your presentation.
Creating the Toppings
The toppings are what transform your No Bake Turtle Mini Cheesecakes from delicious to extraordinary. Follow these steps to prepare the caramel sauce, make the chocolate ganache, and add the perfect finishing touch with chopped pecans.
Preparation of Caramel Sauce
Store-Bought Caramel Sauce:
- Using store-bought caramel sauce is the quickest option. Choose a high-quality brand to ensure a rich and smooth flavor.
- Simply drizzle the caramel sauce over the chilled cheesecake filling before adding the chocolate ganache.
Homemade Caramel Sauce:
- Ingredients:
- 1 cup granulated sugar
- 6 tablespoons unsalted butter, at room temperature, cut into pieces
- 1/2 cup heavy cream, at room temperature
- 1 teaspoon salt (optional, for salted caramel)
- Instructions:
- In a medium saucepan over medium heat, melt the sugar, stirring constantly with a heat-resistant spatula. It will form clumps and eventually melt into a thick amber liquid.
- Once melted, carefully add the butter, continuing to stir until fully combined.
- Slowly drizzle in the heavy cream while stirring. Allow the mixture to boil for 1 minute.
- Remove from heat and stir in the salt if making salted caramel. Let it cool slightly before drizzling over the cheesecakes.
Making the Chocolate Ganache
Ingredients:
- 6 oz chopped semi-sweet chocolate
- 1/4 cup heavy cream
Instructions:
- Place the chopped chocolate in a heatproof bowl.
- Heat the heavy cream in a small saucepan over medium heat until it just begins to simmer. Do not let it boil.
- Pour the hot cream over the chocolate and let it sit for a minute.
- Stir until the chocolate is completely melted and the mixture is smooth and glossy.
- Allow the ganache to cool slightly before spooning it over the caramel layer on the cheesecakes.
Tips for Chopping and Adding Pecans
- Chopping Pecans:
- Use a sharp knife to coarsely chop the pecans. This ensures a consistent texture and size, which is ideal for topping.
- Alternatively, pulse the pecans a few times in a food processor, but be careful not to over-process them into a fine meal.
- Adding Pecans:
- Sprinkle the chopped pecans over the chocolate ganache while it is still slightly warm. This allows the pecans to adhere well to the ganache.
- For extra flair, you can also add mini chocolate chips along with the pecans for a more decorative and flavorful topping.
Final Touches and Presentation
Bringing all the components together to assemble your No Bake Turtle Mini Cheesecakes is the final step in creating these delightful treats. Here’s how to perfect the final assembly and present them creatively.
Assembling the Final Cheesecake with Toppings
- Add Caramel Sauce:
- Remove the chilled mini cheesecakes from the refrigerator.
- Drizzle a generous amount of caramel sauce over each cheesecake. Allow it to spread and settle naturally over the surface.
- Chocolate Ganache:
- Spoon the slightly cooled chocolate ganache over the caramel layer on each cheesecake.
- Spread it gently with the back of the spoon to cover the caramel layer evenly.
- Garnish with Pecans and Mini Chocolate Chips:
- Sprinkle chopped pecans over the top of the chocolate ganache.
- Add mini chocolate chips for an extra touch of flavor and decoration.
Creative Presentation Ideas for Serving
- Individual Serving Plates: Serve each mini cheesecake on a small, elegant plate. Add a drizzle of extra caramel and a sprinkle of crushed graham crackers around the plate for a professional touch.
- Dessert Trays: Arrange the mini cheesecakes on a tiered dessert tray. This not only looks impressive but also makes it easy for guests to help themselves.
- Decorative Wrappers: Use decorative cupcake liners or wrappers to add a festive look, perfect for parties or special occasions.
- Topped with Whipped Cream: Add a dollop of freshly whipped cream on top of each cheesecake just before serving for an extra touch of indulgence.
Storage Tips to Keep Them Fresh
- Refrigeration: Store the mini cheesecakes in an airtight container in the refrigerator. They will stay fresh for up to 5 days.
- Freezing: These cheesecakes freeze well. Place them in a single layer in a freezer-safe container and freeze for up to 2 months. Thaw in the refrigerator overnight before serving.
- Avoid Direct Sunlight: Keep the cheesecakes out of direct sunlight and at a cool temperature during serving to prevent the toppings from melting.
FAQs
Can I Make These Ahead of Time?
Yes, you can definitely make No Bake Turtle Mini Cheesecakes ahead of time. In fact, making them a day before serving allows the flavors to meld and the cheesecakes to set firmly. Here’s how to store them:
- Refrigeration: Place the mini cheesecakes in an airtight container and store them in the refrigerator. They will stay fresh for up to 5 days.
- Freezing: To freeze, place the cheesecakes in a single layer in a freezer-safe container. They can be frozen for up to 2 months. When you’re ready to serve, thaw them overnight in the refrigerator.
What Can I Use If I Don’t Have Mini Cheesecake Pans?
If you don’t have mini cheesecake pans, you have several alternatives:
- Mini Muffin Tins: Line the tins with paper liners for easy removal.
- Silicone Molds: These are flexible and make it easy to pop out the cheesecakes once they’re set.
- Small Jars or Ramekins: These can give a unique, rustic presentation and are great for individual servings.
These options work well and ensure your mini cheesecakes hold their shape and are easy to serve.
How Do I Make This Recipe Vegan/Gluten-Free?
To make this recipe vegan or gluten-free, you can make a few simple substitutions:
- Vegan Version:
- Use plant-based cream cheese.
- Substitute heavy whipping cream with coconut cream.
- Ensure that the chocolate and caramel sauce are dairy-free.
- Gluten-Free Version:
- Use gluten-free graham crackers or crushed gluten-free cookies for the crust.
These substitutions maintain the delicious flavors and textures while accommodating dietary restrictions.
How Long Can These Be Stored in the Refrigerator?
No Bake Turtle Mini Cheesecakes can be stored in the refrigerator for up to 5 days. Ensure they are in an airtight container to keep them fresh and prevent them from absorbing other odors from the fridge.
If you need to store them for a longer period, freezing is a great option. They can be frozen for up to 2 months and thawed in the refrigerator when needed. This makes them a convenient make-ahead dessert for any occasion.
Print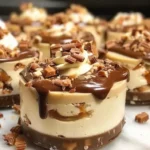
No Bake Turtle Mini Cheesecakes
- Author: Naomi
- Total Time: 2 hours 20 minutes
- Yield: 12 servings
Description
No Bake Turtle Mini Cheesecakes are a delightful, easy-to-make dessert that combines the rich flavors of caramel, chocolate, and pecans with a creamy cheesecake filling. These bite-sized treats are perfect for any occasion, offering a decadent taste experience without the need for baking.
Ingredients
Instructions
Notes
- Ingredient Quality: Use high-quality ingredients for the best results. Fresh cream cheese, real vanilla extract, and good-quality chocolate make a significant difference in taste.
- Chilling Time: Allow adequate chilling time for each layer. The crust should chill before adding the filling, and the entire cheesecake needs to set in the refrigerator before serving. This ensures the cheesecakes hold their shape and the flavors meld together.
- Homemade Caramel Sauce: While store-bought caramel sauce is convenient, making your own can elevate the flavor. Follow the recipe for a simple and delicious homemade caramel sauce.
- Texture Consistency: Achieve the right texture by ensuring the cream cheese is softened and the whipping cream is beaten to stiff peaks. This helps create a smooth and airy filling.
- Prep Time: 20 minutes
- Cook Time: 2 hours
- Category: Dessert
- Cuisine: American
Nutrition
- Calories: 320 kcal per serving


This photo does not show a Graham cracker crust. Is this an AI generated image? That does not look like caramel “sauce” either. It’s rather deceiving. I’m a baker and I’m seeing this more and more. I never try these recipes because of this. It will be disappointing for those that do and don’t get anything like the image presented.
This recipe does not go with that picture. I don’t know why you people keep doing this. To get advertising dollars I’m sure.
Are you lying about this picture? Bcuz I’m trying to get my cheesecakes to workout. I don’t want to waste a bunch of money and ingredients for something that’s a lie. So is this picture generated and not your recipe that you created yourself? Very disappointing if true.
Hi, Naomi! Can you tell me what that top layer is made of? There appear to be 3 layers. Thank you so much!