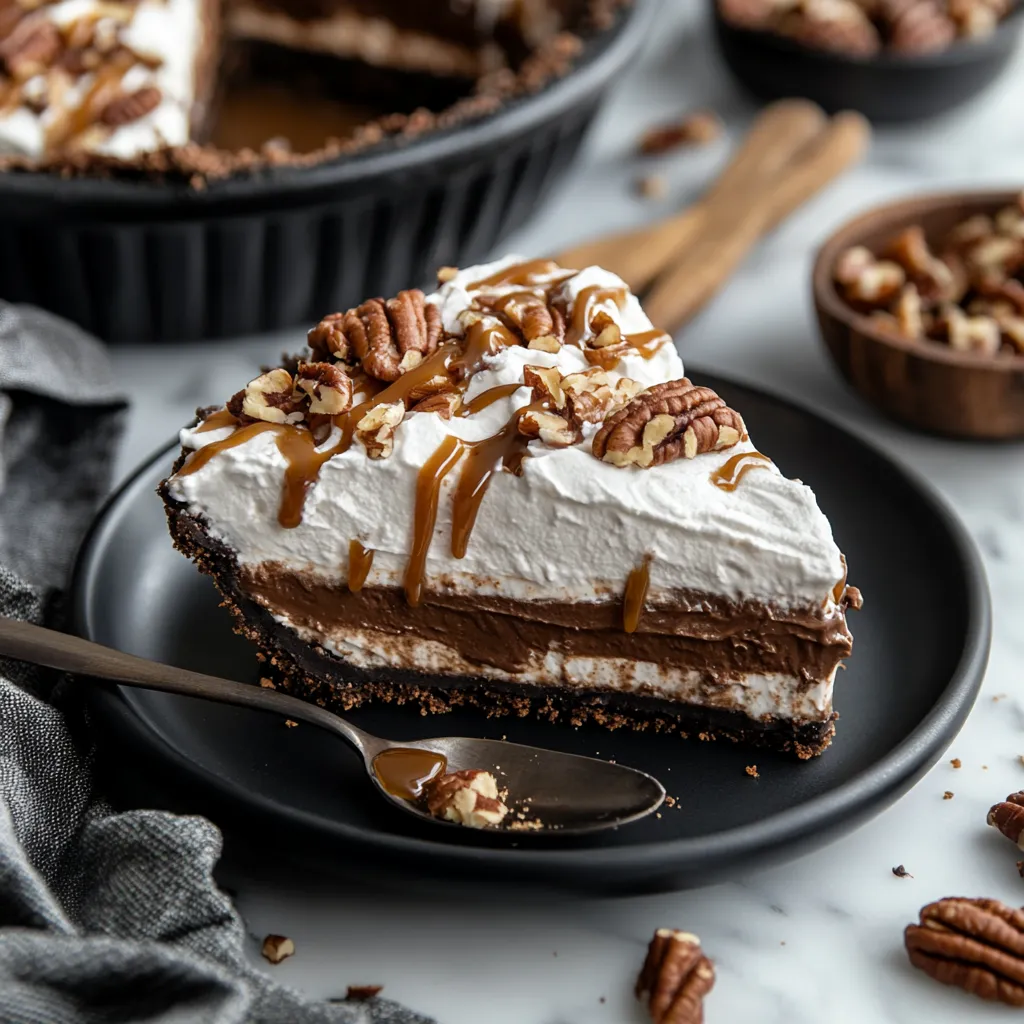
When you’re craving something indulgent, decadent, and easy to make, No Bake Turtle Pie is the perfect dessert. This simple, no-bake treat combines all the classic flavors of the beloved turtle candy—rich caramel, chocolate, and toasted pecans—and transforms them into a pie that will have everyone coming back for more. The best part? There’s no baking required, making it the perfect dessert to whip up even on the busiest days.
With a graham cracker crust, a cream cheese filling, and a luscious caramel and chocolate topping, this dessert is a crowd-pleaser every time. The sweet, creamy filling perfectly complements the crunchy, nutty topping, while the caramel and chocolate drizzle provide that perfect sweet and salty balance. Whether you’re hosting a party, enjoying a family dinner, or just treating yourself, this No Bake Turtle Pie will become your go-to dessert.
Let’s break down the ingredients and steps that will make this irresistible pie so easy to prepare.
Ingredients for the No Bake Turtle Pie:
This dessert uses a handful of simple ingredients that come together to create a truly indulgent treat. With a graham cracker crust, creamy filling, and rich toppings, every layer of this pie is packed with flavor.
For the Crust:
- 1 ½ cups graham cracker crumbs – This forms the base of the pie, providing a sweet and slightly crunchy texture.
- ¼ cup melted butter – Helps bind the graham cracker crumbs together and adds richness to the crust.
- ¼ cup brown sugar – Adds sweetness and a bit of molasses flavor to the crust, giving it a deeper richness.
For the Filling:
- 8 oz cream cheese, softened – The creamy base of the filling, adding a smooth texture and tanginess.
- 1 cup powdered sugar – Sweetens the cream cheese and gives the filling a smooth, velvety texture.
- 1 ½ cups heavy whipping cream – Whipped to soft peaks, this lightens the filling and adds a luscious, creamy texture.
- 1 tsp vanilla extract – Adds warmth and depth to the filling, balancing the richness of the other ingredients.
For the Topping:
- 1 cup pecans, toasted – The star nut of the turtle pie, offering a rich, nutty flavor and crunch.
- ½ cup caramel sauce – Drizzled over the top, it adds the signature sweet and salty flavor of turtle candy.
- ½ cup chocolate chips – Melting these into a drizzle completes the flavor profile, adding that delicious chocolatey goodness.
Step 1: Prepare the Crust
Start by making the graham cracker crust. In a medium bowl, combine the graham cracker crumbs, melted butter, and brown sugar. Stir the ingredients together until well mixed. The mixture should be crumbly but hold together when pressed.
Next, press the mixture into the bottom of a 9-inch pie pan. Make sure to press it down firmly and evenly, creating a solid base for your filling. Once the crust is in place, refrigerate it for 10-15 minutes to allow it to set and firm up.

Step 2: Make the Cream Cheese Filling
While the crust is chilling, prepare the cream cheese filling. In a separate bowl, beat the softened cream cheese and powdered sugar together until smooth. This will create a creamy base that’s rich and slightly tangy, which pairs beautifully with the sweet toppings.

Assembling, Topping, and Setting Your No Bake Turtle Pie:
Now that the crust and cream cheese filling are ready, it’s time to bring everything together and create the layers that will make this No Bake Turtle Pie a showstopper dessert. The process is quick and simple, and in just a few more steps, you’ll have a decadent dessert that’s perfect for any occasion.
Step 3: Whip the Heavy Cream
In a large mixing bowl, whip the heavy cream with 1 teaspoon of vanilla extract until soft peaks form. You can do this using an electric mixer or by hand with a whisk, but using an electric mixer will give you the quickest results. The whipped cream should be light and fluffy, but not too stiff.
Once the whipped cream has reached soft peaks, it’s time to move on to the next step.

Step 4: Combine the Cream Cheese and Whipped Cream
Now that both the cream cheese mixture and whipped cream are ready, it’s time to combine them. Gently fold the whipped cream into the cream cheese mixture, using a spatula or large spoon. Be careful not to deflate the whipped cream too much; the goal is to maintain the light, airy texture of the whipped cream while creating a smooth, creamy filling.
Make sure everything is well combined and there are no streaks of whipped cream left. The mixture should be smooth, fluffy, and light in texture.
Step 5: Spread the Filling Over the Crust
Once the cream cheese filling is ready, spread it evenly over the prepared graham cracker crust. Use a spatula or the back of a spoon to smooth the top, ensuring an even layer. This filling should be creamy and thick, and it will set beautifully in the refrigerator.
Once the filling is evenly spread, place the pie back into the refrigerator to allow it to set properly for the next few steps.

Step 6: Add the Toppings
After the pie has set, it’s time for the most indulgent part—topping it with the caramel, pecans, and chocolate.
- Drizzle the caramel sauce over the top of the pie, making sure to cover it generously. The caramel will pool around the edges and add that signature sweet and salty taste.
- Sprinkle the toasted pecans evenly over the pie, adding a rich, nutty crunch that complements the sweetness of the caramel and the creaminess of the filling.
- Melt the chocolate chips in the microwave or using a stovetop double boiler. Drizzle the melted chocolate over the pie, creating a beautiful swirl of chocolate on top.
Once the toppings are added, the pie is ready for its final chilling session.
Step 7: Refrigerate the Pie
To allow the flavors to meld and the pie to set, refrigerate the pie for at least 4 hours, or preferably overnight. This waiting time allows the filling to firm up and the flavors to develop, making each slice even more delicious. The longer it sits, the more cohesive and flavorful the pie becomes.
Step 8: Serve and Enjoy
After the pie has fully set, it’s time to slice and serve! Garnish with additional caramel sauce or chocolate if desired, and enjoy every indulgent bite of this creamy, rich dessert. The combination of the graham cracker crust, creamy filling, toasted pecans, and decadent chocolate and caramel topping will leave everyone asking for seconds.

FAQ & Final Thoughts – Your No Bake Turtle Pie Questions Answered:
Now that your No Bake Turtle Pie is set, it’s time to answer some common questions about this delicious dessert. Whether you’re looking for ways to make it even more indulgent or have specific dietary needs, we’ve got you covered with helpful tips and tricks to ensure your pie turns out perfectly every time. Plus, we’ll wrap up with a few final thoughts on this easy and irresistible treat.
1. Can I make this pie ahead of time?
Yes! No Bake Turtle Pie is a great dessert to prepare in advance. In fact, making it a day ahead gives the flavors time to fully meld together and results in a firmer filling. You can store the pie, covered, in the refrigerator for up to 3 days. This makes it a perfect dessert for parties, gatherings, or meal prepping.
2. Can I substitute the graham cracker crust?
If you prefer a different type of crust, you can certainly substitute the graham cracker crust. For example, you can use chocolate cookie crumbs (like Oreos) for a richer, more decadent base. If you’re looking for a gluten-free version, try using gluten-free graham crackers or a gluten-free cookie base. Just be sure to adjust the quantity of butter as needed to ensure the crust holds together.
3. Can I use a different type of nut?
While pecans are traditional in turtle desserts, you can easily substitute them with other nuts. Walnuts or almonds work well as alternatives and will still provide the desired crunch and nutty flavor. If you prefer a nut-free version, you can skip the nuts altogether or use toasted coconut flakes for some texture.
4. Can I use store-bought caramel sauce?
Yes, you can use store-bought caramel sauce if you’re short on time or prefer the convenience. However, making your own caramel sauce from scratch can elevate the flavor and richness of the pie. If you choose to use store-bought, opt for a high-quality brand to ensure the best taste.
5. How can I make this pie healthier?
If you’d like to make a lighter version of this pie, here are a few swaps you can consider:
- Use light cream cheese or a cream cheese substitute to reduce the fat content.
- Substitute Greek yogurt for some or all of the heavy cream to add a creamy texture with less fat.
- Opt for a sugar substitute like stevia or monk fruit to reduce the sweetness if needed.
- Choose a whole grain or gluten-free crust to cater to different dietary needs.
6. Can I freeze the pie?
Yes, this pie can be frozen! After preparing the pie, let it set in the fridge as directed, and then cover it tightly with plastic wrap and foil. It can be stored in the freezer for up to 1 month. When you’re ready to serve it, simply thaw the pie in the refrigerator for a few hours before slicing and serving. Keep in mind that the texture of the whipped cream may change slightly after freezing, but it will still be delicious.
Final Thoughts:
This No Bake Turtle Pie is a dessert that’s as easy to make as it is impressive. The simple ingredients come together to create a delicious, indulgent treat that’s perfect for any occasion. Whether you’re serving it for a family dinner, at a holiday gathering, or simply treating yourself, this pie is sure to become a favorite in your dessert repertoire.
The best part? It’s incredibly easy to make, requiring no baking and minimal prep time. The combination of creamy filling, sweet caramel, rich chocolate, and toasted pecans makes every bite unforgettable. Plus, it’s completely customizable—feel free to add more caramel, chocolate, or even a sprinkle of sea salt on top to suit your taste.
So, gather your ingredients, follow these simple steps, and treat yourself to this delicious No Bake Turtle Pie. You won’t regret it!
Happy baking, and enjoy your No Bake Turtle Pie!
Print
No Bake Turtle Pie: The Ultimate Easy Dessert Recipe
- Total Time: 4 hrs 15 min
Description
This No-Bake Turtle Pie is a luscious dessert that layers creamy cheesecake filling with gooey caramel, crunchy pecans, and chocolate—all nestled in a crisp chocolate crust. With no oven needed, it’s the perfect make-ahead dessert for holidays, potlucks, or whenever you’re craving something sweet and easy.
Ingredients
-
1 (9-inch) chocolate cookie crust (store-bought or homemade)
-
1 (8 oz) package cream cheese, softened
-
½ cup powdered sugar
-
1 (8 oz) tub whipped topping (Cool Whip), thawed
-
½ cup caramel sauce (plus more for drizzling)
-
½ cup chopped pecans
-
½ cup mini chocolate chips or melted chocolate for drizzle
-
Optional: extra pecans and whipped topping for garnish
Instructions
1️⃣ Make the filling: In a medium bowl, beat cream cheese and powdered sugar until smooth. Fold in the whipped topping until light and fluffy.
2️⃣ Add mix-ins: Stir in ½ cup caramel sauce, chopped pecans, and chocolate chips (if using chips instead of drizzle).
3️⃣ Assemble the pie: Spoon the filling into the prepared chocolate crust. Smooth the top with a spatula.
4️⃣ Chill: Refrigerate for at least 4 hours, or until set. Overnight is even better.
5️⃣ Garnish and serve: Before serving, drizzle with more caramel and melted chocolate. Top with extra whipped topping and pecans if desired.
Notes
-
Make ahead: Best when made a day in advance and kept chilled.
-
Crust swap: Try using a graham cracker or shortbread crust for a different flavor.
-
Turtle twist: Add a layer of caramel and pecans under the filling for extra texture!
- Prep Time: 15 min
- Cook Time: 4 hrs