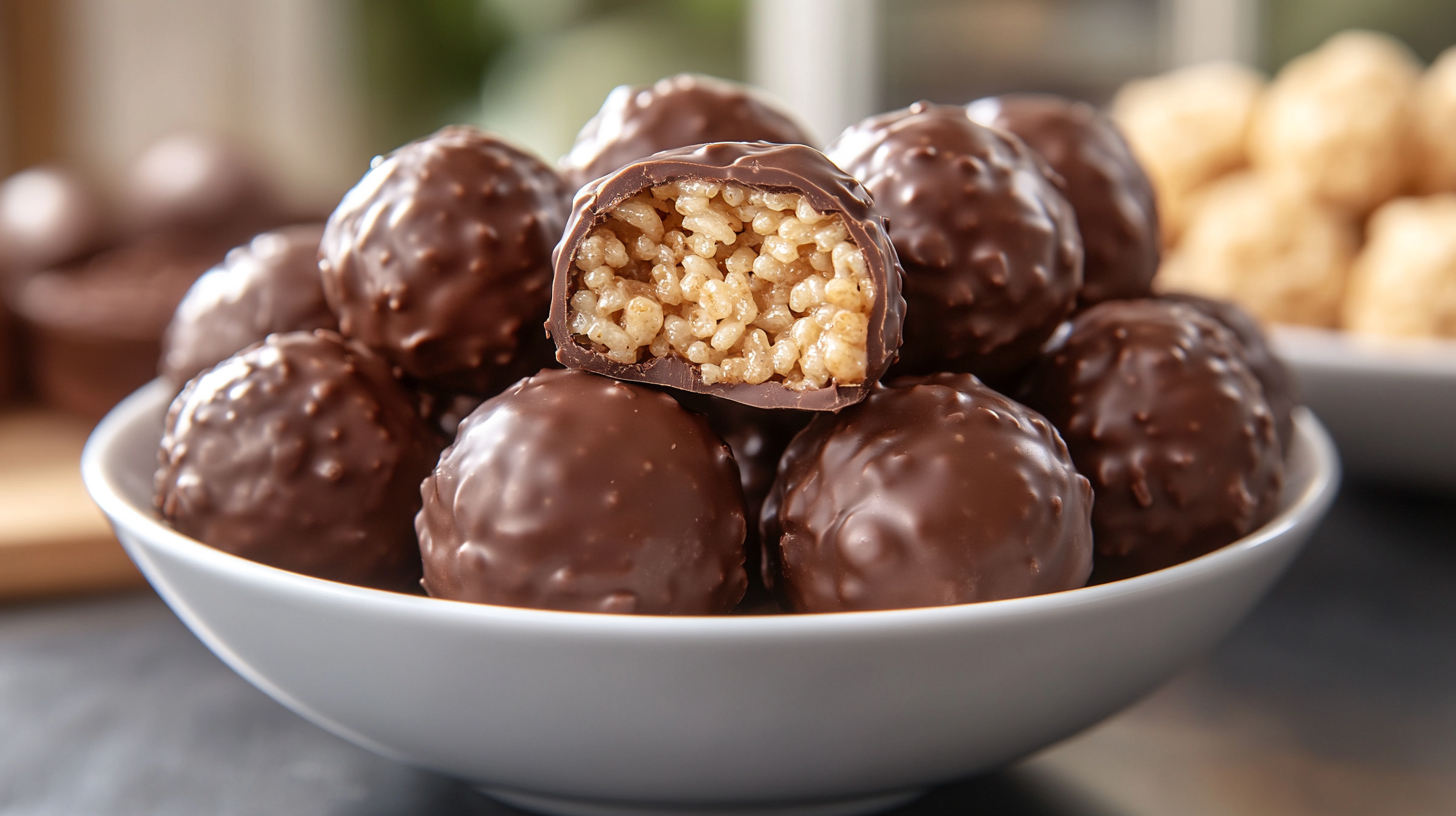
Peanut Butter Balls with Rice Krispies are a classic, no-bake treat that blends sweet, salty, and crunchy textures. Popular at parties and as after-school snacks, they are both nostalgic and simple to make, appealing to both kids and adults. The combination of creamy peanut butter, the satisfying crunch of Rice Krispies, and a smooth chocolate coating makes them irresistible. With minimal ingredients and no oven required, this recipe is a go-to for busy families, holiday treats, or whenever you need a quick and delicious dessert.
Ingredients Overview
Each ingredient in Peanut Butter Balls with Rice Krispies plays a crucial role in creating the perfect balance of flavors and textures.
- Peanut Butter: Using creamy, no-stir peanut butter ensures a smooth texture without the oil separation that can happen with natural peanut butter. This helps the balls hold their shape better.
- Butter: Salted butter balances the sweetness from the sugar and chocolate while adding richness. The salt in the butter enhances the flavor, creating a deeper, more complex taste.
- Rice Krispies: The right cereal adds the perfect crunch without getting soggy. Rice Krispies should be added at the right time to keep their crispy texture intact.
- Powdered Sugar: This binds the mixture, creating the right consistency for rolling. It also sweetens the peanut butter, which is usually unsweetened.
- Chocolate: Semi-sweet chocolate offers the perfect balance between sweetness and bitterness. You can also use melting wafers for a smoother and easier dipping process. Semi-sweet chocolate chips are great for those who prefer a homemade touch, while melting wafers make for an easier coating.
Step-by-Step Instructions
Step 1: Blending Peanut Butter and Butter
Start by blending the peanut butter with the melted butter in a large mixing bowl. The melted butter should be warm but not hot, ensuring it mixes smoothly with the peanut butter. The goal is to achieve a silky consistency without any clumping. If the mixture is too thin, let it sit for a few minutes to cool down, which will help thicken it up. Alternatively, if the mixture feels too sticky, add a little powdered sugar to balance it.
Step 2: Incorporating Rice Krispies
Gently fold in the Rice Krispies cereal. Be careful not to overmix, as this can break the delicate cereal and reduce the desired crunchy texture. Ensure the cereal is evenly distributed throughout the mixture so that each bite has a satisfying crunch. If the Krispies start to lose their crispness, it’s often because the mixture was too warm, so letting the peanut butter mix cool slightly before folding in the cereal can help.
Step 3: Adding Powdered Sugar
Gradually add the powdered sugar, sifting it in to avoid clumping. Start with half a cup, then slowly incorporate the rest. This will thicken the mixture to a point where it can be rolled into balls. If the mixture feels too sticky or wet, add a bit more powdered sugar until it reaches the perfect consistency for shaping.
Step 4: Rolling the Balls
Use a cookie scoop or your hands to portion the mixture into evenly sized balls. Aim for about 1-inch in diameter. Rolling by hand helps to ensure a smooth and even shape. Once rolled, place them on a parchment-lined baking sheet. Refrigerating the balls for at least 30 minutes is crucial, as it helps them firm up, making it easier to dip them into the melted chocolate later.

Step 5: Melting the Chocolate
Melt the chocolate chips or wafers in a microwave-safe bowl. Microwave in 30-second intervals, stirring in between to prevent burning. If you prefer stovetop melting, use a double boiler for a more controlled heat. The chocolate should be smooth and glossy. If the chocolate appears too thick for dipping, stir in a small amount of vegetable oil or shortening to thin it out.
Step 6: Dipping the Peanut Butter Balls
Once the peanut butter balls have chilled, dip them into the melted chocolate using a fork or toothpick to ensure full coating. Let any excess chocolate drip off before placing the ball back on the parchment paper. For the best results, allow the chocolate to cool slightly before dipping, which prevents it from being too runny. Refrigerate the dipped balls until the chocolate is fully set, about 15-20 minutes.
Tips and Tricks for the Perfect Peanut Butter Balls
- Smooth Chocolate Coating: To avoid air bubbles or uneven coating, make sure the peanut butter balls are fully chilled before dipping them into the melted chocolate. After dipping, give the ball a slight tap with the fork to remove excess chocolate and create a smooth finish.
- Substitutions: For dairy-free versions, use vegan butter and dairy-free chocolate. You can also substitute powdered sugar with a sugar-free sweetener like powdered erythritol for a lower-carb option.
- Storage Tips: Peanut butter balls can be made ahead and stored in the refrigerator for up to two weeks. To freeze, place the dipped balls in an airtight container, layering with parchment paper, for up to three months. Defrost in the refrigerator before serving.
- Adding Variety: Customize your peanut butter balls by sprinkling toppings such as sea salt, crushed nuts, or sprinkles before the chocolate hardens for a festive touch.
Flavor Variations and Add-ins
- Crunchy Peanut Butter: If you love extra texture, substitute creamy peanut butter with crunchy peanut butter. This adds a layer of crunch to the already crispy Rice Krispies.
- Add Nuts or Fruits: For a more complex bite, mix in chopped peanuts, almonds, or even dried fruits like cranberries into the peanut butter mixture before rolling the balls.
- White or Dark Chocolate: Switch out the semi-sweet chocolate for white or dark chocolate depending on your preference. White chocolate will provide a sweeter, creamier contrast, while dark chocolate offers a richer, more intense flavor.
- Flavor Extracts: Add a few drops of flavor extracts like vanilla, almond, or coconut to the peanut butter mixture for an extra burst of flavor that complements the chocolate coating.
- Swirled Caramel or Marshmallow: For an indulgent twist, drizzle caramel or melted marshmallow into the melted chocolate before dipping, giving the peanut butter balls a unique flavor and appearance.
Health and Nutritional Considerations
Each peanut butter ball can pack a fair amount of calories, fats, and sugars, making portion control important. On average, a single peanut butter ball can contain around 100-150 calories, 7-10 grams of fat, and about 6-8 grams of sugar, depending on the exact ingredients used.
For healthier versions, consider the following swaps:
- Reduced-Sugar Chocolate: Opt for sugar-free or reduced-sugar chocolate chips to cut down on sugar content without compromising the chocolatey flavor.
- Natural Peanut Butter: Use natural peanut butter, which contains fewer additives and sugar. However, ensure it’s no-stir to maintain consistency.
- Low-Fat Butter: You can also replace regular butter with a low-fat or light butter alternative to reduce fat content.
Since these treats are rich in sugar and fat, it’s best to enjoy them in moderation. Stick to a serving size of 1-2 balls at a time to keep your calorie and sugar intake in check. For a balanced diet, pair these indulgent treats with healthy meals and exercise, using them as a special occasion snack rather than an everyday treat.
Common Questions and Solutions
- Why did my peanut butter mixture turn out too dry?
The peanut butter mixture can become too dry if too much powdered sugar is added or if the peanut butter is very thick. To fix this, add a little more melted butter or peanut butter, one tablespoon at a time, until the mixture becomes more pliable. Using creamy, no-stir peanut butter will help maintain a smooth consistency. - How do I prevent the Rice Krispies from going soggy?
To prevent the Rice Krispies from getting soggy, ensure the mixture has cooled before adding the cereal. If the peanut butter mixture is too warm when you fold in the cereal, it can cause the Krispies to lose their crunch. Gently fold them in rather than mixing vigorously to preserve their texture. - What if my chocolate doesn’t melt smoothly?
Chocolate that doesn’t melt smoothly might be overheated. To avoid this, melt it in 30-second intervals in the microwave or use a double boiler on the stovetop. Stir frequently and, if needed, add a teaspoon of vegetable oil or shortening to make the chocolate smoother and more fluid for dipping. - How can I make the peanut butter balls dairy-free or vegan?
You can easily make these treats dairy-free by swapping out the butter for plant-based or vegan butter. Use dairy-free chocolate chips or melting wafers, which are readily available at most grocery stores, to ensure the recipe remains vegan-friendly. - Can I make these ahead of time and store them?
Yes! Peanut butter balls can be stored in the refrigerator for up to two weeks in an airtight container. You can also freeze them for up to three months. If freezing, layer the balls with parchment paper to prevent them from sticking together. Thaw them in the fridge before serving.
FAQs Section
- Can I substitute almond butter for peanut butter?
Yes, almond butter works well as a substitute for peanut butter. However, it may result in a slightly different texture and a more subtle flavor. Almond butter tends to be a bit oilier than peanut butter, so adjust the consistency if needed by adding more powdered sugar or Rice Krispies. - How long do these peanut butter balls last?
Peanut butter balls can last up to two weeks in the refrigerator, stored in an airtight container. For longer storage, freeze them for up to three months. Just make sure to allow them to thaw in the fridge for a few hours before serving. - How do I keep the chocolate coating from cracking?
To prevent the chocolate coating from cracking, chill the peanut butter balls slightly before dipping them, but avoid freezing them completely. Also, allow the melted chocolate to cool slightly before dipping the balls, as extreme temperature changes between the cold balls and hot chocolate can cause cracks. - Can I use milk chocolate instead of semi-sweet chocolate?
Yes, milk chocolate can be used instead of semi-sweet chocolate. However, keep in mind that milk chocolate is sweeter, so it may result in a more sugary taste. Semi-sweet chocolate offers a more balanced sweetness with a deeper cocoa flavor.
Final Thoughts and Serving Suggestions
Peanut Butter Balls with Rice Krispies are perfect for serving at parties, as a holiday gift, or as a fun snack for kids. Arrange them on a festive platter or wrap them in decorative boxes or bags for an easy homemade gift. For added flair, sprinkle crushed nuts, sea salt, or holiday-themed sprinkles on top before the chocolate hardens.
These treats pair wonderfully with a glass of cold milk, a cup of coffee, or hot chocolate, making them ideal for dessert or as a snack with your favorite beverage. Whether you’re making them for a special occasion or just for fun, these peanut butter balls are sure to be a hit!
Print
Peanut Butter Balls with Rice Krispies
Description
Peanut Butter Balls with Rice Krispies are a delicious no-bake dessert that combines the creamy richness of peanut butter, the crispy texture of Rice Krispies, and the smooth finish of chocolate. These bite-sized treats are perfect for any occasion, from holiday parties to afternoon snacks. Easy to prepare and highly customizable, they’re a hit with both kids and adults. Whether you’re looking for a simple dessert or something fun to make with the family, this recipe is guaranteed to be a crowd-pleaser.
Ingredients
- 1 cup creamy peanut butter (no-stir)
- 3 tbsp salted butter (melted)
- 1 cup powdered sugar
- 2 1/2 cups Rice Krispies cereal
- 12 oz semi-sweet chocolate chips or chocolate melting wafers
Instructions
- Blend Peanut Butter and Butter
In a large mixing bowl, combine the peanut butter with the melted butter. Stir until the mixture is smooth and creamy. Make sure the butter is warm but not too hot to avoid separating the fats in the peanut butter. - Incorporate Rice Krispies
Gently fold in the Rice Krispies cereal, being careful not to crush them. Ensure they are evenly distributed throughout the mixture to maintain that satisfying crunch. - Add Powdered Sugar
Gradually mix in the powdered sugar, adding it in small portions. This helps bind the ingredients together, resulting in a thicker and more cohesive mixture that’s easier to handle. - Roll into Balls
Line a baking sheet with parchment paper. Scoop out portions of the peanut butter mixture and roll them into balls about 1-inch in diameter. Place the balls on the prepared baking sheet and refrigerate for at least 30 minutes to firm up. - Melt the Chocolate
Melt the semi-sweet chocolate chips or chocolate melting wafers in a microwave-safe bowl. Heat in 30-second intervals, stirring in between, until smooth and fully melted. Alternatively, you can use a double boiler on the stovetop for more controlled melting. - Dip the Peanut Butter Balls
Remove the chilled peanut butter balls from the fridge. Using a fork or toothpick, dip each ball into the melted chocolate, ensuring it is fully coated. Let the excess chocolate drip off, then place the dipped balls back onto the parchment-lined sheet. - Set the Chocolate
Place the chocolate-covered peanut butter balls in the refrigerator until the chocolate is set, which takes about 15-20 minutes. Once the chocolate is firm, your peanut butter balls are ready to enjoy!
Notes
- Consistency Matters: If the mixture feels too dry, add a little more melted butter or peanut butter to help bring it together. If it’s too wet or sticky, add a bit more powdered sugar to reach the perfect rolling consistency.
- Chocolate Tips: For smoother dipping, make sure the chocolate isn’t too hot when coating the peanut butter balls. If the chocolate becomes too thick while melting, stir in a small amount of vegetable oil or shortening to thin it out for easier dipping.
- Storage: Store peanut butter balls in an airtight container in the refrigerator for up to two weeks. For longer storage, freeze them in a freezer-safe container for up to three months.
- Customizations: Feel free to customize these treats by using white or dark chocolate, adding sprinkles, crushed nuts, or even a drizzle of caramel on top. You can also experiment with different nut butters like almond or cashew butter for a unique twist.


