Tropical desserts transport us to exotic locales with vibrant, fruity flavors, offering a refreshing break from traditional sweets. They are perfect for adding sunshine to any table, regardless of the season.
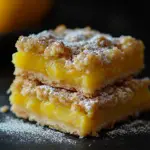
Pineapple Bliss Bars bring the essence of the tropics to your kitchen, combining a buttery shortbread crust with a luscious pineapple filling. The tropical twist of pineapple creates a delightful balance of tang and sweetness.
Overview: Why This Recipe Stands Out
This recipe is popular for its simplicity and versatility. Whether for a summer picnic or a winter treat, Pineapple Bliss Bars provide a refreshing flavor with minimal effort. Plus, the buttery crust complements the tropical pineapple filling perfectly, making it an all-occasion favorite.
What are Pineapple Bliss Bars?
Definition of Bliss Bars and Their Tropical Twist
Pineapple Bliss Bars are a dessert made with a soft, buttery crust topped with a rich, tangy pineapple filling. The “bliss” in the name refers to the satisfying balance of sweet and tart flavors, creating a burst of tropical freshness in each bite.
Historical Origins of Pineapple in Desserts
Pineapple has long been cherished in tropical regions, and it found its way into various desserts in both Eastern and Western cuisines. In the mid-20th century, canned pineapple became more accessible, making it a favorite in home baking, especially for creating sweet and tangy dessert bars like Pineapple Bliss Bars.
Perfect for All Seasons and Occasions
Though perfect for summer, Pineapple Bliss Bars work equally well year-round, offering a bright contrast to heavier winter desserts. Their simplicity makes them ideal for potlucks, family gatherings, and holiday events, offering a tropical escape on any occasion.
Ingredients Breakdown
Key Ingredients:
- Flour: Forms the base of the crust, providing structure.
- Butter: Creates a rich, tender shortbread crust.
- Crushed Pineapple: The star ingredient, adding tangy sweetness and tropical flavor.
- Sugar: Sweetens both the crust and filling.
- Eggs: Help bind the filling and give it a custard-like texture.
Optional Additions:
- Shredded Coconut: For an extra tropical flair.
- Vanilla Extract: Adds depth to the flavor profile.
- Powdered Sugar: Perfect for dusting as a finishing touch.
Ingredient Functions:
- Flour and butter form the buttery crust, offering a stable base.
- Pineapple adds a tart-sweet element, while sugar enhances the sweetness.
- Eggs hold the filling together and create a soft, custardy texture.
Detailed Step-by-Step Guide
Crust Preparation:
- Mixing: Combine flour, sugar, and cold butter. Using a pastry cutter or your hands, mix until it forms a crumbly dough.
- Pressing: Press the mixture evenly into a greased baking dish. Make sure to create a solid base.
- Pre-baking: Bake the crust at 350°F (175°C) for 10–15 minutes until lightly golden. This prevents sogginess when adding the filling.
Pineapple Filling:
- Mixing: In a separate bowl, beat eggs and sugar until combined. Add crushed pineapple (drained) and stir to distribute evenly.
- Thickening: Incorporate flour into the filling mixture. This thickens the filling and helps it set when baked.

Baking Process:
- Layering: Pour the pineapple filling over the pre-baked crust.
- Baking: Return the dish to the oven and bake at 350°F for an additional 25–30 minutes, until the filling is set and slightly golden at the edges.
- Cooling: Let the bars cool completely in the pan before cutting. This ensures the filling sets properly.
Final Touches:
- Dusting with Powdered Sugar: For a delicate, sweet finish, lightly dust the top with powdered sugar once the bars have cooled.
- Garnishing Ideas: For added presentation, top with shredded coconut or a drizzle of melted white chocolate.
Expert Tips for Perfect Pineapple Bliss Bars
Ensuring the Right Texture (Crust vs. Filling Balance):
To achieve the perfect texture, aim for a well-baked, slightly crisp crust that contrasts with the soft pineapple filling. Pre-baking the crust is crucial to preventing it from becoming soggy. Keep the filling layer thin to avoid overpowering the crust.
Best Way to Drain Crushed Pineapple:
Properly draining the pineapple is essential to avoid a watery filling. Place the crushed pineapple in a fine mesh sieve and gently press with the back of a spoon to remove excess juice. If needed, pat it dry with a paper towel.
How to Store Bars for Optimal Freshness:
Store the Pineapple Bliss Bars in an airtight container at room temperature for up to two days or refrigerate for up to a week. For longer storage, freeze the bars in a single layer, then transfer them to a sealed bag for up to three months.
Ideal Pan and Equipment Recommendations:
A 9×13-inch baking dish is ideal for this recipe, ensuring even cooking and a good crust-to-filling ratio. Use parchment paper to line the pan for easy removal. A pastry cutter or food processor can simplify the process of mixing the crust.
Popular Recipe Variations
Coconut-Infused Version:
For a more tropical flavor, add shredded coconut to both the crust and filling. Sprinkle toasted coconut on top after baking for added texture and visual appeal.
Adding a Citrus Twist with Lime Zest:
Incorporate fresh lime zest into the filling to add a zesty citrus kick. Lime’s bright acidity enhances the sweetness of the pineapple, creating a refreshing flavor combination.
Making the Bars Gluten-Free with Alternative Flours:
Substitute regular flour with a gluten-free blend or almond flour for a gluten-free version. Be sure to adjust baking times slightly, as gluten-free flours can behave differently, ensuring the crust maintains its structure and the filling sets properly.
How to Serve Pineapple Bliss Bars
Best Occasions for Serving:
Pineapple Bliss Bars are versatile and perfect for any occasion, from summer picnics to holiday gatherings. They work well as a refreshing dessert after a heavy meal or as a light treat during warm-weather events.
Pairings:
- Drinks: Pair with tropical cocktails like piña coladas, mojitos, or a refreshing iced tea to enhance the tropical vibe.
- Desserts: Serve alongside coconut custard or pineapple sorbet for a complete tropical-themed dessert spread.
Presentation Ideas:
For parties, cut the bars into small squares and display them on a colorful platter. Garnish with toasted coconut flakes or lime zest to elevate the presentation. You can also serve them in cupcake liners for individual servings at a gathering.
Nutritional Information
Brief Overview of Nutritional Content:
Pineapple Bliss Bars contain a mix of carbs, fats, and sugars from the butter, sugar, and flour. A typical serving (about 2×2 inch square) provides approximately 200-250 calories, with higher sugar content from both the pineapple and sugar in the crust and filling.
Suggestions for Reducing Sugar or Fat Content:
To make a healthier version, reduce the sugar in the filling by 25-50%. You can also replace some of the butter with unsweetened applesauce in the crust for fewer calories and fat. Alternatively, use a sugar substitute like stevia to maintain sweetness while cutting down on sugar.
Frequently Asked Questions (FAQs)
Can I use fresh pineapple instead of canned?
Yes, you can use fresh pineapple, but it must be finely chopped and drained well to avoid excess moisture. Canned pineapple is pre-softened, which makes it easier to incorporate into the filling.
How long do these bars last?
Stored in an airtight container, Pineapple Bliss Bars will last up to two days at room temperature or about a week in the refrigerator.
What can I use as a substitute for butter?
You can use margarine, coconut oil, or plant-based butter alternatives for a dairy-free option. Keep in mind that the texture might vary slightly.
Can I freeze Pineapple Bliss Bars?
Yes, they freeze well. Once fully cooled, store them in an airtight container or freezer bag for up to three months. Thaw in the fridge before serving.
How do I prevent a soggy crust?
Pre-baking the crust before adding the filling is essential. Drain the pineapple thoroughly to reduce moisture, ensuring the crust remains crisp.
Pineapple Bliss Bars
Description
Pineapple Bliss Bars are a delightful tropical treat that combines a buttery shortbread crust with a tangy-sweet pineapple filling. Perfect for any occasion, these bars offer a balance of textures with a crispy base and soft, fruity topping, bringing the essence of a tropical paradise to your dessert table.
Ingredients
- 1 1/2 cups all-purpose flour
- 1/2 cup granulated sugar
- 1/4 tsp salt
- 3/4 cup cold unsalted butter, cubed
- 1 cup crushed pineapple, well-drained
- 2 large eggs
- 1 cup granulated sugar
- 1/4 cup all-purpose flour
- 1/2 tsp baking powder
- 1 tsp vanilla extract
- Powdered sugar for dusting
Instructions
- Preheat oven to 350°F and line a 9×13 baking pan with parchment paper.
- Make the crust: In a bowl, mix together 1 1/2 cups flour, 1/2 cup sugar and salt. Cut in cold butter until crumbly. Press evenly into the prepared pan.
- Bake crust for 15 minutes until lightly golden. Allow to cool slightly.
- Make the pineapple filling: In a bowl, whisk the eggs and 1 cup sugar until smooth. Mix in 1/4 cup flour, baking powder and vanilla. Fold in the drained crushed pineapple.
- Pour the pineapple filling evenly over the crust. Bake for 25-30 minutes until set on the edges.
- Allow bars to cool completely in pan. Once cooled, dust generously with powdered sugar before slicing into squares.
Notes
- Crust Texture: Ensure the crust is pre-baked to avoid sogginess. A firm, golden crust is key to holding the filling.
- Pineapple: Thoroughly drain crushed pineapple to prevent excess moisture.
- Storage Tip: Store in an airtight container for freshness. They can also be frozen for up to three months.