


If you’re looking for a cheesecake that’s creamy, bright, and just a little unexpected, this Pistachio Cheesecake with Sweet Cherries and Lime Zest is everything you need. It’s rich and smooth, with pops of citrus, bursts of sweet cherry, and a nutty crunch from pistachios—all nestled on a buttery graham cracker crust. This dessert isn’t just pretty to look at—it’s packed with flavor in every bite.
I first made this recipe for a spring brunch, wanting something a little different from the usual fruit tarts and lemon bars. The cherries and pistachios gave it such a beautiful color contrast, and the citrus zest made the whole thing feel light and fresh, even though it’s a traditional baked cheesecake. It was gone in minutes, and ever since, it’s become one of my go-to desserts for celebrations, showers, and even holidays.
This cheesecake feels elegant but is actually pretty simple to make. It bakes up beautifully in a springform pan, and the topping can be as casual or as decorative as you want. If you’re the type who loves a balance of creamy, sweet, tangy, and crunchy—this is going to be your new favorite.
Let’s get started with the first steps: making the crust and preparing the smooth, citrus-kissed cheesecake filling.
Ingredients for the Crust
- 1 ½ cups graham cracker crumbs
- ⅓ cup unsalted butter, melted
- ¼ cup granulated sugar
STEP 1: Preheat the Oven
Start by preheating your oven to 325°F (165°C). While the oven heats up, you can move on to prepping the crust.
STEP 2: Make the Graham Cracker Crust
In a medium mixing bowl, combine the graham cracker crumbs, melted butter, and granulated sugar. Stir until the mixture resembles wet sand. This texture helps the crust hold together once it’s baked.
Next, press the mixture firmly into the bottom of a 9-inch springform pan. Use the back of a spoon or the bottom of a flat measuring cup to get an even, compact layer. This crust gives your cheesecake a buttery, slightly sweet base with just the right amount of crunch.
Once your crust is evenly pressed in, set it aside while you make the filling.
Ingredients for the Filling
- 16 oz (450g) cream cheese, softened
- ½ cup granulated sugar
- 2 large eggs
- 2 tbsp lemon juice
- 1 tbsp lime juice
- 1 tsp lemon zest
- 1 tsp lime zest
- 1 tsp vanilla extract
- ½ cup chopped maraschino cherries
- ¼ cup chopped unsalted pistachios

STEP 3: Beat the Cream Cheese and Sugar
In a large mixing bowl, beat the softened cream cheese until smooth. You want a silky texture here—no lumps. Once smooth, add the granulated sugar and continue mixing until everything is fully combined and creamy.

Tip: Make sure your cream cheese is at room temperature before starting. This helps it mix more easily and ensures a smooth filling.
STEP 4: Add Eggs One at a Time
Crack in the eggs one at a time, mixing well after each addition. This step helps keep the batter smooth and consistent. Be careful not to overmix—just enough to fully incorporate each egg.

STEP 5: Add Citrus and Vanilla
Now, stir in the lemon juice, lime juice, lemon zest, lime zest, and vanilla extract. This is what gives the cheesecake its fresh, zesty kick. The citrus doesn’t overpower—it just lifts the flavor and balances the richness of the cream cheese.
Once everything is mixed in, you’ll have a creamy, fragrant filling with a smooth texture and a citrusy aroma that’s hard to resist.

STEP 6: Fold in Cherries and Pistachios
Finally, gently fold in the chopped maraschino cherries and pistachios. The cherries add pops of sweetness and color, while the pistachios bring a subtle nuttiness and crunch that pairs beautifully with the creamy filling.

Pistachio Cheesecake with Sweet Cherries and Lime Zest
Now that our flavorful filling is packed with cherries, citrus, and pistachios, it’s time to bring everything together. This is the part where patience really pays off—a gentle bake, a careful cooling process, and the perfect chill all ensure that your cheesecake sets beautifully and slices cleanly.
The beauty of this Pistachio Cheesecake is in the contrast: smooth and creamy filling against a slightly crisp graham cracker crust, tart citrus balanced with sweet cherries, and a topping that’s as vibrant as it is delicious. Even though it’s a baked cheesecake, it comes together in a few simple steps with no water bath required.
Let’s walk through how to bake and finish this dessert to get that gorgeous final result.
STEP 7: Pour and Smooth the Filling
Pour the prepared cheesecake filling into the springform pan over the crust. Use a spatula to smooth the top so the surface is even. This ensures a nice clean presentation once it bakes and cools.
If you see any air bubbles on top, you can tap the pan gently on the counter a couple of times. This helps settle the batter and release any trapped air.
STEP 8: Bake the Cheesecake
Place the pan in the preheated oven and bake at 325°F (165°C) for 45–50 minutes. You’ll know it’s done when the center is just set and still slightly jiggly when you gently shake the pan. The edges will look firm, but the middle should have a soft wobble—that’s exactly what you want.
Avoid opening the oven door during baking. A sudden temperature change can cause cracks on the surface. If you’re tempted to peek, just turn the oven light on and check through the glass.
STEP 9: Cool in the Oven
Once the cheesecake is done baking, turn off the oven but leave the cheesecake inside with the door slightly cracked open. Let it cool in the oven for 1 hour. This gradual cooling helps prevent the top from cracking and allows the filling to set gently.
STEP 10: Refrigerate Until Set
After cooling in the oven, remove the cheesecake and let it come to room temperature. Then, cover it loosely with plastic wrap or foil and refrigerate for at least 4 hours, preferably overnight. This chilling time allows the cheesecake to firm up completely and makes it much easier to slice.
Tip: Don’t skip this step—even if the cheesecake looks ready, it needs time in the fridge to fully set. The texture and flavor are both better when it’s served cold.
Topping Ingredients
- ½ cup whipped cream
- Extra maraschino cherries for garnish
- Chopped pistachios for garnish
- Lemon and lime zest for garnish
STEP 11: Add the Toppings
When you’re ready to serve, it’s time for the fun part—decorating. Spread or pipe the whipped cream over the top of the cheesecake, then add a few extra maraschino cherries for color and sweetness.
Sprinkle chopped pistachios over the top, and finish with a generous pinch of lemon and lime zest. The topping adds texture, flavor, and a beautiful visual contrast that makes this cheesecake look as good as it tastes.
You can keep it simple or go all out, depending on the occasion. Either way, it’s a dessert that’s sure to impress.

Pistachio Cheesecake with Sweet Cherries and Lime Zest
You’ve baked, cooled, and topped your Pistachio Cheesecake, and now comes the best part—serving it up and seeing everyone’s faces light up with that first bite. This cheesecake is an unexpected showstopper. The bright citrus flavors, the soft bites of cherry, the crunch of pistachio, and the silky texture all come together for a dessert that’s both elegant and comforting.
Whether you’re serving this for a holiday, brunch, or simply because you love cheesecake (and who doesn’t?), it’s a recipe that delivers in both flavor and presentation.
Before we wrap things up, here are some of the most common questions that come up with this recipe—plus a few tips to help you nail it every time.
1. Can I use fresh cherries instead of maraschino?
Yes, you can. Just make sure to pit and chop them first. Keep in mind that fresh cherries are less sweet than maraschino, so you may want to taste your filling and adjust the sugar slightly if needed.
2. How can I prevent my cheesecake from cracking?
Letting the cheesecake cool slowly is key. Turning off the oven and letting it rest inside with the door cracked open helps avoid sudden temperature changes, which are the main cause of cracks. Also, avoid overmixing the batter once the eggs are added.
3. What’s the best way to slice cheesecake cleanly?
Use a sharp knife and wipe it clean between each slice. For extra clean cuts, run the knife under hot water, dry it, then slice. Repeat for every cut to keep the edges neat.
4. Can I make this cheesecake ahead of time?
Definitely. This cheesecake needs to chill for at least 4 hours, but it can be made up to 2 days in advance. Just keep it covered in the fridge and wait to add the whipped cream and toppings until just before serving.
5. Can I freeze this cheesecake?
Yes. After baking and chilling, you can freeze the cheesecake without the toppings. Wrap it tightly in plastic wrap and foil, and freeze for up to 2 months. Thaw in the fridge overnight, then decorate before serving.
6. Can I use different nuts or omit them altogether?
Absolutely. If you prefer, you can substitute chopped almonds or walnuts, or leave the nuts out entirely. The cheesecake will still have plenty of flavor thanks to the cherries and citrus.
7. What should I serve with this cheesecake?
This cheesecake is great on its own, but a cup of coffee or a glass of sparkling water with lemon complements the bright flavors beautifully. It also pairs well with fresh berries or a scoop of vanilla ice cream for extra indulgence.
Final Thoughts: A Cheesecake That Stands Out
This Pistachio Cheesecake with Sweet Cherries and Lime Zest is a little different from your classic cheesecake, and that’s what makes it so special. The combination of tart and sweet, smooth and crunchy, makes each bite unique and satisfying. It’s colorful, full of flavor, and just sophisticated enough to make any occasion feel special.
What I love most about this recipe is how versatile it is. You can keep it casual for a weekday treat or dress it up for a celebration. It’s simple enough for home bakers but impressive enough for guests—and that balance is always a win in my book.
If you give this recipe a try, I’d love to hear how it turns out. Did you use fresh cherries? Add a different nut? Or maybe play with the citrus? Let me know in the comments and share your favorite variations. However you make it, this cheesecake is sure to earn a spot in your dessert rotation.
Print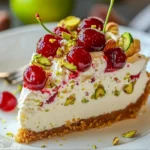
Pistachio Cheesecake with Sweet Cherries and Lime Zest
- Total Time: 5.5 hrs
Description
This Pistachio Cheesecake features a velvety cream cheese base with a hint of nutty pistachio, topped with a glossy sweet cherry compote and a refreshing sprinkle of lime zest. It’s a decadent, flavorful dessert that’s both elegant and unexpected.
Ingredients
For the Crust:
-
1 ½ cups graham cracker crumbs
-
¼ cup finely ground pistachios
-
¼ cup sugar
-
6 tbsp melted butter
For the Cheesecake Filling:
-
3 (8 oz) blocks cream cheese, softened
-
¾ cup sugar
-
3 large eggs
-
½ cup sour cream
-
1 tsp vanilla extract
-
½ tsp almond extract (optional)
-
½ cup pistachio paste or ground pistachios
For the Cherry Topping:
-
2 cups fresh or frozen sweet cherries, pitted
-
¼ cup sugar
-
1 tbsp cornstarch mixed with 1 tbsp water
-
1 tsp lemon juice
For Garnish:
-
Zest of 1 lime
-
Extra chopped pistachios (optional)
Instructions
1️⃣ Prepare the crust: Preheat oven to 325°F (160°C). Mix graham crumbs, pistachios, sugar, and butter. Press into the bottom of a 9-inch springform pan. Bake for 8–10 minutes. Cool.
2️⃣ Make the filling: Beat cream cheese and sugar until smooth. Add eggs one at a time, then sour cream, vanilla, almond extract, and pistachio paste. Mix until just combined.
3️⃣ Bake the cheesecake: Pour filling over crust. Bake for 50–60 minutes until center is just set. Turn off oven, crack door, and let cool for 1 hour. Refrigerate at least 4 hours or overnight.
4️⃣ Prepare cherry topping: In a saucepan, combine cherries, sugar, and lemon juice. Cook until bubbly. Stir in cornstarch mixture and cook until thickened. Cool completely.
5️⃣ Assemble and garnish: Spoon cherry topping over chilled cheesecake. Sprinkle with lime zest and extra pistachios if desired. Slice and serve!
Notes
-
Use pistachio pudding mix for a shortcut pistachio flavor.
-
Cherry topping can be swapped for raspberry or blueberry.
-
Cheesecake freezes well—wrap tightly and store up to 1 month.
- Prep Time: 30 min
- Cook Time: 4 hrs includes chill time


