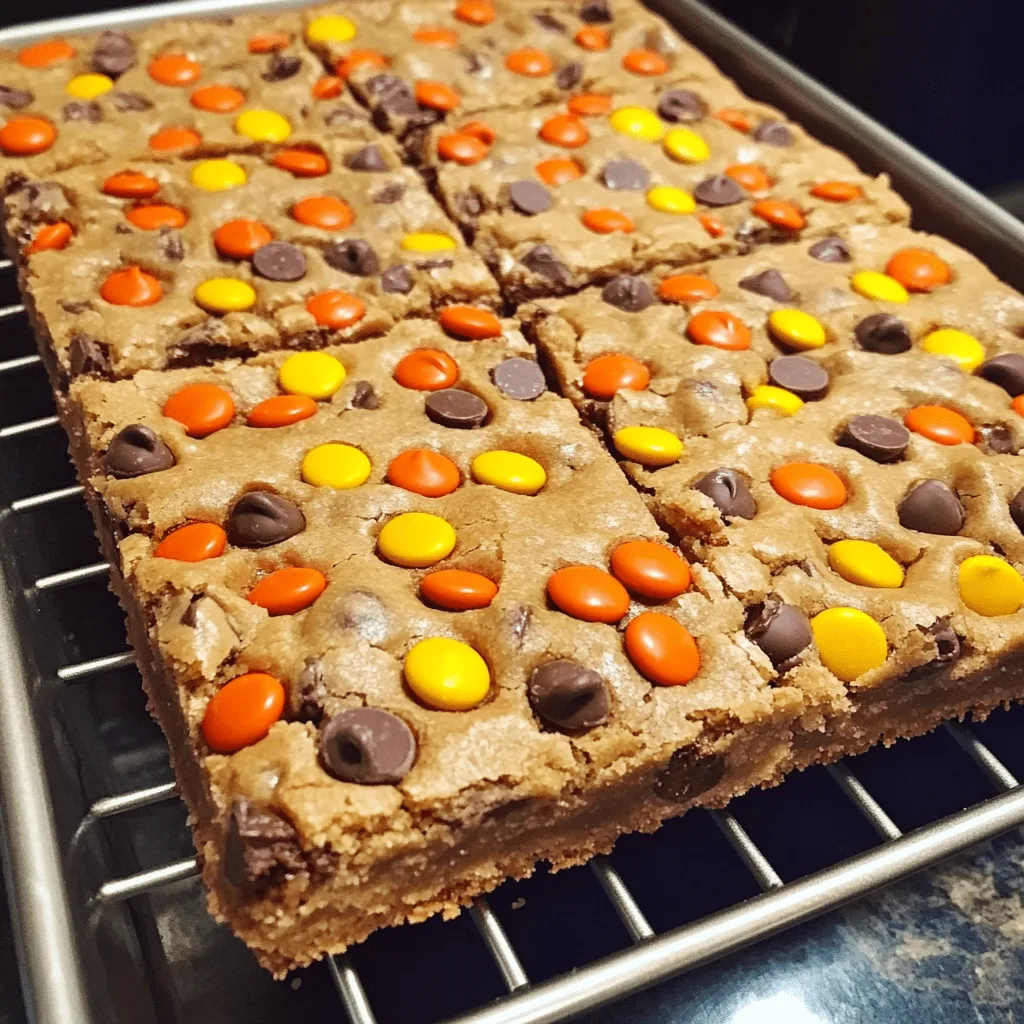
Looking for a quick, crowd-pleasing dessert that packs a punch of flavor? These Reece’s Pieces Chocolate Chip Cookie Bars offer a perfect blend of gooey chocolate, creamy peanut butter, and soft, chewy cookie texture. Made with a base of yellow cake mix, this recipe is a convenient way to create rich dessert bars with minimal effort, making it a favorite for busy bakers and snack lovers alike.
This recipe is perfect for family gatherings, parties, or anytime you need a sweet treat that’s easy to prepare but doesn’t compromise on taste. With only a few simple ingredients, you’ll have delicious cookie bars ready in less than an hour. The addition of Reece’s Pieces not only brings color and crunch but also enhances the dessert with a delightful peanut butter flavor.
For those interested in learning more about the types of cake mix commonly used in baking, check out Wikipedia’s overview of cake mix. The classic yellow cake mix creates a perfectly sweet foundation for these bars, while the chocolate chips add that essential gooeyness everyone loves in a cookie. Curious about the origins of chocolate chip cookies? Here’s an informative history from Wikipedia.
In short, this recipe’s simplicity and delicious result make it a must-try for anyone who loves chocolate and peanut butter treats.
Ingredients Overview
To make these Reece’s Pieces Chocolate Chip Cookie Bars, you’ll need only a handful of ingredients, each playing an essential role in creating the perfect dessert bar texture and flavor. Here’s a closer look at the ingredients and why they’re important:
- Yellow Cake Mix: This mix provides a convenient and delicious base that combines flour, sugar, and leavening agents for a soft and chewy texture. Using a yellow cake mix simplifies the recipe, saving time while delivering a consistent taste. For more on how cake mixes work, explore this resource on cake mix.
- Chocolate Chips: Adding chocolate chips introduces gooey sweetness, a key element of any good cookie bar. Whether you choose semi-sweet, dark, or milk chocolate, chocolate chips create pockets of melted chocolate throughout the bars, balancing the peanut butter flavor of the Reece’s Pieces. You can even experiment with different types of chocolate, like white chocolate, for a unique twist. Learn more about chocolate varieties here.
- Reece’s Pieces: These colorful peanut butter candies add crunch and a nutty sweetness that complements the chocolate chips. Sprinkling them on top ensures a burst of peanut butter flavor in every bite while also making the bars visually appealing. For another peanut butter treat idea, check out these Pinterest recipe ideas for kids’ desserts.
- Butter and Eggs: Melted butter helps bind the ingredients, creating a moist, tender bar. Eggs add structure, helping the bars rise slightly and hold together. Together, these ingredients create a rich, flavorful base that complements the sweetness of the chocolate and candies.
- Vanilla Extract: Just a teaspoon of vanilla extract enhances the overall flavor, adding warmth and depth to the bars. This classic ingredient is a must-have for many desserts. For a deep dive on vanilla, check out vanilla extract.
With just these few ingredients, you’re set to create an irresistible dessert that combines the best of peanut butter and chocolate flavors in every bite!

Ingredient Tips and Substitutions
For those looking to add a unique twist to these Reece’s Pieces Chocolate Chip Cookie Bars, there are several substitutions and variations you can try. Here are some popular ideas to suit different tastes and dietary preferences:
- Candy Swaps: If Reece’s Pieces aren’t available or if you’d like to mix things up, try using M&M’s, peanut butter chips, or even mini chocolate candies. Each alternative brings a different texture and flavor, making this recipe versatile for different occasions.
- Chocolate Chip Variations: Experiment with different types of chocolate chips, such as dark chocolate, milk chocolate, or even white chocolate. Each type offers a distinct level of sweetness and richness, allowing you to customize the bars to your preference.
- Gluten-Free Options: For a gluten-free version, simply substitute the yellow cake mix with a gluten-free cake mix. This swap makes the bars suitable for those with gluten sensitivities while retaining the delicious, chewy texture.
- Healthier Modifications: Consider using a sugar-free cake mix or reducing the chocolate chip amount by half for a lighter version. Adding nuts like walnuts or pecans can also boost the nutritional value, adding protein and healthy fats.
With these substitutions, you can tailor the recipe to your needs while still enjoying the classic combination of chocolate and peanut butter.
Step-by-Step Preparation Instructions
Now, let’s get into the step-by-step process of making these Reece’s Pieces Chocolate Chip Cookie Bars. This recipe is straightforward and easy to follow, so even beginners can achieve great results. Here’s how to bring this delicious dessert to life:
- Preheat the Oven: Start by preheating your oven to 350°F (175°C). Preheating is crucial for achieving even baking, helping your cookie bars bake evenly without undercooked or over-baked spots.
- Prepare Your Ingredients: In a large mixing bowl, combine the yellow cake mix, melted butter, vanilla extract, and eggs. These ingredients form the base of the bars, creating a rich, flavorful dough. For a smoother batter, melt the butter in advance and let it cool slightly before mixing it in.
- Mix the Batter: Use a spoon or spatula to mix the ingredients until just combined. Avoid over-mixing, as this can make the bars dense instead of tender. Mixing by hand is generally recommended for this type of recipe, as it helps control the consistency and prevents the dough from becoming too tough.
- Fold in the Chocolate Chips: Add in the chocolate chips and gently fold them into the dough. Be careful not to over-mix; a light fold ensures that the chips are evenly distributed without making the batter too dense. If you’re interested in other ways to use chocolate chips, check out this Pinterest board on dessert ideas.
- Prepare the Pan: Grease a 9×13-inch baking pan well with non-stick spray or a light coating of butter. Proper greasing prevents the bars from sticking, making them easier to cut and serve later. If you’re looking for more tips on baking and preparing pans, see Baking Tips for Beginners on Pinterest.
- Spread the Batter in the Pan: Pour the dough into the prepared baking pan. Use a spatula to spread it evenly, pressing it gently to ensure a smooth, level surface. This step helps the bars bake uniformly, giving them a consistent texture.
- Add Reece’s Pieces on Top: Finally, sprinkle the Reece’s Pieces on top of the batter. Placing them on top instead of mixing them in allows the candies to stay visible, adding a colorful and appetizing look to the bars.
- Bake the Bars: Place the pan in the preheated oven and bake for 20-25 minutes. You’ll know they’re done when the edges turn golden and a toothpick inserted into the center comes out clean. If your bars seem too soft, leave them in for an additional 2-3 minutes, but avoid over-baking, as this can make them dry.
Following these steps will help you create cookie bars with a perfect blend of flavors and textures. After baking, allow the bars to cool for at least 10 minutes before cutting to ensure they hold their shape.
Baking Instructions and Tips for Perfect Bars
Achieving the ideal texture and flavor in your Reece’s Pieces Chocolate Chip Cookie Bars largely depends on baking time and technique. Here are some essential tips to ensure your bars come out perfectly every time:
- Preheat and Maintain Oven Temperature: Always preheat your oven to 350°F (175°C) before baking. Consistent heat is essential for even baking, preventing undercooked centers and overly crisp edges.
- Bake Time: The recommended baking time for these bars is 20-25 minutes. Check the bars around the 20-minute mark; they should appear set, with the edges turning golden brown. Use a toothpick or a small knife inserted into the center to test for doneness. If it comes out clean or with only a few crumbs, your bars are ready.
- Avoid Over-Baking: Be cautious not to exceed the suggested bake time, as over-baking can make the bars dry and crumbly. If they appear slightly soft in the center, that’s fine—they will firm up as they cool.
- Cooling Time: Allow the bars to cool in the pan for 10-15 minutes before cutting. This brief resting period helps them set and makes it easier to cut clean, even slices.
Following these baking tips will help you achieve cookie bars with a moist, chewy texture and deliciously golden edges.

Presentation and Serving Suggestions
Presentation can elevate your Reece’s Pieces Chocolate Chip Cookie Bars, making them as visually appealing as they are delicious. Here are a few serving ideas to make these bars even more enticing:
- Cutting into Even Bars: For a neat presentation, use a sharp knife to slice the bars into uniform squares or rectangles once they’ve cooled. To prevent sticking, wipe the knife with a damp cloth between cuts.
- Adding a Finishing Touch: If you’d like to make your bars look extra special, consider a light drizzle of melted chocolate or caramel over the top. This adds a touch of elegance and complements the flavors of the chocolate chips and Reece’s Pieces.
- Serving with Ice Cream: For an indulgent treat, serve a warm bar with a scoop of vanilla or chocolate ice cream on top. The combination of warm, gooey cookie bar and cold, creamy ice cream is irresistible!
- Whipped Cream or Fresh Berries: Add a dollop of whipped cream or a sprinkle of fresh berries for a hint of freshness. This balances the sweetness and creates a visually appealing contrast.
With these presentation tips, your cookie bars will be the star of any dessert table, perfect for impressing guests or treating yourself to a special snack.
Recipe Variations and Add-Ons
One of the best things about this Reece’s Pieces Chocolate Chip Cookie Bars recipe is its versatility. You can easily customize it to suit different flavor preferences or dietary needs. Here are some fun variations and add-ons to try:
- Add Nuts for Extra Crunch: Chopped nuts like walnuts, pecans, or almonds bring an added layer of texture and flavor. Nuts complement the rich chocolate and peanut butter flavors, making each bite more satisfying. Just fold about 1/2 cup of nuts into the batter before spreading it in the pan.
- Sprinkle with Sea Salt: For a sweet-salty twist, sprinkle a pinch of coarse sea salt on top of the bars right after baking. This addition enhances the sweetness and brings out the flavors of chocolate and peanut butter.
- Holiday-Themed Variations: Add festive touches by incorporating colored sprinkles on top. For example, red and green sprinkles for Christmas, or pastel colors for Easter, create a fun, seasonal look that makes these bars perfect for holiday gatherings.
- Use Other Candy Mix-Ins: Try swapping Reece’s Pieces with different candies, like mini M&M’s or peanut butter chips, for a new flavor profile. Each variation provides a slightly different experience while maintaining the chewy, gooey goodness.
These easy variations allow you to adapt the recipe to different occasions and tastes.
Troubleshooting Common Issues
Making Reece’s Pieces Chocolate Chip Cookie Bars is generally straightforward, but a few common issues can affect the final result. Here are solutions to ensure your bars turn out perfectly every time:
- Bars Are Too Dry: If your bars come out dry or crumbly, it could be due to over-baking or not using enough butter. Make sure to check the bars at the 20-minute mark to prevent over-baking. Also, measure ingredients carefully, as a slight reduction in butter can impact the moisture level.
- Crumbly Texture: Over-mixing the batter can lead to a crumbly texture in baked goods. To prevent this, mix until ingredients are just combined, and gently fold in the chocolate chips. This technique keeps the batter from becoming too tough.
- Candies Sinking to the Bottom: To prevent Reece’s Pieces from sinking, add them on top of the batter rather than mixing them in. This ensures they remain visible and evenly distributed, giving the bars an appealing look.
- Uneven Baking: If you notice that some areas are over-baked while others are undercooked, it might be due to uneven spreading of the batter. Use a spatula to spread the batter evenly in the pan before baking.
With these troubleshooting tips, you’ll be able to enjoy perfectly baked cookie bars every time.
Healthier Alternatives and Modifications
For those looking to make Reece’s Pieces Chocolate Chip Cookie Bars a bit lighter, here are some simple adjustments:
- Reduce Chocolate and Candy Amounts: Use half the amount of chocolate chips or Reece’s Pieces to cut down on sugar and calories without sacrificing too much flavor.
- Choose Dark Chocolate: Replacing semi-sweet chocolate chips with dark chocolate chips offers a richer taste and lower sugar content.
- Use a Low-Sugar Cake Mix: Opting for a low-sugar or sugar-free yellow cake mix can make this recipe more diabetic-friendly while maintaining the same delicious texture.
These small changes allow for a slightly healthier version of this indulgent treat!

FAQs
To help you make the most of your Reece’s Pieces Chocolate Chip Cookie Bars recipe, here are answers to some commonly asked questions:
1. Can I use other types of cake mix?
Yes, you can use different flavors of cake mix for variety. Chocolate cake mix adds a richer, more chocolatey base, while white or funfetti cake mix brings a lighter, sweeter flavor. Each cake mix will alter the taste slightly, so choose one that suits your preference.
2. What’s the best way to store leftover bars?
Store leftover bars in an airtight container at room temperature for up to three days to keep them soft and fresh. For longer storage, you can freeze them by wrapping each bar individually in plastic wrap and placing them in a freezer-safe container. They’ll last in the freezer for up to three months—perfect for make-ahead treats!
3. How do I prevent the bars from sticking to the pan?
Greasing the pan thoroughly with non-stick spray or butter will help prevent sticking. If you want extra assurance, line the bottom of the pan with parchment paper before adding the batter. This will make removing the bars easier and prevent crumbs from sticking.
4. Can I make this recipe dairy-free or gluten-free?
Yes, you can! Use a dairy-free butter substitute and dairy-free chocolate chips for a dairy-free version. For a gluten-free version, simply replace the yellow cake mix with a gluten-free cake mix. Both adjustments will allow you to enjoy the same delicious treat while accommodating dietary needs.
5. Why did my bars turn out too soft or too hard?
If the bars are too soft, they may be under-baked. Try leaving them in the oven for an extra 2-3 minutes. If they’re too hard, they might be over-baked, or the batter was over-mixed, making them dense. Be sure to check for doneness at the 20-minute mark and mix only until ingredients are combined.
These FAQs cover common concerns, ensuring your cookie bars turn out perfectly every time!
Print
Reece’s Pieces Chocolate Chip Cookie Bars
- Author: Kouider Walid Bentahar
Description
These Reece’s Pieces Chocolate Chip Cookie Bars are a deliciously chewy, chocolatey, and peanut buttery treat that’s incredibly easy to make. Using a yellow cake mix as a base, these bars come together quickly with just a few ingredients, making them perfect for busy days or last-minute desserts.
Ingredients
1 box yellow cake mix
1 stick melted butter
1 Tsp vanilla
2 eggs
2 Cups chocolate chips
1 small box Reece’s Pieces
Instructions
Notes
- Customization Options: Feel free to experiment with different candies, nuts, or chocolate types for a unique twist. Using dark chocolate chips or white chocolate can add a different flavor profile, while adding nuts like walnuts or pecans can add extra crunch and protein.
- Baking Tip: To avoid over-baking, keep a close eye on the bars starting at the 20-minute mark. The edges should be golden, and the center should be set but still soft. Allowing them to cool fully in the pan helps the bars firm up without becoming too dry.
- Storage: These bars keep well at room temperature in an airtight container for up to three days. For longer storage, freeze individually wrapped bars for a convenient treat that stays fresh up to three months.
- Serving Ideas: Serve warm with a scoop of vanilla ice cream, or drizzle with melted chocolate for an extra indulgent dessert. These bars are also great for gift-giving; package them in a decorative box for a homemade treat that friends and family will love!


