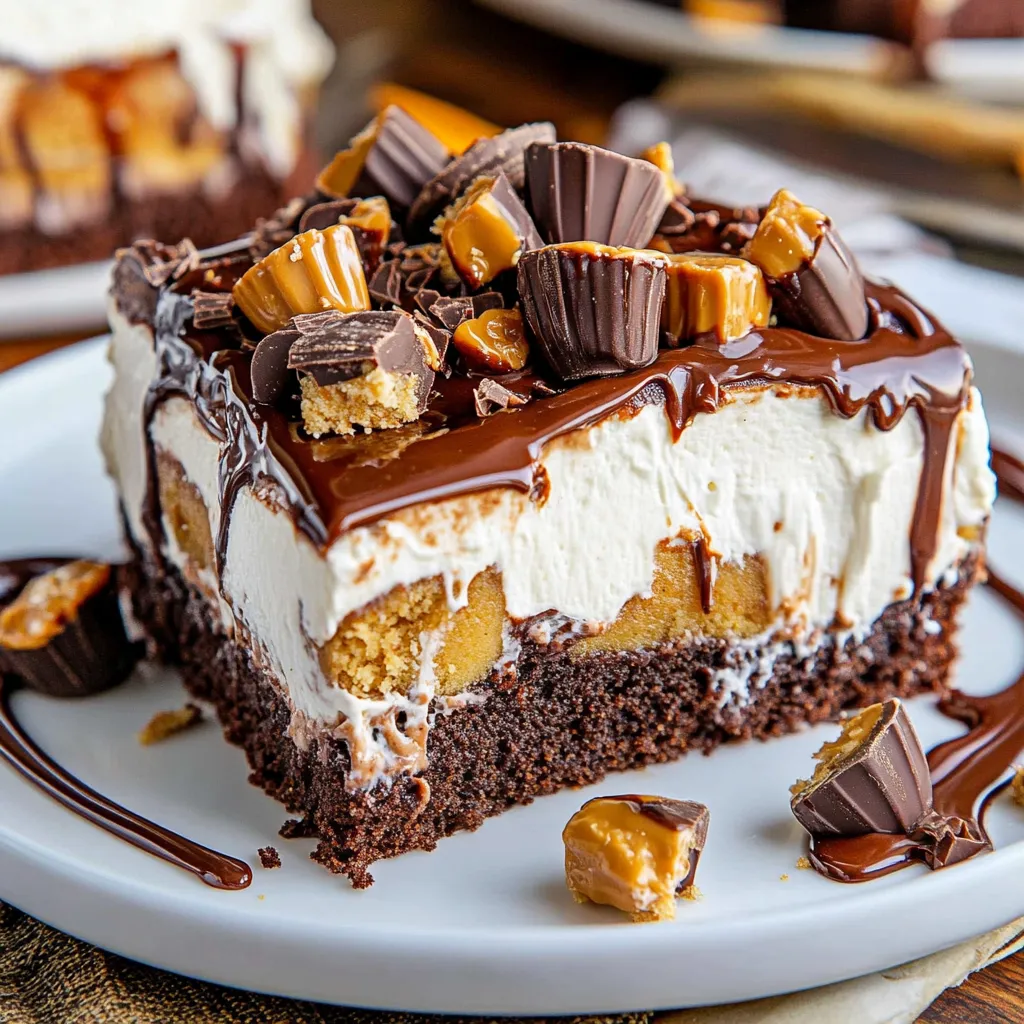
If you love the combination of chocolate and peanut butter, then this Reese’s Peanut Butter Poke Cake Recipe You Must Try is going to be your new favorite dessert. With layers of moist chocolate cake, creamy peanut butter filling, and a fluffy whipped topping, this cake is pure indulgence in every bite. Plus, it’s incredibly easy to make and perfect for any occasion—whether you’re hosting a party, celebrating a birthday, or just want to treat yourself.
This poke cake takes the classic flavor combo of Reese’s peanut butter cups and transforms it into a rich, moist cake that’s both impressive and effortless. The secret is in the poke method, which allows the creamy peanut butter filling to seep into the cake, making every slice decadently moist and flavorful.
WHY YOU’LL LOVE THIS REESE’S PEANUT BUTTER POKE CAKE
There’s a lot to love about this recipe:
- Easy to prepare with simple ingredients.
- Loaded with chocolate and peanut butter flavor.
- Perfect make-ahead dessert for parties or gatherings.
- Moist, rich, and completely irresistible.
- Decorated with peanut butter chips and Reese’s cups for extra indulgence.
INGREDIENTS YOU’LL NEED
Here’s everything you need to make this show-stopping poke cake:
- 1 box chocolate cake mix (plus ingredients listed on the box)
- 1 can (14 oz) sweetened condensed milk
- ½ cup creamy peanut butter
- 1 container (8 oz) whipped topping (Cool Whip)
- ½ cup peanut butter chips
- ½ cup mini Reese’s peanut butter cups, chopped
- Chocolate syrup (optional, for drizzling)
HELPFUL TIPS BEFORE YOU START
- Use a good quality chocolate cake mix for the best flavor.
- Make sure the cake is slightly warm before poking holes for easier filling absorption.
- Use creamy peanut butter for a smooth filling mixture.
- Chill the cake well before serving to allow the flavors to meld perfectly.
LET’S GET STARTED: THE FIRST STEPS
STEP 1: BAKE THE CAKE
Prepare the chocolate cake mix according to the package instructions. Pour the batter into a greased 9×13-inch baking dish and bake as directed. Once done, remove from the oven and let it cool slightly, but not completely.
STEP 2: POKE THE CAKE
While the cake is still warm, use the handle of a wooden spoon to poke holes evenly across the entire surface of the cake. Make sure the holes go deep to allow the filling to soak through every layer.

STEP 3: MIX FILLING
In a small mixing bowl, combine the sweetened condensed milk and creamy peanut butter. Stir until the mixture is completely smooth and well combined.

STEP 4: POUR FILLING
Slowly pour the peanut butter filling over the entire cake, allowing it to seep into the holes. Use a spatula to gently spread the mixture evenly across the surface, ensuring it fills all the holes completely.

HOW TO CHILL, TOP, AND DECORATE YOUR REESE’S PEANUT BUTTER POKE CAKE
Now that the filling has soaked into the cake, it’s time to add the finishing touches that take this dessert from delicious to completely irresistible. Chilling allows the flavors to meld, while the toppings add texture, richness, and that perfect Reese’s-inspired look.
THE SECRET TO AN EXTRA-DECADENT POKE CAKE
Letting the cake chill fully before adding the topping helps the filling set and allows the cake to become incredibly moist without being soggy. The creamy whipped topping, combined with the peanut butter chips and mini Reese’s, gives each slice a beautiful presentation and a delicious contrast of textures.
LET’S CONTINUE: CHILLING, TOPPING, AND DECORATING THE CAKE
STEP 5: CHILL
Place the filled cake in the refrigerator and chill for at least 1 hour. This allows the peanut butter filling to fully soak into the cake and set properly, making the texture extra rich and moist.
STEP 6: ADD TOPPING
Once the cake has chilled, remove it from the refrigerator. Spread the whipped topping (Cool Whip) evenly over the entire surface of the cake, covering it completely.
STEP 7: DECORATE
Sprinkle the peanut butter chips evenly across the top of the whipped topping. Next, scatter the chopped mini Reese’s peanut butter cups over the surface. For an extra layer of decadence, drizzle chocolate syrup over the top if desired.
STEP 8: SERVE
Once decorated, the cake is ready to serve. Slice into generous portions and enjoy the rich combination of chocolate and peanut butter in every bite. This cake can be served chilled or at room temperature depending on your preference.
EXPERT TIPS FOR THE BEST REESE’S PEANUT BUTTER POKE CAKE
- Chill longer for best results: If you have time, chill the cake overnight to fully enhance the flavor and texture.
- Use a sharp knife for clean slices: This helps keep the layers intact when serving.
- Customize the toppings: Try adding chopped peanuts or drizzle caramel sauce for even more variety.
- Keep refrigerated until serving: The whipped topping holds its shape better when kept cold.
- Use mini Reese’s cups for easy chopping: They’re easier to cut and distribute evenly across the top.
SERVING SUGGESTIONS
This Reese’s Peanut Butter Poke Cake is perfect for potlucks, birthday parties, holidays, or anytime you want a crowd-pleasing dessert. Pair it with a glass of cold milk or a cup of coffee for the ultimate indulgent treat.

FREQUENTLY ASKED QUESTIONS ABOUT REESE’S PEANUT BUTTER POKE CAKE
Here are answers to some common questions to help you make this delicious poke cake perfectly every time.
1. Can I make this cake in advance?
Yes! This cake is actually better when made ahead. Preparing it a day in advance allows the filling to fully soak into the cake, making it even more moist and flavorful.
2. Do I have to use Cool Whip, or can I use homemade whipped cream?
You can use either. Cool Whip holds its shape well for longer periods, which makes it a convenient choice for make-ahead desserts. Homemade whipped cream works just as well if you plan to serve the cake soon after decorating.
3. Can I use a homemade chocolate cake instead of boxed mix?
Absolutely. If you have a favorite homemade chocolate cake recipe, feel free to use it. Just bake it in a 9×13-inch pan and follow the same steps for poking and filling.
4. How should I store leftovers?
Store any leftover cake covered in the refrigerator for up to 4-5 days. The cake will remain moist and delicious during this time.
5. Can I freeze this cake?
Yes, you can freeze the cake before adding the whipped topping and decorations. Once thawed, add the toppings before serving for the best texture and appearance.
6. What other toppings can I use?
You can add chopped peanuts, caramel drizzle, or even crushed pretzels for a salty-sweet twist. Feel free to get creative based on your preferences.
7. How deep should I poke the holes?
Poke the holes about halfway to two-thirds of the way through the cake. This allows the peanut butter filling to soak in nicely without making the cake too soggy.
CONCLUSION: A DECADENT DESSERT EVERYONE WILL LOVE
This Reese’s Peanut Butter Poke Cake Recipe You Must Try combines everything you love about chocolate and peanut butter into one irresistibly moist and rich dessert. With simple ingredients and easy steps, you can create a cake that’s perfect for any celebration or casual get-together.
I hope you give this recipe a try and enjoy how simple and delicious it is. Whether you serve it for a special occasion or just because, this poke cake is sure to be a crowd favorite that everyone will request again and again.
Print
Reese’s Peanut Butter Poke Cake Recipe You Must Try
- Total Time: 1 hr 50 min
Description
This Reese’s Peanut Butter Poke Cake is rich, decadent, and absolutely irresistible! Moist chocolate cake is filled with creamy peanut butter, topped with fluffy frosting, and loaded with chopped Reese’s — a true dessert lover’s dream!
Ingredients
For the cake:
-
1 box chocolate cake mix (plus ingredients listed on the box)
-
1 (14 oz) can sweetened condensed milk
-
¾ cup creamy peanut butter
For the topping:
-
1 (8 oz) container whipped topping (Cool Whip), thawed
-
½ cup creamy peanut butter
-
½ cup powdered sugar
-
2 tbsp milk (more if needed for consistency)
-
½ cup hot fudge sauce (for drizzling)
-
1 cup chopped Reese’s Peanut Butter Cups
-
¼ cup mini chocolate chips (optional)
Instructions
1️⃣ Bake the cake:
Prepare and bake the chocolate cake according to package instructions in a 9×13-inch baking dish. Allow to cool for about 10 minutes.
2️⃣ Poke the cake:
Using the handle of a wooden spoon, poke holes all over the surface of the warm cake.
3️⃣ Fill the cake:
In a small bowl, microwave the peanut butter for 20-30 seconds until pourable. Stir in the sweetened condensed milk until smooth. Slowly pour the mixture evenly over the entire cake, allowing it to seep into the holes. Refrigerate for at least 1 hour to set.
4️⃣ Make the frosting:
In a medium bowl, whisk together whipped topping, peanut butter, powdered sugar, and milk until smooth and fluffy.
5️⃣ Frost the cake:
Spread the frosting evenly over the chilled cake.
6️⃣ Add toppings:
Drizzle hot fudge sauce over the frosting. Sprinkle chopped Reese’s and mini chocolate chips on top.
7️⃣ Chill and serve:
Refrigerate for at least 30 minutes before serving to allow everything to set.
Notes
-
You can use homemade chocolate cake if preferred.
-
For extra peanut butter flavor, swirl some peanut butter into the cake batter before baking.
-
Store leftovers covered in the fridge for up to 4 days.
- Prep Time: 20 min
- Cook Time: 1 hr 30 min


