

Rice Krispie Treat Pumpkins are a delightful twist on the classic Rice Krispie treat, transforming a simple dessert into a festive and fun creation perfect for the fall season. These cute, bite-sized pumpkins are not only delicious but also incredibly easy to make, making them a popular choice for Halloween parties, fall-themed gatherings, and cozy family get-togethers.
The appeal of Rice Krispie Treat Pumpkins lies in their simplicity and versatility. With just a handful of ingredients—marshmallows, butter, Rice Krispies cereal, food coloring, and a few candies—you can create a treat that is both visually stunning and irresistibly tasty. The process of making these pumpkins is straightforward, requiring no baking and minimal prep time, making it an ideal activity to involve kids in. Children love getting hands-on in the kitchen, and shaping these pumpkins offers a fun and creative way to spend time together.
Whether you’re looking to add a festive touch to your dessert table or seeking a quick and easy treat to share with friends and family, Rice Krispie Treat Pumpkins are sure to be a hit. Their charming appearance and sweet, crunchy texture make them a standout treat that will bring joy to any occasion.
Why Rice Krispie Treats Are Popular
Rice Krispie treats have been a beloved dessert since their creation by Kellogg’s in 1939. Originally invented as a way to promote the Rice Krispies cereal, these treats quickly became a household favorite due to their simple ingredients and easy preparation. The combination of crispy rice cereal, melted marshmallows, and butter creates a sweet, chewy, and crunchy treat that appeals to both children and adults.
One of the key reasons for their enduring popularity is their incredible versatility. Rice Krispie treats can be molded into various shapes and customized with different colors, flavors, and decorations, making them perfect for any occasion. From holiday-themed treats like Rice Krispie pumpkins and Christmas trees to birthday party shapes and everyday snacks, the possibilities are endless. This adaptability, coupled with their nostalgic appeal and delicious taste, has ensured that Rice Krispie treats remain a favorite in kitchens across the world.
Gathering Your Ingredients and Tools
Before you begin making Rice Krispie Treat Pumpkins, it’s essential to gather all your ingredients and tools to ensure a smooth and enjoyable cooking experience. Here’s what you’ll need:
Ingredients:
- 1/4 cup butter: Provides the rich, buttery base for the treats.
- 1 bag large marshmallows (approximately 40): The key ingredient that binds the Rice Krispies together.
- 6 cups Rice Krispies: The main component that gives the treats their signature crunch.
- Red & Yellow Liquid Food Coloring: To create the perfect pumpkin orange.
- Mini Rolos: Used to form the pumpkin stem.
- Green M&M’s: Represents the pumpkin leaf.
- 1/4 cup cooking oil or melted butter: Keeps the mixture from sticking to your hands while shaping the pumpkins.
Tools:
- Large pot: For melting butter and marshmallows together.
- Wooden spoon: To stir the ingredients without sticking.
- Parchment paper: Keeps the pumpkins from sticking as they cool.
- Small bowl for oil/butter: For easy access when coating your hands.
Step-by-Step Instructions
Step 1: Melting the Butter and Marshmallows
Begin by placing a large pot on the stove over low heat. Add the 1/4 cup of butter to the pot and let it slowly melt. Stir occasionally to prevent burning. Once the butter is fully melted, add the entire bag of large marshmallows (approximately 40). Continue stirring the marshmallows constantly as they melt, ensuring they blend smoothly with the butter. The mixture should be creamy and free of lumps. Keep the heat low to avoid scorching the marshmallows, as this can affect the texture and flavor of your Rice Krispie treats. Once the marshmallows have completely melted and are fully combined with the butter, remove the pot from the heat. This melted mixture will serve as the base for your Rice Krispie pumpkins.
Step 2: Coloring the Mixture
To achieve the perfect pumpkin color, you’ll need to add food coloring to the melted marshmallow mixture. Start by adding several drops of yellow food coloring to the mixture. Stir well to ensure the color is evenly distributed. The yellow will form the base color of your pumpkins. Once you have a bright yellow base, begin adding red food coloring one drop at a time. Stir thoroughly after each drop to see how the color develops. The goal is to create a vibrant orange hue that resembles a real pumpkin.
Typically, you’ll need about 12 drops of yellow food coloring and around 4 drops of red, but this can vary depending on the brand of food coloring and the intensity you desire. If the color isn’t as vivid as you’d like, continue adding red and yellow in small increments, stirring well each time, until you achieve the desired shade of orange. Be careful not to add too much red too quickly, as it can overpower the yellow and result in a reddish color rather than the bright orange you’re aiming for.
Step 3: Mixing in the Rice Krispies
Once you’ve achieved the perfect pumpkin color, it’s time to incorporate the Rice Krispies. Gradually add the 6 cups of Rice Krispies cereal to the pot, stirring constantly to ensure they are evenly coated with the colored marshmallow mixture. It’s important to mix thoroughly, so every piece of cereal is covered and the color is consistent throughout. This step should be done relatively quickly, as the mixture will start to cool and become harder to stir. Make sure to scrape the sides and bottom of the pot to get every bit of the marshmallow mixture into the cereal. The goal is to create a cohesive, sticky mass that can be easily shaped into balls for your pumpkins.
Step 4: Shaping the Pumpkins
Shaping the Rice Krispie mixture into pumpkins can be a bit sticky, but with the right technique, it’s easy and fun. Start by coating both sides of your hands generously with cooking oil or melted butter. This will prevent the sticky mixture from adhering to your hands as you work. Take a small handful of the mixture and roll it gently between your palms to form a ball. The size of the ball can vary depending on your preference, but a golf ball-sized shape usually works well for creating small, bite-sized pumpkins.
If the mixture begins to stick to your hands, reapply the oil or butter as needed. Continue shaping the balls until you’ve used up all the Rice Krispie mixture. Be sure to work quickly, as the mixture is easier to shape while it’s still warm. If you want to create pumpkins of varying sizes, simply adjust the amount of mixture you use for each ball.
Once all the balls are shaped, place them on a sheet of parchment paper to cool slightly. The parchment paper will prevent the pumpkins from sticking as they firm up. If any of the pumpkins lose their shape, you can gently press and reshape them while they are still warm and pliable.
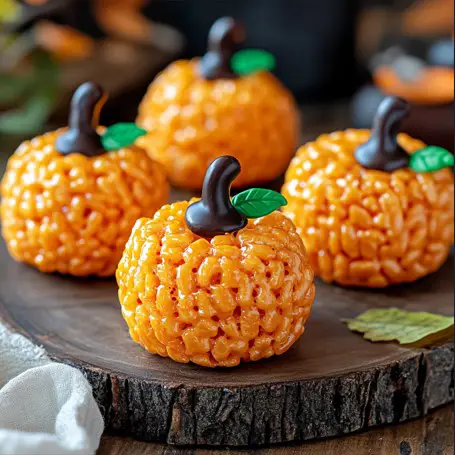
Step 5: Adding the Stem and Leaf
Now that your pumpkins are shaped, it’s time to add the finishing touches. While the Rice Krispie pumpkins are still warm and slightly pliable, press a Mini Rolo candy into the top of each ball. This will act as the pumpkin’s stem. Be sure to press gently but firmly so that the Rolo stays in place as the pumpkin cools. Next, take a green M&M and place it beside the Rolo to represent the pumpkin’s leaf.
If the pumpkins have cooled too much and are no longer soft enough to easily press the candies in, you can use the end of a thick marker or an apple corer to make a small indent in the top of the pumpkin. Then, place the Rolo and M&M in the indent. This will help them stay securely in place.
These simple decorations not only make the pumpkins look more realistic but also add a delicious chocolatey element to the treat. Once all the stems and leaves are in place, allow the pumpkins to cool completely.
Step 6: Cooling and Setting
After you’ve shaped and decorated your Rice Krispie pumpkins, it’s important to let them cool completely so they can firm up. Allow the pumpkins to rest on the parchment paper at room temperature for at least 30 minutes. This cooling period helps the marshmallow mixture set, ensuring the pumpkins hold their shape when handled.
If you’re in a hurry, you can speed up the cooling process by placing the pumpkins in the refrigerator for about 10-15 minutes. However, avoid leaving them in the fridge for too long, as this can make them too firm and less enjoyable to eat.
Once the pumpkins are fully cooled and set, they are ready to serve. You can store them in an airtight container at room temperature for up to two days, making them a convenient make-ahead treat for parties and gatherings.
Tips for Perfect Rice Krispie Treat Pumpkins
Creating perfect Rice Krispie Treat Pumpkins is all about managing the little details. Here are some tips to ensure your pumpkins turn out just right:
1. Preventing Sticking:
The Rice Krispie mixture can be quite sticky, especially when warm. To prevent it from sticking to your hands, generously coat your hands with cooking oil or melted butter before you start shaping the pumpkins. Keep a small bowl of oil or butter nearby, so you can reapply as needed while working. You can also use a non-stick cooking spray if you prefer. Additionally, working on parchment paper will help keep the pumpkins from sticking to your work surface.
2. Adjusting Color Intensity:
Achieving the perfect pumpkin color requires a careful balance of red and yellow food coloring. If your mixture turns out too pale, add more yellow food coloring to brighten it. If it’s too yellow, add a drop or two more of red. Always add the food coloring gradually, stirring well between each addition to avoid overpowering the color. Remember, it’s easier to add more color than to correct if you’ve added too much.
3. Making Larger or Smaller Pumpkins:
The size of your Rice Krispie pumpkins can be easily adjusted depending on your needs. For larger pumpkins, take a bigger handful of the mixture and roll it into a ball, but remember that larger pumpkins may take longer to cool and set. For smaller, bite-sized pumpkins, use less of the mixture per ball. This is especially useful if you want to create a variety of sizes for a more dynamic presentation. Adjusting the size also allows you to control portion sizes based on your audience or event.
Creative Variations
Rice Krispie Treat Pumpkins are a great base for creativity, allowing you to personalize them with fun and unique touches. Here are a few creative variations to try:
1. Adding Candy Eyes for “Jack-o’-Lanterns”:
Transform your pumpkins into spooky Jack-o’-Lanterns by adding candy eyes. Simply press candy eyeballs into the Rice Krispie balls before they cool completely. For an extra touch, use black gel icing to draw on mouths or other facial features, creating a playful Halloween-themed treat.
2. Using Different Colored M&Ms:
Instead of the traditional green M&M for the pumpkin leaf, mix things up with different colors. Try using brown for a more autumnal look, or go wild with vibrant colors like purple or blue for a whimsical twist. You can even use multiple M&Ms to create multicolored leaves.
3. Incorporating Different Flavorings or Cereals:
Give your Rice Krispie pumpkins a flavor boost by adding a few drops of vanilla or pumpkin spice extract to the marshmallow mixture. Alternatively, try using Cocoa Krispies or another flavored cereal for a unique taste and appearance. These small changes can add a fun, unexpected twist to the traditional recipe.
Storing and Serving Suggestions
To keep your Rice Krispie Treat Pumpkins fresh and delicious, proper storage is essential. After the pumpkins have fully cooled and set, place them in an airtight container. If you’re stacking them, separate layers with parchment or wax paper to prevent sticking. Store the container at room temperature; these treats are best kept away from direct sunlight and heat to avoid melting or softening.
Rice Krispie Treat Pumpkins will stay fresh for about 2-3 days when stored properly. However, for the best texture and flavor, it’s recommended to enjoy them within the first 24-48 hours. If you need to store them longer, you can refrigerate them, but this may cause them to become slightly harder, so allow them to sit at room temperature for a few minutes before serving.
When serving, present them on a festive platter for a seasonal touch. They make a great addition to any dessert table, especially for Halloween or fall-themed gatherings.
Frequently Asked Questions (FAQs)
Q: Can I use regular marshmallows instead of large ones?
A: Yes, you can use regular-sized marshmallows instead of large ones, but you may need to adjust the quantity to achieve the same consistency in your Rice Krispie Treat Pumpkins. Typically, a bag of large marshmallows contains about 10 ounces, which equates to around 4 cups of regular-sized marshmallows. If you’re using mini marshmallows, you’ll need approximately 6 cups to match the quantity of large marshmallows. The key is to ensure that the marshmallows are fully melted and smoothly combined with the butter before adding the Rice Krispies.
Q: How do I prevent the mixture from sticking to my hands?
A: The Rice Krispie mixture can be quite sticky, especially when warm, but you can easily prevent it from sticking to your hands by generously coating them with cooking oil or melted butter. Keep a small bowl of oil or butter nearby so you can reapply as needed while shaping the pumpkins. You can also use non-stick cooking spray as an alternative. Another tip is to work quickly while the mixture is still warm, as it becomes more manageable and less sticky as it cools.
Q: Can I make these treats ahead of time?
A: Yes, Rice Krispie Treat Pumpkins can be made a day in advance, which makes them a convenient option for party prep. After shaping and decorating your pumpkins, allow them to cool and set completely before storing them in an airtight container. Keep them at room temperature, away from heat sources, to maintain their freshness. If stored properly, they should remain delicious and crispy for up to 2-3 days. However, for the best taste and texture, it’s recommended to enjoy them within the first 24-48 hours.
Q: What other decorations can I use?
A: In addition to Mini Rolos and green M&Ms, there are many creative ways to decorate your Rice Krispie Treat Pumpkins. For a spooky twist, add candy eyes to create Jack-o’-Lantern faces, or use black gel icing to draw on facial features. You can also experiment with different colored M&Ms to match your party theme, or sprinkle edible glitter for a touch of sparkle. Other fun options include using small candy corn pieces, pretzel sticks for stems, or even piping frosting leaves. These variations allow you to personalize the treats and add extra flair to your festive creations.
Print
Rice Krispie Treat Pumpkins
Description
Rice Krispie Treat Pumpkins are a fun, festive, and easy-to-make treat that’s perfect for Halloween, fall parties, and family gatherings. These no-bake delights are made by combining crispy rice cereal with gooey marshmallows and butter, then shaping the mixture into adorable pumpkin shapes. With the addition of orange food coloring, Mini Rolos for stems, and green M&Ms for leaves, these treats are not only delicious but also visually appealing. Kids and adults alike will enjoy crafting and eating these delightful autumn-themed snacks.
Ingredients
- 1/4 cup butter
- 1 bag large marshmallows approximately 40 marshmallows
- 6 cups Rice Krispies
- Red & Yellow Liquid Food Coloring
- Mini Rolos
- Green M&M’s
- 1/4 cup cooking oil or melted butter in a small bowl to keep it from sticking to your hands
Instructions
-
In a large pot, melt the butter over low heat.
-
Add the marshmallows and stir until completely melted and combined with the butter.
-
Remove from the heat. Add several drops of yellow food colouring, mix it together, then add red food colouring one drop at a time, mixing as you go. Add red/yellow drops until you reach your desired colour. (I used about 4 drops red and 12 drops yellow). Mix well.
-
Add the Rice Krispies and stir to combine.
-
Coat both sides of your hands with a generous amount of cooking oil or butter, and roll the Rice Krispie mixture into small balls. Set on parchment paper. Add oil/butter to your hands after each ball.
-
While the balls are still warm, gently press a Mini Rolo into the top of each pumpkin for the stem and add a green M&M beside it as the leaf. (Tip: If the pumpkins cool before you’re finished, use the end of a thick marker or apple corer to make a small indent in the top for the chocolate to sit in.)
-
Allow to cool until firm.
Notes
This recipe is very flexible and can be easily adapted to suit your preferences. Feel free to adjust the food coloring to achieve the perfect shade of orange or experiment with different decorations to customize your pumpkins. The key to success is working quickly while the mixture is warm to ensure easy shaping and even distribution of the ingredients. If you’re making these treats ahead of time, be sure to store them in an airtight container to maintain their freshness. These Rice Krispie Treat Pumpkins are sure to be a hit, whether as a party snack or a fun family activity.


