There’s something magical about cotton candy. Maybe it’s the childhood memories of county fairs, amusement parks, or carnivals—or maybe it’s just that soft, sweet melt-in-your-mouth texture that feels like pure nostalgia. If you’re looking to bring that same whimsical joy into your kitchen, this Cotton Candy Cake is exactly what you need. It’s light, fluffy, colorful, and full of that classic spun-sugar flavor that makes every bite feel like a treat.
This cake is a showstopper for birthdays, baby showers, or any celebration where you want a dessert that’s as fun as it is delicious. What makes it stand out is the unique addition of real cotton candy in both the cake batter and the buttercream frosting. The result is a subtle sweetness and delicate texture that takes this cake to a whole new level. Plus, it’s incredibly pretty—with pastel colors and a topping of fluffy cotton candy, it looks just as good as it tastes.
Ready to whip up a cake that’s straight out of a dream? Let’s get started with everything you’ll need.
Ingredients You’ll Need:
For the Cake:
- 2 ½ cups all-purpose flour
- 2 ½ teaspoons baking powder
- ½ teaspoon salt
- 1 cup unsalted butter, softened
- 1 ½ cups granulated sugar
- 4 large eggs
- 1 teaspoon vanilla extract
- 1 cup whole milk
- ½ cup cotton candy, chopped into small pieces
For the Cotton Candy Buttercream:
- 1 cup unsalted butter, softened
- 4 cups powdered sugar
- 2 tablespoons heavy cream
- 1 teaspoon vanilla extract
- ½ cup cotton candy, chopped into small pieces
- Pink food coloring (optional)
For the Decoration:
- Cotton candy (for topping)
- Sprinkles (optional)
Step-by-Step Instructions:
Step 1: Preheat and Prep Your Cake Pans
Start by preheating your oven to 350°F (175°C). This ensures your oven is hot and ready by the time your batter is mixed. Next, grease and flour two 9-inch round cake pans. You can also line the bottoms with parchment paper to help the cakes release easily after baking.

Step 2: Mix the Dry Ingredients
In a medium mixing bowl, whisk together the all-purpose flour, baking powder, and salt. This dry mix is the base of your fluffy cake. Make sure the ingredients are well combined to avoid uneven rising later on.

Step 3: Cream the Butter and Sugar
In a large bowl, beat the softened butter and granulated sugar together until the mixture is light and fluffy. This should take about 3 to 4 minutes using a hand mixer or stand mixer. The creaming process is essential for creating a soft, airy texture in your cake.

Step 4: Add the Eggs and Vanilla
Once your butter and sugar are perfectly creamed, add the eggs one at a time. Beat well after each addition to fully incorporate them into the mixture. Stir in the vanilla extract for that sweet, aromatic base flavor that enhances the cotton candy.

Step 5: Combine Wet and Dry Ingredients
With your wet and dry mixtures ready, it’s time to bring them together. Gradually add the dry ingredients to the butter mixture, alternating with the milk. This means adding a bit of flour mixture, then a bit of milk, and repeating until everything is combined. Mix just until everything is incorporated—overmixing can lead to a dense cake.
Now for the fun part—gently fold in the chopped cotton candy. It will melt slightly into the batter, infusing the cake with that subtle cotton candy flavor and adding a touch of texture.

Step 6: Divide and Bake
Evenly divide your batter between the two prepared cake pans. Smooth the tops with a spatula to ensure even baking. Place the pans in the preheated oven and bake for 25–30 minutes, or until a toothpick inserted in the center comes out clean.
Once baked, let the cakes cool in the pans for about 10 minutes. Then transfer them to a wire rack to cool completely. This step is important—trying to frost warm cakes will cause the buttercream to melt.

Step 7: Make the Cotton Candy Buttercream
While your cakes are cooling, it’s time to whip up that dreamy cotton candy buttercream. In a large bowl, beat the softened butter until smooth and creamy. This step ensures your frosting will have a silky texture.
Gradually add the powdered sugar, one cup at a time, beating well after each addition. Doing it in stages keeps the sugar from flying everywhere and helps you control the consistency. Once all the sugar is mixed in, the frosting should be thick and slightly stiff.

Step 8: Add Cream, Vanilla, and Cotton Candy
Next, add the heavy cream and vanilla extract to the butter and sugar mixture. Continue beating until the frosting becomes light and fluffy—this usually takes about 2 minutes on medium speed.
Then, gently fold in the chopped cotton candy. This will give your frosting both flavor and a bit of extra texture. If you want that signature cotton candy pink hue, go ahead and add a few drops of pink food coloring until you get the pastel shade you like.

Step 9: Frost the Cake
Once your cakes have cooled completely, it’s time to assemble. Place one cake layer on your serving plate or cake stand. Spread a generous layer of the cotton candy buttercream on top using a spatula or offset knife.
Carefully place the second cake layer on top, aligning it evenly. Then, use the remaining buttercream to frost the top and sides of the cake. Smooth out the edges as much or as little as you’d like—this cake looks just as charming with a rustic finish as it does with a polished one.

Step 10: Decorate with Cotton Candy and Sprinkles
The final step is where you get to have fun and make the cake your own. Just before serving, top the frosted cake with tufts of cotton candy for that whimsical, cloud-like finish. You can also scatter a few colorful sprinkles on top if you want to add a festive touch.

Perfecting Your Cotton Candy Cake: Tips, Tricks, and Fun Variations
Now that your cake is layered, frosted, and ready for its big debut, let’s take a moment to talk about how to make your Cotton Candy Cake truly unforgettable. From keeping your cotton candy fluffy to getting the buttercream just right, here are some helpful tips and creative variations to make your cake the star of any celebration.
Tip 1: Use Fresh Cotton Candy
Cotton candy tends to absorb moisture quickly, which can cause it to melt or clump. To maintain that signature airy texture, make sure to use fresh cotton candy—especially when decorating the top of your cake. Add it just before serving to keep it looking light and fluffy. If you’re using bagged cotton candy from the store, check the date to make sure it’s not overly compacted or stale.
Tip 2: Don’t Overmix the Batter
After you’ve combined the dry and wet ingredients, be careful not to overmix the batter. Overmixing can lead to a dense or tough cake. Mix just until the ingredients are incorporated, and gently fold in the cotton candy last. You want to keep as much air in the batter as possible to ensure a soft, tender crumb.
Tip 3: Use Room Temperature Ingredients
This tip is especially important when working with butter and eggs. Room temperature butter creams better with sugar, creating that fluffy base for both your cake and your frosting. Room temperature eggs incorporate more evenly into the batter, resulting in a smoother texture. Plan ahead and let your ingredients sit out for 30–60 minutes before you start baking.
Tip 4: Try Different Food Coloring Options
While pink is the classic cotton candy color, you don’t have to stop there. Try splitting your buttercream into two bowls and coloring one blue and the other pink for a swirled or two-tone frosting effect. You can also match the color of your cotton candy for a fun, cohesive look. A few drops of gel food coloring go a long way, so start small and build to the shade you like.
Tip 5: Make it a Layered Showstopper
Want to take this cake to the next level? Turn it into a multi-layered masterpiece. Simply double the recipe and bake four layers instead of two. Add a thin layer of frosting and a sprinkle of cotton candy between each layer for visual and textural impact. When you slice into the cake, you’ll have a stunning striped effect that’s sure to impress.
Fun Variations to Try:
The base of this cotton candy cake is already dreamy, but if you’re in the mood to experiment or tailor the recipe for a different occasion, here are some creative variations to inspire you:
Variation 1: Cotton Candy Cupcakes
Instead of baking a full cake, divide the batter into cupcake liners and bake at 350°F (175°C) for 18–20 minutes. Top each cupcake with a swirl of cotton candy buttercream and a tuft of cotton candy right before serving. These are great for parties, baby showers, or birthdays when you want single servings.
Variation 2: Add a Cotton Candy Center
Looking for a fun surprise inside the cake? Create a well in the center of each baked layer by cutting out a small circle (about 1 to 2 inches in diameter) before stacking. Fill the hollow with extra cotton candy, sprinkles, or pastel candy-coated chocolates, then frost as usual. When you cut into the cake, the center will spill out for a fun reveal.
Variation 3: Add a Hint of Fruit Flavor
Cotton candy pairs beautifully with fruity flavors like strawberry or raspberry. For a subtle twist, try adding a few drops of strawberry extract to the buttercream or mix in a spoonful of raspberry preserves between the cake layers. You’ll still get the classic cotton candy vibe, but with a fruity edge.
Variation 4: Use Cotton Candy Flavored Sugar
If you want to boost the cotton candy flavor in your cake or frosting, try using cotton candy flavored sugar or flavoring oil. A small amount goes a long way, so add gradually and taste as you go. These specialty ingredients are available online or at baking supply stores.
Variation 5: Make it a Rainbow Cotton Candy Cake
Use gel food coloring to divide and dye the cake batter into pastel rainbow shades (pink, blue, lavender, and yellow work well). Layer or swirl the colors in the pans before baking for a colorful surprise inside. It’s the perfect way to bring some magic to a birthday or special occasion.

Cotton Candy Cake Recipe: FAQ and Final Thoughts
You’ve made it through the baking, the frosting, and the decorating—now let’s wrap things up with some of the most common questions about making this Cotton Candy Cake, plus a few final tips to help you serve it up with confidence. Whether you’re baking it for a birthday party, a baby shower, or just because you love all things whimsical and sweet, this cake is a guaranteed hit.
Can I make this cake ahead of time?
Yes, you can! The cake layers can be baked a day or two in advance and stored tightly wrapped in plastic at room temperature. The buttercream can also be made ahead and stored in the refrigerator for up to 3 days. Just let it come to room temperature and give it a quick whip before frosting the cake. As for the final assembly, wait to add the cotton candy decorations until just before serving to keep them fluffy.
What’s the best way to store the finished cake?
Store the finished cake in the refrigerator in a cake carrier or covered loosely with plastic wrap. It will stay fresh for about 3 days. Be sure to remove the cotton candy topping if refrigerating overnight—it tends to dissolve in the fridge due to the moisture. Add a fresh topping before serving for the best visual and textural effect.
Can I use store-bought cotton candy?
Absolutely. Store-bought cotton candy works great in both the cake and the frosting. Just be sure it’s fresh and not overly compressed or hard. If you’re adding cotton candy as decoration, fluff it up with your fingers just before placing it on the cake for the best appearance.
Can I make this cake using boxed cake mix?
Yes! If you’re short on time or want a simpler version, you can use a white or vanilla boxed cake mix as the base. Prepare the mix as directed, fold in the chopped cotton candy, and bake as usual. It’s an easy shortcut that still delivers great flavor and a fun result.
What if I can’t find cotton candy locally?
No worries—cotton candy is available online and ships well. You can also check candy stores, amusement parks, or seasonal shops that stock novelty treats. In a pinch, cotton candy flavored syrup or sugar can be used to infuse that signature flavor into your buttercream or cake batter.
How do I keep the cotton candy from melting on the frosting?
Cotton candy is sensitive to moisture, so it should only be added right before serving. Avoid placing it directly on damp frosting or in the fridge. You can also place a small piece of parchment under the cotton candy to keep it from touching the frosting directly if you want it to stay fluffy longer.
Conclusion:
This Cotton Candy Cake is more than just a dessert—it’s an experience. With its soft, pastel colors, airy texture, and nostalgic flavor, it brings a bit of magic to any celebration. From the fluffy layers of vanilla cake infused with cotton candy to the silky, sweet buttercream, every bite feels like a trip back to childhood.
It’s also incredibly versatile. Whether you bake it as a two-layer classic, turn it into cupcakes, or decorate it with rainbows and sprinkles, there’s no wrong way to enjoy this whimsical treat. Just remember to add your cotton candy toppings right before serving for that wow factor.
So grab your mixer, fluff up some cotton candy, and get ready to make a cake that’s as fun to bake as it is to eat. If you try this recipe, don’t forget to share your results and any creative twists you tried—I’d love to hear how you made it your own.
Happy baking, and enjoy every sweet, fluffy slice!
Print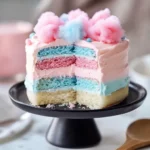
Whimsical Cotton Candy Cake That’s Almost Too Pretty to Eat
- Total Time: 1 hr
Description
A dreamy, pastel-hued layer cake swirled and crowned with fluffy cotton candy “clouds.” Light as air vanilla sponge layers are filled with marshmallow-flavored buttercream, then frosted in a soft ombré of pink and blue. Perfect for birthdays, baby showers, or anytime you want a showstopper that tastes as sweet as it looks!
Ingredients
For the vanilla sponge:
-
2½ cups (312 g) all-purpose flour
-
2½ tsp baking powder
-
½ tsp salt
-
1 cup (226 g) unsalted butter, room temperature
-
2 cups (400 g) granulated sugar
-
4 large eggs, room temperature
-
1 Tbsp pure vanilla extract
-
1 cup (240 ml) whole milk, room temperature
-
Pastel gel food coloring in pink and blue
For the cotton-candy buttercream:
-
1½ cups (340 g) unsalted butter, room temperature
-
6 cups (720 g) powdered sugar, sifted
-
2 Tbsp marshmallow fluff
-
½ tsp pure vanilla extract
-
2–3 Tbsp heavy cream (as needed for consistency)
For assembly & decoration:
-
2–3 large tufts of cotton candy (pink and blue)
-
Edible glitter or pearl dust (optional)
-
Sprinkles or sugar pearls (optional)
Instructions
1️⃣ Bake the sponge layers.
-
Preheat oven to 350 °F (175 °C). Grease and line three 8″ round cake pans.
-
Whisk together flour, baking powder, and salt; set aside.
-
In a large bowl, cream butter and sugar on medium speed until pale and fluffy, about 4 minutes.
-
Add eggs one at a time, beating well after each, then stir in vanilla.
-
With mixer on low, alternate adding flour mixture and milk in three batches (flour first), mixing just until combined.
2️⃣ Color the batter.
-
Divide batter equally into three bowls. Leave one uncolored, tint one with a few drops of pink gel, and one with blue gel—each just until pastel.
3️⃣ Fill and bake.
-
Spread each color into its own pan, smoothing tops.
-
Bake 18–22 minutes, or until a toothpick inserted in the center comes out clean.
-
Cool in pans 10 minutes, then invert onto wire racks to cool completely.
4️⃣ Make the buttercream.
-
In a large bowl, beat butter on medium until creamy (about 2 minutes).
-
Gradually add powdered sugar, one cup at a time, scraping sides as needed.
-
Beat in marshmallow fluff and vanilla, then add heavy cream a tablespoon at a time until frosting is light and spreadable.
5️⃣ Assemble the cake.
-
Place the uncolored (white) layer on your cake stand. Pipe or spread a thin layer of buttercream.
-
Top with the pink layer, repeat frosting, then finish with the blue layer.
6️⃣ Crumb coat and chill.
-
Apply a thin “crumb coat” of buttercream around the sides and top.
-
Chill 20 minutes to set.
7️⃣ Final frosting & ombré effect.
-
Divide remaining buttercream into three bowls: leave one white, tint one pink, one blue (light pastels).
-
Starting at the bottom edge, apply a stripe of blue, then white in the middle, then pink at the top.
-
Use an offset spatula or bench scraper to smooth and blend the stripes upward into a soft ombré.
8️⃣ Decorate with cotton candy.
-
Gently nestle tufts of cotton candy on top of the cake, arranging to look like candy clouds.
-
Sprinkle edible glitter or sugar pearls around the edges for extra whimsy.
9️⃣ Serve immediately.
-
Cotton candy will begin to melt if left out—add right before guests arrive for maximum effect!
Notes
-
Stabilizing cotton candy: For longer display, tuck small picks into the cake layers first, then gently attach candy tufts so they don’t rest on the frosting directly.
-
Flavor twists: Swap half the vanilla extract in the buttercream for cotton-candy or almond flavoring.
-
Make-ahead: Bake layers up to 2 days ahead; wrap tightly in plastic and refrigerate. Bring to room temp before assembling.
-
Vegan/dairy-free option: Use plant-based butter, plant milk, and dairy-free marshmallow fluff.
-
Extra shine: Lightly dust the frosted cake with pearl dust for an ethereal shimmer.
- Prep Time: 30 min
- Cook Time: 20 min