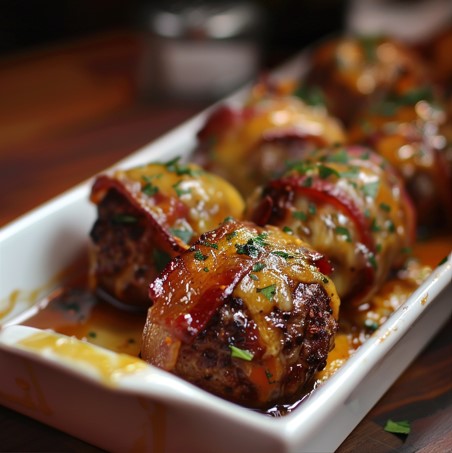
Bacon Cheeseburger Bombs are a delightful fusion of classic cheeseburgers and convenient finger foods. These bite-sized treats encapsulate the savory flavors of a traditional bacon cheeseburger in a fun, portable form, making them perfect for parties, gatherings, or a unique family dinner. Their versatility allows for endless customization, from spicy variations to different cheese options, catering to diverse tastes. This article aims to provide a comprehensive guide to making Bacon Cheeseburger Bombs, including ingredients, preparation steps, customization tips, and answers to common questions, ensuring you can easily recreate this delicious dish at home.
What Are Bacon Cheeseburger Bombs?
Bacon Cheeseburger Bombs are a creative twist on the traditional cheeseburger, offering all the beloved flavors in a compact, easy-to-eat form. These bombs consist of seasoned ground beef mixed with cheese and other ingredients, wrapped in a layer of bacon, and then baked to perfection. Unlike traditional cheeseburgers, which require buns and can be messy to eat, these bite-sized morsels are portable and less messy, making them ideal for parties and casual gatherings. Their growing popularity can be attributed to their delicious taste, versatility in preparation, and the fun experience of eating them. People love them because they combine the familiar comfort of a cheeseburger with the novelty of a unique, easy-to-handle snack.
Ingredients and Their Benefits
Essential Ingredients
- Ground Beef: The base of the bombs, providing protein and rich flavor.
- Cheddar Cheese: Adds a creamy texture and sharp flavor.
- Parmesan Cheese: Enhances the taste with its nutty and savory notes.
- Onion: Offers a sweet, aromatic taste and adds moisture.
- Garlic: Delivers a pungent, savory depth.
- Egg: Acts as a binding agent, ensuring the mixture holds together.
- Breadcrumbs: Provides structure and a slight crunch.
- Bacon: Wraps the bombs, adding a smoky, salty flavor.
Health Benefits
- Ground Beef: High in protein, essential for muscle repair and growth.
- Cheddar Cheese: Rich in calcium, supporting bone health.
- Parmesan Cheese: Contains probiotics, aiding digestion.
- Onion: High in antioxidants, promoting heart health.
- Garlic: Known for its anti-inflammatory and immune-boosting properties.
- Egg: A good source of vitamins and minerals.
- Breadcrumbs: Adds fiber, which aids in digestion.
- Bacon: Provides essential fats and protein.
Healthier Alternatives
- Substitute ground turkey for beef to reduce fat content.
- Use low-fat cheese options to cut down on calories.
- Opt for whole wheat breadcrumbs for added fiber.
- Choose turkey bacon as a leaner option.
Step-by-Step Preparation Guide
Preparing the Meat Mixture
- Ingredients: Gather ground beef, shredded cheddar cheese, grated Parmesan cheese, finely chopped onion, minced garlic, one egg, and breadcrumbs.
- Mixing: In a large bowl, combine the ground beef, cheddar cheese, Parmesan cheese, onion, garlic, egg, and breadcrumbs. Mix thoroughly until all ingredients are evenly distributed.
- Seasoning: Season the mixture with salt, pepper, and any additional preferred spices, such as paprika or Italian seasoning.
Assembling the Bombs
- Portioning: Divide the meat mixture into equal portions, about the size of a golf ball.
- Shaping: Roll each portion into a ball and slightly flatten it to create a patty.
- Cheese Filling: Add a small cube of cheddar cheese in the center of each patty.
- Sealing: Fold the meat around the cheese to form a ball, ensuring the cheese is fully enclosed.
- Wrapping: Wrap each meatball with a slice of bacon, securing with a toothpick if necessary.
Baking Instructions
- Preheating: Preheat your oven to 375°F (190°C).
- Baking Sheet: Line a baking sheet with parchment paper or lightly grease it to prevent sticking.
- Placement: Arrange the bacon-wrapped meatballs on the baking sheet, ensuring they are spaced evenly.
- Baking Time: Bake for 20-25 minutes or until the bacon is crispy and the meat is fully cooked (internal temperature should reach 160°F or 71°C).
- Cooling: Allow the bombs to cool for a few minutes before serving.
Tips for Ensuring Perfect Results
- Crispier Bacon: To achieve crispier bacon, you can pre-cook the bacon slices slightly before wrapping the meatballs.
- Even Cooking: Rotate the baking sheet halfway through the cooking time to ensure even browning.
- Flavor Infusion: Marinate the ground beef mixture for an hour before assembling for a deeper flavor.
- Cheese Choices: Experiment with different cheeses like mozzarella or pepper jack for varied flavors.
- Storing Leftovers: Store any leftovers in an airtight container in the refrigerator for up to three days. Reheat in the oven to maintain crispiness.
Customization Options
Making it Spicy
- Adding Jalapeños: Finely chop jalapeños and mix them into the meat mixture for a spicy kick.
- Hot Sauce: Incorporate a few dashes of your favorite hot sauce into the mixture.
- Spicy Cheese: Use pepper jack cheese or add red pepper flakes to the mix.
Using Different Cheeses
- Mozzarella: For a gooey center, substitute mozzarella cheese for cheddar.
- Blue Cheese: Add blue cheese crumbles for a rich, tangy flavor.
- Gouda: Use smoked gouda for a unique, smoky taste.
Adding Caramelized Onions
- Preparation: Slowly cook sliced onions in butter over low heat until they turn golden brown and sweet.
- Integration: Mix the caramelized onions into the meat mixture or place a small amount inside each bomb for added sweetness and depth.
Other Variations and Topping Ideas
- Barbecue Bacon Bombs: Add a layer of barbecue sauce inside the meatball and on top before baking.
- Stuffed with Pickles: Insert a small pickle slice in the center for a tangy surprise.
- Topping Ideas: Serve with a side of dipping sauces such as ranch, aioli, or mustard. Garnish with fresh herbs like parsley or chives for added freshness and color.
Benefits of Bacon Cheeseburger Bombs
Convenience and Portability
Bacon Cheeseburger Bombs are incredibly convenient to make and eat. Their compact size makes them perfect for on-the-go snacking, lunchboxes, or quick meals. Unlike traditional cheeseburgers, these bombs are less messy and easier to handle, making them ideal for busy lifestyles.
Customization Options
One of the standout benefits of Bacon Cheeseburger Bombs is their versatility. You can easily customize them to suit different tastes by varying the type of cheese, adding spices, or including additional ingredients like caramelized onions or pickles. This flexibility ensures that everyone can enjoy a version that fits their preferences.
Perfect for Parties and Gatherings
These bite-sized treats are perfect for social events. Their small size and fun, interactive nature make them a hit at parties, family gatherings, and potlucks. Guests can enjoy them as appetizers or part of a main course, and the ability to make them in bulk ensures there’s plenty to go around.
Tips and Tricks for Best Results
How to Achieve Crispier Bacon
- Pre-cook Bacon: Partially cook bacon slices in a skillet or microwave before wrapping the meatballs. This ensures they become crispy during baking without overcooking the meat.
- High Heat Finish: Increase the oven temperature to 400°F (200°C) for the last 5 minutes of baking.
Making Them in Advance and Reheating
- Preparation: Assemble the bacon cheeseburger bombs and store them in the refrigerator, covered, for up to 24 hours before baking.
- Reheating: Reheat in a preheated oven at 375°F (190°C) for 10-15 minutes to maintain crispiness and flavor.
Storing Leftovers
- Refrigeration: Store leftovers in an airtight container in the refrigerator for up to 3 days.
- Freezing: Freeze cooked bombs on a baking sheet, then transfer to a freezer bag. Reheat directly from frozen in a 375°F (190°C) oven for 20-25 minutes.
Common Questions and FAQs
Can I use different types of meat?
Yes, you can substitute ground beef with ground turkey, chicken, or pork for a different flavor profile or to reduce fat content.
How do I make them crispier?
To achieve crispier bacon, partially cook the bacon slices before wrapping the meatballs and finish baking at a higher temperature.
Can I make them in a skillet?
Yes, you can cook them in a skillet over medium heat, turning occasionally until the bacon is crispy and the meat is fully cooked.
How do I keep them warm for a party?
Keep them warm in a slow cooker set to the “warm” setting or place them in an oven at a low temperature (200°F or 93°C) until ready to serve.
Can I make them in bulk?
Absolutely. You can prepare large batches in advance and freeze them. Reheat directly from frozen in the oven for convenient, delicious snacks anytime.
Conclusion
In this article, we’ve explored the delightful Bacon Cheeseburger Bombs, covering their definition, ingredients, preparation steps, and customization options. These bite-sized treats offer the convenience of portability and the versatility to suit various tastes, making them ideal for any occasion. Their appeal lies in the combination of classic cheeseburger flavors with the novelty of a fun, easy-to-eat form.
I encourage you to try making Bacon Cheeseburger Bombs at home, experiment with different variations, and enjoy the reactions from family and friends. Whether for a casual snack or a party favorite, these bombs are sure to impress and satisfy. Their adaptability ensures they can fit any dietary preference or flavor craving, making them a must-try recipe for any food enthusiast.
Print
Bacon Cheeseburger Bombs
Description
Bacon Cheeseburger Bombs are bite-sized treats that encapsulate the savory essence of a classic bacon cheeseburger. These bombs feature a seasoned ground beef mixture, stuffed with cheese, wrapped in bacon, and baked to perfection. They are easy to customize and perfect for any occasion, from casual snacking to party appetizers.
Ingredients
Essential Components
- 1 lb ground beef
- 1/2 cup shredded cheddar cheese
- 1/4 cup grated Parmesan cheese
- 1/4 cup finely chopped onion
- 2 cloves garlic, minced
- 1 egg
- 1/2 cup breadcrumbs
- 6 slices of bacon
- Salt and pepper to taste
Optional Toppings
- Lettuce
- Tomato
- Pickles
- Ketchup
- Mustard
- Jalapeños
Instructions
Combine ground beef, shredded cheese, Parmesan cheese, onion, garlic, egg, breadcrumbs, salt, and pepper in a large bowl. Mix well with your hands or a spoon until just combined. Be careful not to overmix.
Divide the meat mixture into 12 equal portions and shape each into a ball. Wrap each ball with a slice of bacon, securing it with a toothpick if needed.
Preheat your oven to 400°F (200°C). Place the bacon-wrapped bombs on a baking sheet lined with parchment paper, leaving some space between each bomb. Bake for 15-20 minutes or until the bacon is crispy and golden brown. Serve hot with your favorite toppings.
Notes
For the best results, consider partially cooking the bacon before wrapping the meatballs to achieve a crispier texture. Additionally, these bombs can be prepared in advance and stored in the refrigerator or freezer for convenient reheating. Experiment with different cheeses and fillings to suit your taste preferences.