

Halloween Vanilla Fudge
When Halloween creeps around the corner, it’s the perfect time to whip up easy no cook treats that dazzle with color and charm. Halloween vanilla fudge bars made with white chocolate and sweetened condensed milk check every box: they’re festive, simple, and irresistibly sweet. With bold swirls of purple, black, and orange, this treat delivers a ghostly twist on classic fudge, making it ideal for parties, classroom celebrations, or just a spooky night in.
This no-cook fudge recipe offers more than just convenience—it’s a foolproof way to create kid-friendly Halloween desserts that don’t sacrifice style. With a prep time of just 10 minutes and a firm, sliceable finish, it’s a recipe anyone can master, even without baking skills. The use of white chocolate allows the colors to shine, making each square look like a piece of phantom art.
Using vibrant gel food coloring gives this fudge its dramatic marbled look. As the swirls mix together, they evoke the mood of Halloween—playful, eerie, and eye-catching. For anyone planning a themed dessert table, these vanilla fudge bars add color and texture alongside cupcakes, bark, or mummy brownies. You can even enhance your Halloween setup by pulling visual ideas from Halloween party food ideas and pairing your fudge with other ghost treats for kids for maximum impact.
And while the visuals are stunning, the taste is just as impressive. With rich notes of vanilla extract balanced by the creamy sweetness of condensed milk, this fudge melts in your mouth while still holding its shape. If you’re new to working with ingredients like white chocolate, this guide to white chocolate can help you understand its melting properties and why it’s perfect for colorful desserts like this one.
Ready to craft your own hauntingly delicious Halloween vanilla fudge? Let’s explore why this recipe belongs at the center of your celebration.

Why This Recipe Is Perfect for Halloween
Halloween Phantom Vanilla Fudge with White Chocolate Swirls isn’t just a fun treat — it’s an all-in-one solution for anyone needing an eye-catching, no-cook dessert that fits right into any spooky celebration. The recipe checks all the boxes for party planners, parents, and classroom organizers who need something that’s fast, festive, and flavorful.
Here’s why it’s a must-make for October:
-
Halloween-themed colors – The swirl of black, orange, and purple gel food coloring instantly sets the tone for the season. Unlike traditional chocolate fudge, this version uses a white chocolate base, allowing the colors to remain bold and vibrant. Not sure how coloring affects your recipe? Explore how food coloring works in confections by checking out this article on food coloring.
-
No cooking required – Forget the candy thermometer and stove. This fudge uses just three main ingredients: white chocolate chips, sweetened condensed milk, and vanilla extract. A few minutes of melting and mixing is all you need, which is perfect if you’re juggling a dozen other Halloween tasks.
-
Perfect for parties and potlucks – The recipe yields bars that cut neatly and travel well. They’re ideal for wrapping individually for classroom parties, stacking on dessert trays, or arranging alongside themed items like Halloween classroom snacks or purple and orange Halloween decor. You can also include them in a larger spread featuring other Halloween desserts like cookies, cupcakes, or candy bark.
-
Kid- and allergy-friendly – With no eggs, no nuts, and no gluten-containing ingredients, these bars are generally safe for a wide range of dietary needs (though always double-check labels). If you’re looking for options for school-safe sweets, this fudge easily fits the list.
-
Customizable and creative – You’re not limited to just swirls. You can top the fudge with Halloween sprinkles, embed candy eyeballs, or add edible glitter to make your treats shine. Curious about how fudge became such a staple in American desserts? Here’s more on the history of fudge and how it evolved into a year-round favorite.
Lastly, the visual appeal of this fudge makes it a conversation piece. You can find styling inspiration on Pinterest, especially if you’re planning a themed dessert table. Whether you’re hosting a haunted house bash or a classroom party, this easy vanilla fudge ensures your treats are both practical and spellbinding.
Ingredients Breakdown
The beauty of this no cook Halloween fudge recipe lies in its simplicity. With just a few ingredients, you can create a vibrant, festive dessert that feels as magical as it looks. Here’s a closer look at what each component brings to the table and how to choose the best versions for rich flavor and perfect texture.
-
White Chocolate Chips (3 cups)
These are the heart of the recipe. Unlike dark or milk chocolate, white chocolate has a neutral flavor and pale color, which makes it the perfect base for bold Halloween swirls. It’s essential to use high-quality chips made with cocoa butter for the smoothest melt. Want to know more about what makes white chocolate different? Explore the white chocolate definition to understand its composition. -
Sweetened Condensed Milk (1 can, 14 oz)
This thick, sugary milk acts as the glue that binds the fudge. It adds moisture and sweetness without needing extra sugar or butter. Its viscosity helps the fudge firm up in the fridge while maintaining a creamy mouthfeel. Learn more about how sweetened condensed milk functions in desserts in this Wikipedia article. -
Vanilla Extract (1½ tsp)
A small but mighty addition, vanilla extract gives the fudge a warm, aromatic depth that balances the sweetness of the chocolate. Using pure vanilla instead of imitation enhances the flavor quality. Vanilla may not be colorful, but its role is essential in turning this from simple candy into a refined treat. -
Black, Purple, and Orange Gel Food Coloring
These gel-based colorants are the key to the phantom swirl effect. Unlike liquid food coloring, gels are more concentrated and don’t water down the mixture. Each color represents a classic Halloween hue — black for ghosts and shadows, orange for pumpkins, and purple for a mysterious, magical twist. To understand how food colorings interact with fats like chocolate, check out this detailed look at food coloring.
For extra flair, consider drawing inspiration from Pinterest boards on ghost treats or even no bake Halloween desserts to see how others elevate simple recipes like this one with add-ons like sprinkles, candy eyes, or edible glitter.
With these ingredients, you’ll create a Halloween fudge bar that not only tastes amazing but also dazzles on the dessert table. Simplicity meets seasonal spirit in every bite.
Tools and Equipment Needed
Creating Halloween Phantom Vanilla Fudge with White Chocolate Swirls doesn’t require any fancy equipment, which makes it an ideal recipe for beginners and busy households. All you need are a few basic kitchen tools to ensure a smooth process and professional-looking results.
Here’s what you’ll need:
-
Medium Saucepan
This is used for gently melting the white chocolate chips with the sweetened condensed milk. A heavy-bottomed pan is ideal, as it helps distribute heat evenly and prevents scorching. Since there’s no actual cooking beyond melting, a low-heat setting is sufficient. -
Mixing Bowls (3)
Once the fudge base is melted and smooth, you’ll divide it into three separate bowls to mix in the gel food colorings. Using heat-safe, medium-sized bowls makes this step easier and cleaner. -
Rubber Spatula
A silicone or rubber spatula is essential for scraping down the sides of the pan and bowls, ensuring you don’t waste any of the mixture. It’s also helpful for smoothing the fudge evenly into the pan before chilling. -
8×8-inch Baking Pan
This size is perfect for creating a thick, even slab of fudge that cuts easily into uniform squares. Lining it with parchment paper allows you to lift the entire block out cleanly for slicing. -
Parchment Paper
Don’t skip this! Parchment ensures the fudge doesn’t stick to the pan and makes cleanup effortless. You can also use foil if necessary, but avoid wax paper, which may stick to the fudge. -
Skewer or Knife
You’ll use this to swirl the three colored fudge mixtures together. A skewer gives more control over the marbled design, but a butter knife works fine too. Swirling is where the phantom effect really comes to life. -
Refrigerator
Since this is a no bake fudge recipe, chilling is essential. The fudge needs at least 2 hours in the fridge to set completely. Make sure you have space to lay the pan flat and undisturbed.
If you’re aiming to style your final presentation for a Halloween party, consider serving your fudge with themed accessories like small Halloween napkins or decorative trays. Find visual inspiration on Pinterest Halloween decor boards for a more cohesive and festive display.
With the right tools in place, this simple Halloween fudge bar recipe becomes almost effortless — perfect for when you need a quick treat that still impresses.
Step-by-Step Recipe Instructions
Creating Halloween Phantom Vanilla Fudge with White Chocolate Swirls is simple and satisfying, especially since it’s a no-cook recipe. Follow these steps carefully to achieve a smooth, creamy, and colorful fudge that holds its shape and wows your guests.
-
Prepare the Pan
Line an 8×8-inch baking pan with parchment paper, leaving an overhang for easy removal. Set aside. This ensures the fudge won’t stick and allows for clean slicing later. -
Melt the Base
In a medium saucepan over low heat, combine 3 cups of white chocolate chips and 1 (14 oz) can of sweetened condensed milk. Stir constantly until the mixture is completely melted and smooth. Avoid high heat to prevent the chocolate from seizing. For guidance on working with white chocolate, see white chocolate properties. -
Add Vanilla Extract
Remove the saucepan from heat and stir in 1½ teaspoons of vanilla extract. This will give the fudge a warm, aromatic depth that balances the sweetness. -
Divide and Color
Pour the fudge evenly into three separate bowls. Add gel food coloring to each bowl: black in one, purple in another, and orange in the last. Stir each until the color is fully incorporated. For tips on choosing vibrant colors without altering texture, refer to food coloring basics. -
Create the Swirls
Drop spoonfuls of each colored fudge randomly into the prepared pan, alternating colors. Use a skewer or knife to gently swirl the colors together, creating a marbled phantom effect. Be careful not to overmix, or the colors may blend too much. -
Level and Chill
Gently tap the pan on the counter to level the top. Refrigerate for at least 2 hours, or until firm. -
Cut and Serve
Lift the fudge from the pan using the parchment overhang and cut into squares. Arrange on a tray or package individually for parties or classroom treats.
This method produces Halloween vanilla fudge bars that are creamy, firm, and visually striking. For additional ideas on no-bake Halloween desserts that complement this recipe, explore Pinterest boards on no bake Halloween desserts. Pairing these bars with other themed treats like Halloween classroom snacks or fun decorative elements elevates any Halloween table.

Visual Variation Ideas for Spooky Effects
One of the most fun aspects of Halloween Phantom Vanilla Fudge with White Chocolate Swirls is how easily it can be customized to fit your spooky theme. Simple tweaks can transform these fudge bars from plain swirls into show-stopping Halloween treats.
-
Candy Eyes for Ghosts
Add small candy eyes on top of the fudge before it sets. This instantly transforms the marbled bars into playful ghost faces that are perfect for kid-friendly Halloween treats. For inspiration, check out ghost treats for kids. -
Edible Glitter or Luster Dust
Sprinkle edible glitter on the top layer before chilling to give a phantom shimmer effect. Purple or black glitter enhances the Halloween theme while keeping the fudge elegant. -
Chocolate Drizzles
Melt a small amount of dark or milk chocolate and drizzle it over the top in a spiderweb pattern. This adds contrast and an extra layer of flavor without complicating the no-cook recipe. -
Themed Shapes Using Cookie Cutters
After the fudge is set, use small Halloween-themed cookie cutters (pumpkins, bats, ghosts) to create unique shapes. This is especially effective for classroom treats or party favor boxes. -
Layered Color Effects
For a more dramatic look, try layering colors instead of just swirling. Pour one color, let it partially set, then add the next layer. This creates a distinct stripe effect that pops visually on a dessert table. -
Sprinkles and Halloween Confetti
Top the fudge with seasonal sprinkles or edible confetti in orange, purple, and black. These small accents make the fudge look festive and add a little crunch to the creamy texture. -
Marble Intensity
Experiment with how much you swirl the colors. Light swirling keeps colors distinct, while more mixing produces softer blends. Both give a unique “phantom” effect reminiscent of Halloween spirits.
For additional creative ideas, Pinterest boards on no-bake Halloween desserts are a great source of inspiration. You can see how others enhance simple fudge with minimal effort while keeping it visually striking and fun for kids and adults alike.
These visual variations not only enhance presentation but also make your Halloween vanilla fudge bars stand out on a dessert table, complementing other themed items like purple and orange Halloween decor and themed snacks.
Storage & Shelf Life Tips
Proper storage ensures your Halloween Phantom Vanilla Fudge with White Chocolate Swirls remains fresh and creamy for days. Since this is a no-cook fudge recipe, it relies on refrigeration to maintain its texture and flavor.
-
Refrigeration
Store the fudge in an airtight container in the fridge. It will stay firm and sliceable for up to 2 weeks. Layer parchment paper between fudge squares if stacking to prevent sticking. -
Room Temperature
If you prefer serving at room temperature, keep the fudge in a cool, dry area for up to 2 days. Warm or humid environments can cause the fudge to become too soft or sticky. -
Freezing
For longer storage, fudge can be frozen. Wrap individual squares in plastic wrap, then place in a freezer-safe container. Freeze for up to 2 months. Thaw overnight in the fridge before serving to retain the creamy texture. -
Tips for Best Texture
Avoid leaving the fudge uncovered, as it can absorb odors from other foods. Also, resist cutting too soon; chilling for at least 2 hours ensures clean slices and prevents smudging the phantom swirls.
How to Serve at a Halloween Party
Serving Halloween vanilla fudge bars is an opportunity to impress guests visually while keeping it simple and kid-friendly. Presentation can elevate even a small batch into a centerpiece treat.
-
Plating Ideas
Use black or metallic trays to make the vibrant orange, purple, and black swirls pop. Arrange the squares neatly or in a slightly staggered pattern for a more dynamic display. -
Pairings
Pair fudge with themed beverages like pumpkin spice hot chocolate or Halloween punch. It complements other desserts like no-bake Halloween desserts and Halloween classroom snacks. -
Party Favors
Wrap individual squares in clear cellophane bags and tie with Halloween-themed ribbon. This makes them perfect for party favors or safe classroom treats. -
Decorative Enhancements
Small edible elements, such as candy eyes or sprinkles, can turn the fudge into little ghosts or pumpkins. Use ideas from ghost treats for kids for creative inspiration.
Kid-Friendly Halloween Classroom Treat Ideas
This no-cook fudge recipe is ideal for classroom settings due to its simplicity and minimal allergen concerns.
-
Allergy Considerations
The recipe contains no nuts or eggs, making it safer for many children. Always check labels of ingredients to confirm, especially gel food coloring and white chocolate chips. -
Portion Control
Cut into small squares to create bite-sized treats. Layer with parchment for easy transport without sticking. -
Transport Tips
Pack in airtight containers or individually wrapped in cellophane. Ensure the container remains cool during transit to prevent melting. -
Engaging Kids
Let children help swirl colors before chilling. It’s an interactive, safe activity that teaches basic kitchen skills while keeping the Halloween spirit alive.
Custom Variations of the Recipe
You can easily adapt Halloween Phantom Vanilla Fudge to suit different tastes and creative ideas:
-
Flavor Variations
Add peppermint, pumpkin spice, or caramel extracts to the fudge base for a unique twist. -
Mix-Ins
Fold in crushed cookies, candy bits, or mini chocolate chips before swirling for added texture. -
Color Adjustments
Swap gel colors to match different themes, like green and black for witches or neon shades for a glow-in-the-dark effect. -
Layering Techniques
Pour each color in layers rather than swirls for a striped, rainbow effect that is visually striking. -
Decorative Toppings
Sprinkles, edible glitter, or chocolate drizzle enhance presentation and can be tailored to any Halloween theme.
No Cook vs Traditional Fudge Comparison
Comparing no-cook fudge with traditional fudge highlights why this recipe is ideal for quick, stress-free preparation:
-
Preparation Time
No-cook fudge takes just 10 minutes to prepare, compared to traditional fudge that requires boiling sugar to a specific temperature. -
Ease of Technique
No-cook fudge eliminates the need for candy thermometers and constant stirring, making it beginner-friendly. -
Texture Differences
Both types are creamy, but traditional fudge may have a slightly firmer or more crystalline texture, while no-cook fudge remains ultra-smooth. -
Shelf Life
Both can be stored for similar durations if refrigerated, but no-cook fudge avoids the risk of burning or graininess.
Hosting a Full Halloween Dessert Table
Halloween vanilla fudge bars can anchor a dessert table with complementary themed treats:
-
Themed Pairings
Include mummy brownies, pumpkin cupcakes, candy corn bark, and popcorn hands to create a festive spread. -
Presentation Tips
Use trays, cake stands, and decorative boxes to elevate the display. Arrange treats by color or shape to create visual appeal. -
DIY Decorations
Incorporate small props like fake cobwebs, mini pumpkins, or Halloween figurines to enhance the theme. -
Interactive Stations
Set up a fudge-decorating station where guests can add candy eyes, sprinkles, or drizzle chocolate for a fun, hands-on activity.

FAQs
Q1. Can I make Halloween fudge without condensed milk?
Yes, you can use heavy cream or a mixture of butter and sugar as a substitute, but the texture may be slightly less creamy.
Q2. How do I swirl multiple colors in fudge?
Drop spoonfuls of each colored fudge randomly in the pan and use a skewer or knife to gently swirl them together. Avoid overmixing to retain distinct colors.
Q3. What type of food coloring works best for fudge?
Gel food coloring is ideal because it provides vibrant colors without altering the consistency of the fudge.
Q4. How do you keep fudge from sticking to the pan?
Line the pan with parchment paper, leaving an overhang. This allows you to lift the fudge out easily for slicing.
Q5. Can you make fudge ahead for a Halloween party?
Yes, fudge can be made several days in advance and stored in the refrigerator for up to two weeks or frozen for longer storage.
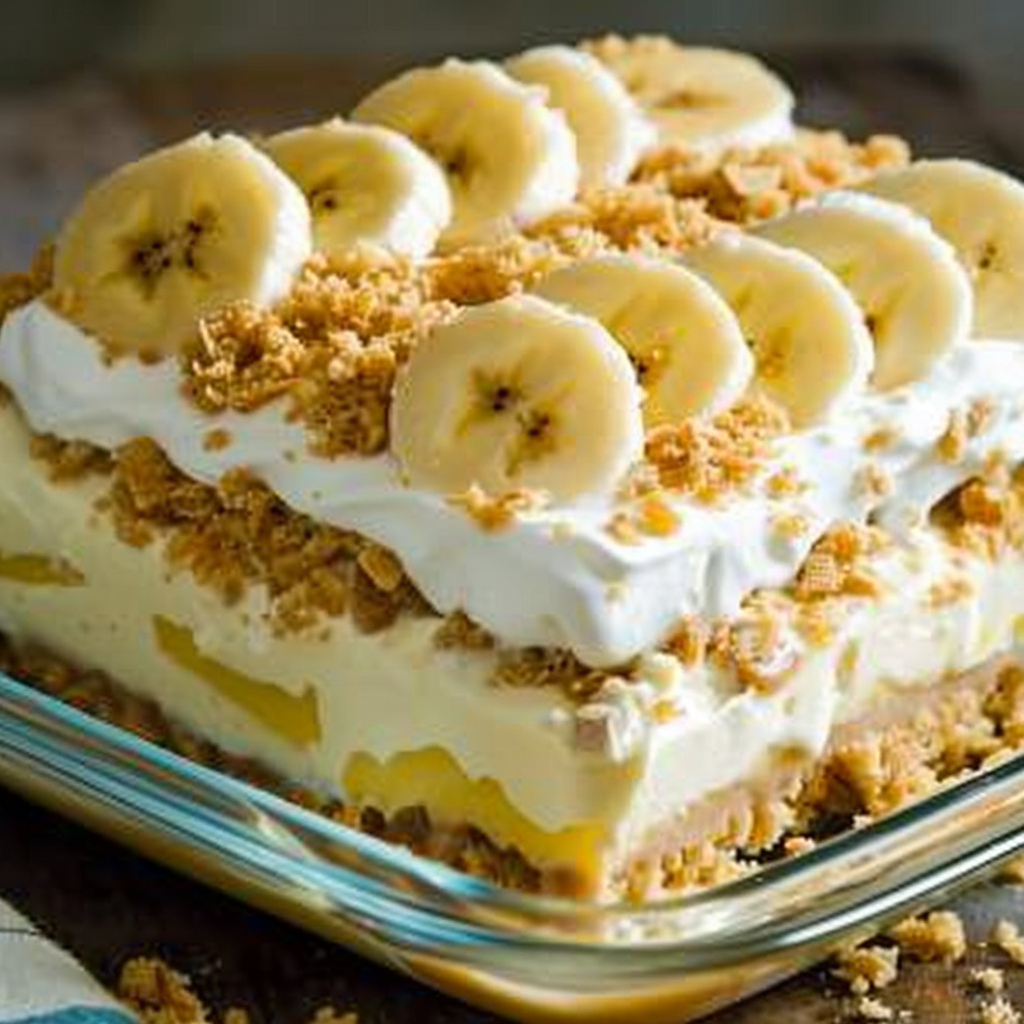
Banana Pudding Lush No Bake Layered Dessert With Nilla Wafers
- Author: Naomi
Description
Halloween Phantom Vanilla Fudge with White Chocolate Swirls is a simple, no-cook dessert perfect for Halloween parties, classroom treats, or festive gatherings. Made with white chocolate, sweetened condensed milk, and gel food coloring, this fudge is creamy, colorful, and kid-friendly. Its marbled swirls of orange, purple, and black make it visually striking, while optional toppings like candy eyes, sprinkles, or chocolate drizzle add creative flair. Easy to prepare and store, it’s an ideal recipe for anyone looking to add a spooky yet delicious treat to their Halloween spread.
Ingredients
For the crust:
- 1 1/2 cups crushed vanilla wafer cookies
- 1/4 cup granulated sugar
- 1/3 cup unsalted butter, melted
For the cream cheese layer:
- 8 oz cream cheese, softened
- 1 cup powdered sugar
- 1 cup whipped topping (such as Cool Whip)
For the pudding layer:
- 1 package (3.4 oz) instant banana cream pudding mix
- 1 1/2 cups cold milk
- 1/2 tsp vanilla extract
For the topping:
- 1 1/2 cups whipped topping
- 2 bananas, sliced
- Crushed vanilla wafers, for garnish
Instructions
Preheat your oven to 350°F (175°C). In a medium bowl, combine crushed vanilla wafers, sugar, and melted butter. Mix until evenly moistened.
Press the mixture firmly into the bottom of a 9×9-inch baking dish. Bake for 10 minutes, then let cool completely.
In a separate bowl, beat the softened cream cheese and powdered sugar until smooth. Fold in the whipped topping until fully combined. Spread this layer evenly over the cooled crust.
In another bowl, whisk together the banana pudding mix, cold milk, and vanilla extract for 2 minutes until thickened. Spread the pudding layer over the cream cheese layer.
Top with the remaining whipped topping and smooth it out evenly.
Refrigerate for at least 4 hours or until fully set.
Before serving, garnish with banana slices and crushed vanilla wafers. Serve chilled.
Notes
-
Use high-quality white chocolate chips for the smoothest, creamiest texture.
-
Chill the fudge for at least 2 hours before slicing to ensure clean edges.
-
Experiment with different gel food color combinations to match your Halloween theme.
-
Store in an airtight container in the refrigerator for up to 2 weeks or freeze for up to 2 months.
-
For extra flair, add candy eyes, sprinkles, or edible glitter before chilling.
-
This recipe is nut-free, egg-free, and can be made gluten-free, making it ideal for classroom settings.


