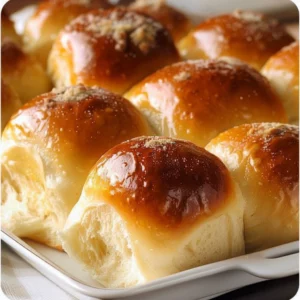
The Best & Easy Dinner Rolls Soft, fluffy, golden-brown dinner rolls with a rich buttery flavor—simple to make and perfect for any meal. Total time: 2 hours 15 minutes (includes rising time) Yield: 12 rolls. Look, I get it. Life is busy, and sometimes the last thing you want to do is spend hours in the kitchen crafting the perfect dinner rolls. But trust me when I say that these rolls are worth the time. There’s something magical about the smell of freshly baked bread wafting through your home, right? It brings a sense of warmth and comfort that’s hard to beat.
I remember the first time I decided to tackle dinner rolls. I had a few friends over, and the plan was simple: a cozy dinner with some homemade soup. But then I thought, “Why not try my hand at making those fluffy little rolls?” Spoiler alert: it was a success, and those rolls stole the show! They were soft, buttery, and absolutely addictive. My friends kept asking for the recipe, and I realized that sharing this experience could help others feel the same joy I did.
So, whether you’re looking to elevate a weeknight meal or impress at a family gathering, these dinner rolls are the way to go. They work for everyone—busy parents, college students, or anyone trying to bring a little homemade goodness into their lives. Plus, they’re super easy to make, even in a tiny kitchen like mine!
Why You’ll Love This Recipe
- **Time-Friendly**: In just about 2 hours and 15 minutes, you’ll have warm, homemade rolls ready to serve.
- **Fluffy Texture**: These rolls are soft and pillowy, perfect for soaking up gravy or slathering with butter.
- **Versatile**: Serve them alongside soups, stews, or even as a base for sliders. They fit any meal!
- **Budget-Friendly**: With simple ingredients, you won’t break the bank making these little delights.
- **Skill Level**: If you can mix, knead, and wait a bit, you can definitely make these rolls.
Here’s the thing: I’ve tried other recipes that promised “easy” rolls, but they often fell flat—literally! This one has been tested so many times that I can confidently say you won’t be disappointed.
Ingredients You’ll Need
- 3½ cups all-purpose flour (plus more if needed): The foundation of your rolls, giving them structure.
- ¼ cup granulated sugar: Adds a touch of sweetness and helps with browning.
- 1 tablespoon instant yeast: This is your leavening agent, making the rolls rise beautifully.
- 1 teaspoon salt: Enhances the flavor—don’t skip it!
- 1 cup warm milk (about 110°F): Activates the yeast, leading to fluffy rolls.
- ¼ cup unsalted butter, melted: Adds richness and flavor to the dough.
- 1 large egg: Helps bind the ingredients together and adds moisture.
- 2 tablespoons unsalted butter, melted (for brushing): Gives that golden-brown finish and extra flavor.
- Look, if you don’t have unsalted butter, you can use salted instead—just reduce the salt in the recipe. And for the milk, if you’re dairy-free, feel free to substitute with almond or oat milk, just make sure it’s warm!
Let’s Get Started
Step 1: Mix Dry Ingredients
In a large mixing bowl, whisk together the flour, sugar, yeast, and salt. This step is crucial as it ensures that the yeast and salt are evenly distributed. I remember the first time I made these, I forgot to mix the dry ingredients well, and let’s just say the rolls didn’t rise as beautifully.
Step 2: Add Wet Ingredients
Add the warm milk, melted butter, and egg to the dry ingredients. Mix until a soft dough forms. You’ll want to use a wooden spoon or a spatula; I found that using my hands at this point gets a little messy but feels more satisfying!
Step 3: Knead the Dough
Knead the dough by hand or with a stand mixer for about 8–10 minutes, until it is smooth and elastic. If the dough feels too sticky, add a little more flour, but be careful not to add too much. I once ended up with a dough that was too dry and tough, and that’s not what you want for these rolls.
Step 4: First Rise
Transfer the dough to a greased bowl, cover it, and let it rise in a warm place for 1 hour or until it has doubled in size. This is the time to clean your kitchen or prep your dinner—multitasking at its finest!
Shaping the Rolls
Step 5: Punch Down and Divide
Punch down the dough gently to release the air. This step is oddly satisfying. Divide the dough into 12 equal pieces and shape each piece into a smooth ball. If they aren’t perfectly round, no worries—these rolls are forgiving!
Step 6: Second Rise
Place the rolls in a greased 9×13-inch baking dish. Cover them loosely and let them rise again for 30–45 minutes until they are puffy. This is where you can get a little creative—if you want, shape them into knots or cloverleafs instead of balls!
Step 7: Preheat the Oven
While the rolls are rising, preheat your oven to 375°F (190°C). A hot oven is key to achieving that nice golden-brown crust.
Step 8: Bake
Bake for 15–18 minutes, or until the tops are golden brown. Honestly, it’s hard to wait for them to cool down at this stage. The smell is almost too good to handle!
Step 9: Brush with Butter
Immediately brush the warm rolls with the remaining melted butter and let them cool slightly before serving. This final touch is what gives them that restaurant-quality finish.
Tips for the Best Dinner Rolls
- Always use warm milk—not hot, as it can kill the yeast. Aim for about 110°F.
- If you don’t have instant yeast, you can substitute active dry yeast, but you’ll need to activate it in warm water first.
- Don’t skip the kneading step; it develops gluten, which gives your rolls that chewy texture.
- If your rolls don’t rise as much as you’d like, check your yeast! It might be expired.
- Feel free to customize—add herbs, garlic powder, or cheese for extra flavor!
Storage Tips
For storage, keep any leftover rolls in an airtight container at room temperature for up to 2 days. If you want them to last longer, freeze them! Just wrap them well and they’ll keep for about a month. When you’re ready to eat, pop them in the oven for a few minutes to reheat. Honestly, they taste even better fresh out of the oven.
Frequently Asked Questions About Dinner Rolls
Can I make these rolls ahead of time?
Absolutely! You can prepare the dough, shape it into rolls, and place them in the baking dish. Cover and refrigerate them overnight. The next day, let them come to room temperature before baking.
What if my dough doesn’t rise?
First, check if your yeast is still active. If you’ve confirmed it’s good and it’s still not rising, it might be too cold in your kitchen. Try placing the dough in a warmer spot, like near the oven.
Can I add herbs or spices to the dough?
Yes! Feel free to add dried herbs like rosemary or thyme for a savory twist. Just remember to adjust the salt if you’re adding anything salty.
How do I know when the rolls are done baking?
The tops should be golden brown, and if you tap the bottom of a roll, it should sound hollow.
Can I make these rolls vegan?
Sure! Substitute the egg with a flax egg (1 tablespoon ground flaxseed mixed with 2.5 tablespoons water), use plant-based butter, and choose a non-dairy milk.
Final Thoughts
So, there you have it! The best and easiest dinner rolls to elevate any meal. I can’t stress enough how satisfying it is to pull these fluffy, golden-brown beauties out of the oven and serve them warm. They’ve been a game-changer in my kitchen, and I hope they will be in yours too. Next time you’re looking for a comforting, homemade addition to your dinner, just remember these rolls. Happy baking, and enjoy the deliciousness that follows!
The Ultimate Fluffy Dinner Rolls
Ingredients
- 3½ cups all-purpose flour (plus more if needed)
- ¼ cup granulated sugar
- 1 tablespoon instant yeast
- 1 teaspoon salt
- 1 cup warm milk (about 110°F)
- ¼ cup unsalted butter, melted
- 1 large egg
- 2 tablespoons unsalted butter, melted (for brushing)
Instructions
- In a large mixing bowl, whisk together the flour, sugar, yeast, and salt.
- Add the warm milk, melted butter, and egg to the dry ingredients. Mix until a soft dough forms.
- Knead the dough by hand or with a stand mixer for about 8–10 minutes, until it is smooth and elastic. Add a little more flour if the dough is too sticky.
- Transfer the dough to a greased bowl, cover it, and let it rise in a warm place for 1 hour or until it has doubled in size.
- Punch down the dough and divide it into 12 equal pieces. Shape each piece into a smooth ball.
- Place the rolls in a greased 9×13-inch baking dish. Cover loosely and let them rise again for 30–45 minutes, until they are puffy.
- Preheat the oven to 375°F (190°C).
- Bake for 15–18 minutes, or until the tops are golden brown.
- Immediately brush the warm rolls with melted butter and let them cool slightly before serving.