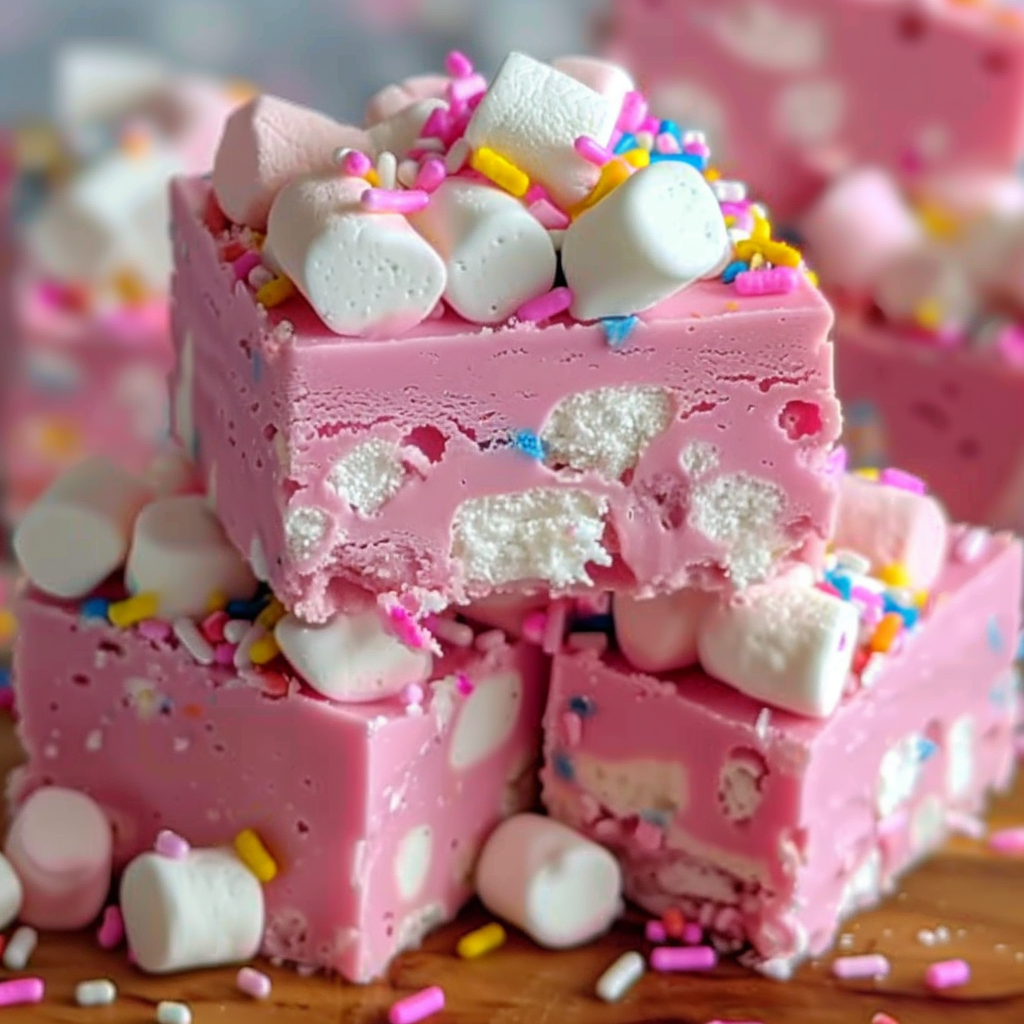
1.A Treat Straight From a Carnival Dream
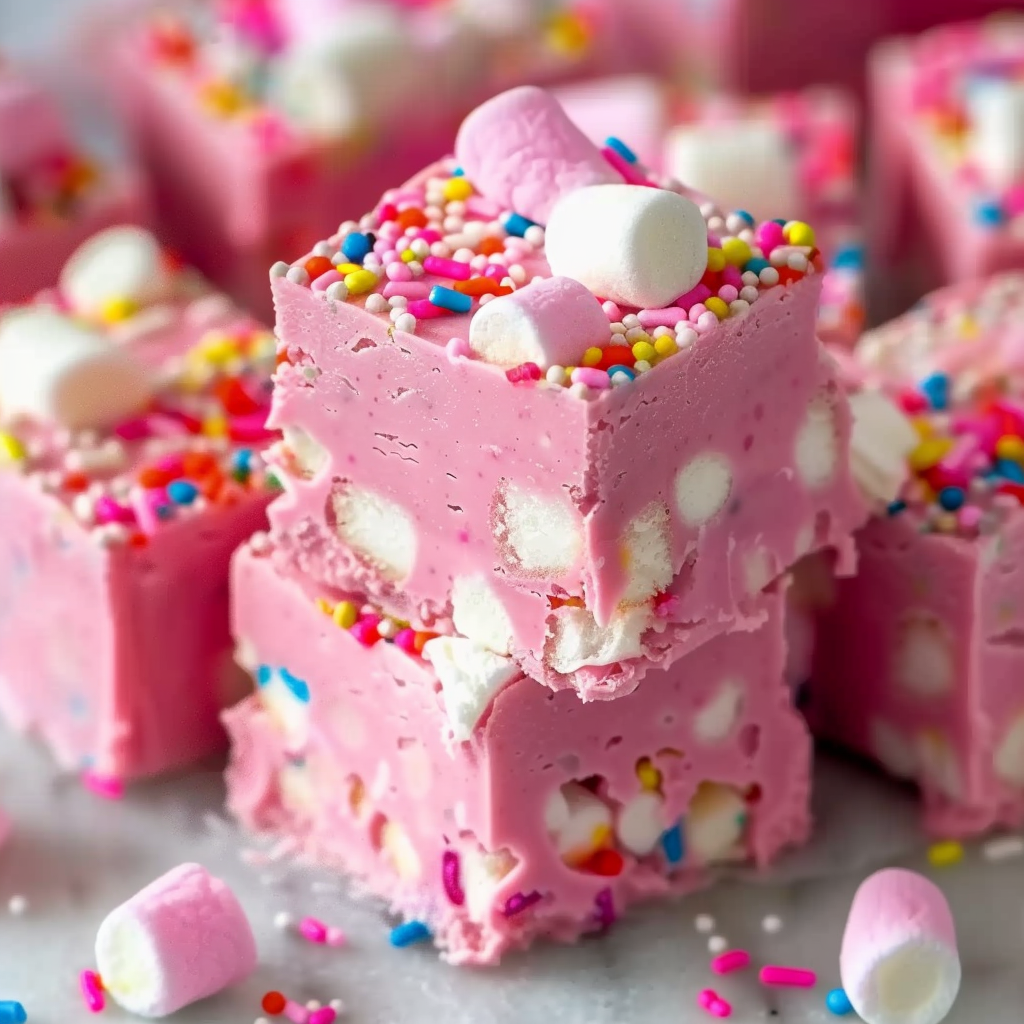
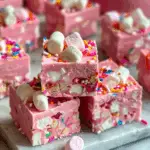
Imagine stepping into a world where carnival lights shimmer, cotton candy floats in the air, and every bite of dessert sparks a sense of childhood wonder. Bubblegum Cloud Fudge is exactly that—a no-bake, whimsical party treat designed to capture those nostalgic moments in a single, colorful bite. With its dreamy swirls of pink and blue, silky white chocolate base, and sweet bubblegum aroma, this fudge delivers both charm and flavor.
Whether you’re planning a birthday bash, organizing a bake sale, or just craving something playful, these bubblegum cloud fudge bars are a go-to. Not only are they visually stunning, but they’re also incredibly easy to make, with just a handful of pantry staples and zero oven time. Inspired by the vibrant colors of cotton candy, this recipe taps into that joyful carnival aesthetic—making it a guaranteed crowd-pleaser.
The fudge is built on a base of white chocolate chips and sweetened condensed milk, which gives it a smooth, creamy texture. A dash of bubblegum extract transforms it into a fun and flavorful treat, while gel food coloring creates marbled swirls reminiscent of the pastel hues seen at county fairs. Want to elevate it even more? Add sprinkles or edible glitter for that extra sparkle.
If you’re curious about the origins of these nostalgic flavors, check out the Wikipedia page on bubblegum, which explains its colorful history. And to explore more no-bake dessert inspiration, visit this curated Pinterest board on no-bake desserts. These bars don’t just taste like joy—they look like it too, making them ideal for any occasion where fun is on the menu.

2. What Is Bubblegum Cloud Fudge?
Bubblegum Cloud Fudge is a vibrant, no-bake dessert bar that captures the essence of fun through color, flavor, and texture. At its core, it’s a variation of traditional fudge—but instead of dark chocolate and nuts, it uses a smooth white chocolate base, enhanced with bubblegum flavoring and playful swirls of color. The result is a confection that’s not just sweet, but visually enchanting, resembling the swirling pastels of cotton candy.
Unlike dense, chewy fudge, this version is light and creamy. The use of sweetened condensed milk gives it a soft, melt-in-your-mouth texture without the need for a candy thermometer or intensive cooking. That’s what makes it especially appealing for beginners or anyone looking for a quick party dessert. A simple mix-and-pour process transforms pantry ingredients into a whimsical, candy-shop style treat.
The name “cloud” comes from its appearance and consistency. When you alternate pink and blue-colored mixtures in the pan and give them a slight swirl, the effect resembles fluffy, cotton candy clouds. If you’re unfamiliar with cotton candy’s history, you might enjoy reading more on its origin via Wikipedia’s cotton candy article.
What makes this fudge unique is the use of bubblegum extract. This flavoring, commonly used in nostalgic candies and ice creams, delivers a distinct sweetness that’s unmistakably playful. If you’re curious about other flavor profiles, Pinterest’s unicorn fudge ideas show how this type of recipe can be creatively adapted for a wide range of party themes.
More than just a sweet treat, Bubblegum Cloud Fudge represents a sensory experience—it’s nostalgic, colorful, and joyfully whimsical. Whether you’re 6 or 60, there’s something undeniably delightful about eating a dessert that looks and tastes like a childhood memory.
3. Why You’ll Love This Recipe
There’s something truly special about Bubblegum Cloud Fudge—it’s more than just a sweet treat. This no-bake dessert stands out because of its simplicity, visual charm, and unmistakable flavor, making it an instant favorite for kids, teens, and nostalgic adults alike. Here’s why it’s bound to become your go-to recipe for every festive occasion.
-
No baking required
One of the most appealing aspects of this recipe is that it’s completely no-bake. That means no oven, no preheating, and no complicated steps. Just melt, mix, swirl, and chill. It’s ideal for quick prep or when you want to involve children in the kitchen without worrying about hot surfaces. -
Visually stunning
The pastel swirls of pink and blue food coloring create a dreamy, cloud-like effect. This fudge looks like it came straight from a fantasy party table, inspired by the aesthetics of rainbow swirl fudge you’ll often find on Pinterest boards like this one. Add some edible glitter or sprinkles, and it instantly becomes party-ready. -
Kid-friendly flavor
The bubblegum extract gives this fudge a nostalgic sweetness that reminds many of bubblegum ice cream or old-school candy stores. If you’re looking to create desserts for kids’ birthday parties, this recipe ranks high on fun and flavor. For more inspiration, check out Pinterest’s kids birthday treats collection. -
Easy to store and gift
These bars store well in the refrigerator for up to a week, making them perfect for prepping in advance. Slice them into squares, wrap them in wax paper or cellophane bags, and you have delightful homemade gifts for holidays, bake sales, or party favors. -
Highly customizable
You can easily switch up the colors or flavors to suit different themes. Think holiday party dessert bars in red and green or unicorn fudge in multiple pastel shades. This flexibility is a big reason why the recipe remains a favorite among DIY bakers and dessert creators.
Whether you’re making treats for a school event, a carnival-themed party, or simply because you’re craving something sweet and playful, Bubblegum Cloud Fudge brings the magic every single time.
4. Key Ingredients & Their Role in the Recipe
Understanding the purpose of each ingredient in Bubblegum Cloud Fudge not only helps you make the perfect batch every time but also opens the door to creative customizations. This recipe relies on a handful of accessible ingredients, each chosen to deliver the desired flavor, texture, and visual impact. Let’s break them down.
White Chocolate Chips
White chocolate serves as the creamy, neutral base of the fudge. Its mild flavor lets the bubblegum extract shine, while its high fat content ensures a smooth and velvety consistency once melted. Be sure to use quality chips made with real cocoa butter—check the label to avoid overly processed versions with waxy texture.
Melting tip: Always use low heat and stir continuously to prevent the chocolate from seizing. You can learn more about this ingredient on Wikipedia’s white chocolate page, which details how it differs from milk or dark chocolate.
Sweetened Condensed Milk
This thick, sugary milk product is the secret to no-bake fudge’s creamy texture. When combined with white chocolate, it forms a rich and stable base that sets well in the refrigerator without needing boiling or candy thermometers.
Its concentrated sweetness also means you don’t need to add extra sugar to the recipe. You can explore the properties of this ingredient further via Wikipedia’s article on sweetened condensed milk.
Substitutions: For dairy-free versions, there are plant-based condensed milks available in most health food stores.
Bubblegum Extract
This is the defining flavor of the entire recipe. Bubblegum extract delivers a playful, nostalgic sweetness reminiscent of bubblegum ice cream or classic penny-candy flavors. It’s important to measure this extract carefully—too much can overpower, and too little might not come through the creamy white chocolate.
Not all bubblegum extracts taste the same; some may lean more toward banana or berry notes. You can experiment with brands or even try cotton candy extract as a fun variation. Learn about the history and flavor profile of this nostalgic ingredient on Wikipedia’s page on bubblegum.
Pink & Blue Gel Food Coloring
The visual appeal of Bubblegum Cloud Fudge comes largely from the marbled swirl of pastel pink and blue. Using gel food coloring is essential here—it’s more concentrated than liquid coloring, which means brighter results without thinning the mixture.
Technique tip: Divide your mixture evenly into two bowls, tint one pink and one blue, then drop alternating spoonfuls into the pan. Lightly swirl with a knife or skewer for the cloud effect. To explore more food styling ideas, visit Pinterest’s food coloring inspiration.
Sprinkles or Edible Glitter (Optional)
While optional, these toppings transform the fudge from cute to party-ready. Sprinkles add texture and fun, while edible glitter creates a magical sparkle that elevates the carnival vibe. This is especially great for holiday-themed treats, bake sales, or kids’ events.
For more visual inspiration, explore ideas for unicorn fudge and candy-style toppings on Pinterest’s unicorn fudge page. These toppings not only enhance presentation but also allow you to match themes, holidays, or party color palettes.
Essential Equipment Checklist
Making Bubblegum Cloud Fudge is simple, but having the right tools ensures smooth preparation and a polished final result. Here’s a breakdown of what you’ll need:
-
Saucepan: A medium-sized saucepan is perfect for melting the white chocolate chips and sweetened condensed milk together over low heat. Using a heavy-bottomed pan helps prevent scorching.
-
Mixing Bowls: Two medium bowls for dividing and tinting the fudge with pink and blue gel food coloring. Clear bowls make it easier to monitor color consistency.
-
8×8 Baking Pan: Standard size ensures uniform thickness for even setting. A metal or glass pan lined with parchment paper works best.
-
Parchment Paper: Prevents sticking and allows you to lift the fudge from the pan effortlessly.
-
Skewer or Knife: Used to gently swirl the colored fudge mixtures, creating the signature cloud effect.
-
Measuring Spoons & Cups: Accurate measurement of bubblegum extract and other ingredients is key for balanced flavor.
-
Spatula: Essential for scraping all the mixture into the pan and ensuring minimal waste.
Optional tools that can elevate the process:
-
Offset Spatula: Ideal for smoothing the top before adding sprinkles or edible glitter.
-
Decorating Tweezers: Helpful for precise placement of larger sprinkles or decorative elements.
Using the right equipment minimizes errors and ensures your bubblegum cloud fudge bars have that professional, party-ready finish. Preparing these tools ahead of time also allows you to focus on the fun, creative part of the recipe: swirling colors, adding sprinkles, and creating a dessert that’s visually stunning and delightfully nostalgic.
For inspiration on creative party dessert bars and styling techniques, check out Pinterest’s party dessert bars collection and learn more about white chocolate as a versatile ingredient on Wikipedia. These resources offer ideas to elevate your presentation and ensure your fudge looks as dreamy as it tastes.
Step-by-Step Instructions With Pro Tips
Creating Bubblegum Cloud Fudge is straightforward, but a few small tips can make the process smoother and ensure the best results. Follow these steps carefully for perfectly creamy, colorful fudge every time.
-
Prepare Your Pan
Line an 8×8-inch baking pan with parchment paper, leaving some overhang on the sides for easy removal. This prevents sticking and allows you to lift the fudge out once it has set. -
Melt the Base
In a medium saucepan over low heat, combine white chocolate chips and sweetened condensed milk. Stir constantly until the mixture is completely smooth. Avoid high heat to prevent the chocolate from seizing. -
Add Flavoring
Remove the saucepan from heat and stir in bubblegum extract. Accurate measurement ensures a balanced, playful sweetness that’s unmistakably bubblegum without being overpowering. -
Divide and Color
Pour the mixture evenly into two bowls. Tint one with pink gel food coloring and the other with blue. Mix until fully blended. For more visual inspiration, see Pinterest’s unicorn fudge ideas, which showcases similar color-swirl techniques. -
Create the Cloud Effect
Drop alternating spoonfuls of the pink and blue fudge into the prepared pan. Use a skewer or knife to gently swirl the colors, forming a soft, cotton candy-like pattern without overmixing. -
Optional Decoration
Sprinkle the top with edible glitter or colorful sprinkles for added whimsy. These small touches elevate the fudge, making it visually stunning and perfect for parties. -
Chill Until Firm
Refrigerate for at least 2 hours or until the fudge sets completely. This ensures clean slices and prevents crumbling. -
Cut and Serve
Lift the fudge out of the pan using the parchment overhang and cut it into squares. Store in an airtight container in the refrigerator to maintain texture and flavor.
Pro Tips for Success:
-
Use gel food coloring to avoid thinning the fudge mixture.
-
Swirl gently to maintain distinct colors—overmixing can muddy the pattern.
-
For easy cleanup, line your spatula with parchment paper when spreading the fudge evenly in the pan.
This step-by-step method guarantees a playful, creamy, and visually appealing bubblegum cloud fudge that’s perfect for birthday parties, bake sales, or carnival-themed events. For more party dessert inspiration, check Pinterest’s kids birthday treats collection.
Creative Variations on Bubblegum Cloud Fudge
One of the best things about Bubblegum Cloud Fudge is how easily it can be customized to fit any theme, flavor, or celebration. By tweaking colors, flavors, and toppings, you can transform this base recipe into countless playful versions that keep every batch exciting.
Flavor Swaps
-
Cotton Candy Extract: Amplifies the carnival feel for a more authentic, whimsical taste.
-
Strawberry or Raspberry Extract: Adds a fruity twist that pairs beautifully with the creamy white chocolate base.
-
Vanilla or Almond Extract: For a subtler flavor that lets the texture shine.
Color Combinations
-
Unicorn Swirl: Pastel rainbow effect achieved with multiple gel colors, perfect for themed parties.
-
Galaxy Style: Deep blues, purples, and a touch of black create a cosmic swirl that fascinates kids and adults alike.
-
Holiday Themes: Red and green for Christmas, orange and purple for Halloween, pink and red for Valentine’s.
Toppings and Add-Ins
-
Sprinkles: Rainbow, metallic, or themed shapes elevate the fun factor.
-
Pop Rocks: Add an exciting fizzy surprise to delight kids.
-
Mini Marshmallows or Crushed Candy: Introduce extra texture and bursts of flavor.
By experimenting with these variations, you can create personalized versions of Bubblegum Cloud Fudge suitable for every occasion. Explore inspiration and visual guides on Pinterest’s unicorn fudge page or check out Pinterest’s party dessert bars for additional creative ideas.
How to Store & Serve for Maximum Impact
Proper storage ensures your Bubblegum Cloud Fudge maintains its creamy texture and vibrant appearance. Store the bars in an airtight container in the refrigerator for up to a week. If you want to make them ahead of time for a bake sale or party, refrigerating overnight is perfect.
For longer storage, you can freeze the fudge for up to one month. Wrap each square individually in wax paper or plastic wrap to prevent sticking and frost buildup. When ready to serve, thaw in the refrigerator for a few hours or at room temperature for about 20–30 minutes.
Serving tips:
-
Cut into uniform squares for a neat presentation.
-
For themed events, layer with sprinkles, edible glitter, or mini candies that match your party’s color palette.
-
Arrange on a colorful platter or a tiered dessert stand to enhance visual appeal, especially for birthday parties or school events.
Occasions That Call for Bubblegum Cloud Fudge Bars
Bubblegum Cloud Fudge is versatile and fun, making it suitable for a wide range of occasions:
-
Birthday Parties: Colorful, playful, and kid-approved.
-
Bake Sales: Eye-catching and simple to package.
-
Gender Reveals: Customize colors to match the theme.
-
Slumber Parties: Fun for decorating and eating with friends.
-
School Events: Easy to make in large batches.
-
Carnival or Unicorn-Themed Events: Complements the theme perfectly with its pastel swirls.
This fudge is a perfect conversation starter and a visually appealing addition to any dessert table. Explore creative event-specific ideas on Pinterest’s kids birthday treats for inspiration.
Troubleshooting Common Issues
Even with a simple recipe like Bubblegum Cloud Fudge, small mistakes can affect texture and appearance. Here’s how to troubleshoot common issues:
-
Fudge Not Setting: Ensure you used the correct ratio of white chocolate to sweetened condensed milk. Refrigerate long enough for the mixture to firm.
-
Colors Mixing Too Much: Swirl gently; overmixing can muddy the pastel effect. Use a skewer or toothpick for delicate swirls.
-
Grainy Texture: Melt chocolate over low heat and stir constantly. Avoid overheating, which can cause seizing.
-
Flavor Too Strong or Weak: Measure bubblegum extract accurately. Taste before chilling to adjust if necessary.
-
Difficulty Cutting Cleanly: Use a sharp knife and warm it under hot water before slicing for smoother edges.
Additional inspiration and troubleshooting ideas can be found on Pinterest’s no-bake desserts collection and on Wikipedia’s page about food coloring to better understand how coloring impacts presentation.
Frequently Asked Questions (FAQs)
Can I use a microwave instead of a saucepan?
Yes, melt the white chocolate and sweetened condensed milk in 20-second intervals, stirring between each to avoid burning.
Is there a substitute for bubblegum extract?
Cotton candy extract, vanilla, or fruit-flavored extracts can be used, though the iconic bubblegum flavor may be slightly altered.
Can I freeze fudge for later?
Yes, wrap individual squares tightly and freeze up to one month. Thaw in the refrigerator before serving.
How long does homemade fudge last?
Stored in an airtight container, it lasts up to a week in the refrigerator. Freezing extends shelf life to about one month.
How do I cut fudge cleanly without it crumbling?
Use a sharp knife, warm it under hot water, and wipe between cuts for smooth, clean edges.
Bubblegum Cloud Fudge White Chocolate No Bake Party Bars
- Author: Naomi
Description
Bubblegum Cloud Fudge is a no-bake, white chocolate party treat with playful pink and blue swirls. Creamy, sweet, and visually whimsical, it’s perfect for birthdays, bake sales, school events, and carnival-themed parties. The addition of bubblegum extract brings nostalgic charm, while optional sprinkles or edible glitter make each square eye-catching and fun. Quick to prepare and simple to customize, these bars are ideal for both kids and adults seeking a joyful, colorful dessert experience.
Ingredients
- 3 cups white chocolate chips
- 1 (14 oz) can sweetened condensed milk
- 1 1/2 tsp bubblegum extract (or flavoring)
- Pink gel food coloring
- Blue gel food coloring
- Sprinkles or edible glitter (optional, for decoration)
Instructions
Line an 8×8-inch square baking pan with parchment paper and set aside.
In a medium saucepan over low heat, melt the white chocolate chips and sweetened condensed milk together, stirring constantly until smooth.
Remove from heat and stir in the bubblegum extract.
Divide the mixture evenly into two bowls. Tint one bowl with pink gel food coloring and the other with blue gel food coloring. Stir each until fully blended.
Drop spoonfuls of pink and blue fudge alternately into the prepared pan, creating a cloud-like pattern.
Use a knife or skewer to swirl the colors slightly for a marbled effect.
If desired, sprinkle the top with sprinkles or edible glitter for a fun, dreamy look.
Chill in the refrigerator for at least 2 hours or until firm.
Once set, lift the fudge out of the pan using the parchment paper and cut into squares. Store in an airtight container in the refrigerator.
Notes
-
Use high-quality white chocolate for a smooth, creamy base.
-
Adjust bubblegum extract carefully; too much can overpower the fudge.
-
Gel food coloring is preferred to maintain the consistency and vibrancy of the swirls.
-
Refrigerate at least 2 hours or until fully set before cutting.
-
Decorate with sprinkles or edible glitter for themed events or added fun.
-
Store in an airtight container in the refrigerator for up to one week or freeze for up to one month.
-
Experiment with flavor and color variations to match party themes or personal preferences.