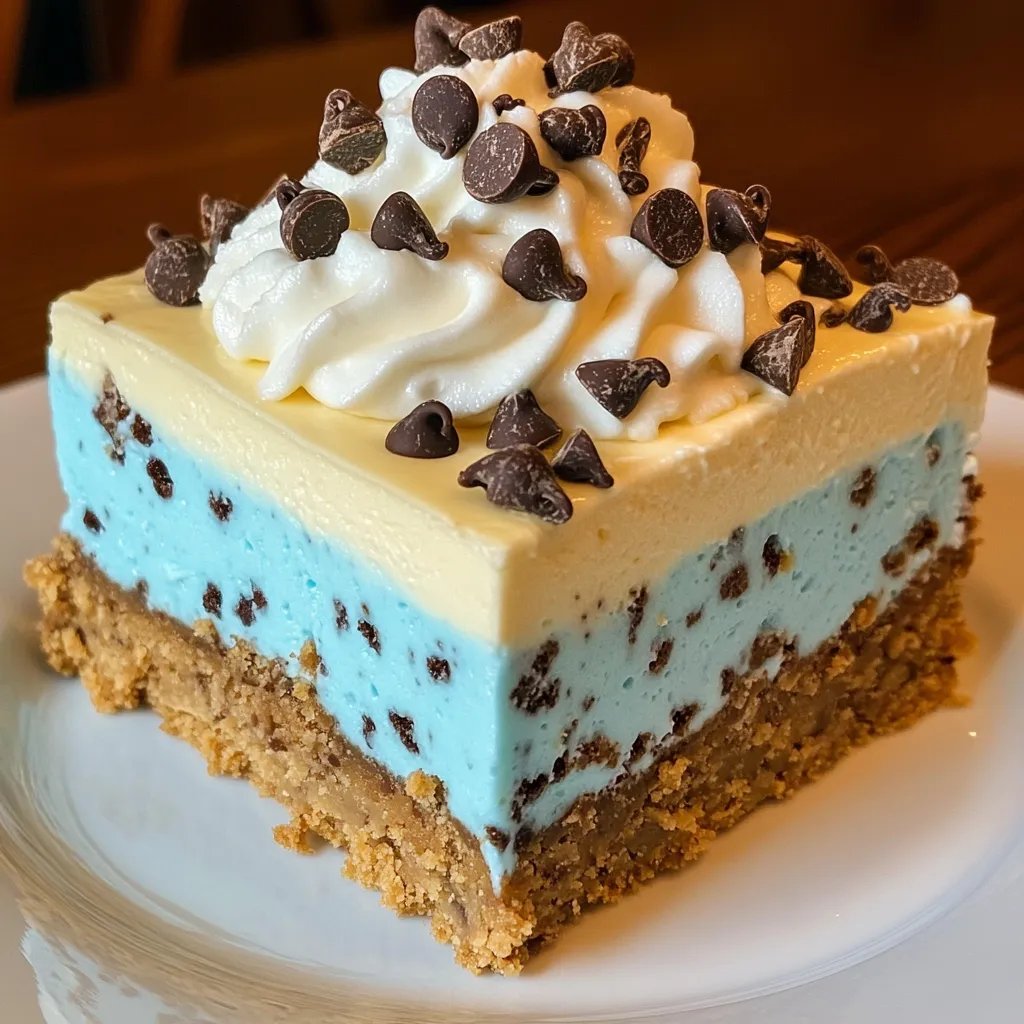
If you’re looking for a whimsical, show-stopping dessert that’s as much fun to make as it is to eat, this Cookie Monster Cheesecake has your name written all over it. Whether you’re prepping for a kid’s birthday party, a bake sale, or just feel like channeling your inner Sesame Street fan, this no-bake layered dessert is playful, colorful, and surprisingly simple to whip together.
The best part? There’s zero baking involved. From the chocolate cookie crust to the creamy blue cheesecake layer, and the soft pudding packed with mini cookies—each bite is packed with flavor and texture. Plus, with a bit of blue food coloring, you’ll end up with that classic Cookie Monster hue that’ll put a smile on everyone’s face.
Let’s dive into how to layer this delicious dessert from the bottom up.
INGREDIENTS YOU’LL NEED
Crust Layer:
- 24 chocolate sandwich cookies (like Oreos), crushed
- 5 tbsp melted butter
Cream Cheese Layer:
- 8 oz cream cheese, softened
- ½ cup powdered sugar
- 1 tsp vanilla extract
- 1 cup whipped topping (Cool Whip), thawed
- Blue gel food coloring (optional for that signature Cookie Monster look)
Pudding Layer:
- 1 package (3.4 oz) instant vanilla pudding mix
- 1 ½ cups cold milk
- ½ cup mini chocolate chip cookies (or crushed cookies)
Topping:
- 1 ½ cups whipped topping (Cool Whip)
- Additional mini cookies and chocolate chips for garnish
LET’S GET STARTED
STEP 1: MAKE THE CRUST
Start by crushing 24 chocolate sandwich cookies into fine crumbs. You can do this with a food processor or by placing them in a zip-top bag and rolling with a rolling pin. Mix the crumbs with 5 tablespoons of melted butter until they’re fully moistened.
Press this mixture evenly into the bottom of a 9×9-inch or 8×8-inch dish. Place the dish in the refrigerator while you prepare the next layers. This helps the crust set and gives you a nice firm base.
STEP 2: CREAM CHEESE LAYER
In a medium bowl, beat together the softened cream cheese, powdered sugar, and vanilla extract until smooth and creamy. Fold in 1 cup of thawed whipped topping until light and fluffy. For that fun Cookie Monster color, add a few drops of blue gel food coloring and stir until the color is even throughout.
Spread the blue cream cheese layer over the chilled cookie crust, smoothing the top with a spatula.

STEP 3: PREPARE THE PUDDING LAYER
In a separate bowl, whisk the instant vanilla pudding mix with cold milk for about 2 minutes, or until thickened. Fold in your mini chocolate chip cookies or some coarsely crushed chocolate sandwich cookies for a little crunch and texture.

FINISHING YOUR COOKIE MONSTER CHEESECAKE
Now that you’ve built your cookie crust and layered in the cream cheese and pudding mixtures, it’s time for the final (and most fun) part—topping, decorating, and chilling. This is where your Cookie Monster cheesecake really comes to life. The contrast between the bold blue layer, cookie crumbles, and whipped topping makes this dessert just as fun to look at as it is to eat.
Let’s get back to the steps!
STEP 4: ADD THE PUDDING LAYER
Once your pudding is thickened and mixed with mini cookies, spread it evenly over the blue cream cheese layer. Take your time here to make sure it’s level—this helps the dessert set with clean, even layers once it chills.
Place the dish back in the refrigerator while you move on to the topping.

STEP 5: TOP IT OFF
Spread 1 ½ cups of whipped topping over the pudding layer, smoothing it gently with a spatula or the back of a spoon. Try not to press too hard—you don’t want to mix the layers. This white topping gives you the perfect surface for decorating.
Now for the fun part: decorate with mini chocolate chip cookies, extra cookie crumbs, or even a sprinkle of chocolate chips across the top. You can even press a cookie upright into each square when serving, or drizzle a little chocolate syrup for extra flair.
If you’re going all out with the Cookie Monster theme, you could also use a small drop of blue gel food coloring swirled gently into the whipped topping before spreading it for a fun, marbled look.
STEP 6: CHILL AND SET
Cover the dish loosely with foil or plastic wrap and refrigerate for at least 3–4 hours, or until the cheesecake is fully set and holds its shape when sliced. Overnight is even better if you’re prepping ahead for a party or event.
This is a crucial step—rushing the chill time might leave you with a messier dessert, so let it set properly to ensure those beautiful, distinct layers.
TIPS & VARIATIONS TO MAKE IT YOUR OWN
- Switch up the cookies: Try using chocolate chip cookies or vanilla sandwich cookies in place of the Oreos for a fun twist.
- Use a chocolate pudding layer instead of vanilla if you want a double chocolate effect.
- Add sprinkles or candy eyes on top for a more playful, Cookie Monster-inspired presentation—especially fun for birthdays.
- Make it gluten-free by using gluten-free sandwich cookies and pudding mix.
You can also easily double this recipe and layer it in a larger 9×13-inch dish for a crowd. Just adjust the chill time slightly to ensure it’s fully set before slicing.

FREQUENTLY ASKED QUESTIONS ABOUT COOKIE MONSTER CHEESECAKE
Can I make this cheesecake ahead of time?
Yes! This no-bake dessert is perfect for prepping a day in advance. In fact, the flavors and layers hold up better when allowed to chill overnight.
Do I have to use blue food coloring?
Not at all. The blue color is optional and just adds a fun “Cookie Monster” vibe, especially for themed parties or kids’ desserts. Feel free to leave it out if you prefer a more classic look.
Can I use homemade whipped cream instead of Cool Whip?
Yes, you can use stabilized whipped cream as a substitute. Just make sure it holds its shape well so the layers don’t collapse over time.
What’s the best way to crush the sandwich cookies for the crust?
You can pulse them in a food processor until fine, or place them in a zip-top bag and crush them with a rolling pin. Either method works—just be sure to mix well with the melted butter for a firm base.
Can I freeze this dessert?
While it can technically be frozen, the texture of the whipped topping may change slightly. If you choose to freeze it, wrap it well and thaw in the refrigerator before serving.
Can I use a different flavor pudding?
Definitely! Vanilla pudding keeps it classic, but chocolate, cookies and cream, or even banana pudding would be fun and delicious variations.
FINAL THOUGHTS: A PLAYFUL DESSERT THAT ALWAYS WINS HEARTS
Whether you’re making this for a birthday party, a bake sale, or just a whimsical weekend treat, this Cookie Monster Cheesecake is guaranteed to be a crowd-pleaser. It’s got the perfect mix of creamy layers, crunchy cookies, and playful charm. And best of all? No oven required.
If you try this recipe, I’d love to hear how it turned out—especially if you added your own twist. Did you go all-in on the decorations? Switch up the pudding? Share your version in the comments and let others get inspired too.
And don’t forget: this dessert may be themed after a beloved blue character, but it’s something kids and adults will devour with equal joy. Happy no-baking!
Print
Cookie Monster Cheesecake – A Fun Dessert for All Ages
- Total Time: 6 hrs 25 min
Description
This no-bake cheesecake is as fun to look at as it is to eat! With a cookie crust, creamy blue cheesecake filling, and loads of chocolate chip cookies and Oreos, it’s a dessert that brings out your inner child.
Ingredients
For the crust:
-
24 Oreo cookies (with filling)
-
¼ cup melted butter
For the filling:
-
16 oz cream cheese, softened
-
1 cup powdered sugar
-
1 tsp vanilla extract
-
1 ½ cups heavy whipping cream
-
Blue food coloring (gel preferred)
-
½ cup mini chocolate chip cookies (plus extra for topping)
-
½ cup chopped Oreos (plus extra for topping)
For decoration (optional):
-
Whipped cream
-
Extra mini cookies and Oreo halves
Instructions
1️⃣ Make the crust:
Crush Oreos into fine crumbs using a food processor or bag and rolling pin. Mix with melted butter until combined. Press firmly into the bottom of a 9-inch springform pan. Chill in the freezer while you prepare the filling.
2️⃣ Whip the cream:
In a large mixing bowl, beat heavy cream until stiff peaks form. Set aside.
3️⃣ Prepare the filling:
In another bowl, beat cream cheese until smooth. Add powdered sugar and vanilla extract; beat until combined and creamy. Add a few drops of blue food coloring and mix until evenly colored.
4️⃣ Combine:
Gently fold the whipped cream into the cream cheese mixture. Once fully combined, fold in chopped mini cookies and Oreos.
5️⃣ Fill the pan:
Spread the cheesecake filling over the chilled crust, smoothing the top.
6️⃣ Chill:
Refrigerate for at least 6 hours, preferably overnight, until set.
7️⃣ Decorate and serve:
Top with whipped cream, extra cookies, and Oreo halves for a fun Cookie Monster look. Slice and serve cold!
Notes
-
For best results, use gel food coloring – it gives vibrant color without thinning the mix.
-
Use a mix of mini Chips Ahoy! and regular Oreos for that classic Cookie Monster look.
-
Freezes well – just thaw in the fridge before serving.
- Prep Time: 25 min
- Cook Time: 6 hrs chill time