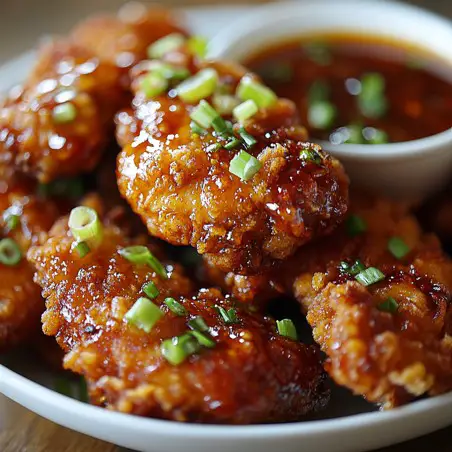
Double Crunch Honey Garlic Chicken Breasts is a dish that perfectly balances sweet, savory, and crispy elements, making it a favorite among home cooks. This recipe transforms simple chicken breasts into a culinary delight by coating them in a spiced flour mixture, frying them to golden perfection, and then bathing them in a rich honey garlic sauce. The result is a deliciously crispy exterior that encases tender, juicy chicken. Honey garlic chicken is a beloved staple in many households due to its universal appeal and the comfort it brings to the table. What sets this version apart is the “double crunch” achieved by a two-step coating and cooking process, ensuring an extra crispy texture that stays crunchy even when coated in the luscious sauce. Whether you’re serving it with rice, noodles, or vegetables, this dish is sure to impress and become a go-to recipe in your kitchen.
Ingredients Overview
The success of Double Crunch Honey Garlic Chicken Breasts lies in its carefully selected ingredients, each contributing to the dish’s flavor and texture. The primary ingredient, boneless, skinless chicken breasts, is chosen for its lean, tender meat that cooks evenly and absorbs the flavors of the spices and sauce. Boneless breasts are easy to work with, and their lack of skin ensures that the coating adheres well, creating the perfect crispy exterior.
The spice mix used in this recipe is a blend of ground ginger, paprika, nutmeg, thyme, sage, cayenne pepper, and black pepper. Each spice plays a crucial role in building a complex flavor profile. Ground ginger adds warmth and a slight pungency, while paprika contributes a mild sweetness and vibrant color. Nutmeg offers a subtle nutty flavor that deepens the overall taste, and thyme and sage bring earthy, aromatic notes that complement the chicken. A dash of cayenne pepper provides a hint of heat, balancing the sweetness of the honey, and black pepper rounds out the spice mix with its sharp, biting edge.
The sauce, featuring honey and garlic, is the star of the dish. Honey brings a natural sweetness and glossy finish, perfectly balancing the savory and spicy elements of the chicken. Garlic, with its robust and aromatic flavor, infuses the sauce with depth and richness, making it irresistibly flavorful.
For those looking to switch things up, chicken thighs can be used instead of breasts for a juicier, more flavorful alternative. Additionally, agave syrup or maple syrup can substitute for honey if needed, offering different nuances of sweetness while maintaining the dish’s integrity.
Preparing the Chicken
Properly preparing the chicken is a critical step to ensure even cooking and the desired texture in your Double Crunch Honey Garlic Chicken Breasts. This section will guide you through the process, ensuring that your chicken is perfectly prepped for the frying or baking stages.
Step 1: Pounding the Chicken for Even Cooking
To achieve consistent thickness, begin by placing each chicken breast between two sheets of plastic wrap or parchment paper. Using a meat mallet, gently pound the chicken breasts to an even ½ inch thickness. This step is essential for several reasons: it ensures that the chicken cooks evenly, reduces cooking time, and allows the chicken to absorb more flavor from the seasoning and spices. If a meat mallet isn’t available, you can use a rolling pin or a heavy skillet as an alternative.
Step 2: Slicing Techniques for Thinner Cuts
If you prefer thinner chicken pieces or if your chicken breasts are particularly large, you can opt to slice them horizontally. Place the chicken breast flat on a cutting board, and using a very sharp knife, carefully slice it in half to create two thinner pieces. This method not only helps with even cooking but also increases the surface area for the crispy coating, maximizing the “double crunch” effect.
Step 3: Seasoning the Chicken
Seasoning the chicken properly before dredging and cooking is crucial for depth of flavor. Start by sprinkling both sides of the chicken breasts with salt and freshly ground black pepper. This initial seasoning enhances the natural flavor of the chicken and ensures that every bite is well-seasoned. Additionally, the salt helps to tenderize the meat, making it juicier. For a more intense flavor, you can let the seasoned chicken rest for a few minutes, allowing the seasoning to penetrate the meat.
Creating the Flour and Spice Dredge
The flour and spice dredge is a key element in achieving the signature “double crunch” of this honey garlic chicken dish. This dredge not only provides the crispy coating but also infuses the chicken with a complex blend of flavors. Let’s break down the components and the process of creating the perfect dredge.
Detailed Breakdown of the Spice Mix
The spice mix in this recipe includes salt, black pepper, ground ginger, nutmeg, thyme, sage, cayenne pepper, and paprika. Each spice plays a crucial role in the final flavor profile:
- Salt: Essential for enhancing the overall taste and ensuring the chicken is well-seasoned.
- Black pepper: Adds a sharp, pungent kick that complements the other spices.
- Ground ginger: Contributes warmth and a subtle spiciness, balancing the sweetness of the honey.
- Nutmeg: Offers a slightly sweet, nutty undertone that deepens the flavor.
- Thyme and sage: Provide earthy, aromatic notes that bring a savory depth to the chicken.
- Cayenne pepper: Adds a touch of heat, which contrasts beautifully with the sweet honey sauce.
- Paprika: Delivers a mild sweetness and a vibrant red color, making the coating visually appealing and flavorful.
How to Properly Sift and Combine the Ingredients
To ensure an even distribution of spices in the dredge, it’s important to sift the flour and spices together. Start by measuring out the flour into a large bowl. Add the spices on top, and then use a fine mesh sieve to sift the entire mixture into another bowl. This process breaks up any clumps in the flour or spices, ensuring a smooth and even coating on the chicken.
Storing Excess Dredge for Future Use
This recipe’s flour and spice mixture is designed to make more than enough for a single batch of chicken, allowing you to store the excess for future use. After sifting, divide the dredge into two portions. Store the unused portion in a Ziploc bag or an airtight container, and place it in the freezer. This way, you’ll have a ready-made dredge on hand the next time you make this dish, saving time and ensuring consistency in flavor.
Making the Egg Wash
The egg wash is a crucial step in the coating process, serving as the binding agent that helps the flour and spice dredge adhere to the chicken, creating that desired crispy texture. Without the egg wash, the coating would not stick properly, resulting in an uneven or less crunchy exterior.
Proper Ratio of Eggs to Water
The ideal ratio for an egg wash is 4 eggs to 8 tablespoons of water. This ratio ensures that the mixture is fluid enough to coat the chicken evenly while still being thick enough to bind the dredge to the chicken. Whisk the eggs and water together in a shallow dish until fully combined, creating a smooth, consistent mixture.
Tips for Evenly Coating the Chicken
To ensure the chicken is evenly coated, dip each piece into the egg wash after the first dredging in the flour mixture. Make sure the chicken is fully submerged and then lift it out, allowing any excess egg wash to drip off. This step prevents the coating from becoming too thick or uneven. Proceed immediately to the final dredge in the flour mixture, pressing the coating onto the chicken to ensure it adheres well. This process will result in a uniform, crispy coating once cooked.
Cooking the Chicken: Frying Method
Frying the chicken to achieve the perfect “double crunch” is a key part of this recipe. Following these step-by-step instructions will help you achieve evenly cooked, golden-brown chicken that is crispy on the outside and tender on the inside.
Step-by-Step Frying Instructions
- Heat the Oil: Start by pouring about half an inch of canola oil into a large skillet. Canola oil is ideal for frying due to its high smoke point and neutral flavor. Heat the oil over medium heat, aiming for a temperature of around 350°F (175°C). To check if the oil is ready, you can drop a small piece of the flour mixture into the oil; if it sizzles and bubbles immediately, the oil is at the right temperature.
- Fry the Chicken: Carefully place the coated chicken breasts into the hot oil, making sure not to overcrowd the pan. Fry the chicken in batches if necessary. Cook each piece for about 4-5 minutes per side, or until the chicken is golden brown and crispy. The thinness of the chicken ensures it will cook through by the time the coating is browned.
- Drain the Chicken: Once cooked, remove the chicken from the oil using tongs and place it on a wire rack to drain. This allows excess oil to drip off and prevents the chicken from becoming soggy.
Tips for Ensuring Even Browning and Proper Cooking
- Maintain the Oil Temperature: Keep the oil at a steady temperature by adjusting the heat as needed. If the oil gets too hot, the coating will burn before the chicken is fully cooked; if too cool, the chicken will absorb more oil, leading to a greasy texture.
- Avoid Overcrowding the Pan: Frying too many pieces at once lowers the oil temperature, resulting in uneven cooking and soggy coating. Leave enough space between the chicken pieces to allow them to cook evenly.
- Monitor the Browning: Check the color of the coating as it fries. If one side is browning too quickly, lower the heat slightly and adjust the cooking time accordingly.
How to Avoid Common Frying Mistakes
- Oil Too Hot: If the oil is too hot, the outside of the chicken will brown too quickly, leaving the inside undercooked. Use a thermometer to monitor the oil temperature and adjust the heat as needed.
- Oil Too Cold: If the oil is too cold, the chicken will take longer to cook and absorb more oil, resulting in a greasy coating. Allow the oil to reheat between batches and avoid overcrowding the pan.
- Uneven Cooking: To prevent uneven cooking, make sure the chicken breasts are of uniform thickness and fry in batches, giving each piece enough space to cook properly.
Cooking the Chicken: Oven-Baked Method
For those seeking a healthier alternative to frying, the oven-baked method for Double Crunch Honey Garlic Chicken Breasts provides a lighter option while still delivering a satisfying crunch. By following this method, you can enjoy the same delicious flavors with less oil and fewer calories.
Alternative Baking Method for a Healthier Option
This baking method reduces the amount of oil used and minimizes the calories while maintaining the crispy texture that makes this dish so appealing. The key to success is preheating the baking sheet and carefully managing the baking process to mimic the results of frying.
Preheating and Preparing the Baking Sheet
Begin by preheating your oven to 425°F (220°C). While the oven heats up, place a baking sheet inside to preheat as well. Preheating the baking sheet is crucial because it ensures that the chicken starts cooking immediately upon contact, helping to develop a crispy crust without the need for excessive oil.
Once the oven and baking sheet are preheated, carefully remove the sheet and lightly coat it with a thin layer of canola oil or another vegetable oil. This layer of oil prevents the chicken from sticking and contributes to the crispy exterior. Be sure to work quickly to keep the sheet hot.
Tips for Achieving Crispiness in the Oven
- Spacing: Place the coated chicken breasts on the hot baking sheet, ensuring they do not touch each other. Leaving space between each piece allows hot air to circulate, which is essential for crisping the coating.
- Spraying with Oil: Lightly spray the tops of the chicken pieces with canola oil using a spray bottle. This extra layer of oil will help the coating become crispy as it bakes.
How to Flip and Monitor the Chicken Without Losing Heat
Bake the chicken on the middle rack for 15 minutes without opening the oven door. Maintaining the oven’s heat is crucial for even cooking and crispiness. After 15 minutes, carefully remove the baking sheet and flip each piece of chicken using tongs. Flipping the chicken ensures even browning on both sides.
Return the baking sheet to the oven and bake for an additional 10-15 minutes until the chicken is golden brown and crispy. Resist the temptation to open the oven door frequently, as this can cause heat loss and affect the crispiness of the coating.
Making the Honey Garlic Sauce
The honey garlic sauce is the heart of this dish, adding a rich, sweet, and savory glaze that perfectly complements the crispy chicken. Mastering the sauce’s preparation is key to achieving the balance of flavors that makes this recipe so irresistible.
Detailed Sauce Preparation
To begin, you’ll need the following ingredients: 3-4 cloves of minced garlic, 1 cup of honey, 1/4 cup of low-sodium soy sauce, 1 teaspoon of ground black pepper, and 2 tablespoons of olive oil. The combination of honey and soy sauce provides the signature sweet and salty balance, while the garlic adds depth and a slight pungency that cuts through the sweetness.
Cooking the Garlic Without Burning
Start by heating the olive oil in a medium saucepan over medium heat. Once the oil is hot, add the minced garlic. The key here is to cook the garlic gently to soften it without letting it brown. Stir the garlic continuously for about 1-2 minutes until it becomes fragrant and slightly golden. Be cautious not to overcook the garlic, as burnt garlic can turn bitter and overpower the sauce.
Achieving the Right Sauce Consistency
After the garlic has softened, add the honey, soy sauce, and ground black pepper to the saucepan. Stir the mixture well to combine all the ingredients. Bring the sauce to a gentle simmer, which helps thicken it and intensifies the flavors. Simmer the sauce for 5-10 minutes, stirring occasionally, until it reaches a slightly thickened, syrupy consistency. The sauce should coat the back of a spoon but still be pourable.
Balancing Sweetness and Saltiness in the Sauce
Taste the sauce as it simmers to ensure the right balance between sweetness and saltiness. If the sauce is too sweet, add a small splash of soy sauce to increase the saltiness. Conversely, if it’s too salty, add a little more honey. Adjusting the balance allows the sauce to complement, rather than overpower, the chicken.
Tips for Simmering and Cooling the Sauce
As the sauce simmers, keep an eye on it to prevent it from boiling too vigorously, which could cause it to thicken too quickly or burn. If you notice the sauce foaming up, reduce the heat to keep it at a gentle simmer.
Once the sauce has thickened to your liking, remove it from the heat and let it cool for a few minutes. Cooling allows the flavors to meld and gives the sauce a chance to thicken further. When ready, dip the cooked chicken into the sauce, ensuring it’s fully coated, and serve immediately.
This carefully prepared honey garlic sauce will add the perfect finishing touch to your Double Crunch Honey Garlic Chicken Breasts, enhancing the dish with its rich, balanced flavors.
Final Assembly: Dipping and Serving
After frying or baking your Double Crunch Honey Garlic Chicken Breasts to golden perfection, the final step is to dip them in the luscious honey garlic sauce. This step requires a bit of finesse to ensure the chicken is evenly coated without losing its signature crunch.
Proper Technique for Dipping Chicken in Sauce
To dip the chicken, use tongs to hold each piece, and gently lower it into the honey garlic sauce. Ensure that the entire surface of the chicken is submerged in the sauce. Lift the chicken out of the sauce and allow any excess to drip off before placing it on a serving platter. This method helps avoid oversaturating the coating, which can lead to sogginess.
Ensuring Even Coating Without Sogginess
For an even, glossy coating, dip the chicken in the sauce just before serving. If you dip too early, the sauce may start to absorb into the coating, making it less crispy. If you prefer a lighter sauce coating, you can brush the sauce onto the chicken using a pastry brush, which gives you more control over the amount of sauce.
Best Sides to Serve with the Chicken
Double Crunch Honey Garlic Chicken Breasts pair beautifully with a variety of sides. Serve the chicken over steamed rice or alongside fluffy noodles to soak up the extra sauce. For a balanced meal, add a side of steamed or stir-fried vegetables, such as broccoli, green beans, or bok choy. The fresh, crisp texture of the vegetables complements the rich, savory-sweet chicken, creating a satisfying and complete meal.
Tips and Tricks for Perfect Double Crunch Chicken
Achieving the perfect Double Crunch Honey Garlic Chicken Breasts requires attention to detail and a few expert tips to ensure the best results every time.
Expert Advice on Getting the Best Results
- Consistent Thickness: Ensure the chicken breasts are of uniform thickness by pounding them to about ½ inch. This promotes even cooking and prevents overcooking.
- Proper Oil Temperature: Use a thermometer to keep the oil around 350°F (175°C) when frying. This temperature ensures the coating crisps up without burning while the chicken cooks through.
Common Mistakes to Avoid
- Overcrowding the Pan: Avoid overcrowding the pan when frying. This can cause the oil temperature to drop, leading to soggy, unevenly cooked chicken. Fry in batches if necessary.
- Skipping Preheating in the Oven Method: If baking, always preheat the baking sheet to ensure the chicken starts crisping immediately, preventing it from sticking to the pan.
How to Customize the Recipe
- Spice Level: Adjust the cayenne pepper to control the heat. For a spicier version, increase the cayenne or add hot sauce to the honey garlic sauce.
- Alternative Sweeteners: Substitute honey with maple syrup or agave for a different sweetness profile.
Suggestions for Making the Recipe Ahead of Time
- Meal Prep: Prepare and cook the chicken ahead of time, but store the sauce separately. When ready to eat, reheat the chicken in the oven to restore its crispiness and then dip it in the freshly warmed sauce.
- Freezing: You can freeze the uncooked, coated chicken. When ready to cook, thaw it in the refrigerator, then fry or bake as usual.
FAQs
Can I use bone-in chicken for this recipe?
Yes, you can use bone-in chicken, but adjustments are needed. Bone-in pieces take longer to cook, so if frying, lower the heat slightly to ensure the inside cooks thoroughly without burning the coating. If baking, increase the cooking time and ensure the chicken reaches an internal temperature of 165°F (74°C).
What can I use as a substitute for honey?
Maple syrup or agave syrup are great substitutes for honey, offering a similar sweetness with a slightly different flavor profile. These alternatives will still give you a delicious sauce with the same glossy texture.
How do I store leftovers and reheat them without losing crunchiness?
Store leftovers in an airtight container in the refrigerator. To reheat, place the chicken on a wire rack in the oven at 350°F (175°C) for about 10 minutes. This method helps restore the crispiness without overcooking the chicken.
Can I freeze the cooked chicken?
Yes, you can freeze the cooked chicken. Let it cool completely, then store it in a freezer-safe container. To reheat, bake it in the oven at 375°F (190°C) until heated through and crispy again, about 20-25 minutes.
Conclusion
Double Crunch Honey Garlic Chicken Breasts is a standout dish that combines crispy, flavorful chicken with a sweet and savory honey garlic sauce. The recipe offers versatility in preparation, with options for both frying and baking to suit your preferences and dietary needs. The key to success lies in careful preparation, from pounding the chicken for even cooking to mastering the perfect flour and spice dredge, and finally, dipping the chicken in a rich, balanced sauce.
Whether you choose the traditional frying method for an extra-crispy finish or opt for the healthier oven-baked alternative, this recipe is sure to impress. The result is a delicious, crowd-pleasing meal that pairs well with a variety of sides, making it a versatile addition to your recipe collection. Give both methods a try to discover your favorite way to enjoy this delightful dish, and savor the irresistible combination of crunch and flavor in every bite.
Print
Double Crunch Honey Garlic Chicken Breasts
Description
Double Crunch Honey Garlic Chicken Breasts is a delectable dish that combines the irresistible crunch of a perfectly fried or baked chicken coating with the rich, sweet, and savory flavors of a honey garlic sauce. This recipe is a hit in any household, offering a delightful contrast of textures and flavors that will leave you craving more. Whether you’re preparing a comforting family dinner or impressing guests, this recipe is a versatile choice that pairs beautifully with a variety of sides like rice, noodles, or vegetables.
Ingredients
- 4 large boneless skinless chicken breasts
- 2 cups flour
- 4 tsp salt
- 4 tsp black pepper
- 3 tbsp ground ginger
- 1 tbsp freshly ground nutmeg
- 2 tsp ground thyme
- 2 tsp ground sage
- 1 tsp cayenne pepper
- 2 tbsp paprika
- 4 eggs
- 8 tbsp water
- 2 tbsp olive oil
- 3–4 cloves minced garlic
- 1 cup honey
- 1/4 cup soy sauce, low sodium soy sauce is best
- 1 tsp ground black pepper
- canola oil for frying
Instructions
TO MAKE THE FRYING VERSION
- Place the chicken breasts between 2 sheets of plastic wrap and using a meat mallet, pound the meat to an even 1/2 inch thickness. Alternatively, you can slice the breasts by placing them flat on a cutting board and using a very sharp knife to slice them into halves horizontally.
- Sift together the flour, salt, black pepper, ground ginger, nutmeg, thyme, sage paprika and cayenne pepper. NOTE: This flour and spice dredge mix is sufficient for two batches of this chicken recipe so divide the batch and store 1/2 in a Ziploc bag in the freezer. I always like to make enough for next time…and there’s always a next time with this recipe.
- Make an egg wash by whisking together the eggs and water.
- Season the chicken breasts with salt and pepper, then dip the meat in the flour and spice mixture. Dip the breast into the eggwash and then a final time into the flour and spice mix, pressing the mix into the meat to get good contact.
Cooking the chicken
- Heat a skillet on the stove with about a half inch of canola oil covering the bottom. You will want to carefully regulate the temperature here so that the chicken does not brown too quickly. The thinness of the breast meat practically guarantees that it will be fully cooked by the time the outside is browned. I find just below medium heat works well. I use a burner setting of about 4 1/2 out of 10 on the dial and fry them gently for about 4 or 5 minutes per side until golden brown and crispy.
- Drain on a wire rack for a couple of minutes before dipping the cooked breasts into the Honey Garlic Sauce. Serve with noodles or rice.
- To make the Honey Garlic Sauce:
- In a medium saucepan add the 2 tbsp olive oil and minced garlic. Cook over medium heat to soften the garlic but do not let it brown.
- Add the honey, soy sauce and black pepper.
- Simmer together for 5-10 minutes, remove from heat and allow to cool for a few minutes. Watch this carefully as it simmers because it can foam up over the pot very easily.
TO MAKE THE OVEN BAKED VERSION
- Follow the recipe exactly as for the fried version but while you are preparing the chicken, heat a baking sheet in a 425F degree oven. Preheating the pan does 2 things; it prevents the chicken from sticking to the pan and it ensures that the heat from the oven starts going directly into the crust on the chicken to make sure it becomes crispy.
- Dip all your chicken pieces and coat as instructed. As you finish individual pieces, lay them out on a lightly floured cutting board while you finish getting them all ready.
- When the pieces are all ready, take the hot pan from the oven and lightly oil the bottom of the baking pan with canola oil or other vegetable oil. Use only enough to coat the bottom of the pan.
- Working as quickly as possible, transfer the chicken pieces to the oiled pan. Do not crowd the pieces together. They should NOT touch each other or they will steam and not get crispy. Leave at least an inch of space between all pieces.
Cooking the chicken
- Lightly spray the tops of the chicken pieces with vegetable oil. I recommend that you have a spray bottle filled with canola oil to use in any oven fried recipe for chicken, including this one. A simple pump bottle will do. Spraying the tops helps them start to get crispy in the hot oven too.
- Maintain the heat at 425 degrees F and place baking sheet in the oven. I use the second lowest rack in my oven.
- Bake for 15 minutes without opening the door! Take the pan out of the oven and flip all of the chicken pieces over.
- Return to the oven for another 10-15 minutes until the chicken pieces brown nicely and become crispy. Again don’t open the door, maintaining a hot oven is important for this method.
- Dip the baked pieces in the sauce as usual and serve immediately.
Notes
For best results, ensure that the chicken breasts are pounded to an even thickness, which guarantees even cooking and a tender, juicy interior. If you’re short on time, consider making the flour and spice dredge in advance and storing it in the freezer for future use. The honey garlic sauce can also be customized to suit your taste—adjust the sweetness or heat level by modifying the amount of honey or cayenne pepper. Lastly, both frying and baking methods offer excellent results, so choose the one that best fits your preference or dietary needs. Enjoy this dish fresh for the crispiest texture, and reheat leftovers in the oven to maintain that satisfying crunch.


