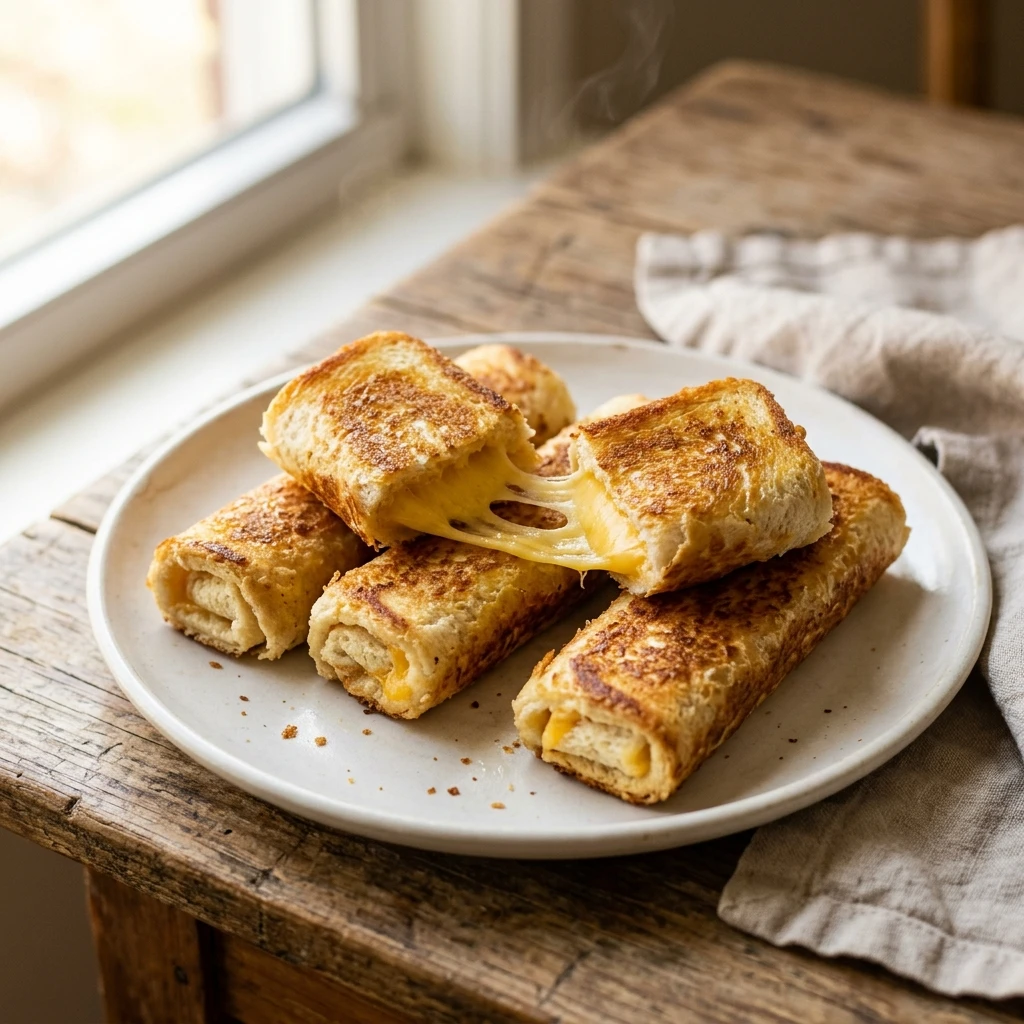
Grilled Cheese Roll Ups are a delightful twist on the classic sandwich that every cheese lover will adore. These crispy, cheesy bites are perfect for quick snack ideas, easy toddler meals, or fun kids’ sandwich ideas. Imagine the aroma of melting cheese wafting through your kitchen as you prepare these tasty treats. The golden-brown crust, combined with a gooey, melty center, creates an irresistible snack that will have everyone coming back for more. Whether you’re serving them for a weeknight dinner or packing them in a lunchbox, these roll-ups are sure to become a family favorite.
- Why This Recipe Is Worth Your Time
- Main Ingredients
- Tools Needed
- Step-by-Step Instructions
- Pro Tips for Perfect Grilled Cheese Roll Ups
- Serving Ideas and Pairings
- Variations and Swaps for Grilled Cheese Roll Ups
- Leftovers and Storage Tips
- Nutrition Notes
- Frequently Asked Questions About Grilled Cheese Roll Ups
Why This Grilled Cheese Roll Ups Is Worth Your Time
Grilled Cheese Roll Ups stand out from traditional sandwiches for a variety of reasons. First, they offer a fun, interactive eating experience that kids love. The crispy exterior pairs wonderfully with the gooey cheese inside, creating a perfect balance of textures. Additionally, these roll-ups are incredibly versatile; you can customize them with different types of cheese or seasonings to suit your taste. They also cook quickly, making them an ideal choice for busy weeknights or spontaneous snack cravings. With their appealing shape and delicious flavors, Grilled Cheese Roll Ups are sure to impress everyone at the table.
Main Ingredients for Grilled Cheese Roll Ups
These Grilled Cheese Roll Ups are made with simple ingredients that you likely already have in your kitchen. Here’s what you will need:
- 8-10 slices soft white sandwich bread: This forms the base of our roll-ups. The soft texture allows for easy rolling.
- 8-10 slices melting cheese: Choose from Cheddar, American, Monterey Jack, Colby Jack, or Provolone. These cheeses melt beautifully and provide that signature grilled cheese flavor.
- 4-5 tablespoons unsalted butter: This will be used to crisp up the roll-ups. Softened or melted butter ensures even coverage.
- Optional seasonings: 1/4 teaspoon garlic powder, a pinch of paprika, or dried Italian herbs can elevate the flavor of your roll-ups.
Tools Needed for Grilled Cheese Roll Ups
| Tool | Purpose / what it helps with |
| Rolling pin | To flatten the bread, making it easier to roll and ensuring it cooks evenly. |
| Skillet | For cooking the roll-ups to achieve a crispy texture on all sides. |
| Tongs | To safely turn the roll-ups while cooking without damaging them. |
| Butter knife | For spreading the butter evenly across the bread. |
Step-by-Step Instructions for Grilled Cheese Roll Ups
Making Grilled Cheese Roll Ups is a straightforward process. Follow these steps to create your own delicious version:
- Begin by laying one slice of crustless bread on a clean, flat surface. Using a rolling pin, gently roll the bread until it is as thin as possible, aiming for a thickness of about 1/16 to 1/8 inch. Roll in multiple directions to ensure even flattening. Repeat this process with all slices of bread, as achieving the right thickness is essential for rolling tightly without tearing.
- Next, position a slice of cheese (or a neat line of shredded cheese) along one edge of the flattened bread, leaving a small border of approximately 1/4 inch on the sides. If desired, sprinkle optional seasonings like paprika or herbs over the cheese at this stage.
- If you are using softened butter, gently spread a thin, even layer of it over the entire surface of each roll-up. This step can be delicate but will yield great results.
- Carefully place the buttered roll-ups seam-side down in a preheated skillet. It may be necessary to cook them in batches to prevent overcrowding the pan, which could lower the temperature and result in less crispy roll-ups.
- Cook the roll-ups for 2-4 minutes on the first side, or until they are golden brown and crispy.
- Using tongs, gently turn the roll-ups to cook on another side. Continue to cook and turn for approximately 1-2 minutes per side until all sides are golden brown and crispy, and the cheese inside is fully melted and gooey. This process typically takes a total of 5-8 minutes. Don’t worry if some cheese oozes out; it’s perfectly normal and will create tasty, crispy cheese bits on the outside!
- Serve the roll-ups immediately while they are hot, the bread is crispy, and the cheese is at its meltiest. Enjoy!
Pro Tips for Perfect Grilled Cheese Roll Ups
- Ensure the bread is rolled thin enough to create a tight roll without tearing.
- Use a mix of cheeses for a more complex flavor profile.
- Don’t rush the cooking; a lower heat will help achieve that perfect golden crust.
- Experiment with different seasonings for a unique twist each time.
- Make sure to serve immediately for the best texture and flavor.
- For extra crunch, you can sprinkle some breadcrumbs on the buttered sides before cooking.
- If the cheese oozes out, don’t worry; those crispy bits are a delicious bonus!
Serving Ideas and Pairings
- Serve with marinara sauce or ketchup for dipping.
- Pair with a side salad for a balanced meal.
- Offer a selection of fresh fruits or veggies on the side.
- Enjoy with a glass of milk or a fruit juice.
- Top with fresh herbs for a pop of color and flavor.
Variations and Swaps for Grilled Cheese Roll Ups
Faster Weeknight Version
For a quicker version, use pre-sliced cheese and ready-made garlic butter spread. This will save you time on prep and still yield delicious results.
Lighter Version
Try using whole grain bread and a reduced-fat cheese option for a lighter take on these roll-ups.
High-Protein Version
Add cooked chicken or turkey slices along with the cheese for a protein boost that will keep you fuller longer.
Budget-Friendly Version
Use store-brand bread and cheese to keep costs low while still enjoying the delicious flavors of grilled cheese roll-ups.
Leftovers and Storage Tips
- Leftover roll-ups can be stored in an airtight container in the fridge for up to 3 days.
- To reheat, place in a skillet over low heat until warmed through, about 3-5 minutes.
- You can also reheat in an oven at 350°F for 10 minutes to restore crispiness.
- These roll-ups do not freeze well due to the texture of the bread; it’s best to enjoy them fresh.
Nutrition Notes
Each serving of Grilled Cheese Roll Ups is approximately 250-300 calories, depending on the type and amount of cheese used. They are a good source of carbohydrates and protein but can be adjusted for different dietary needs by swapping out ingredients. For a gluten-free version, use gluten-free bread and cheese. Always check labels for any allergens.
Frequently Asked Questions About Grilled Cheese Roll Ups
Can I make Grilled Cheese Roll Ups ahead of time?
Yes, you can prepare the roll-ups and store them in the fridge for up to 3 days. Just reheat before serving.
What types of cheese work best for Grilled Cheese Roll Ups?
Cheddar, American, Monterey Jack, Colby Jack, or Provolone are all great choices as they melt well.
Are Grilled Cheese Roll Ups suitable for kids?
Absolutely! Grilled Cheese Roll Ups are a fun and kid-friendly meal that children love.
How can I customize my Grilled Cheese Roll Ups?
You can customize your roll-ups by adding different seasonings, using various cheeses, or incorporating meats and veggies.
Try making these Grilled Cheese Roll Ups for your next snack or meal. They are easy to prepare, delicious, and perfect for any occasion. Enjoy the crispy, cheesy goodness that will surely become a staple in your home!

Cheesy Roll-Up Delight
Ingredients
- 8-10 slices soft white sandwich bread (crusts removed)
- 8-10 slices melting cheese (Cheddar, American, Monterey Jack, Colby Jack, or Provolone)
- 4-5 tablespoons unsalted butter, softened to room temperature or melted
Instructions
- Begin by laying one slice of crustless bread on a clean, flat surface. Using a rolling pin, gently roll the bread until it is as thin as possible, aiming for a thickness of about 1/16 to 1/8 inch. Roll in multiple directions to ensure even flattening. Repeat this process with all slices of bread, as achieving the right thickness is essential for rolling tightly without tearing.
- Next, position a slice of cheese (or a neat line of shredded cheese) along one edge of the flattened bread, leaving a small border of approximately 1/4 inch on the sides. If desired, sprinkle optional seasonings like paprika or herbs over the cheese at this stage.
- If you are using softened butter, gently spread a thin, even layer of it over the entire surface of each roll-up. This step can be delicate but will yield great results.
- Carefully place the buttered roll-ups seam-side down in a preheated skillet. It may be necessary to cook them in batches to prevent overcrowding the pan, which could lower the temperature and result in less crispy roll-ups.
- Cook the roll-ups for 2-4 minutes on the first side, or until they are golden brown and crispy.
- Using tongs, gently turn the roll-ups to cook on another side. Continue to cook and turn for approximately 1-2 minutes per side until all sides are golden brown and crispy, and the cheese inside is fully melted and gooey. This process typically takes a total of 5-8 minutes. Don't worry if some cheese oozes out; it's perfectly normal and will create tasty, crispy cheese bits on the outside!
- Serve the roll-ups immediately while they are hot, the bread is crispy, and the cheese is at its meltiest. Enjoy!