

When it comes to snacks, it’s hard to beat the comforting combination of garlic, butter, and cheese. Enter garlic Parmesan pizza rolls—a bite-sized treat that’s bursting with flavor and perfect for satisfying your cravings. These little rolls are a fantastic way to elevate pizza night, and they make the ideal party appetizer, snack, or even a fun addition to your family dinner. With just a few simple ingredients and a bit of time, you’ll have a cheesy, garlicky, golden snack that will disappear before you know it.
I first came across these garlic Parmesan pizza rolls at a friend’s house, and from that moment, I was hooked. The crispy, buttery exterior combined with the melty, cheesy center is honestly a game-changer. They’re incredibly easy to make, especially when using refrigerated pizza dough (though I’ll explain how to make them with homemade dough too, if you’re feeling adventurous). The best part? You don’t need to be an expert in the kitchen to pull off this recipe. If you can roll dough and spread a little garlic butter, you’re all set!
Let’s get into it!
Ingredients:
- 1 package refrigerated pizza dough (or homemade dough)
- 1/4 cup unsalted butter, melted
- 3 cloves garlic, minced
- 1/2 teaspoon dried oregano
- 1/2 teaspoon dried basil
- 1/2 cup grated Parmesan cheese
- 1/2 cup shredded mozzarella cheese
- 1/4 teaspoon red pepper flakes (optional)
- 1 tablespoon fresh parsley, chopped (for garnish)
Step 1: Preheat and Prepare Your Baking Sheet
Start by preheating your oven to 375°F (190°C). This temperature is ideal for getting those pizza rolls golden and crispy without burning the garlic or cheese. While the oven is warming up, line a baking sheet with parchment paper or lightly grease it with cooking spray. The parchment paper will make cleanup easier, and it helps prevent the rolls from sticking to the pan.
A well-prepared baking sheet is essential for making sure the rolls bake evenly and get that perfect golden crust we all crave. It’s a small step, but it sets the stage for a smooth baking process!

Step 2: Roll Out the Pizza Dough
Next, roll out the pizza dough onto a lightly floured surface. You’ll want to aim for a rectangle that’s about 10×12 inches in size. This doesn’t need to be perfect—just roughly that shape will do. The dough will be the base for all that delicious garlic, butter, and cheese, so it’s important to get it evenly rolled out so every bite is full of flavor.
If you’re using homemade dough, great! Just be sure to let it rise before rolling it out. Store-bought dough is a quick and easy shortcut, but homemade dough can elevate the flavor and texture if you’ve got the time.

Step 3: Prepare the Garlic Butter Mixture
Now comes the magic part. In a small bowl, combine the melted butter, minced garlic, dried oregano, and dried basil. Stir it all together until the garlic is well-distributed in the buttery mixture. The smell of garlic and butter is going to fill your kitchen, and trust me, it’s irresistible.
This garlic butter mixture will coat the dough and infuse it with so much flavor. The oregano and basil add a nice herby touch that pairs perfectly with the cheesy goodness we’re about to add. If you’re someone who loves a little heat, sprinkle in a bit of red pepper flakes (I’ll get into that in just a bit). But for now, let’s focus on getting the dough ready for its garlic butter makeover.

Step 4: Brush the Dough with Garlic Butter
Take your garlic butter mixture and generously brush it over the entire surface of the pizza dough. Make sure to coat it evenly, getting all the way to the edges. The more garlic butter you can get on there, the better. After all, this is what gives the pizza rolls that rich, savory flavor we all love.
As you brush, feel free to add extra butter if you want a more indulgent taste. It’s hard to go wrong here—just let your nose guide you as you spread that glorious mixture.

Rolling, Baking, and Perfecting Your Pizza Rolls:
Now that your dough is coated with that flavorful garlic butter mixture, it’s time to move on to the next steps to make these garlic Parmesan pizza rolls truly irresistible. With just a few more simple actions, you’ll be ready to pop them in the oven and enjoy their golden, cheesy goodness.
Step 5: Add the Parmesan and Mozzarella Cheese
Once the dough is generously coated in garlic butter, it’s time to layer on the cheese. Start by sprinkling the grated Parmesan cheese evenly over the entire surface of the dough. Parmesan brings that sharp, salty kick that complements the creamy mozzarella so perfectly. Then, follow with the shredded mozzarella cheese, covering the dough with an even layer. Mozzarella is key here because it melts so beautifully, creating the gooey, cheesy texture inside the rolls.
Take your time with this step to make sure both cheeses are distributed evenly. The more cheese you can add, the more deliciously cheesy your rolls will be. But be careful not to overdo it—just enough to create that melty, cheesy center in every bite.

Step 6: Roll Up the Dough
Here comes the fun part: rolling the dough into a log! Starting from one end of the dough, carefully roll it up tightly into a log shape. Try to keep the roll as even as possible, so the pizza rolls cook evenly and look neat when sliced. Don’t worry about being perfect here—just make sure the dough is tightly rolled so that the cheese doesn’t escape during baking.
Once the dough is rolled up, you’ll have a long log of pizza dough filled with garlic butter, cheese, and herbs. This is the moment when you can already imagine how delicious those rolls are going to be. The aroma from the garlic butter and cheese will have you eagerly awaiting the final product!

Step 7: Slice the Rolled Dough
Now that your dough is rolled up, it’s time to slice it into individual pizza rolls. Using a sharp knife, carefully slice the rolled dough into 1-inch pieces. You should get about 10-12 rolls, depending on how tightly you rolled the dough. Try to make each slice even so that the rolls bake uniformly. A serrated knife works really well here, as it will prevent the dough from being squished while slicing.
As you slice each roll, place it carefully on the prepared baking sheet. Leave a little space between each roll to ensure they have room to puff up and bake evenly. Don’t worry if the rolls look a bit messy at first—the beauty of these rolls is that they will turn golden and perfect once they’re baked.

Step 8: Add Red Pepper Flakes (Optional)
If you like a bit of heat in your snacks, now’s the time to sprinkle the rolls with red pepper flakes. This step is entirely optional, depending on how spicy you want your pizza rolls to be. The red pepper flakes give the rolls a subtle kick that balances the richness of the garlic and cheese, making them even more addictive.
If you’re serving these to a crowd, you can always leave the red pepper flakes on the side as an option for those who enjoy a bit of spice. But trust me, it adds just the right amount of warmth to the dish without overpowering the other flavors.
Step 9: Bake the Rolls
Now that your pizza rolls are assembled and ready, it’s time to bake them. Place the baking sheet in the preheated oven and bake the rolls for 12-15 minutes, or until they’re golden brown and the cheese is melted and bubbly. Keep an eye on them as they bake, especially towards the end of the cooking time, so they don’t burn. The rolls should puff up a bit and get a nice, crispy exterior while the inside remains gooey and cheesy.
As they bake, your kitchen will start to smell amazing. The combination of garlic, cheese, and freshly baked dough will be hard to resist. You may want to sneak a peek into the oven every now and then to watch them get golden and delicious.
Now that your garlic Parmesan pizza rolls are out of the oven, golden brown, and bubbling with cheese, it’s time to add a few finishing touches and serve them up. These little rolls are perfect for sharing, and they’re sure to impress anyone lucky enough to get a taste. But before we dive into serving suggestions, let’s take a moment to answer some common questions about these delicious rolls.
Step 10: Garnish and Serve
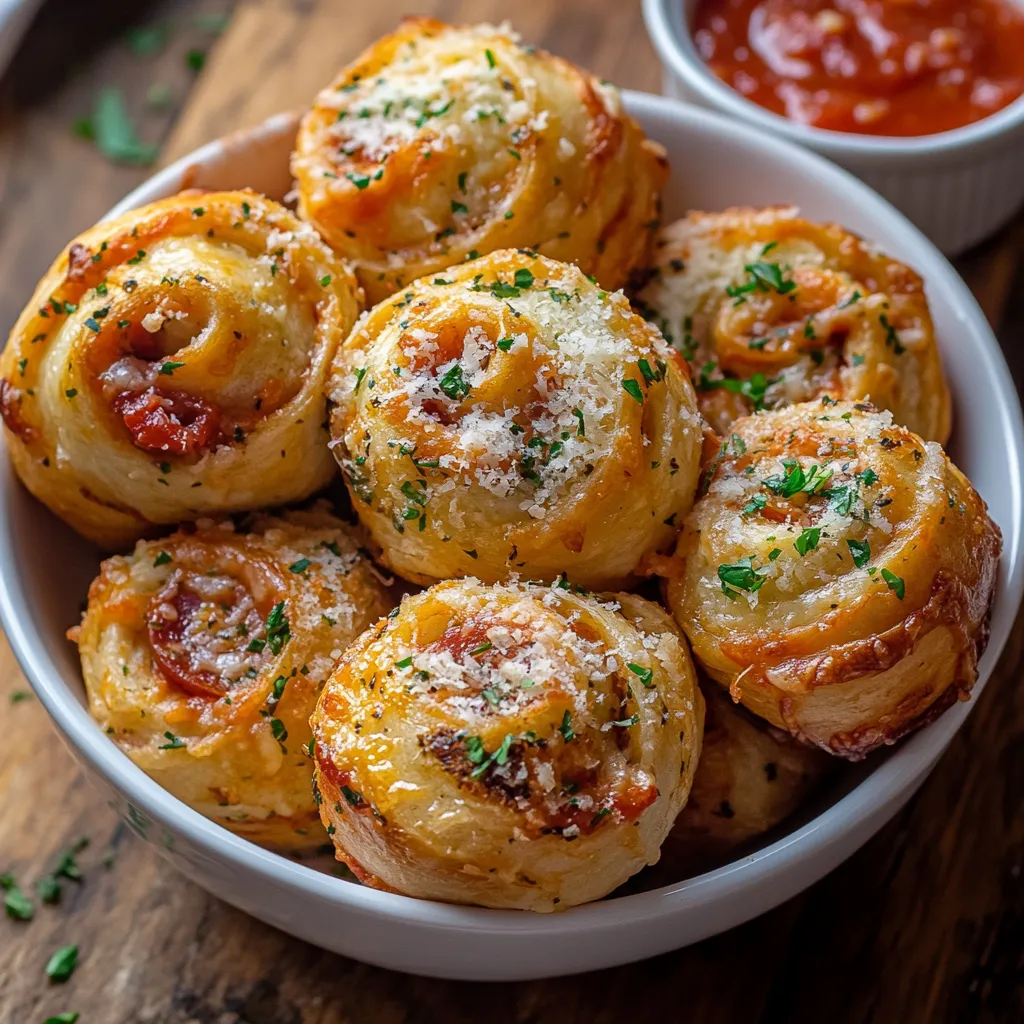
Once the rolls are baked to perfection, remove them from the oven and let them cool for just a minute. This allows the cheese to set slightly so that you can enjoy each roll without everything falling apart. After that, sprinkle the rolls with freshly chopped parsley for a burst of color and a little freshness that balances the richness of the garlic and cheese.
The parsley adds a nice visual contrast to the golden rolls and enhances the overall flavor. It’s a simple step, but it takes these rolls from great to extraordinary.
Serve these garlic Parmesan pizza rolls warm, ideally with a side of marinara sauce for dipping. The tangy, savory sauce pairs beautifully with the rich, cheesy rolls, making each bite even more indulgent. Whether you’re serving them as an appetizer, a snack, or a side dish, these pizza rolls are always a crowd-pleaser.

FAQ Section:
1. Can I make garlic Parmesan pizza rolls ahead of time?
Yes, you can prepare the rolls ahead of time! If you want to make them in advance, you can assemble the rolls and store them in the fridge for up to a day before baking. Just cover the baking sheet with plastic wrap or foil and refrigerate. When you’re ready to bake, simply pop them in the oven and follow the baking instructions. Keep in mind that they may need an extra minute or two in the oven since they’ll be chilled.
2. Can I use homemade pizza dough instead of refrigerated dough?
Absolutely! Homemade pizza dough will work wonderfully here and add a personal touch to your pizza rolls. If you’re using homemade dough, be sure to let it rise properly before rolling it out. The homemade dough will give your rolls a slightly thicker, chewier texture, which is a fantastic addition to the flavor.
3. Can I add other toppings to the pizza rolls?
Yes, the beauty of these pizza rolls is that you can customize them to suit your tastes. Feel free to add other pizza toppings like pepperoni, cooked sausage, or even vegetables like mushrooms or bell peppers. Just be sure not to overload them, as too many fillings can make the rolls difficult to slice and bake evenly.
4. Can I make these pizza rolls without cheese?
While cheese is a big part of what makes these pizza rolls so indulgent, you can make them without it if you prefer a lighter snack. If you skip the cheese, you can still brush the dough with the garlic butter and season with herbs, creating a flavorful breadstick-like treat. For a dairy-free version, you can use dairy-free cheese or simply omit it altogether and enjoy the rich garlic flavor.
5. How do I store leftover pizza rolls?
If you happen to have any leftover garlic Parmesan pizza rolls, you can store them in an airtight container at room temperature for up to 2 days. To reheat, place them in a preheated oven at 350°F (175°C) for about 5-7 minutes until they’re warmed through and the cheese is melty again. You can also reheat them in the microwave for a quicker option, though they won’t have quite the same crispy texture.
6. Can I freeze garlic Parmesan pizza rolls?
Yes, you can freeze these pizza rolls for later! After baking, allow them to cool completely before storing them in an airtight container or freezer bag. They’ll keep in the freezer for up to a month. When you’re ready to eat them, simply reheat them in the oven at 350°F (175°C) for about 10 minutes, or until they’re hot and crispy.
Conclusion: A Snack Worth Making Again and Again
Garlic Parmesan pizza rolls are the kind of snack that makes everyone smile. They’re easy to make, full of flavor, and completely customizable to your liking. Whether you’re making them for a cozy night in, a party, or a fun side dish to a main meal, these pizza rolls are sure to be a hit every time.
With their golden, cheesy exterior and that irresistible garlic butter flavor, they’re hard to resist. The best part is that they come together quickly and with minimal effort—perfect for those times when you need something that feels indulgent but doesn’t take hours to prepare.
So, the next time you’re in the mood for a savory snack or need a crowd-pleasing appetizer, give these garlic Parmesan pizza rolls a try. I’m confident they’ll quickly become a favorite in your recipe rotation. Happy baking!
Print
Garlic Parmesan Pizza Rolls: A Flavorful Snack You’ll Love
- Total Time: 30 min
Description
Soft, savory pizza dough stuffed with melty cheese, garlic butter, and Italian-inspired fillings, then rolled and baked to golden perfection. These bite-sized rolls are irresistible when paired with marinara or ranch dipping sauces—pssst, you’ll devour them!
Ingredients
-
1 lb pizza dough (homemade or store‑bought, about 1 ball)
-
1 cup shredded mozzarella cheese
-
¼ cup grated Parmesan cheese (plus more for topping)
-
2–3 garlic cloves, minced
-
2 tbsp unsalted butter, melted
-
2 tbsp chopped fresh parsley (or 2 tsp dried Italian seasoning)
-
Optional fillings:
-
¼ cup mini pepperoni or sliced ham
-
2 tbsp marinara sauce (for brushing inside)
-
Instructions
1️⃣ Preheat & prep:
Preheat oven to 400°F (200°C). Line a baking sheet with parchment paper or lightly grease it.
2️⃣ Roll the dough:
On a lightly floured surface, roll pizza dough into a rectangle (approx. 12×8″). Brush lightly with melted butter.
3️⃣ Add flavor & fillings:
Sprinkle garlic, parsley (or seasoning), mozzarella, and Parmesan evenly over the dough. Add pepperoni or ham if using. (If you like saucy rolls, drizzle or spread marinara as well.)
4️⃣ Roll & slice:
Starting on the long side, roll the dough tightly into a log. Slice into 12–15 rolls using a sharp knife or dental floss.
5️⃣ Bake to perfection:
Place rolls cut‑side up on the prepared baking sheet. Brush tops with more melted butter and sprinkle extra Parmesan on top. Bake 15–18 minutes, until golden and melty.
6️⃣ Serve hot:
Let cool slightly for 2–3 minutes, then transfer to a serving plate. Serve warm with marinara sauce, garlic‑herb dip, or ranch dressing for dunking.
Notes
-
Cheese swap: Try provolone, fontina, or a blend of Italian cheeses.
-
Meaty options: Add crumbled cooked sausage or bacon for extra flavor.
-
Herby twist: Stir 1 tsp chopped fresh basil or oregano into the butter for extra aroma.
-
Make‑ahead tip: Roll and slice the rolls, then refrigerate or freeze unbaked. Bake straight from the fridge as needed (add a few minutes to baking time).
- Prep Time: 10 min
- Cook Time: 18 min


