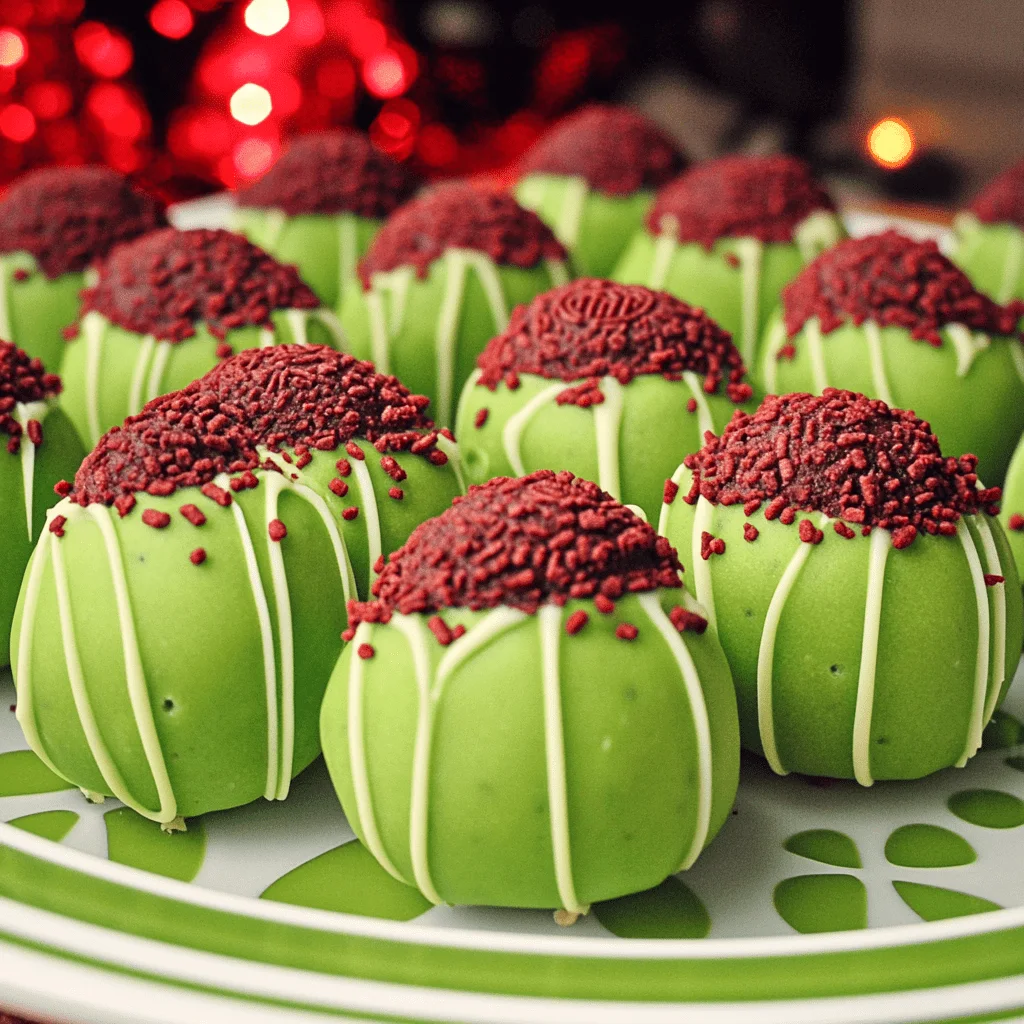
If you’re looking for a fun, festive treat for the holiday season, Grinch Oreo Balls are the perfect choice! Inspired by the classic holiday story, these no-bake desserts combine the beloved flavors of Red Velvet Oreos and creamy filling, all wrapped in a bright green candy coating. They’re not just delicious, but also visually striking, making them a hit at any Christmas party. Whether you’re hosting a gathering or looking for an easy-to-make treat for the kids, these Oreo balls bring the holiday spirit to life.
The inspiration behind the Grinch theme lies in the bright green candy coating, reminiscent of the Grinch’s signature color. For more Christmas dessert ideas, you can explore this collection on Pinterest. The Red Candy Hearts on top symbolize the Grinch’s growing heart, adding a sweet and iconic touch. This simple yet delightful recipe is sure to become a holiday favorite!
Ingredients Overview
To make these Grinch Oreo Balls, you’ll need a few simple ingredients. Understanding each one’s role is crucial for achieving the perfect texture and flavor:
- Red Velvet Oreos (44 cookies)
Red Velvet Oreos add a unique flavor twist to the traditional Oreo balls, with their slightly tangy and rich taste. They are the foundation of this recipe and provide the signature cookie crumb texture. Learn more about Oreo variants and flavors for other ideas you might want to try. - Cream Cheese (8 ounces, softened)
Cream cheese is essential for binding the crushed cookies together, creating a smooth and creamy mixture. When blended with Oreos, it forms the perfect filling that holds the balls together. For more information on the benefits of using cream cheese in desserts, check out this Wikipedia article. - Light Green Candy Melts (15 ounces)
These candy melts provide the vibrant green coating that makes these Oreo balls “Grinchy.” Melting them properly is key for achieving a smooth, even coating. You can explore this guide to candy melts on Pinterest for additional tips. - Red Candy Hearts
The red candy hearts add a charming and thematic detail to the Oreo balls, symbolizing the Grinch’s growing heart. It’s a small but meaningful decoration that enhances the visual appeal of the treat.
Using the right quantities of these ingredients is important for ensuring the Oreo balls hold their shape and maintain a balanced flavor. Adjusting quantities can affect the texture, so stick to the specified amounts for the best results.
Step-by-Step Instructions & Tips
Preparation: Setting Up the Workspace
Before you begin making your Grinch Oreo Balls, it’s important to set up your workspace efficiently. Start by lining a large baking sheet with parchment paper; this will ensure that the Oreo balls don’t stick and make cleanup easy. Organizing your tools and ingredients ahead of time is also essential. Make sure you have:
- A food processor or blender for crushing the Oreos.
- An electric mixer for blending the cream cheese and Oreo crumbs.
- A cookie scoop (1.5”) for portioning the mixture evenly.
For alternative tools, if you don’t have a food processor, you can place the cookies in a zip-lock bag and crush them with a rolling pin. Keeping your workspace organized will make the process smoother and quicker. For more baking tips, visit Holiday Baking Tips.
Crushing the Oreos
The first step in creating these Grinch Oreo Balls is crushing the Red Velvet Oreos into fine crumbs. This can be done using a food processor, which ensures the cookies are broken down evenly and quickly. Simply pulse the cookies a few times until they resemble fine crumbs. Alternatively, if you don’t have a food processor, you can use a blender or put the cookies in a zip-lock bag and crush them with a rolling pin. Both methods are effective, but may require a bit more time and effort.
Achieving the right crumb texture is crucial for the consistency of the Oreo balls. Make sure there are no large cookie pieces left, as these could affect the structure of the mixture. To learn more about different cookie crumb techniques, check out this Oreo information page for insights on the variety of cookie types available.
By properly crushing the Oreos, you set the foundation for a smooth and well-blended filling that holds together during the chilling and dipping process.
Mixing the Ingredients
Now that the Oreos are crushed, it’s time to mix them with the cream cheese. Start by adding the softened cream cheese to a large mixing bowl. Using an electric hand mixer, blend it on high speed until it becomes smooth and creamy. This step is important because it ensures that the cream cheese can easily incorporate the cookie crumbs. If you’re curious about the role of cream cheese in baking, this article provides useful details.
Once the cream cheese is smooth, gradually add the Oreo crumbs. Mix the two ingredients together until they form a cohesive, dough-like mixture. It should be moist but not overly sticky. If the mixture feels too wet, you may need to add a few more cookie crumbs. Alternatively, if it’s too dry, a small amount of softened cream cheese can help achieve the right consistency.
Common issues during this step include overmixing, which can result in a dense filling. To avoid this, mix only until the ingredients are just combined. This creates a balanced and smooth texture for your Grinch Oreo Balls.
Shaping and Chilling the Balls
Once the Oreo and cream cheese mixture is ready, it’s time to shape the balls. Using a 1.5-inch cookie scoop, portion the mixture into even-sized balls. This not only ensures uniformity but also helps the balls hold their shape during the dipping process. After scooping, roll each portion between your hands to form a smooth, round ball. Place each ball on the parchment-lined baking tray.
Chilling the balls is crucial before dipping them in candy melts. Put the tray in the refrigerator for at least 2 hours. This firming process helps the balls maintain their shape when dipped and prevents them from falling apart. If you’re short on time, you can also place them in the freezer for about 30 minutes. However, be careful not to freeze them completely, as this could cause cracking during dipping.
Melting the Candy Melts
Melting the candy melts properly is key to achieving a smooth and even coating for your Grinch Oreo Balls. The recommended method is using a double boiler, which allows for gentle heating and prevents the candy from burning. If you’re unfamiliar with this technique, learn more about the double boiler process to avoid common mistakes.
- Double Boiler Method:
Fill the bottom pot with a small amount of water and place the candy melts in the top pot. Heat on low, stirring constantly until the candy melts are completely smooth. It’s important to avoid any water getting into the candy, as this can cause it to seize and become unusable. - Microwave Method:
If you don’t have a double boiler, you can melt the candy melts in the microwave. Use a microwave-safe bowl and heat on a low setting (defrost setting) for 30-second intervals, stirring between each session. This method is quicker but requires careful monitoring to prevent overheating.
Ensuring the candy melts reach the right consistency is crucial for dipping; they should be smooth but not runny. By following these steps, your Grinch Oreo Balls will have the perfect festive coating.

Dipping, Decorating, and Presentation
Dipping the Oreo Balls
Once the Grinch Oreo Balls have chilled for the recommended time, it’s time to dip them in the melted candy. Using a fork or toothpick is the best approach for dipping. Simply pick up each ball, dip it into the melted candy, and tap the fork gently on the edge of the pot to remove any excess coating. This technique ensures an even layer of candy while preventing drips and pooling around the base.
If you notice the candy starts to harden while you’re dipping, simply place it back on the double boiler or microwave for a few seconds to re-melt. After dipping each ball, place it back onto the parchment-lined tray. For more tips on handling melted chocolate and candy, check out this guide on melting chocolate properly.
Ensuring the candy coating is smooth and even will give your Grinch Oreo Balls a professional, festive look.
Decorating with Drizzle and Hearts
Decorating the dipped Grinch Oreo Balls is where the fun begins. If you have extra melted candy, you can create a drizzle effect to add texture and visual appeal. Place the leftover candy melts in a microwave-safe piping bag and heat in short intervals until melted. Once fully melted, snip a small tip off the bag and drizzle the candy over the balls.
Alternatively, use a spoon or knife to drizzle by dipping it into the melted candy and waving it back and forth over the Oreo balls. Immediately after adding the drizzle, press a red candy heart on top of each ball before the coating sets. This will add a festive and thematic touch that’s sure to impress. For more creative Christmas baking traditions, you can explore Pinterest’s Christmas Baking collection.
This step is quick, easy, and ensures your Oreo balls capture the essence of the Grinch’s growing heart.
Final Set and Presentation
Once all the Grinch Oreo Balls are dipped and decorated, place the tray back in the refrigerator to allow the candy coating to set completely. This step is important for maintaining the integrity of the coating and for ensuring they stay fresh.
When ready to serve, arrange them on a festive Christmas tray or box for a holiday party. Storing these treats in an airtight container in the fridge ensures freshness for up to one week. For additional ideas on how to display and serve your holiday desserts, you can explore Christmas dessert ideas on Pinterest.

Tips, Variations, and Serving Suggestions
Additional Tips for Perfect Grinch Oreo Balls
Achieving the perfect Grinch Oreo Balls requires a few essential tips and tricks to avoid common pitfalls:
- Avoid Overheating Candy Melts: If the candy melts are overheated, they may seize up, becoming clumpy and unusable. Always melt on a low setting or use a double boiler to maintain the right temperature. Learn more about candy melt techniques for the perfect consistency.
- Prevent Cracking: To prevent the Oreo balls from cracking when dipped, make sure they are chilled but not frozen solid. Freezing them completely can cause the candy coating to crack as the filling expands.
- Adjust Consistency if Needed: If the mixture feels too wet when rolling, add a few more cookie crumbs. Conversely, if it’s too dry, a small addition of softened cream cheese can help.
These tips will help you create beautiful, professional-looking Oreo balls every time.
Variations and Flavor Customizations
While the classic Grinch Oreo Balls recipe uses Red Velvet Oreos, you can easily customize the flavor to match your preferences:
- Different Oreo Flavors: Try using Peppermint or Golden Oreos for a festive twist. Each flavor creates a unique variation, offering new tastes and colors.
- Alternative Coatings: If you can’t find light green candy melts, you can use white chocolate and add green food coloring. Learn about food coloring to understand the best options for coloring your chocolate.
- Adding Texture: Enhance the texture by rolling the dipped balls in crushed candy canes or sprinkles for a crunchy exterior.
These variations allow you to personalize your Grinch Oreo Balls, making them a versatile holiday treat that can be tailored to suit any party theme.
FAQs
- Can I use regular Oreos instead of Red Velvet?
Yes, you can use regular Oreos or any other variety. The texture will remain the same, but the flavor profile will change. For example, Peppermint Oreos are a great option for a holiday twist. Explore Oreo variants and flavors to see what other types you might want to try. - How do I store Grinch Oreo Balls?
Store them in an airtight container in the refrigerator for up to one week. This keeps the cream cheese fresh and the candy coating firm. Make sure they are properly chilled to maintain their shape and flavor. - Can I freeze these for later?
Absolutely! You can freeze the Oreo balls for up to three months. However, it’s best to freeze them before dipping in candy melts. Thaw in the refrigerator before coating and decorating to avoid cracking. - Why is my candy coating cracking or uneven?
Cracking usually occurs when the Oreo balls are too cold or if the candy melts were overheated. Ensure the balls are chilled but not frozen solid and heat the candy melts gradually. For tips on working with chocolate, check out this chocolate melting guide. - What if I can’t find light green candy melts?
You can substitute with white chocolate and green food coloring. Just be sure to use oil-based or candy coloring to prevent the chocolate from seizing. Visit this food coloring guide for more information.

Grinch Oreo Balls
- Author: Naomi
Description
Grinch Oreo Balls are a festive, no-bake dessert perfect for holiday gatherings and Christmas parties. These delightful treats combine the rich flavor of Red Velvet Oreos and creamy cream cheese filling, all coated in a vibrant green candy shell inspired by the Grinch’s iconic color.
Ingredients
24.4 ounces Red Velvet Oreos (2)
12.2 ounces packages (44 cookies)
8 ounces cream cheese softened to room temperature
15 ounces light green candy melts
Red candy hearts
Instructions
Line a large baking sheet with parchment.
In a food processor, add the Oreo cookies and pulse a few times into fine crumbs. You can also use a blender or place them in a zip closure plastic baggie and crush them with a rolling pin.
24.4 ounces Red Velvet Oreos
In a large mixing bowl, add the softened cream cheese and blend with an electric hand mixer on high speed until smooth.
8 ounces cream cheese
Add the Oreo crumbs and mix the two together well.
Using a 1.5” cookie scoop, scoop the mixture and roll into smooth balls with your hands and place onto the prepared baking tray.
Place the try in the refrigerator at least for at least 2 hours to chill before dipping so they hold their shape.
Set aside ½ cup of the candy wafers to use for the drizzle after dipping if you’d like.
15 ounces light green candy melts
In a double boiler, add the candy melts and heat over low heat, stirring often, until melted and smooth. Be very careful not to overheat or get any water into the candy or it may saize and be unusable.
Then, using a fork or toothpick, dip each ball into the melted candy. Tap the fork on the edge of the pot to remove excess dripping candy and place it onto baking sheet.
If you’d like to add the extra drizzle, you can drizzle any leftover melted candy with a spoon or knife over top of the balls. Or you can place the reserved ½ cup of candy melts into a microwave safe piping bag. Twist it tight to close and place it in the microwave and melt on a low setting (defrost setting) for 30 seconds. Then massage the bag until fully melted. Repeat for another 30 seconds if needed. (Again, be careful not to overheat it).
Snip a small tip off the bag and drizzle over the coated balls and immediately top with a red candy heart before the drizzle sets.
Red candy hearts
Place them back in the refrigerator to set completely.
Notes
- Chilling is Key: Make sure to chill the Oreo balls for at least 2 hours before dipping them in the candy coating. This helps them maintain their shape and prevents cracking.
- Candy Melts: If you don’t have light green candy melts, use white chocolate with green food coloring (make sure it’s oil-based to avoid seizing). This allows you to achieve the same bright green look.
- Storage Tip: For best results, store the Oreo balls in an airtight container in the refrigerator. They stay fresh for up to a week, making them a perfect make-ahead dessert for busy holiday schedules.
- Freezing Option: These can be frozen (before coating) for up to three months. Thaw in the fridge before dipping and decorating.
- Variations: Experiment with different Oreo flavors like Peppermint for a wintery twist or Golden Oreos for a lighter flavor profile. You can also roll them in crushed candy canes or sprinkles for added texture and festive flair.









None of the photos show the red candy hearts. Are these cinnamon red hots or what do you use?
What is the yield? I can’t seem to find that on the recipe page.
Where can I buy the “red candy hearts” in your picture?