1.Halloween Chocolate Fudge & Vampire Treats
Halloween is more than just costumes and candy; it’s a full sensory experience, especially when it comes to themed food. Halloween chocolate fudge and vampire treats bring a creepy yet delightful twist to the dessert table, making your party trays both memorable and delicious. These spooky sweets add visual intrigue and indulgent flavor, making them perfect for treat boxes, potluck platters, or late-night bites during movie marathons. From gory-looking raspberry “blood” layers to spooky candy bar swirls, these recipes bring a horror-inspired edge to classic favorites.
Using layered textures and bold flavors, Halloween fudge recipes transform everyday ingredients into eerie delights. The base recipe blends white chocolate, sweetened condensed milk, and shredded coconut for a silky, chewy texture that contrasts brilliantly with a blood-red raspberry jam filling. For presentation ideas, Pinterest is packed with Halloween dessert table inspiration you can use to match your vampire fudge to your party’s theme.
These spooky fudge treats are also a clever way to use up leftover Halloween candy. Chop up favorite candy bars—like Snickers, Reese’s, or Crunch—and mix them into the fudge layers for added crunch and flavor. For more on how fudge evolved into such a beloved sweet, explore this background on fudge as a confection. By customizing flavors and decorations, you’ll have a spooky dessert that appeals to both kids and adults—while being incredibly easy to prepare in advance and store.
Stay tuned for the full recipe in the next section, where we break down the ingredients and steps to make this frightfully fun vampire-inspired fudge.
2. Why Halloween Fudge is a Must-Have Party Dessert
When planning a Halloween party, the dessert table is often the centerpiece, and Halloween fudge earns its place as a must-have. It’s easy to make, richly flavored, and endlessly adaptable. With minimal prep and no baking required, fudge recipes can be scaled up quickly for party trays or gift boxes, making them ideal for busy hosts looking to wow their guests without spending hours in the kitchen.
One of the main reasons Halloween chocolate fudge is so popular is its ability to hold up well over time without losing its texture or flavor. It can be made days in advance and stored in the fridge, freeing up time for last-minute party tasks. Its creamy consistency and layered colors make it perfect for spooky dessert designs—especially when you use red food coloring and jam to simulate blood. This approach is visually striking and ties into eerie party themes like vampires, zombies, or haunted houses.
If you’re looking for inspiration to create themed trays or boxes, Pinterest has hundreds of Halloween packaging ideas that match perfectly with fudge squares. Plus, integrating classic candy bars into your fudge not only adds texture and flavor but also makes use of leftover candy—a common surplus after trick-or-treating. From a planning perspective, these treats are economical, customizable, and always a hit with guests of all ages. Whether you’re hosting a classroom party or an adults-only Halloween bash, spooky fudge deserves a place on your dessert table.
3. Halloween Chocolate Fudge Vampire Treats: Recipe Overview
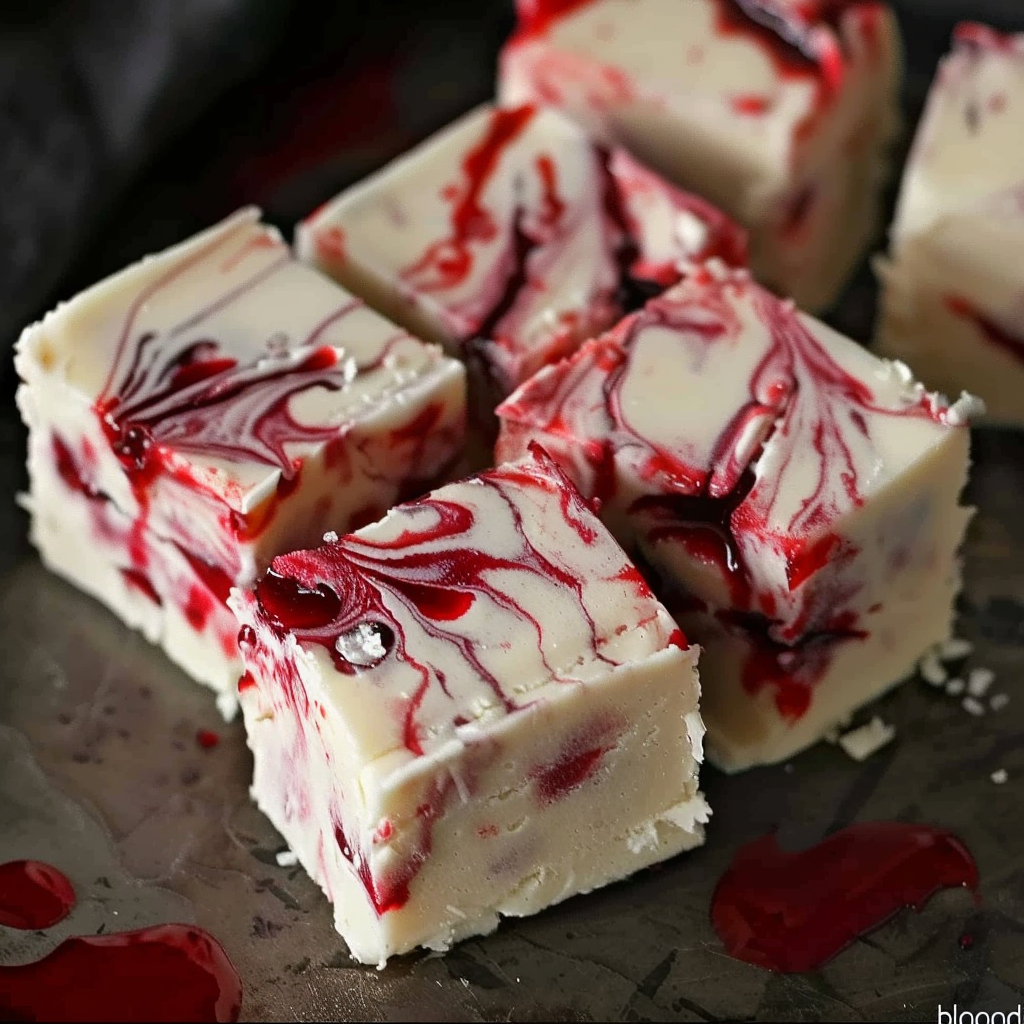
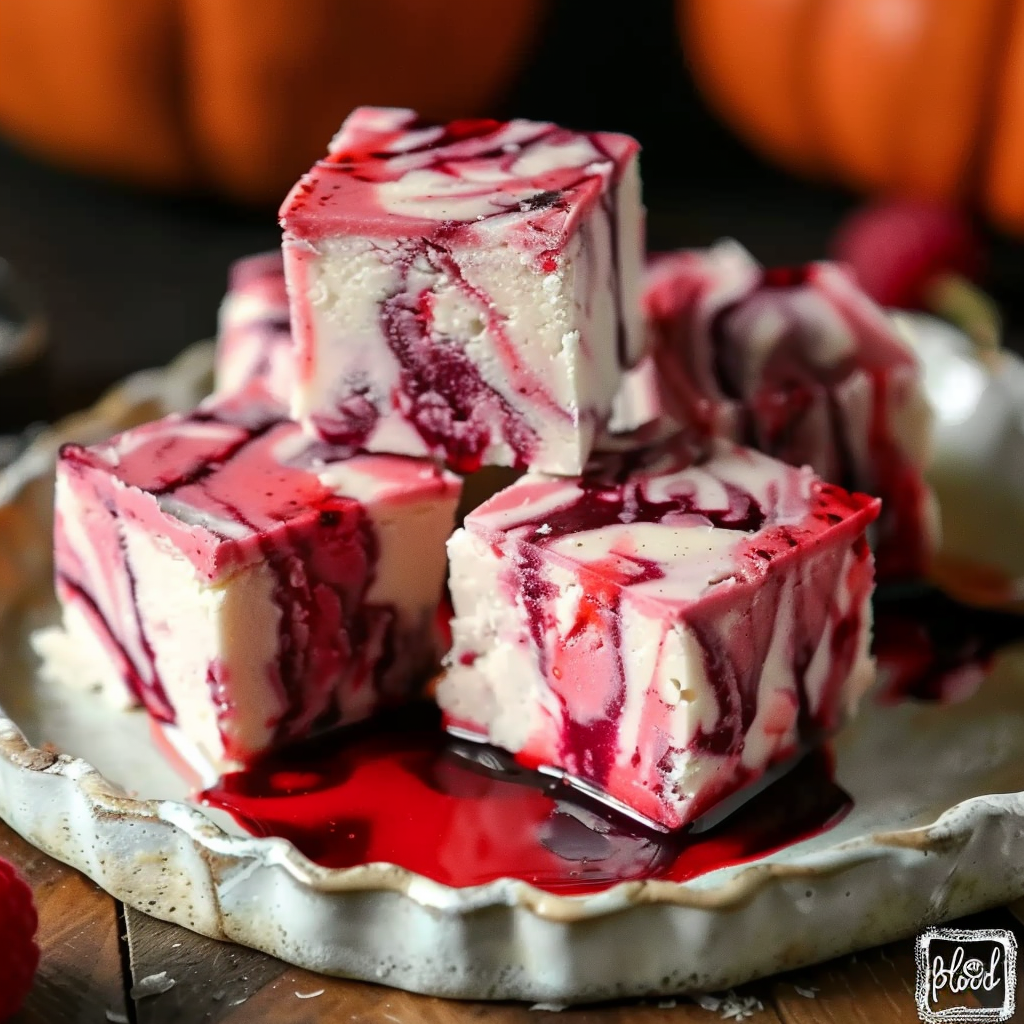
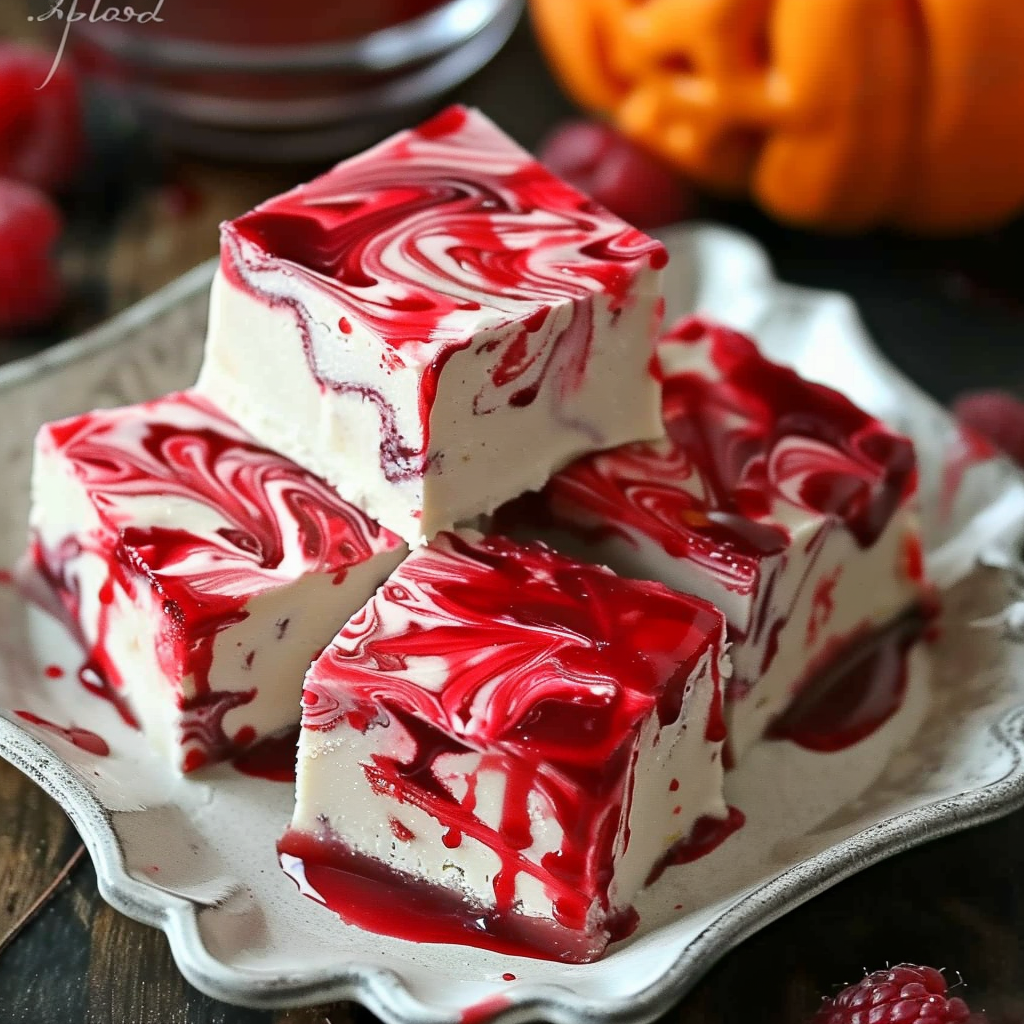
These Halloween chocolate fudge vampire treats take the classic richness of white chocolate and coconut and give it a sinister twist with a bold raspberry “blood” center. The result is a layered, eye-catching dessert that pairs perfectly with any haunted theme. Beyond its creepy aesthetic, this fudge is packed with texture—from the creamy base to the chewy coconut and gooey jam filling.
The recipe is simple but delivers major visual and flavor impact. The base layer blends white chocolate chips, sweetened condensed milk, and vanilla extract with shredded sweetened coconut for a tropical-meets-sweet base. Then comes the spooky centerpiece: a ribbon of blood-red raspberry jam, colored with red gel food dye for that eerie vampire effect. Topped with more coconut fudge, it sets into a sliceable tray of sweet horror.
Looking for ways to tie these treats into a vampire-themed party? You’ll find plenty of visual inspiration from this Pinterest board on vampire party food ideas, which includes trays featuring red accents, blood-dripped effects, and themed signs. For a deeper understanding of the jam’s role, check out raspberry’s flavor profile and how it complements white chocolate and coconut with its tart contrast.
This recipe’s versatility is another reason it’s ideal for Halloween. You can swap in different jam flavors (like cherry or strawberry), adjust the food coloring intensity, or add candy bar chunks between the layers for extra texture. It’s also easy to cut into bite-sized pieces for party trays or wrap individually for spooky favors. If you’re creating a Halloween dessert table, these bloody fudge squares are guaranteed to stand out—and disappear fast.
4. Step-by-Step Guide: Making the Coconut Fudge with Raspberry “Blood” Filling
Creating these vampire-themed Halloween fudge treats is simple and fun, even for beginner bakers. This section breaks down each step so you can assemble them with confidence and customize them to suit your spooky party vibe.
Ingredients Breakdown
Before getting started, gather your ingredients. Here’s what you’ll need for the three layers:
For the coconut fudge layer:
-
3 cups white chocolate chips
-
1 (14 oz) can sweetened condensed milk
-
½ tsp vanilla extract
-
1¼ cups shredded sweetened coconut
For the blood filling:
-
¼ cup seedless raspberry jam or preserves
-
Red gel food coloring (as needed)
For the optional spooky drizzle:
-
¼ cup white chocolate chips, melted
-
Additional red gel food coloring
You can substitute the raspberry jam with strawberry or cherry preserves if desired. For a natural coloring alternative, try beetroot powder or reduced berry juice. Learn more about sweetened condensed milk to understand how it enhances the fudge’s smooth, creamy texture without requiring traditional candy thermometers.
Step-by-Step Instructions
-
Prepare your pan:
Line an 8×8-inch square baking dish with parchment paper. This helps lift the fudge easily after chilling. -
Melt the base ingredients:
In a medium saucepan over low heat, combine the white chocolate chips and sweetened condensed milk. Stir continuously to prevent scorching. -
Add coconut and vanilla:
Once the mixture is smooth and melted, remove from heat. Stir in the vanilla extract and shredded coconut until evenly combined. -
Layer the base:
Spread half the coconut mixture into the bottom of your prepared pan. Smooth it into an even layer using a spatula. -
Make the “blood” center:
In a small bowl, mix raspberry jam with a few drops of red gel food coloring. Stir until you achieve a deep red, blood-like appearance. -
Add the jam layer:
Drizzle or spoon the jam mixture evenly over the coconut base. Try not to let it touch the edges to keep a clean border. -
Top with remaining coconut fudge:
Carefully spread the remaining fudge mixture over the jam layer. Gently smooth it flat, ensuring the “blood” is fully covered. -
Chill to set:
Refrigerate the pan for at least 2 hours, or until fully set. This helps the layers hold their shape when sliced. -
Decorate (optional):
Melt the remaining white chocolate and drizzle over the top. Add red gel food coloring drops and use a toothpick to create a blood-splatter swirl. For visual inspiration, visit this Pinterest board with spooky fudge recipes. -
Slice and serve:
Once chilled, remove the fudge from the pan and slice into squares. Store in the fridge until ready to serve.
For a fun Halloween presentation, arrange the squares on dark slate trays or coffin-shaped platters. Pair them with other themed sweets to create a balanced party spread. Need help planning your Halloween food display? This Pinterest guide to Halloween food decoration offers clever ideas to enhance the creepy appeal of your dessert table.
Incorporating this kind of themed fudge into your party brings not just flavor but also a visually engaging element that amplifies your Halloween decor. Plus, the layering technique allows you to play with different candies or mix-ins, turning a simple recipe into something uniquely spooky and personal.
5. Visual Design Tips for Halloween-Themed Presentation
Once your Halloween chocolate fudge vampire treats are ready, presentation is key to creating a memorable dessert experience. The visual impact of your fudge can elevate your entire party table, making simple squares appear as eerie, high-end Halloween treats.
Tray and Plating Ideas
-
Use dark or black slate trays to enhance the red “blood” contrast.
-
Arrange fudge in staggered layers or pyramid stacks for height.
-
Place small props like fake spiders, plastic bats, or miniature coffins around the fudge for a spooky touch.
-
Consider themed napkins or doilies underneath each tray to add a pop of color or texture.
Creative Cutting Techniques
-
Traditional squares work well, but cookie cutters can create Halloween shapes like bats, coffins, or tombstones.
-
Use a sharp knife dipped in hot water for cleaner cuts through layered fudge.
-
For party trays, bite-sized pieces encourage guests to sample without leaving crumbs behind.
Drizzle and Decoration Tips
-
The optional white chocolate and red gel drizzle can be manipulated with a toothpick to mimic dripping blood.
-
Add edible glitter or small candy eyes to enhance a creepy aesthetic.
-
Mini candy bar pieces on top can tie the fudge to a candy bar-inspired dessert theme.
Coordinating with Other Treats
-
Pair fudge squares with cupcakes, cookies, or candy corn for a visually diverse dessert table.
-
For a cohesive display, group sweets by color—reds, blacks, and whites are perfect for vampire or gothic themes.
-
For inspiration on creating cohesive Halloween spreads, Pinterest offers creative dessert table layouts that can guide your setup.
By paying attention to Halloween dessert design, you transform your simple fudge recipe into a showstopper. These visual touches not only impress guests but also make your party table a perfect backdrop for photos and social media shares. With the combination of layered colors, themed props, and creative slicing, your vampire fudge will be the centerpiece of any Halloween celebration.

6. Spooky Candy Bar Fudge Variations
One of the best ways to elevate Halloween fudge is by incorporating popular candy bars. These variations add texture, flavor, and extra sweetness, making your dessert table irresistible. You can easily customize the base coconut fudge or chocolate layers to include chopped candy bars for a festive, spooky twist.
Popular Candy Bar Fudge Ideas
-
Snickers Fudge: Mix chopped Snickers into the fudge for a combination of chocolate, caramel, and peanuts.
-
Reese’s Fudge: Add mini peanut butter cups or chopped Reese’s for a creamy, nutty flavor.
-
Milky Way Fudge: Incorporate nougat and caramel pieces for a gooey, indulgent treat.
-
Crunch Bar Fudge: Puffed rice and chocolate create a crunchy texture that contrasts with the smooth fudge.
Layering Tips for Candy Add-Ins
-
For a visually appealing result, layer candy pieces between fudge layers rather than mixing them in completely. This prevents the candy from sinking to the bottom.
-
Chop candy bars into small, uniform pieces to distribute flavor evenly.
-
Miniature candy bars are ideal for maintaining the fudge’s smooth texture while adding bursts of flavor.
Themed Twists
-
Use Halloween-colored candy pieces to match the season—orange, black, and red candies enhance the spooky look.
-
Pair candy-infused fudge with your “blood” raspberry layer to create an extra eerie effect.
-
For inspiration, Pinterest boards with spooky fudge recipes show creative ways to combine candy and themed decorations.
Incorporating candy bars not only makes your fudge more flavorful but also increases its visual appeal, ensuring your dessert tray stands out. Whether you’re aiming for a kid-friendly option or a sophisticated twist for adults, these variations are easy to make ahead and perfect for any Halloween celebration.
7. Make-Ahead and Storage Tips for Halloween Fudge
Halloween fudge is an excellent make-ahead dessert because it holds its texture and flavor well when stored properly. Preparing it in advance saves time during party setup and ensures each layer is fully set for clean, precise cuts.
Make-Ahead Tips
-
Assemble the fudge 1–3 days before your event. This allows the layers to firm up and the “blood” raspberry center to settle.
-
For added convenience, prepare the fudge base and candy add-ins separately, then layer them just before chilling.
-
If making multiple batches, use multiple pans lined with parchment paper to prevent sticking and simplify storage.
Storage Guidelines
-
Keep fudge refrigerated in an airtight container to maintain freshness and prevent moisture from softening the layers.
-
Fudge can also be frozen for up to 2 months. Wrap individual pieces in parchment or plastic wrap, then place them in a freezer-safe container. Thaw in the refrigerator before serving.
-
Avoid leaving fudge at room temperature for extended periods, especially with fruit fillings, to prevent spoilage.
Packaging for Treat Boxes
-
For party favors or gift boxes, wrap fudge squares individually in parchment or cellophane.
-
Add themed labels or ribbons to match your Halloween dessert table aesthetics.
-
Pair with other small treats, like candy corn or mini chocolate bars, for a complete Halloween-themed package.
Proper planning ensures that your vampire fudge retains its visual appeal and flavor, making it ideal for parties, classrooms, or Halloween gift-giving.
8. Serving Ideas for Halloween Dessert Tables
Halloween fudge shines when paired with other spooky treats on the dessert table. Presentation enhances both visual appeal and guest experience.
Pairing Suggestions
-
Serve alongside cupcakes, ghost-shaped cookies, or candy corn for color contrast.
-
Incorporate themed props, like small cauldrons, miniature gravestones, or fake cobwebs, to create a haunted display.
-
Use dark or black serving trays to highlight the bright red “blood” center and white coconut layers.
Display Tips
-
Group sweets by color or theme, such as red and white for vampire-themed treats.
-
Arrange treats on tiered trays or cake stands to add height and visual interest.
-
Consider using small cards or labels to identify each treat, especially if you’re offering multiple fudge variations.
Spooky fudge is versatile enough to adapt to any Halloween theme while maintaining its striking visual impact.
9. Halloween Party Tray Building: Themed Dessert Tray Tips
Creating a memorable Halloween party tray goes beyond placing treats on a platter. Thoughtful arrangement enhances the Halloween dessert experience.
Tray Building Tips
-
Use contrasting tray materials such as black slate, wood, or metallic trays to make colors pop.
-
Add height and dimension with tiered trays or stands for a more professional display.
-
Place treats in groups according to theme, such as vampire bites, zombie brains, or witch’s cauldrons.
-
Incorporate props like small candles, fake spiders, or Halloween figurines to create a spooky atmosphere.
Transport and Setup
-
If transporting trays, secure individual fudge pieces with parchment or cupcake liners.
-
Assemble props and additional decorations after arrival to prevent shifting during transit.
These tips help create an immersive, visually engaging dessert table that complements your spooky Halloween fudge.
10. FAQs: Halloween Fudge & Vampire Treat Tips
Q1: Can I use different types of chocolate in Halloween fudge?
-
Yes, white, milk, or dark chocolate can be used. Dark chocolate provides a richer flavor, while white chocolate allows the red “blood” layer to pop visually.
Q2: What’s the best way to make fudge without a thermometer?
-
Use a no-cook method by gently melting chocolate with sweetened condensed milk and stirring until smooth. Avoid boiling to prevent grainy texture.
Q3: Can Halloween fudge be made dairy-free?
-
Substitute dairy-free chocolate chips and sweetened condensed coconut milk for a vegan-friendly option. Adjust sweetness if using natural alternatives.
Q4: How long does Halloween fudge last?
-
Stored in the refrigerator, fudge lasts 1–2 weeks. For longer storage, freeze up to 2 months in airtight containers.
Q5: What are other spooky variations I can try?
-
Zombie green matcha fudge, witch’s brew fudge with marshmallows, or candy corn fudge layers are fun alternatives.
Halloween Chocolate Fudge And Vampire Treats For Party Dessert Trays
- Author: Naomi
Description
These Halloween chocolate fudge vampire treats combine creamy white chocolate, sweetened coconut, and a blood-red raspberry center to create a spooky, layered dessert perfect for Halloween parties. Silky, chewy, and visually striking, these treats are easy to prepare and customize with candy bar add-ins, themed decorations, or colored drizzles. Ideal for dessert tables, party trays, or individual treat boxes, this recipe delivers both flavor and fright in every bite.
Ingredients
For the coconut fudge layer:
- 3 cups white chocolate chips
- 1 (14 oz) can sweetened condensed milk
- 1/2 tsp vanilla extract
- 1 1/4 cups shredded sweetened coconut
For the blood filling:
- 1/4 cup seedless raspberry jam or preserves
- Red gel food coloring (as needed)
For the top drizzle (optional):
- 1/4 cup white chocolate chips, melted
- Additional red gel food coloring
Instructions
Line an 8×8-inch square pan with parchment paper and set aside.
In a medium saucepan over low heat, combine the white chocolate chips and sweetened condensed milk. Stir constantly until the mixture is smooth and melted.
Remove from heat and stir in the vanilla extract and shredded coconut.
Spread half of the coconut fudge mixture into the bottom of the prepared pan and smooth into an even layer.
In a small bowl, mix the raspberry jam with a drop or two of red gel food coloring until it resembles a blood-red color.
Spoon or drizzle the jam mixture over the first layer of fudge.
Carefully spread the remaining coconut fudge mixture on top of the jam layer, covering it completely.
Refrigerate the fudge for at least 2 hours or until fully set.
If desired, drizzle melted white chocolate over the top and add a few drops of red gel food coloring. Use a toothpick to swirl it for a blood-splatter effect.
Once set, cut into squares and serve. Store in the refrigerator.
Notes
-
For a cleaner layer separation, chill the first coconut fudge layer for 15–20 minutes before adding the raspberry “blood” filling.
-
Use parchment paper for easy removal from the pan and precise cutting.
-
Swap jam flavors or candy add-ins for creative variations.
-
Store fudge in an airtight container in the refrigerator, or freeze individual squares for later enjoyment.
-
For a dramatic effect, drizzle melted white chocolate with red gel coloring on top to create a blood-splatter appearance.
-
These treats can be made 1–3 days in advance, making them perfect for party prep.
-
Pair with other Halloween-themed desserts for a cohesive and visually stunning table display.