No-bake desserts have gained immense popularity for their simplicity and convenience, making them an ideal choice for busy schedules and hot summer days. With no need to turn on the oven, these treats are a perfect way to enjoy something sweet without adding extra heat to your kitchen. The No-Bake Lemonade Pie is an excellent example of this trend, offering a refreshing, tangy burst of lemon flavor wrapped in a creamy, velvety texture.
This recipe is not only easy to follow but also requires minimal ingredients, making it a go-to option for those who want a quick, delicious dessert. The highlight of the No-Bake Lemonade Pie is its vibrant lemon flavor, balanced by the smoothness of whipped topping and vanilla pudding, all nestled in a crunchy graham cracker crust.
What makes this pie truly versatile is its adaptability—it can be served chilled for a light, creamy treat or frozen for a firmer, more refreshing option. Whether you’re preparing for a casual summer gathering or simply satisfying a craving, this lemonade pie offers a delightful, hassle-free dessert that appeals to all ages.
The Appeal of Lemon Desserts
Lemon is a beloved ingredient in the world of desserts, celebrated for its bright, tangy flavor that perfectly balances sweetness and tartness. The sharpness of lemon adds a refreshing quality that makes it an ideal choice, especially in the warmer months. In a dessert like Lemonade Pie, the citrusy punch cuts through the richness of the creamy filling, creating a harmonious blend of flavors.
Lemon desserts are often viewed as light and refreshing, making them perfect for summer gatherings, picnics, and barbecues. The No-Bake Lemonade Pie combines the essence of a classic lemonade drink with the luxurious texture of a cream-based dessert. It’s a crowd-pleasing option for various occasions, offering a fresh alternative to heavier, baked goods.
Whether it’s a family gathering or a festive occasion, lemon-based desserts are a fantastic choice for anyone looking for a satisfying, vibrant treat that’s both indulgent and refreshing.
Overview of No-Bake Recipes
No-bake recipes have become increasingly popular for their ease, convenience, and the ability to create delicious desserts without the need for an oven. These recipes are perfect for beginners and busy individuals, as they often involve just a few steps and simple ingredients. With minimal preparation time, no-bake desserts allow you to whip up a treat quickly while still delivering fantastic flavor and texture.
No-bake pies, in particular, have become a favorite because they require little effort yet deliver impressive results. The absence of baking makes them ideal for warm weather or when you’re short on time. Additionally, they are highly versatile—you can experiment with different flavors, textures, and fillings to suit your preferences.
The No-Bake Lemonade Pie exemplifies the beauty of these recipes: quick assembly, no oven required, and a refreshing result. Its straightforward approach makes it an ideal recipe for novice bakers or anyone looking for a low-effort, high-reward dessert.
Ingredients Breakdown
- Milk: The milk serves as the liquid base for the pie, playing a crucial role in creating the creamy texture. It also helps dissolve and thicken the instant vanilla pudding mix, forming the foundation of the filling. Whole milk or 2% milk is recommended for optimal creaminess, but low-fat options can be used for a lighter version.
- Instant Vanilla Pudding Mix: This ingredient adds both sweetness and structure to the pie, ensuring the filling is thick and set. The vanilla flavor complements the tartness of the lemonade concentrate, creating a balanced contrast between sweet and tangy. Instant pudding is key for speed and convenience, setting quickly without the need for heat.
- Frozen Lemonade Concentrate: The lemonade concentrate is what gives the pie its signature bright, tangy flavor. Using frozen concentrate is essential because it provides a more intense lemon flavor than freshly squeezed lemonade, without adding too much liquid. It blends easily into the pudding mixture, infusing the entire pie with a refreshing citrus punch.
- Frozen Whipped Topping: Whipped topping adds a light, airy texture to the filling, making it fluffy and easy to slice. It’s also convenient because it’s pre-sweetened and stable. For those who prefer homemade whipped cream, it can be used as a substitute, but it should be whipped to stiff peaks for the best consistency.
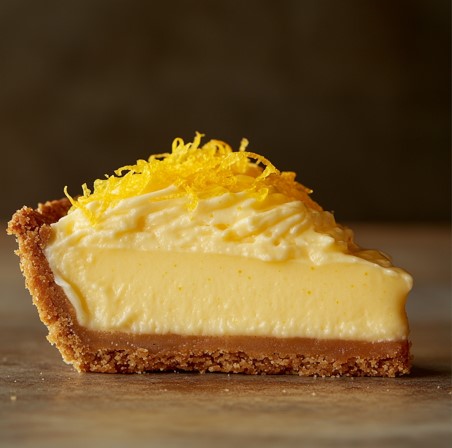
- Graham Cracker Pie Crust: The graham cracker crust provides a crunchy, buttery base that contrasts with the creamy filling. Store-bought crusts offer convenience, but homemade versions can be made with crushed graham crackers, butter, and sugar for a more customized taste.
- Optional Garnish: Lemon slices, candied peel, or zest can elevate the presentation, adding a visual pop and extra flavor.
Instructions: Preparing the Lemonade Pie
- Whisking the Milk and Pudding Mix: Begin by pouring 1 ¾ cups of cold milk into a large mixing bowl. Add the two 3.4-ounce packages of instant vanilla pudding mix to the milk. Whisk the mixture for about 2 minutes, ensuring that it becomes thick and smooth. The goal is to achieve a pudding-like consistency without lumps. Be sure to use a hand whisk or electric mixer for a faster, more uniform result. This step is crucial for setting the base structure of the pie.
- Incorporating the Lemonade Concentrate: Once the pudding mixture is ready, add the thawed 6-ounce frozen lemonade concentrate. Whisk for an additional 1-2 minutes until the lemonade is fully incorporated. The key here is to make sure the lemonade flavor is evenly distributed throughout the filling. The mixture should take on a smooth, slightly tangy flavor, with a light yellow color.
- Folding in the Whipped Topping: Next, gently fold in an 8-ounce container of thawed frozen whipped topping. Use a spatula to fold the whipped topping into the pudding mixture, ensuring there are no streaks left. Be careful not to overmix, as this can deflate the whipped topping, resulting in a denser pie filling. The folding technique keeps the filling light and airy.
- Filling the Pie Crust: Pour the prepared lemonade pie filling into a pre-made graham cracker crust. Use a spatula to smooth the top evenly. Spread the filling to the edges of the crust for a clean and polished look. Ensure the surface is level for better presentation.
- Chilling the Pie: Place the pie in the refrigerator and let it chill for at least 4 hours. This step allows the pie to set and thicken to the perfect consistency. Proper chilling is key to ensuring the filling holds its shape when sliced.
- Optional Step – Freezing the Pie: For a frozen version of the pie, transfer it to the freezer instead of the fridge. Freeze for 2-3 hours, then slice and serve. Freezing changes the texture slightly, giving the pie a firmer, ice cream-like consistency perfect for hot days.
Tips for the Perfect No-Bake Lemonade Pie
To ensure your No-Bake Lemonade Pie turns out perfectly, follow these key tips:
- Chilling Time: One of the most important steps is allowing the pie enough time to chill. It needs at least 4 hours in the refrigerator to fully set and develop the right texture. If you’re in a hurry, make the pie the night before to allow it ample time to firm up.
- Texture Consistency: The success of this pie lies in the texture. When mixing the milk and pudding, whisk until smooth and thick—this ensures a creamy and cohesive filling. After adding the lemonade concentrate, make sure it’s well-incorporated for even flavor distribution.
- Mixing Technique: Folding in the whipped topping requires a gentle touch. Overmixing can deflate the whipped topping, leading to a denser pie. Use a spatula to gently fold the topping into the pudding mix until no streaks remain, preserving the light and airy consistency.
- Avoiding Common Mistakes:
- Overmixing: As mentioned, overmixing the whipped topping can lead to a heavy pie filling. Mix just until combined.
- Skipping the Chilling Step: If you slice the pie before it’s fully set, the filling may not hold its shape, resulting in a runny dessert.
- Proper Storage: To maintain the freshness of your No-Bake Lemonade Pie, cover it with plastic wrap or store it in an airtight container. It can be refrigerated for up to 4-5 days, and a frozen version will last up to a month.
Creative Variations of the Recipe
The No-Bake Lemonade Pie is highly versatile and can easily be adapted to different flavors:
- Limeade or Pink Lemonade Pie: For a fun twist, substitute the lemonade concentrate with limeade or pink lemonade concentrate. These variations maintain the citrusy freshness but offer a slightly different taste. Limeade provides a sharper, tarter flavor, while pink lemonade adds a subtle fruity note.
- Strawberry Lemonade Pie: Add a fruity twist by folding in fresh strawberries or a few tablespoons of strawberry puree into the filling. This variation creates a sweet-tart blend, reminiscent of strawberry lemonade, and adds a lovely pink hue to the pie.
- Using Different Crusts: Change up the pie crust for a unique flavor combination:
- Shortbread Crust: Offers a rich, buttery contrast to the tart lemonade filling.
- Chocolate Cookie Crust: Adds a deep, chocolaty element that pairs surprisingly well with the bright citrus flavor. Simply crush chocolate cookies and mix with butter for a delicious alternative to graham crackers.
Serving Suggestions and Garnishing Ideas
Elevate the presentation of your No-Bake Lemonade Pie with these simple yet elegant garnishing ideas:
- Lemon Slices: Add thinly sliced lemon wheels on top of the pie for a classic and vibrant look.
- Fresh Berries: Top the pie with fresh raspberries, blueberries, or strawberries to complement the lemon flavor with a burst of natural sweetness.
- Mint Leaves: Place a few sprigs of fresh mint on the pie for a pop of color and a refreshing aroma.
- Candied Lemon Peel or Zest: Sprinkle some candied lemon peel or fresh lemon zest over the top to enhance the citrusy appeal and add a touch of texture.
To make the pie visually appealing for parties, serve it on a decorative cake stand, and arrange the garnish in a symmetrical pattern. Adding a dollop of whipped cream on each slice before serving adds an extra layer of indulgence for guests.
Frequently Asked Questions (FAQs) for No-Bake Lemonade Pie
Can I make this pie ahead of time?
Yes, you can absolutely make this pie ahead of time. In fact, it’s a great dessert to prepare in advance since it needs several hours to set. You can make the pie 1-2 days before serving, and it will keep well in the refrigerator. Just be sure to cover it tightly with plastic wrap or foil to prevent it from drying out or absorbing any unwanted odors from the fridge.
Can I use fresh lemonade instead of concentrate?
While fresh lemonade might seem like a natural substitution, it’s not recommended for this recipe. The lemonade concentrate is essential because of its strong, tangy flavor and thicker consistency. Fresh lemonade is more diluted and may result in a pie with a less intense lemon flavor and a runnier texture, which can affect the pie’s ability to set properly.
Can I use homemade whipped cream instead of frozen topping?
Yes, you can use homemade whipped cream in place of frozen whipped topping if you prefer a more natural option. However, it’s important to ensure that the whipped cream is whipped to stiff peaks to provide the stability needed for the pie’s structure. Homemade whipped cream can sometimes be less stable over time, so be sure to refrigerate the pie immediately after assembling and avoid leaving it out for too long.
How long does this pie last in the fridge?
When properly covered, the No-Bake Lemonade Pie can last for about 4-5 days in the refrigerator. To preserve its freshness, make sure the pie is tightly wrapped with plastic wrap or stored in an airtight container. If garnished with fresh fruit, such as berries or lemon slices, it’s best to add those just before serving to avoid any sogginess.
Can I freeze the pie?
Yes, you can freeze the pie if you prefer a firmer, ice cream-like texture. Simply place the pie in the freezer for 2-3 hours before serving. Freezing enhances the refreshment factor, making it an ideal treat for especially hot days. If freezing for longer periods, cover the pie tightly to prevent freezer burn, and allow it to thaw slightly before slicing for the best texture.
Conclusion: Final Thoughts and Recap
The No-Bake Lemonade Pie is the perfect dessert for those seeking a simple yet delicious treat that requires minimal effort. Its refreshing lemon flavor, combined with a creamy, light texture, makes it ideal for hot summer days, family gatherings, or any occasion where you need a quick and crowd-pleasing dessert. With no need for baking, it saves time and effort while delivering a sweet and tangy flavor profile that’s sure to impress.
The pie’s versatility is one of its biggest strengths. Whether you prefer it chilled or frozen, it can easily be adapted to suit different tastes and occasions. You can even experiment with variations like limeade, pink lemonade, or different crust options to create your own unique version. Additionally, the recipe is easy enough for novice bakers, yet impressive enough to serve at any event.
We encourage you to try this delightful recipe and make it your own. Whether you stick to the classic lemonade flavor or customize it with your favorite fruits and flavors, the No-Bake Lemonade Pie is a fun, flexible, and refreshing dessert that will quickly become a staple in your recipe collection.
Print
No-Bake Lemonade Pie
Description
This No-Bake Lemonade Pie is a tangy, creamy, and refreshing dessert that’s perfect for summer or any time you want a simple, no-fuss treat. With just a few ingredients and no need for an oven, this pie is ideal for novice bakers or anyone looking for a quick, crowd-pleasing dessert. The balance of tart lemonade and sweet vanilla pudding makes for a light yet indulgent flavor, and it can be served chilled or frozen for extra versatility.
Ingredients
- 1 ¾ cups milk
- 2 (3.4 oz) packages instant vanilla pudding mix
- 1 (6 oz) can frozen lemonade concentrate, thawed
- 1 (8 oz) container frozen whipped topping, thawed
- 1 graham cracker pie crust
- Optional Garnish: Lemon slices, candied lemon peel, or zest
Instructions
- Whisk the Milk and Pudding Mix:
In a large bowl, whisk together the milk and instant vanilla pudding mixes for about 2 minutes, until thick and smooth. The pudding should achieve a creamy, thick texture to provide a solid base for the pie. - Incorporate the Lemonade Concentrate:
Add the thawed lemonade concentrate to the pudding mixture and whisk for 1-2 minutes until fully combined. Make sure the lemonade flavor is evenly distributed for a balanced sweet-tart flavor. - Fold in the Whipped Topping:
Gently fold in the thawed whipped topping using a spatula until the mixture is smooth and uniform. Be careful not to overmix, as this could deflate the whipped topping and affect the lightness of the pie. - Fill the Pie Crust:
Pour the lemonade pie filling into the graham cracker crust, using a spatula to smooth it into an even layer. - Chill the Pie:
Refrigerate the pie for at least 4 hours, allowing it to set fully. This step ensures the pie will slice cleanly and maintain its structure. - Optional: For a frozen version, place the pie in the freezer for 2-3 hours before serving. This gives the pie a firmer, ice cream-like texture.
- Garnish and Serve:
Before serving, garnish with lemon slices, candied peel, or a sprinkle of zest for extra flavor and visual appeal.
Notes
- Whipped Topping Alternatives: If you prefer, you can substitute the frozen whipped topping with homemade whipped cream. Just make sure it’s whipped to stiff peaks to maintain the pie’s light texture.
- Crust Variations: If you’re feeling creative, try swapping the graham cracker crust for a shortbread or chocolate cookie crust to add a different flavor dimension.
- Serving Tip: For a decorative finish, add a dollop of whipped cream or fresh berries on each slice when serving.