

Fudge is a beloved confection with a rich history, tracing its origins back to the late 19th century in the United States. It’s said that fudge was accidentally created by a confectioner who “fudged” a batch of caramel, leading to its name. While its exact origins remain debated, fudge quickly gained popularity as a sweet treat sold at fairs and candy shops. Among the many variations, chocolate fudge stands out as a favorite due to its deep, rich flavor and creamy texture.
Chocolate fudge has become a dessert staple, cherished for its versatility and ease of preparation. Its perfect balance of sweetness and richness makes it a go-to treat for holidays, gifts, and everyday indulgences. This particular recipe for chocolate fudge captures the essence of traditional fudge but with a modern twist, making it an ideal choice for any occasion, whether you’re hosting a party or craving a homemade treat.
Key Ingredients and Their Importance
- Butter: Butter is the foundation of this fudge recipe, providing both richness and a smooth, melt-in-your-mouth texture. Its fat content helps create the creamy consistency that fudge is known for, preventing it from being too dense or dry.
- Semisweet Chocolate Chips: Semisweet chocolate is favored for its balanced sweetness and deep chocolate flavor. Unlike milk chocolate, it doesn’t overwhelm with sugar, allowing the richness of the chocolate to shine while complementing the other sweet ingredients.
- Vanilla Extract: A small amount of vanilla extract can make a significant difference in fudge. It enhances the chocolate’s natural flavors, adding depth and warmth that elevate the overall taste profile.
- White Sugar: Sugar is essential not only for sweetness but also for structure. When heated, sugar helps the fudge firm up, giving it the ideal consistency once cooled.
- Evaporated Milk: Evaporated milk is preferred over regular milk in fudge recipes because it provides creaminess without added water content. This helps the fudge set properly and prevents it from becoming too soft or runny.
- Marshmallow Creme: Acting as a stabilizer, marshmallow creme ensures the fudge remains smooth by preventing the sugar from crystallizing. It contributes to the fudge’s rich, silky texture.
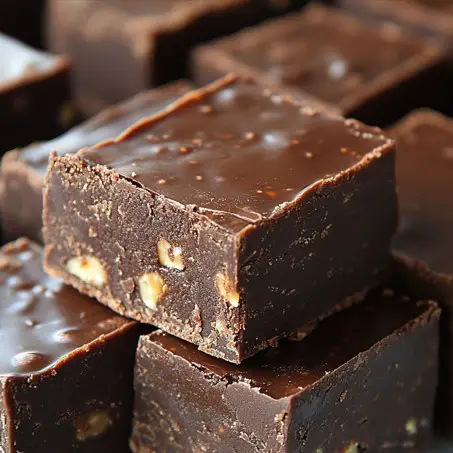
- Chopped Walnuts: Walnuts add a delightful crunch to the otherwise smooth fudge, providing contrast in texture. Their mild, nutty flavor also complements the rich chocolate without overpowering it.
Step-by-Step Instructions with Detailed Explanations
- Step 1: Preparing the Baking Dish
Before you begin cooking, butter an 8×8 inch baking dish. Greasing the dish is essential for easy removal of the fudge once it sets. It prevents sticking, ensuring that you can effortlessly cut the fudge into neat squares after it cools. - Step 2: Melting the Base Ingredients
In a mixing bowl, place the butter, semisweet chocolate chips, and vanilla extract. By setting these ingredients aside in a separate bowl, you can focus on controlling the heat during the next step. This method prevents the chocolate from burning or seizing, ensuring a smooth, silky melt when the hot marshmallow mixture is poured over it later. - Step 3: Boiling the Marshmallow Mixture
In a medium saucepan over medium heat, combine the sugar, evaporated milk, and marshmallow creme. Stir frequently to ensure the ingredients dissolve and blend evenly. Bring the mixture to a boil, and then reduce the heat to low. Continue cooking and stirring constantly for about 6 minutes. Stirring is crucial to prevent the mixture from burning or overcooking, which can lead to a grainy texture. - Step 4: Combining and Beating the Mixture
Once the marshmallow mixture is ready, pour it over the butter, chocolate chips, and vanilla in the mixing bowl. Begin beating the mixture vigorously. As you mix, the fudge will thicken and lose its glossy appearance. This step is key in ensuring the fudge achieves the right consistency; stopping too early may result in soft, runny fudge. - Step 5: Folding in the Nuts
Once the fudge has thickened, quickly fold in the chopped walnuts. This ensures the nuts are evenly distributed throughout the fudge, adding a consistent crunch with every bite. - Step 6: Refrigerating for Proper Setting
After mixing, pour the fudge into the prepared baking dish and smooth it out evenly. Refrigerate the fudge for several hours until firm. The cooling process allows the fudge to set properly; skipping or rushing this step may result in soft, unstructured fudge that doesn’t hold its shape.
Expert Tips for Perfect Fudge
- Temperature Control
Proper temperature control is critical for achieving the perfect fudge texture. To prevent burning or graininess, always cook the sugar, milk, and marshmallow mixture over medium heat. If the heat is too high, the sugar can caramelize too quickly or burn, leading to a gritty texture. Keeping the heat at a moderate level allows the sugar to dissolve properly and evenly without crystallizing. For best results, use a candy thermometer if you have one to ensure the mixture reaches the correct temperature (around 234°F or 112°C). - Stirring Techniques
Consistent stirring is essential throughout the cooking process, especially when dealing with sugar. Sugar tends to crystallize when left undisturbed, leading to a grainy fudge. Stir the mixture gently but constantly to ensure that it heats evenly and doesn’t stick to the bottom of the pan. Also, once you begin beating the mixture after combining all ingredients, keep stirring until the fudge starts to lose its gloss, which indicates it’s ready. - Cooling Process
Allow the fudge to set for at least 3–4 hours in the refrigerator. Cooling it too quickly or at room temperature can lead to a softer, less firm texture. Refrigeration ensures the fudge solidifies properly and is easy to cut into clean squares. - Substitutions for Ingredients
- Dairy-Free Fudge: Substitute dairy butter with plant-based butter and use coconut milk or almond milk instead of evaporated milk.
- Nut-Free Fudge: Simply omit the walnuts or replace them with other mix-ins like raisins or chocolate chips.
- Gluten-Free Fudge: This recipe is naturally gluten-free, but double-check ingredient labels for gluten contaminants.
Common Mistakes to Avoid
- Overcooking the Sugar Mixture
One of the most common mistakes in making fudge is overcooking the sugar mixture. When sugar is heated beyond the right temperature or cooked for too long, it can cause the fudge to become gritty due to crystallization. The key is to heat the mixture just until it reaches the soft-ball stage (around 234°F or 112°C) and to avoid boiling it for too long. Always monitor the heat and use a candy thermometer if possible to prevent overcooking. - Not Beating the Mixture Enough
Beating the mixture is essential for achieving the perfect fudge texture. Under-mixing results in a fudge that’s too soft or runny, as the ingredients haven’t had enough time to combine fully and thicken. You’ll know the fudge is ready when it starts to lose its glossy shine and thickens significantly. Be patient during this step, as rushing can leave you with an unset fudge. - Skipping the Refrigeration Step
Attempting to speed up the setting process by skipping refrigeration or reducing the cooling time can result in fudge that is too soft and won’t hold its shape. Refrigeration allows the fudge to firm up and ensures that the texture is smooth and solid. Give it at least 3–4 hours to set properly for the best results.
Fudge Variations and Customizations
- Adding Different Nuts or Nut Butters
While walnuts are traditional in fudge, you can easily substitute them with other nuts like pecans or almonds. Pecans offer a buttery, softer crunch, while almonds provide a firmer texture. To incorporate, simply chop your preferred nuts and fold them into the fudge after mixing. If you’re a fan of nut butters, consider swirling in peanut butter for a rich, creamy contrast to the chocolate. Add a couple of tablespoons of peanut butter during the final mixing stage, and lightly stir to create a marbled effect. - Flavor Variations
For those who enjoy a twist on classic chocolate fudge, try experimenting with flavors like mint chocolate or white chocolate. To make mint chocolate fudge, add a teaspoon of mint extract to the base mixture. For a white chocolate version, replace the semisweet chocolate chips with white chocolate chips. You can also sprinkle a little sea salt on top of the fudge before it sets, creating a delightful contrast between sweet and salty. - Mix-ins
To add extra texture and flavor, consider mixing in ingredients like dried fruits, mini marshmallows, or crushed cookie pieces. Dried cranberries, raisins, or even freeze-dried raspberries offer a tart contrast to the sweetness of fudge, while marshmallows or cookie bits give a fun, chewy or crunchy surprise in each bite. - Holiday-themed Fudge
For festive occasions, customize your fudge with holiday-inspired ingredients. Add peppermint extract and top the fudge with crushed candy canes for a Christmas-themed treat. Alternatively, mix in colorful sprinkles or edible glitter to match any holiday or celebration, adding visual appeal and a festive touch.
Storing and Freezing Chocolate Fudge
- How to Properly Store Fudge
To keep your chocolate fudge fresh and maintain its smooth texture, store it in an airtight container. This prevents the fudge from drying out and losing moisture, which can cause it to become hard or crumbly. You can keep fudge at room temperature for up to 2 weeks, as long as it’s in a cool, dry place away from heat and direct sunlight. If you prefer, refrigerating the fudge can extend its shelf life to around 3–4 weeks. - Freezing Fudge
For longer storage, fudge can be easily frozen without compromising its texture. Wrap individual pieces of fudge tightly in plastic wrap or wax paper and place them in a freezer-safe airtight container or zip-top bag. Fudge can be frozen for up to 3 months. To thaw, simply transfer it from the freezer to the refrigerator and let it sit for a few hours before serving. Avoid rapid thawing at room temperature, as this can lead to condensation and affect the texture.
Serving Ideas and Presentation
- How to Cut and Serve Fudge
To achieve clean, even squares when cutting fudge, use a sharp knife that has been warmed in hot water, then wiped dry. This prevents sticking and gives smooth edges. For best results, allow the fudge to come to room temperature before cutting, and slice it in one swift motion without sawing. Cut into small, bite-sized squares for easy serving. - Decorating the Fudge
Elevate your fudge’s appearance by adding a decorative touch. You can drizzle melted white or dark chocolate over the top for a striking visual contrast. Alternatively, dust the surface with cocoa powder or powdered sugar for a classic look. For extra flair, sprinkle crushed nuts or sprinkles before the fudge fully sets. - Pairing with Other Desserts or Beverages
Fudge pairs wonderfully with rich desserts like ice cream or brownies, adding extra indulgence to any dessert platter. It also complements a cup of coffee, hot cocoa, or a glass of red wine, making it perfect for after-dinner treats at parties or holiday gatherings.
FAQs Section
- Why did my fudge turn out grainy?
Grainy fudge is often the result of overcooking the sugar mixture or inconsistent stirring. When sugar is heated too long or at too high a temperature, it can crystallize, leading to a gritty texture. To prevent this, cook the sugar mixture at medium heat and stir continuously to ensure it dissolves properly and stays smooth throughout the process. - How long does chocolate fudge last?
Properly stored in an airtight container, chocolate fudge can last up to 2 weeks at room temperature. If you prefer to refrigerate it, fudge can stay fresh for 3–4 weeks. For longer storage, you can freeze fudge for several months, preserving its texture and flavor. - Can I use different types of chocolate for this recipe?
Yes, you can substitute other types of chocolate, such as dark chocolate or milk chocolate, for semisweet chocolate. However, this will alter the sweetness and flavor profile of the fudge. Dark chocolate will result in a more intense, less sweet fudge, while milk chocolate will make it creamier and sweeter. - What can I use if I don’t have marshmallow creme?
If you don’t have marshmallow creme, you can melt regular marshmallows as a substitute. Use about 1 ½ cups of marshmallows in place of the jar of marshmallow creme. While the texture may be slightly different, it will still work to stabilize the fudge. - How can I make this fudge without nuts?
To make the fudge without nuts, simply omit them from the recipe. You can also replace the nuts with other mix-ins, such as crushed cookies, dried fruit, or additional chocolate chips, for added texture.
Conclusion and Final Thoughts
Making the perfect chocolate fudge comes down to a few key points: controlling the temperature to avoid graininess, stirring consistently for a smooth texture, and allowing the fudge to cool properly for the right firmness. By following these steps, you’ll create a rich, creamy fudge that melts in your mouth.
Don’t hesitate to experiment with variations! Whether you swap in different nuts, add unique flavors like mint or sea salt, or include fun mix-ins like dried fruit or cookie pieces, the possibilities are endless. This fudge recipe is versatile and can be tailored to suit any occasion or personal preference.
For the best results every time, remember to use fresh ingredients, stir the mixture evenly, and take your time with the cooling process. Sharing your homemade fudge with friends and family will not only impress them but also create sweet memories around a delicious classic dessert.
Print
Perfect Chocolate Fudge
Description
This rich and creamy chocolate fudge is the perfect balance of sweetness and smoothness, making it an indulgent treat for any occasion. Made with semisweet chocolate chips, marshmallow creme, and chopped walnuts, this recipe is easy to follow and yields a deliciously decadent dessert. Whether you’re looking for a classic sweet to enjoy yourself or a gift to share with friends and family, this fudge is sure to impress.
Ingredients
- ½ cup butter
- 1 cup semisweet chocolate chips
- 1 teaspoon vanilla extract
- 2 cups white sugar
- 1 (5 oz) can evaporated milk
- 1 (7 oz) jar marshmallow creme
- 1 cup chopped walnuts
Instructions
- Prepare the Baking Dish:
Butter an 8×8 inch baking dish to ensure easy fudge removal once it sets. - Prepare the Base Ingredients:
Place butter, chocolate chips, and vanilla extract in a large mixing bowl. Set aside for later. - Boil the Marshmallow Mixture:
In a medium saucepan over medium heat, combine the sugar, evaporated milk, and marshmallow creme. Stir frequently to prevent burning. Bring the mixture to a boil, then reduce heat to low and continue cooking for about 6 minutes, stirring constantly. - Combine Mixtures:
Remove the marshmallow mixture from heat and pour it over the butter and chocolate chips in the mixing bowl. Beat the mixture until the chocolate melts, and the fudge thickens, losing its gloss. - Add the Walnuts:
Quickly fold in the chopped walnuts to distribute them evenly throughout the fudge. - Refrigerate:
Pour the mixture into the buttered dish, spread it evenly, and refrigerate for several hours or until firm. Once set, cut the fudge into squares and serve.
Notes
- Consistency is Key: Make sure to stir the fudge mixture continuously to avoid burning or graininess.
- Customization: Feel free to omit the walnuts for a nut-free version, or add other mix-ins like dried fruit, coconut, or different nuts for variety.
- Storage: Store the fudge in an airtight container at room temperature for up to two weeks, or freeze for longer shelf life. To freeze, wrap the fudge tightly in plastic wrap and store in an airtight container for up to three months.


