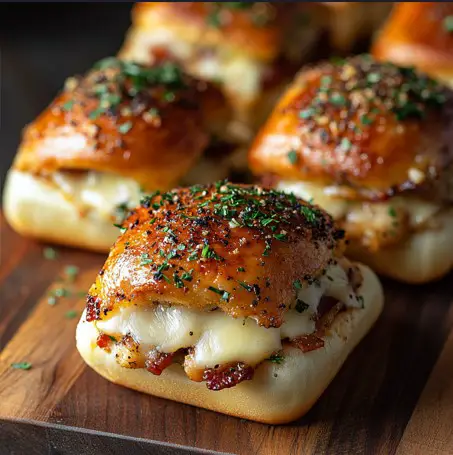
Chicken Bacon Ranch Pull Apart Rolls are the ultimate comfort food, bringing together the irresistible flavors of savory chicken, crispy bacon, and creamy Ranch dressing in a single, delectable bite. Perfect for parties, family gatherings, or a cozy night in, this dish is designed to be shared, making it a crowd-pleaser that’s as fun to eat as it is delicious. The combination of soft, buttery potato rolls melted Colby Jack cheese, and a hint of chives and garlic creates a mouthwatering blend of textures that will have everyone reaching for seconds. Whether you’re looking to impress your guests or simply satisfy your own cravings, these pull-apart rolls are a guaranteed hit. In this article, we’ll guide you through the easy steps to prepare this dish, along with tips for customization and serving, so you can create your own version of this classic comfort food.
Ingredients Breakdown
Potato Rolls
For this recipe, Martin’s potato rolls are the ideal choice due to their soft, fluffy texture and slight sweetness, which perfectly complements the savory and tangy elements of the Chicken Bacon Ranch Pull Apart Rolls. The rolls absorb the seasoned butter well without becoming soggy, ensuring that each bite is flavorful and satisfying. Martin’s rolls also hold up nicely under the weight of the ingredients, making them easy to handle when pulling apart the rolls after baking. If Martin’s potato rolls aren’t available, other soft rolls like Hawaiian rolls or even homemade dinner rolls can be used as substitutes. Just ensure that the rolls are sturdy enough to hold the layers of chicken, bacon, and cheese while still being soft and tender.
Deli Chicken
Thinly sliced deli chicken is essential for this recipe because it allows for easy layering and ensures that the chicken is evenly distributed across all the rolls. This not only makes the rolls easier to assemble but also guarantees that every bite is balanced with the right amount of chicken. The mild flavor of deli chicken pairs well with the bold flavors of bacon and Ranch dressing without overpowering them. If deli chicken isn’t available, shredded rotisserie chicken or leftover roasted chicken can be used as substitutes. Just be sure to slice or shred the chicken finely so that it layers smoothly and evenly.
Bacon
Crispy bacon adds a delightful crunch and a rich, smoky flavor to these pull-apart rolls. To achieve the perfect crispiness, cook the bacon slowly over medium heat until it is browned and slightly crisp, then drain it well on paper towels to remove excess grease. Crumbling the bacon ensures that it is evenly distributed throughout the rolls, adding texture and flavor to every bite. If you prefer a different type of bacon, such as turkey bacon, be sure to cook it until it reaches a similar level of crispiness to maintain the texture balance in the rolls.
Cheese (Colby Jack)
Colby Jack cheese is chosen for its excellent melting quality and mild flavor, which blends well with the other ingredients without overwhelming them. It provides a creamy, gooey layer that holds the rolls together and enhances the overall richness of the dish. If you prefer a sharper or different flavor, you can substitute Colby Jack with cheddar, mozzarella, or even a blend of both to suit your taste preferences.
Ranch Dressing
Ranch dressing adds a creamy, tangy element to the rolls, complementing the savory flavors of the chicken and bacon. It also helps to keep the rolls moist and flavorful. You can use store-bought Ranch dressing for convenience or make your own for a fresher, more personalized flavor.
Butter and Seasonings
The seasoned butter in this recipe is key to adding depth and richness to the rolls. A mixture of melted butter, garlic salt, onion powder, and fresh chives is brushed onto the rolls, infusing them with flavor. A sprinkle of grated Parmesan cheese on top adds a final touch of umami, making each bite even more delicious.
Step-by-Step Instructions
1. Preparation
- Preheating the Oven: Begin by preheating your oven to 350°F (175°C). This temperature is ideal for ensuring that the rolls bake evenly without drying out or burning. While the oven is heating, take a large baking sheet and line it with parchment paper. The parchment paper not only prevents the rolls from sticking to the pan but also makes for easy cleanup.
- Cutting the Rolls: Using a serrated knife, carefully slice the entire package of potato rolls horizontally, making sure to keep the rolls connected as a whole. The goal is to create a top and bottom layer, almost like a large sandwich bun. By not fully separating the rolls, you make it easier to assemble the layers without them sliding apart during baking. Once the rolls are cut, place the bottom half of the rolls on the prepared baking sheet, leaving the top half to the side for later.
2. Seasoned Butter
- Melting the Butter: In a small saucepan, melt ½ cup of butter over medium heat. Be sure to melt the butter slowly to prevent it from burning or separating. Once melted, remove the pan from heat.
- Adding Seasonings: Stir in 1 tablespoon of chopped fresh chives, 1 teaspoon of garlic salt, and ½ teaspoon of onion powder into the melted butter. Mix well to ensure that the seasonings are evenly distributed throughout the butter. The fresh chives add a mild onion flavor and a pop of color, while the garlic salt and onion powder enhance the savory profile of the dish.
- Consistency and Flavor Balance: The key to a well-seasoned butter is a smooth, even consistency with a balanced flavor. If you find the butter too thick, you can thin it slightly with a teaspoon of olive oil. Taste the mixture before applying it to ensure that the flavors are well-balanced and to your liking.
3. Assembling the Rolls
- Layering the Bottom Half: Begin by brushing about one-third of the seasoned butter mixture onto the bottom half of the rolls. Make sure to coat them evenly, as this layer of butter will infuse the rolls with flavor and prevent them from becoming dry.
- Adding Cheese: Next, layer half of the Colby Jack cheese slices evenly over the buttered rolls. The cheese acts as a delicious, melty base that holds the other ingredients in place.
- Adding Chicken and Bacon: Arrange the thinly sliced deli chicken on top of the cheese, ensuring that it’s evenly distributed across all the rolls. Follow with the crumbled bacon, spreading it out evenly as well. The goal is to have each roll filled with a uniform amount of chicken and bacon to ensure consistent flavor in every bite.
- Drizzling with Ranch Dressing: Drizzle the Ranch dressing over the chicken and bacon. This adds a creamy, tangy layer that ties all the ingredients together. Be careful not to overdo it, as too much dressing can make the rolls soggy.
- Final Cheese Layer and Roll Tops: Finally, layer the remaining cheese slices over the chicken and bacon. This top layer of cheese helps to seal the rolls and adds an extra cheesy element. Once the cheese is in place, position the top half of the rolls over the assembled ingredients, aligning them with the bottom half.
4. Baking Process
- Initial Baking Phase: Before placing the rolls in the oven, brush the remaining seasoned butter generously over the tops and sides of the rolls. This not only adds flavor but also helps the rolls develop a golden, crispy exterior. After buttering, loosely cover the rolls with aluminum foil. This initial baking step, which lasts for 20 minutes, helps to keep the rolls moist and ensures that the cheese melts thoroughly without the tops becoming too browned.
- Final Baking Phase: After 20 minutes, remove the foil and continue baking the rolls for an additional 10 minutes. During this time, the tops will become lightly golden and slightly crispy. Keep an eye on the rolls to prevent over-browning. If necessary, you can rotate the baking sheet to ensure even coloring.
5. Serving
- Cutting the Rolls: Once baked, remove the rolls from the oven and let them cool for a few minutes before serving. Use a sharp knife to cut between each roll, creating individual portions. The rolls should be easy to pull apart, with each piece holding its layers of chicken, bacon, cheese, and Ranch dressing.
- Serving Suggestions: Serve the rolls warm, with extra Ranch dressing on the side for dipping. These rolls are perfect as an appetizer, party snack, or even as a main dish when paired with a fresh salad or soup. For added flavor, you can garnish with additional chopped chives or sprinkle more Parmesan cheese on top.
Tips and Tricks
1. Customizing the Recipe
- Alternative Meats: If you want to switch things up, consider using turkey, ham, or even roast beef in place of the chicken. Each of these meats brings its own flavor profile, allowing you to tailor the rolls to your taste.
- Different Cheeses: While Colby Jack is a great choice for its melting properties and mild flavor, feel free to experiment with other cheeses. Sharp cheddar will add a more pronounced flavor, while mozzarella provides a stretchier, creamier texture. For a gourmet twist, try using Gouda or Havarti.
- Vegetarian Version: For a vegetarian take, omit the chicken and bacon, and add vegetables like sautéed mushrooms, spinach, or roasted red peppers. You can also use plant-based meat alternatives to maintain the hearty feel of the dish.
2. Making Ahead and Storing
- Make-Ahead Instructions: These rolls can be prepared ahead of time, making them ideal for parties or busy weeknights. Assemble the rolls as instructed, but instead of baking, cover the tray tightly with plastic wrap or foil and refrigerate for up to 24 hours. When you’re ready to bake, simply remove the cover and follow the baking instructions, adding an extra 5-10 minutes if needed to ensure they are heated through.
- Freezing and Reheating: To freeze, assemble the rolls and wrap them tightly in aluminum foil and then in plastic wrap. Freeze for up to 2 months. To reheat, bake directly from frozen at 350°F for 25-30 minutes, or until heated through and the cheese is melted.
3. Serving Ideas
- Complementary Dishes: These rolls are delicious on their own but can be paired with a variety of sides. A crisp green salad with a tangy vinaigrette provides a nice contrast to the richness of the rolls. For a more filling meal, consider serving them alongside a warm bowl of tomato soup or a hearty vegetable stew. The rolls also make a great addition to a game day spread, where they can be served alongside dips, chips, and other finger foods.
FAQs
1. What can I use instead of Ranch dressing?
- Alternative Sauces: If you’re not a fan of Ranch dressing, there are plenty of other sauces you can use. Honey mustard adds a sweet and tangy flavor, while blue cheese dressing offers a bolder, creamier taste. For a spicy kick, try using buffalo sauce or a chipotle aioli.
2. Can I make this recipe gluten-free?
- Gluten-Free Options: Yes, you can easily make this recipe gluten-free by using gluten-free rolls. Many grocery stores now offer gluten-free alternatives to popular bread brands. Be sure to also check that your other ingredients, like the Ranch dressing and seasonings, are certified gluten-free to avoid any cross-contamination.
3. How do I prevent the rolls from becoming soggy?
- Avoiding Sogginess: To prevent soggy rolls, make sure to drain any excess liquid from the chicken and bacon before layering them onto the rolls. Additionally, be cautious with the amount of Ranch dressing you use, as too much can lead to a soggy texture. Brushing the rolls with butter rather than soaking them helps maintain the desired texture.
4. Can I use pre-cooked chicken?
- Using Pre-Cooked Chicken: Absolutely! Pre-cooked chicken, such as leftover roast chicken or rotisserie chicken, can be a great time-saver. Simply shred or slice the chicken finely before layering it in the rolls to ensure it heats evenly and retains its moisture during baking.

Chicken Bacon Ranch Pull Apart Rolls
Description
Chicken Bacon Ranch Pull Apart Rolls are a delicious and savory treat that combines the rich flavors of tender chicken, crispy bacon, and creamy Ranch dressing, all layered between soft potato rolls and melted Colby Jack cheese. This dish is perfect for parties, game days, or family gatherings, offering a satisfying mix of textures and tastes that will have everyone reaching for seconds. The rolls are easy to prepare, making them a convenient and crowd-pleasing option for any occasion.
Ingredients
- 1 (15 oz) package 12-count potato rolls (e.g., Martin’s)
- 1 lb thinly sliced deli chicken
- 8 slices bacon, cooked and crumbled
- 12 slices Colby Jack cheese
- 1/3 cup prepared Ranch salad dressing
- 1/2 cup butter
- 1 Tbsp chopped fresh chives
- 1 tsp garlic salt
- 1/2 tsp onion powder
- 2 Tbsp grated Parmesan cheese
Instructions
Preparation
- Preheat your oven to 350°F (175°C). Line a large baking sheet with parchment paper.
- Using a serrated knife, carefully slice the potato rolls horizontally, keeping the rolls connected to create a top and bottom layer. Place the bottom layer on the prepared baking sheet, setting the tops aside.
2. Seasoned Butter
- In a small saucepan, melt the butter over medium heat. Once melted, stir in the chopped chives, garlic salt, and onion powder until well combined.
3. Assembling the Rolls
- Brush about one-third of the seasoned butter onto the bottom half of the rolls.
- Layer half of the Colby Jack cheese slices over the buttered rolls.
- Arrange the thinly sliced deli chicken evenly over the cheese, followed by the crumbled bacon.
- Drizzle the Ranch dressing over the chicken and bacon, then layer the remaining cheese slices on top.
- Place the top half of the rolls over the assembled ingredients and brush the remaining seasoned butter over the tops and sides of the rolls. Sprinkle with grated Parmesan cheese.
4. Baking Process
- Cover the rolls loosely with foil and bake for 20 minutes to keep them moist.
- After 20 minutes, remove the foil and bake for an additional 10 minutes, or until the tops are golden and crispy.
5. Serving
- Allow the rolls to cool slightly before cutting them into individual portions. Serve warm, with extra Ranch dressing on the side for dipping, if desired.
Notes
- Customization: Feel free to customize this recipe by using different types of cheese, such as cheddar or mozzarella, or by adding vegetables like sautéed spinach or mushrooms.
- Make-Ahead Option: The rolls can be assembled and refrigerated up to 24 hours in advance. If baking from refrigerated, add an extra 5-10 minutes to the baking time.
- Storage: Leftovers can be stored in an airtight container in the refrigerator for up to 3 days. Reheat in the oven at 350°F until warmed through to maintain the best texture.
- Freezing: To freeze, assemble the rolls, wrap tightly in foil and plastic wrap, and freeze for up to 2 months. Bake directly from frozen at 350°F for 25-30 minutes, or until heated through.