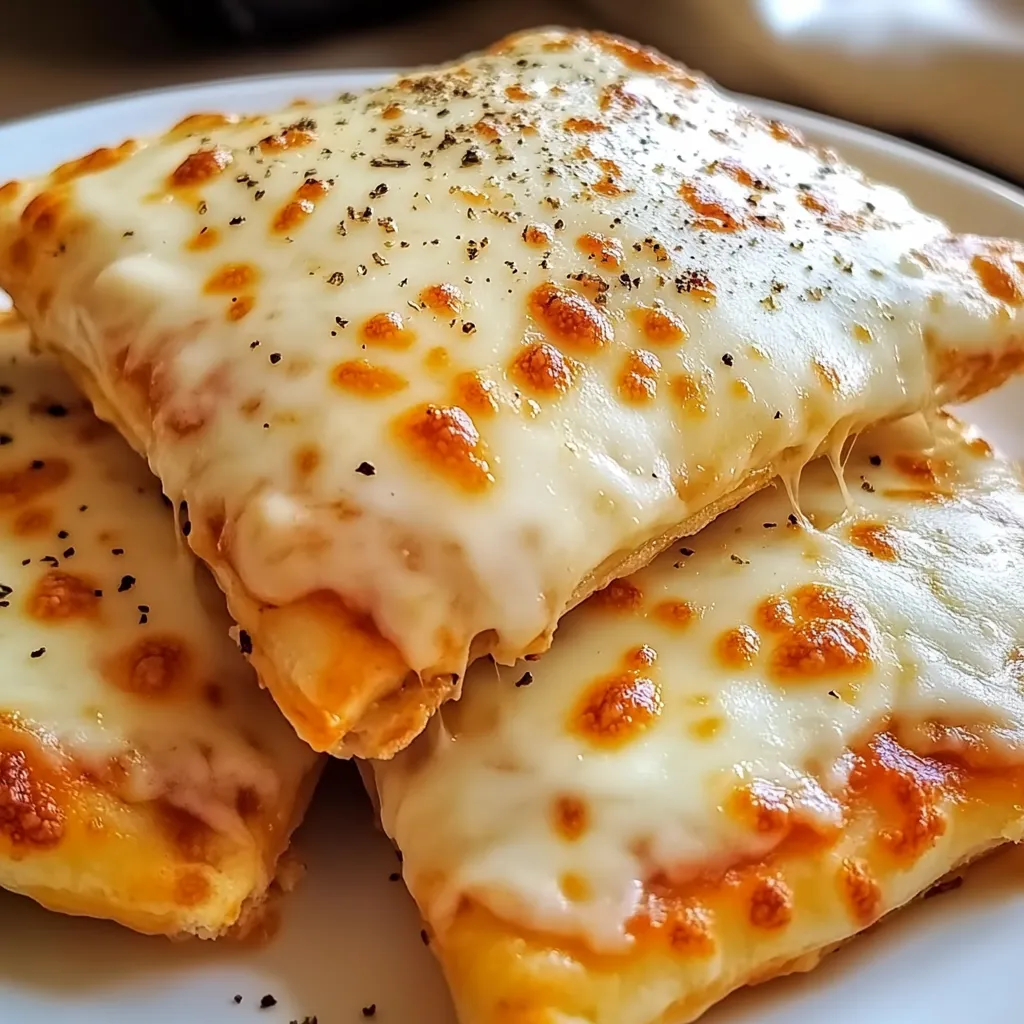
Sometimes the best meals are the ones that are simple, fun, and loved by everyone at the table. These Homemade Easy Cheesy Pizza Pockets for Kids and Family are exactly that. They take all the flavors of a classic pizza—gooey cheese, savory sauce, and delicious pepperoni—and wrap them up into perfectly portioned pockets that are great for kids, family dinners, or even game-day snacks.
The best part? They’re incredibly easy to make. With store-bought refrigerated pizza dough and a handful of simple ingredients, you can have these ready in just 30 minutes. They bake up golden and crispy on the outside while staying soft, melty, and full of flavor on the inside. Whether you serve them for lunch, dinner, or as a party snack, these pizza pockets are always a hit.
WHY YOU’LL LOVE THESE PIZZA POCKETS
There’s a lot to love about this recipe:
- Quick prep time with minimal cleanup.
- Perfect for kids and adults alike.
- Fully customizable with your favorite pizza toppings.
- Great for meal prepping or freezing for later.
- Budget-friendly and uses simple ingredients.
INGREDIENTS YOU’LL NEED
Here’s a quick list of what you’ll need to get started:
- 1 can refrigerated pizza dough
- 1 cup pizza sauce
- 1 ½ cups shredded mozzarella cheese
- ½ cup mini beef pepperoni (or chopped cooked beef sausage)
- 1 teaspoon Italian seasoning
- 1 egg, beaten
- 1 tablespoon water
- 1 tablespoon olive oil
- Optional: crushed red pepper flakes
A FEW HELPFUL TIPS BEFORE YOU START
- Make sure your work surface is lightly floured to prevent the dough from sticking.
- Keep your fillings slightly away from the edges to ensure easy sealing.
- Customize the filling by adding veggies, cooked chicken, or any of your favorite pizza toppings.
LET’S GET STARTED: THE FIRST STEPS
STEP 1: PREHEAT OVEN
Preheat your oven to 400°F (200°C). Starting with a hot oven helps the pizza pockets bake evenly and get that perfect golden crust.
STEP 2: PREPARE THE DOUGH
Unroll the refrigerated pizza dough onto a lightly floured surface. Use a sharp knife or pizza cutter to divide the dough into 6 to 8 equal rectangles or squares, depending on how large you want your pizza pockets.

STEP 3: ADD THE FILLING
Spoon about 1 tablespoon of pizza sauce into the center of each piece of dough. Be careful not to overfill, as too much sauce can make sealing the pockets tricky.

STEP 4: ADD CHEESE & MEAT
Top the sauce with shredded mozzarella cheese and your choice of mini beef pepperoni or chopped cooked beef sausage. Sprinkle a bit of Italian seasoning on top of the filling for extra flavor.
HOW TO SEAL, BAKE, AND SERVE YOUR HOMEMADE PIZZA POCKETS
Now that your pizza pockets are filled with all that cheesy, saucy goodness, it’s time to seal them up, bake them to golden perfection, and get ready to enjoy this easy family favorite.
THE SECRET TO A PERFECTLY SEALED PIZZA POCKET
The key to these pizza pockets holding together while baking is making sure the edges are sealed tightly. Using a fork to crimp the edges helps prevent any filling from leaking out while they bake, keeping all that cheesy goodness inside.
LET’S CONTINUE: SEALING, BAKING, AND SERVING
STEP 5: SEAL THE POCKETS
Fold the dough over the filling to create a pocket. You’ll form either rectangles or triangles depending on how you cut your dough. Use your fingers to gently press the edges together, then crimp all around with a fork to seal tightly. Make sure the seams are closed well to keep the filling from spilling out as they bake.
STEP 6: PREPARE EGG WASH
In a small bowl, whisk together the beaten egg and water to make the egg wash. Brush the tops of each pocket with the egg wash. This will give the crust a beautiful golden color as it bakes.
STEP 7: BAKE
Transfer the sealed pizza pockets onto a parchment-lined baking sheet, leaving a little space between each one. Lightly brush the tops with olive oil for an extra crispy finish. Bake in your preheated oven for 12 to 15 minutes or until the pockets are golden brown and cooked through.

STEP 8: SERVE
Once baked, let the pizza pockets cool slightly before serving. They’ll be very hot inside when they first come out of the oven. If you want a little extra kick, sprinkle some crushed red pepper flakes on top before serving.
EXPERT TIPS FOR THE BEST HOMEMADE PIZZA POCKETS
- Do not overfill: Too much filling can cause the pockets to burst open while baking.
- Use parchment paper: This makes cleanup easy and prevents sticking.
- Press and seal firmly: A good seal keeps the cheese and sauce safely inside the pocket.
- Customize your fillings: Try adding sautéed vegetables, cooked chicken, or different types of cheese for variety.
- Watch your bake time: Ovens may vary slightly, so check for that nice golden brown color as your cue.
SERVING SUGGESTIONS
These pizza pockets are perfect as a main meal served with a simple green salad or some roasted vegetables. They also make great party appetizers or lunchbox treats for kids. For dipping, serve them with extra pizza sauce, ranch dressing, or garlic butter on the side.

FREQUENTLY ASKED QUESTIONS ABOUT HOMEMADE EASY CHEESY PIZZA POCKETS
Even though these pizza pockets are simple to make, a few common questions can help you get perfect results every time.
1. Can I use homemade pizza dough instead of refrigerated dough?
Yes. Homemade pizza dough works great for this recipe. Just roll it out to about ¼ inch thickness and proceed with the rest of the instructions. The homemade dough may give a slightly softer and more flavorful crust.
2. Can I freeze the pizza pockets?
Absolutely. After baking, let the pizza pockets cool completely, then wrap them tightly and freeze for up to 2 months. Reheat them in the oven or air fryer for best results. You can also freeze the unbaked pockets and bake them directly from frozen, adding a few extra minutes to the bake time.
3. What other fillings can I use?
You can customize your pizza pockets with a variety of fillings. Some great options include cooked sausage, ham, cooked ground beef, sautéed mushrooms, bell peppers, olives, or even spinach. Just be sure any meat is fully cooked before adding.
4. How do I keep the pockets from opening while baking?
Make sure you don’t overfill, and press the edges tightly before crimping with a fork. Brushing the edges lightly with water before sealing can also help the dough stick together better.
5. Can I make these pizza pockets ahead of time?
Yes. You can assemble the pockets ahead of time and store them in the refrigerator for up to 24 hours before baking. This makes them perfect for prepping earlier in the day or even the night before.
6. What dipping sauces go well with these pizza pockets?
Classic pizza sauce is always a hit, but ranch dressing, garlic butter, or even a creamy Alfredo sauce also pair wonderfully with these pockets.
7. Can I make these smaller for appetizers?
Yes. Simply cut the dough into smaller pieces to create mini pizza pockets, perfect for parties and appetizers. Reduce the baking time slightly to ensure they don’t overcook.
CONCLUSION: A FAMILY-FRIENDLY RECIPE EVERYONE WILL LOVE
These Homemade Easy Cheesy Pizza Pockets for Kids and Family are the perfect solution for busy weeknights, family dinners, or fun weekend cooking with the kids. They’re quick to prepare, endlessly customizable, and always a crowd-pleaser. With a golden crust, melty cheese, and savory filling, each bite delivers all the flavors of your favorite pizza in a convenient handheld pocket.
I hope you give this recipe a try and enjoy how easy and fun it is to make. Feel free to experiment with different fillings and toppings to create your own favorite version.
Print
Homemade Easy Cheesy Pizza Pockets for Kids and Family
- Total Time: 38 min
Description
These Homemade Easy Cheesy Pizza Pockets are a fun, kid-friendly meal or snack that the whole family will enjoy. With gooey cheese, flavorful sauce, and your favorite pizza toppings wrapped in golden dough, they’re perfect for lunchboxes, quick dinners, or party appetizers!
Ingredients
For the dough (or use store-bought pizza dough):
-
2 ¼ tsp (1 packet) active dry yeast
-
1 cup warm water (110°F/45°C)
-
2 ½ cups all-purpose flour
-
1 tbsp olive oil
-
1 tsp sugar
-
1 tsp salt
For the filling:
-
1 cup pizza sauce or marinara sauce
-
2 cups shredded mozzarella cheese
-
½ cup mini pepperoni or diced regular pepperoni
-
½ cup cooked sausage or diced ham (optional)
-
½ tsp Italian seasoning
-
½ tsp garlic powder
For brushing:
-
1 egg (beaten, for egg wash)
-
1 tbsp grated Parmesan cheese (optional)
-
1 tsp dried oregano (optional)
Instructions
1️⃣ Prepare the dough (if making homemade):
In a large bowl, dissolve yeast and sugar in warm water. Let sit for 5 minutes until foamy. Stir in flour, salt, and olive oil. Knead for 5-7 minutes until smooth. Cover and let rise for 1 hour, or until doubled in size.
2️⃣ Preheat the oven:
Preheat your oven to 400°F (200°C). Line a baking sheet with parchment paper.
3️⃣ Roll out the dough:
On a lightly floured surface, roll out the dough to about ¼-inch thickness. Cut into 6-8 equal squares or circles, depending on your preference.
4️⃣ Assemble the pizza pockets:
Spread 1-2 tablespoons of pizza sauce on one half of each piece of dough. Top with mozzarella cheese, pepperoni, and any other desired fillings. Sprinkle with Italian seasoning and garlic powder.
5️⃣ Seal the pockets:
Fold the dough over the filling to create a pocket. Press the edges with a fork to seal tightly. Place onto the prepared baking sheet.
6️⃣ Brush and bake:
Brush each pocket with the beaten egg. Sprinkle with Parmesan cheese and oregano if desired. Bake for 15-18 minutes, or until golden brown.
7️⃣ Cool and serve:
Let cool for a few minutes before serving. Enjoy warm with extra pizza sauce for dipping.
Notes
-
You can easily customize the fillings with veggies, cooked bacon, or grilled chicken.
-
Store leftovers in the fridge and reheat in the oven or air fryer to keep them crispy.
-
- Prep Time: 20 min
- Cook Time: 18 min