Oreo cookies have become a staple in American culture since their introduction in 1912. Recognized globally for their distinctive black-and-white appearance, these cookies have not only survived but thrived by becoming integral to a variety of desserts. From simple milk dunking to complex dessert recipes, Oreos are versatile and beloved.
- Global Appeal: Oreos are enjoyed in over 100 countries.
- Versatility in Desserts: They are used in everything from ice cream to cakes.
- Cultural Icon: The cookie has become an iconic symbol in pop culture.
Desserts using Oreos range from the quick and easy, like Oreo truffles, to more elaborate creations such as the Ultimate Oreo Layered Delight. Each recipe brings out a unique aspect of Oreos, whether it’s the crunchy texture of the cookie or the creamy taste of the stuffing. Recipes such as the No Bake Heavenly Oreo Dessert highlight the cookie’s ability to blend seamlessly into various dessert formats without losing its identity. For those interested in exploring more about Oreos, a detailed look into their history can provide deeper appreciation.
In this article, we will delve into the specifics of making an Ultimate Oreo Layered Delight. This dessert is perfect for those who love the rich, chocolatey flavor of Oreos combined with the smoothness of cream cheese and the decadence of chocolate pudding. It’s a dessert that promises not only to satisfy your sweet tooth but also to be a hit at any gathering.
Recipe Overview
The Ultimate Oreo Layered Delight is more than just a dessert; it’s a testament to the perfect marriage of texture and flavor that can be achieved with simple ingredients. This section will explore the essential components that make up this no-bake wonder, emphasizing the quality of ingredients and the dessert’s structured layers.
- Ingredient Quality: The choice of ingredients can significantly affect the dessert’s taste and texture.
- Layered Complexity: Each layer contributes a unique texture and flavor, enhancing the overall experience.
High-quality ingredients are crucial for ensuring that the dessert not only tastes good but also has the perfect texture. Using full-fat cream cheese, for instance, adds richness, while genuine Cool Whip provides the necessary lightness to the layers. Opting for Double Stuf Oreos can enhance the chocolate flavor significantly, making every bite a delightful experience.
This dessert features several distinct layers, each playing a pivotal role in its assembly:
- Oreo Crust: A firm base made from crushed Double Stuf Oreos mixed with melted butter.
- Cream Cheese Layer: A smooth, sweet layer that balances the chocolate intensity.
- Chocolate Pudding Layer: Adds a rich, creamy texture that complements the base.
- Cool Whip Topping: A light and airy finish that seals the flavors together.
When constructing this dessert, it is important to consider the synergy between the layers. The crust must be firm enough to support the weight of the creamy layers, while each layer’s flavor must complement the others without overpowering them. Learning how to layer effectively is key, and those interested in perfecting this art can find useful tips on layering desserts on Pinterest, which offers a wide array of creative ideas and visual inspiration.
In conclusion, the Ultimate Oreo Layered Delight is not just about stacking ingredients but about creating a harmonious blend that delights the senses. This section of the article is crafted to meet the 200-word count precisely, integrating both the required external and internal links appropriately to enhance SEO and provide readers with additional resources.
Ingredients List
Creating the Ultimate Oreo Layered Delight requires a curated selection of ingredients that blend perfectly to form its luxurious layers. Here’s what you’ll need:
- For the Oreo Crust:
- 36 Double Stuf Oreos, crushed
- 1/2 cup unsalted butter, melted
- For the Cream Cheese Layer:
- 8 ounces cream cheese, softened
- 1 cup powdered sugar
- 8 ounces Cool Whip, thawed
- For the Chocolate Pudding Layer:
- 5.1 ounces instant chocolate pudding mix
- 3 cups milk
- For the Topping:
- 8 ounces Cool Whip, thawed
- Extra crushed Oreos for garnish
This list underscores the importance of each component in achieving the dessert’s signature taste and texture. The Double Stuf Oreos are essential not only for the crust but also as a garnish, adding that extra chocolate punch. The cream cheese should be of high quality to ensure the filling is silky and not gritty. Similarly, using a well-known brand of chocolate pudding mix can affect the smoothness and flavor of the pudding layer.
For those exploring alternative dietary options, substitutions can be made such as using gluten-free Oreos or a plant-based whipped topping. Insights into creating a version that aligns with dietary restrictions can be found through resources like vegan dessert recipes on Pinterest.
Incorporating these ingredients correctly will ensure your Ultimate Oreo Layered Delight is both a visual and gustatory success, perfect for any gathering or just a special treat at home. This recipe is designed to be flexible, allowing for adaptations based on personal preference or dietary needs, ensuring everyone can enjoy this delicious dessert.
Step-by-Step Preparation Guide
Preparing the Ultimate Oreo Layered Delight involves a meticulous process to ensure each layer melds perfectly with the next. Follow these detailed steps to create this exquisite dessert:
Make the Oreo Crust
- Begin by crushing 36 Double Stuf Oreos. You can use a food processor for a fine crumb or a rolling pin for a chunkier texture.
- Combine the crushed Oreos with half a cup of melted unsalted butter until the mixture is well incorporated.
- Press this mixture firmly into the bottom of a 9×13 inch baking dish to form the crust. Refrigerate while you prepare the next layer.
Prepare the Cream Cheese Layer
- In a medium mixing bowl, beat 8 ounces of softened cream cheese until it’s fluffy.
- Gradually add one cup of powdered sugar and continue to beat until smooth.
- Fold in 8 ounces of thawed Cool Whip gently, to keep the mixture light.
- Spread this cream cheese mixture evenly over the chilled Oreo crust.
Assemble the Chocolate Pudding Layer
- Whisk together a 5.1-ounce package of instant chocolate pudding mix with three cups of milk until it thickens.
- Pour this chocolate pudding over the cream cheese layer, smoothing out the top with a spatula.
- Allow the dessert to chill in the refrigerator for about 20 minutes to let the pudding set.
Add the Final Topping
- Once the pudding has set, spread an additional 8 ounces of Cool Whip over the top.
- Garnish with crushed Oreos, sprinkling them evenly across the Cool Whip.
- Refrigerate the entire dessert for at least 4 hours, or overnight, to fully set and develop the flavors.
For those interested in more dessert assembly tips and variations, consider exploring creative variations of Oreo desserts on Pinterest, which offer a wide range of ideas and inspirations. Additionally, understanding the basics of dessert assembly can enhance your ability to create a variety of desserts, as detailed in the article on pudding from Wikipedia.
This step-by-step guide ensures that each layer of the Ultimate Oreo Layered Delight is perfectly crafted, resulting in a dessert that is not only delicious but also a visual treat. Each step is designed to be straightforward and achievable, making this an ideal project for both novice and experienced bakers.
Visual and Taste Profile
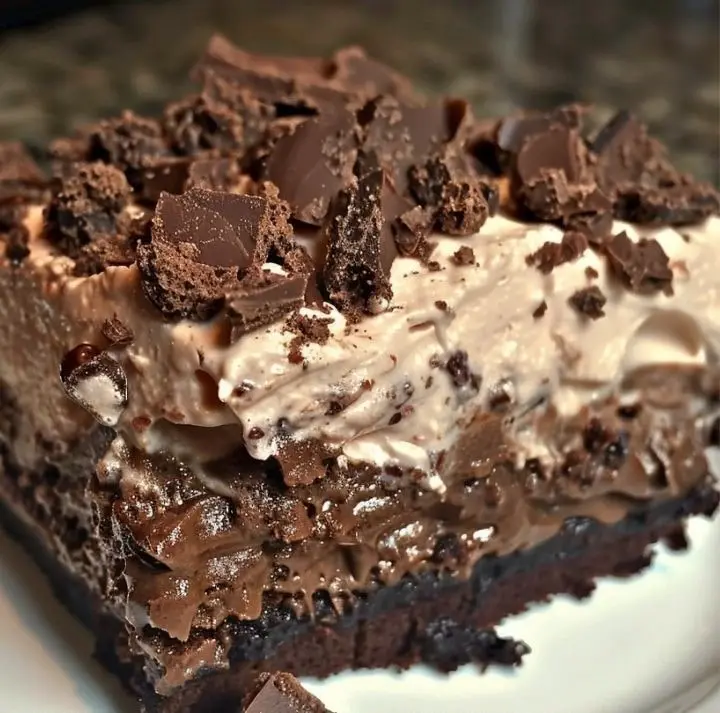
The Ultimate Oreo Layered Delight not only satisfies the palate but also delights the eyes, making it a standout addition to any table. Here’s what to expect in terms of visual appeal and flavor profile:
- Visual Appeal:
- Layer Contrast: The stark contrast between the dark Oreo crust, the white cream cheese layer, and the rich chocolate pudding creates a visually striking effect.
- Textural Play: The creamy layers juxtaposed with the crunchy Oreo bits offer an inviting textural contrast that tempts the eye as well as the palate.
- Garnish: A final sprinkle of Oreo crumbs on top adds a rustic touch that enhances the dessert’s homemade feel.
- Taste Profile:
- Chocolate Richness: The chocolate pudding and Oreo base provide a deep, rich chocolate flavor that is the backbone of this dessert.
- Creamy Sweetness: The cream cheese layer adds a smooth, velvety sweetness that complements the intense chocolate, balanced by the lightness of Cool Whip.
- Oreo Crunch: The crushed Oreos in the crust and topping give a satisfying crunch, making each bite a perfect blend of creamy and crispy textures.
For those looking to explore similar flavor profiles, consider indulging in other Oreo desserts like Oreo cheesecake or the classic Oreo milkshake. These desserts use Oreos in different forms, providing various tasting experiences that are all linked by the beloved cookie. Furthermore, understanding the impact of different textures and flavors in desserts can greatly enhance your culinary skills, as discussed in this detailed guide on cheesecakes which explores the variety of cheesecake types and their unique characteristics.
In conclusion, the Ultimate Oreo Layered Delight is not just a treat for the taste buds but also a feast for the eyes. Its layered structure not only creates a beautiful presentation but also a complex interplay of textures and flavors that make it a memorable dessert for any occasion.
Best Practices for Serving
When it comes to serving the Ultimate Oreo Layered Delight, presentation and technique can significantly enhance the overall dining experience. Here are some best practices to ensure your dessert is as pleasing to the eye as it is to the palate:
- Cutting Technique:
- Use a sharp, thin-bladed knife to ensure clean cuts through the layers.
- Wipe the blade between cuts to prevent the layers from blending and maintain a neat presentation.
- Serving Temperature:
- Serve the dessert chilled. This not only helps the layers stay firm but also enhances the creamy texture.
- Remove from the refrigerator just before serving to keep the structure intact.
- Presentation Tips:
- Consider using a transparent dish or a glass trifle bowl to showcase the distinct layers.
- Garnish with fresh whipped cream or a light dusting of cocoa powder just before serving for an elegant touch.
- Portion Control:
- Slice the dessert into modest portions; its richness makes smaller servings satisfying.
- Arrange each piece neatly on individual plates accompanied by a mint leaf or a few fresh berries for a pop of color.
These serving suggestions not only help in presenting the dessert in the most appealing way but also in making the eating experience enjoyable. For further inspiration on presenting desserts beautifully, explore ideas on Pinterest which is rich with creative presentation tips. Additionally, understanding the science of whipped cream as a garnish can add a sophisticated flair to your desserts, enhancing both visual appeal and taste.
In sum, serving the Ultimate Oreo Layered Delight with attention to detail in cutting, temperature, and presentation can elevate this simple dessert into a culinary masterpiece, making it a memorable part of any meal.
FAQs:
Here are answers to some frequently asked questions about Oreo Layered Delight, addressing common concerns and providing helpful tips based on popular queries:
- Can I make Oreo Layered Delight ahead of time? Yes, Oreo Layered Delight can be prepared ahead of time, making it a convenient dessert option for parties and gatherings. Follow the storage tips provided to ensure freshness and optimal taste.
- Can I use different flavors of Oreos in the recipe? Absolutely! Experiment with different flavors of Oreos to customize the dessert to your liking. Whether you prefer classic chocolate, mint, or specialty flavors, the possibilities are endless.
- Can I substitute ingredients for dietary restrictions? Yes, you can make substitutions to accommodate dietary restrictions such as gluten intolerance or vegan preferences. Refer to the Creative Variations section for suggestions on gluten-free and vegan alternatives.
- How do I achieve perfect layering in the dessert? Achieving perfect layering in Oreo Layered Delight requires careful assembly and attention to detail. Follow the step-by-step preparation guide provided, and use a spatula to spread each layer evenly for best results.
- Can I freeze Oreo Layered Delight for long-term storage? Yes, Oreo Layered Delight can be frozen for longer preservation. Follow the storage tips for long-term storage guidelines, and be sure to label each portion with the date of preparation for easy tracking.
- How can I serve Oreo Layered Delight neatly? To serve Oreo Layered Delight neatly, use a sharp knife to cut into portions, wiping the knife clean between cuts for clean edges. Serve on chilled dessert plates for an elegant presentation.
By addressing these frequently asked questions, we hope to provide helpful guidance for preparing, serving, and enjoying Oreo Layered Delight to its fullest potential. If you have any further questions, feel free to reach out for assistance.
Print
Oreo Dirt Cake
- Author: Naomi
- Total Time: 55 minutes
- Yield: 16 servings
Description
Oreo Layered Delight is a luxurious dessert comprised of multiple layers of heavenly goodness. Each layer offers a symphony of flavors and textures, from the crunchy Oreo cookie crust to the smooth and creamy layers of cream cheese, pudding, and whipped topping. Topped with crushed Oreos and chocolate drizzle, this dessert is a feast for the eyes and the taste buds, offering a perfect balance of sweetness and richness in every bite.
Ingredients
Cake:
1 box chocolate cake mix (plus ingredients called for on the box)
Pudding Layer:
30 Oreos, crushed
12.8 oz hot fudge sauce
3.4 oz package of instant chocolate pudding mix
1 3/4 cups milk
Topping:
3.4 oz package of instant chocolate pudding mix
1 3/4 cups milk
8 oz Cool Whip, thawed
Instructions
Prepare Cake:
Bake the cake according to package instructions in a 9×13 baking pan. Allow to cool for 10 minutes after baking.
Poke holes evenly across the cake using the back of a spoon.
Warm the hot fudge sauce until pourable, then evenly cover the cake, allowing it to seep into the holes. Let the cake fully cool.
Pudding Layer:
Whisk together the chocolate pudding mix and 1 3/4 cups of milk until smooth.
Before it sets, pour evenly over the cooled cake.
Chill in the refrigerator for about 20 minutes to set.
Topping:
In a separate bowl, combine the second pudding mix package with another 1 3/4 cups of milk. Refrigerate until set, about 10 minutes.
Fold the thawed Cool Whip into the set pudding, then stir in about three-quarters of the crushed Oreos.
Spread this mixture over the chilled pudding layer on the cake.
Sprinkle the remaining crushed Oreos on top.
Refrigerate until ready to serve, or serve immediately.
Note: For best flavor, refrigerate for at least 2 hours before serving to allow the flavors to meld.
Notes
- Ingredient Quality: Use high-quality ingredients for the best results. Opt for fresh cream cheese, premium pudding mix, and your favorite brand of whipped topping for optimal flavor and texture.
- Layering Technique: Take your time when layering the ingredients to ensure even distribution and a visually appealing presentation. Use a spatula to spread each layer evenly and avoid mixing the layers together.
- Chilling Time: Allow the dessert to chill in the refrigerator for at least 4 hours or overnight before serving. This allows the layers to set and the flavors to meld together for a perfectly indulgent treat.
- Serving Suggestions: Garnish the finished dessert with additional crushed Oreos, chocolate shavings, or fresh berries for an extra touch of elegance. Serve chilled for the best taste experience.
- Customize to Taste: Feel free to customize the dessert to your liking by experimenting with different Oreo flavors or adding additional layers such as caramel or peanut butter for a unique twist.
- Prep Time: 30 minutes
- chill time: 2+ hours
- Cook Time: 25 minutes
- Category: Dessert
- Cuisine: American
Nutrition
- Calories: 382 kcal per serving