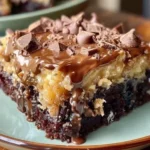
Peanut butter blossom bars combine the irresistible flavors of peanut butter and chocolate into a delightful treat that’s perfect for any occasion. Originating from the classic peanut butter blossom cookies, these bars simplify the baking process without sacrificing taste.
- History: The peanut butter blossom cookie first gained popularity in the mid-20th century. It features a soft peanut butter cookie base topped with a Hershey’s Kiss, introduced in the 1956 Pillsbury Bake-Off by Freda Smith of Gibsonburg, Ohio.
- Popularity: These cookies are a staple during the holiday season, beloved for their perfect blend of peanut butter and chocolate. Transitioning this concept into bar form allows for easier preparation and serving, making it a favorite for home bakers and professional chefs alike.
The transition from individual cookies to bar form not only simplifies the baking process but also introduces a new way to enjoy this traditional favorite. By combining all the ingredients in one pan, bakers can save time without compromising on the nostalgic flavors of the original cookie. The result is a chewy, rich bar that’s studded with chocolate and offers a satisfying texture contrast with its slightly crispy edges and soft center.
Learn more about the evolution of these treats in this comprehensive history of cookies and discover other bar cookie recipes that might inspire your next baking session on Pinterest.
Detailed Recipe
Creating peanut butter blossom bars is a straightforward process that involves basic baking ingredients and simple steps. Here’s how you can make these delicious treats at home:
- Ingredients:
- 1 cup all-purpose flour
- 1/2 teaspoon baking soda
- 1/4 teaspoon salt
- 1/2 cup unsalted butter, softened
- 3/4 cup creamy peanut butter
- 1/2 cup granulated sugar
- 1/2 cup packed brown sugar
- 1 large egg
- 1 teaspoon vanilla extract
- 2/3 cup milk chocolate chips
- 24 Hershey’s Kisses
- Instructions:
- Preparation: Start by preheating your oven to 350°F (177°C). Grease a 9×13-inch baking pan and set aside.
- Mix Dry Ingredients: In a small bowl, whisk together flour, baking soda, and salt.
- Cream Butters and Sugars: In a larger mixing bowl, beat the butter and peanut butter until smooth. Add both sugars and beat until fluffy.
- Add Egg and Vanilla: Mix in the egg and vanilla until thoroughly combined.
- Combine with Dry Ingredients: Gradually add the dry ingredients to the wet mixture, mixing until just combined.
- Fold in Chocolate Chips: Gently stir in the chocolate chips.
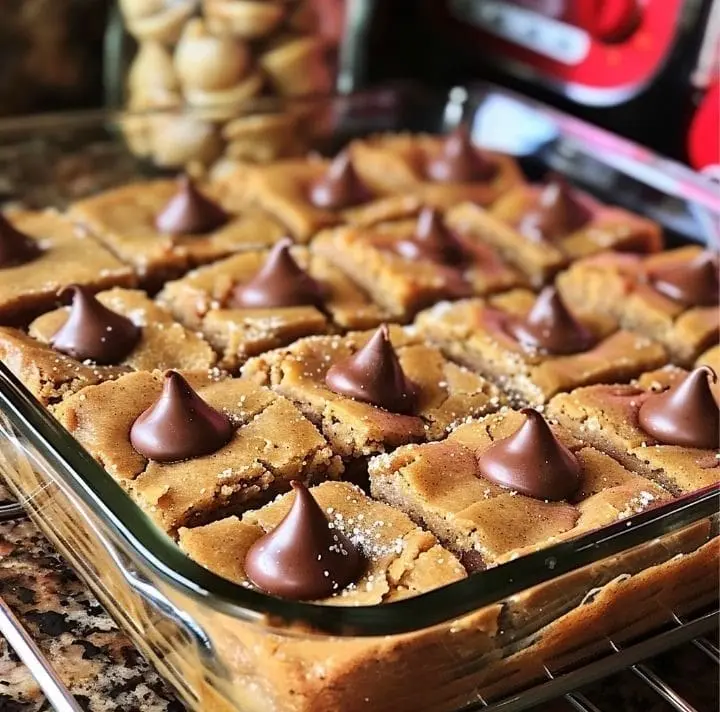
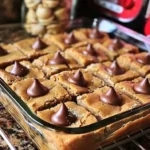
- Bake: Press the dough evenly into the prepared pan. Bake for 20-22 minutes, or until the edges are lightly browned.
- Add Hershey’s Kisses: Immediately after removing from the oven, press Hershey’s Kisses into the top of the bars while they are still hot.
- Cool and Serve: Allow the bars to cool in the pan before cutting into squares.
This recipe not only showcases the delicious pairing of peanut butter and chocolate but also integrates classic baking techniques. For more detailed baking ingredient information, check out this Wikipedia article on Baking Ingredients. Additionally, explore alternative dessert toppings on Pinterest to customize your bars.
Expert Baking Tips
Achieving the perfect peanut butter blossom bars involves a few key techniques that can make all the difference. Here are expert tips to ensure your bars are delicious every time:
- Ingredient Quality: Use high-quality peanut butter for the best flavor. Natural peanut butters without added sugars or oils can change the texture and sweetness.
- Butter Temperature: The butter should be softened but not melted. This helps create a fluffier, more consistent base for your bars.
- Mixing Method: When combining ingredients, mix until just incorporated. Over-mixing can lead to tough bars.
- Uniform Thickness: Press the dough evenly into your baking pan. Uneven bars can lead to undercooked centers and overcooked edges.
- Chocolate Placement: Place Hershey’s Kisses while the bars are still hot to ensure they melt slightly and adhere properly.
- Cooling: Let the bars cool completely in the pan before slicing. This makes them easier to cut cleanly without crumbling.
Adapting the recipe can add variety and cater to different dietary needs or preferences. Consider these variations:
- Gluten-Free: Substitute the all-purpose flour with a gluten-free baking mix.
- Vegan Options: Use plant-based butters and egg substitutes. Check the chocolate for dairy content.
- Extra Flavors: Add a teaspoon of cinnamon or nutmeg to the dough for a spicy twist, or mix in some chopped nuts for added texture.
To delve deeper into the best practices for ingredient selection and other dessert recipes, explore this detailed guide on food preservation techniques and find further inspiration for peanut butter recipes on Pinterest.
Variations of the Recipe
To keep your peanut butter blossom bars exciting, experimenting with variations can cater to different tastes and dietary restrictions. Here are several creative tweaks to the basic recipe:
- Chocolate Choices: Swap out the Hershey’s Kisses for other types of chocolate candies, such as mini peanut butter cups or chocolate chunks, to alter the flavor profile.
- Nutty Additions: For an extra crunch, fold in chopped almonds or pecans into the dough before baking.
- Flavor Enhancers: Introduce ingredients like coconut flakes, dried cranberries, or a swirl of caramel for a unique twist.
- Dietary Adjustments:
- Gluten-Free: Use a reliable gluten-free flour blend instead of all-purpose flour to accommodate gluten sensitivities.
- Vegan: Employ vegan substitutes like plant-based butters and egg replacers, along with dairy-free chocolate options.
These variations not only offer new flavors but also make the bars accessible to more people with specific dietary preferences. By mixing up the ingredients, you can keep the recipe fresh and exciting for all occasions.
Explore a wide range of peanut butter and chocolate recipes that could inspire your next baking project on Pinterest. Additionally, understanding the fundamentals of ingredient substitutions is crucial for successful recipe adaptation, which you can learn more about in this Wikipedia article on dietary substitutions in baking.
Serving and Storage Tips
Proper serving and storage are crucial for maintaining the freshness and taste of your peanut butter blossom bars. Here are some tips to help you get the most out of your delicious treats:
- Serving: Serve the bars at room temperature for optimal flavor and texture. If you’ve added chocolate toppings, allow them to set before serving to ensure they are firm.
- Storage:
- Room Temperature: Store the bars in an airtight container at room temperature for up to 5 days.
- Refrigeration: For longer storage, keep them in the refrigerator. This is particularly helpful in warmer climates where the chocolate might soften.
- Freezing: Freeze the bars for up to 3 months. Wrap them individually in plastic wrap and place them in a zip-top bag. Thaw at room temperature before serving.
By following these storage tips, you can ensure that your peanut butter blossom bars remain fresh and delicious for every occasion. Whether you’re preparing them in advance for a party or saving leftovers, these methods will help preserve their quality.
For more insights into effective food storage methods, particularly for baked goods and desserts, check out this comprehensive resource on food preservation techniques. Additionally, for more creative dessert ideas that might pair well with your bars, explore various chocolate dessert ideas on Pinterest.
The essence of these Peanut Butter Blossom Bars beyond their ingredients and instructions:
These bars evoke a sense of nostalgia, reminiscent of childhood memories spent in the kitchen, eagerly waiting for warm cookies to emerge from the oven. The aroma of freshly baked peanut butter and chocolate permeates the air, inviting anticipation and excitement.
What truly sets these bars apart is their ability to bring people together. Whether it’s a family gathering, a potluck with friends, or a simple afternoon treat, these bars have a way of creating moments of joy and connection. As each square is carefully cut and served, conversations flow freely, laughter fills the room, and bonds are strengthened over shared indulgence.
Moreover, these bars transcend mere culinary delight; they symbolize comfort, familiarity, and love. They represent the simple pleasures in life—the warmth of home, the sweetness of friendship, and the joy of savoring life’s little pleasures. In a world filled with chaos and uncertainty, these bars offer a moment of respite, a reminder to slow down, and a reason to celebrate the beauty of everyday moments.
In essence, these Peanut Butter Blossom Bars are more than just a recipe; they are a symbol of happiness, togetherness, and the enduring power of simple pleasures. So, the next time you bake a batch, take a moment to savor not just the flavors, but the memories and connections they evoke. After all, life is sweeter when shared with those we love.
Nutritional Information:
Indulging in these Peanut Butter Blossom Bars provides a delightful balance of flavor and nutrition, with each serving containing approximately 210 calories. This recipe yields a generous batch of 24 bars, allowing for easy portioning to share with loved ones or to enjoy throughout the week as a special treat. While it’s important to note that these bars contain sugars and fats, they also offer valuable nutrients and can be enjoyed in moderation as part of a balanced diet.
The main ingredients in these bars contribute to their nutritional profile. Peanut butter, a key component, provides a good source of protein, healthy fats, and essential vitamins and minerals such as vitamin E, magnesium, and potassium. Additionally, the inclusion of milk chocolate chips adds a touch of sweetness along with calcium and antioxidants from the cocoa.
Despite their indulgent taste, these bars can be enjoyed sensibly as part of a balanced lifestyle. Pairing them with a glass of milk or a serving of fruit can enhance their nutritional value and help balance out the sugar content. Furthermore, the convenience of these bars makes them a practical option for satisfying cravings without overindulging.
It’s essential to be mindful of portion sizes when enjoying these Peanut Butter Blossom Bars. While they offer a delicious treat, moderation is key to maintaining a healthy diet. By savoring each bite and appreciating the flavors and textures, you can fully enjoy the experience while still prioritizing your health and well-being.
FAQ’s
Many enthusiasts have queries about making peanut butter blossom bars. Here are answers to some of the most common questions:
- Can these bars be frozen for later use?
Yes, these bars freeze exceptionally well. Wrap them individually in plastic wrap, then place them in a zip-top bag. They can be stored in the freezer for up to three months. Thaw at room temperature before enjoying. - How to ensure the Hershey’s Kisses melt properly?
To achieve the perfect melt, press the Hershey’s Kisses into the bars immediately after baking while they are still very hot. This allows the residual heat to soften the chocolate just right, creating a smooth, melty texture. - Are there any alternative toppings that can be used?
Absolutely! While traditional Hershey’s Kisses are popular, you can also use other chocolates such as chocolate chunks, mini chocolate bars, or even flavored chocolate pieces to add a unique twist to each bite. - Can the recipe be doubled and made in a bigger pan?
Yes, the recipe can easily be doubled. If doing so, use a larger baking dish such as a 15×10-inch jelly roll pan and slightly adjust the baking time. Be sure to keep an eye on the bars as they bake to prevent overbrowning.
Peanut Butter Blossom Bars
- Author: Naomi
- Total Time: 42 minutes
- Yield: 24 bars 1x
Description
These Peanut Butter Blossom Bars offer all the delightful flavors of the classic Peanut Butter Blossom cookies but in a convenient bar form. A chewy, peanut butter-infused dough studded with milk chocolate chips forms the base, providing a rich and comforting texture. Topped with iconic Hershey’s Kisses, these bars are not only delicious but also visually appealing, making them a perfect treat for any occasion.
Ingredients
1/2 cup unsalted butter, softened
1/2 cup granulated sugar
1/2 cup brown sugar
1/2 cup creamy peanut butter
1 egg
1 1/2 cups all-purpose flour
3/4 teaspoon baking soda
1/2 teaspoon baking powder
1/8 teaspoon salt
2/3 cup milk chocolate chips
24 Hershey’s Kisses, unwrapped
3 teaspoons white sparkling sugar (or granulated sugar)
Instructions
Preheat Oven: Set the oven to 350°F (177°C). Grease a 9×13-inch baking pan and set aside.
Prepare Dough: In a large mixing bowl, beat together butter, granulated sugar, brown sugar, peanut butter, and egg until well combined. By hand, stir in flour, baking soda, baking powder, and salt just until a dough forms. Fold in milk chocolate chips.
Shape and Bake: Press the dough evenly into the prepared pan. Sprinkle the top with 2 teaspoons of sparkling sugar. Bake for 22-24 minutes or until golden brown and puffed up all over.
Add Kisses: Immediately after removing from the oven, press Hershey’s Kisses into the dough in a 4×6 row pattern. Sprinkle with the remaining sparkling sugar.
Cool and Serve: Allow the bars to cool completely in the pan. Once cooled, cut into squares ensuring each has a Hershey’s Kiss in the center.
Notes
- Ensure the butter is softened to room temperature for easy mixing.
- Creamy peanut butter works best for this recipe, but you can use crunchy if you prefer a bit of texture.
- Be careful not to overmix the dough once the flour is added, as this can lead to a tougher texture.
- Pressing the Hershey’s Kisses into the bars immediately after baking ensures they adhere well to the dough.
- Allow the bars to cool completely before cutting to ensure clean slices and prevent them from crumbling.
- Store any leftovers in an airtight container at room temperature for up to 3 days, or in the refrigerator for longer freshness. Enjoy them as a sweet snack or dessert anytime!
- Prep Time: 20 minutes
- Cook Time: 22 minutes
- Category: Dessert
- Cuisine: American
Nutrition
- Calories: Approx. 300 kcal per bar